


FAX 1170
Table of contents
 Loading...
FAX 1170
FAX 1270
MFC 1770
MFC 1780
®
,
,
,
,
,
,
,
,
,
,
,
,
,
,
,
,
,
,
,
,
,
,
,
,
,
,
,
,
,
,
,
,
,
,
,
,
,
,
,
,
,
,
,
,
,
,
,
,
,
,
,
,
,
,
,
,
,
,
,
,
,,,
OWNER’S MANUAL
©1996-1999 Brother Industries, Ltd.
Year 2000 Compliant
Brother is addressing the Year 2000 related issues for all
Brother fax machines and multi-function centers. Our
focus is to ensure that our bundled third party software
will continue to properly process date/time data after
January 1, 2000.
Brother fax machines and multi-function centers will
function properly after January 1, 2000,
provided that
all
non-Brother hardware, software and firmware used by
our customers in connection or combination with Brother
fax machines, and bundled software, accurately
exchange date data with the Brother products.
Please continue to check our Web page for updates at
http://www.brother.com. All remedies will be provided
to individual customers via software patches through
software download or from Brother Customer Service.
If You Need to Call Customer Service
Please complete the following inf ormation for future
reference:
Model: FAX1170, FAX1270, MFC1770, MFC1780
(Circle your model number)
Serial Number:*
Date of Purchase:
Place of Purchase:
*The serial number is on the back of the unit. Retain
this Owner’s Manual with your
sales receipt
as a
permanent record of y our purc hase, in the e vent of
a theft, fire or warranty service.

i
Brother Numbers
Fax-Back System
Brother Customer Service has installed an easy-to-use Fax-Back System, so you
can get instant answers to common technical questions and product information
for all Brother products. This system is available 24 hours a day, 7 days a week.
You can use the system to send faxes to any fax machine, not just the one from
which you are calling.
If you can’t resolve a difficulty with your FAX or MFC using this manual, call our
Fax-Back System, and follow the voice prompts to receive faxed instructions about
using the system and an index of Fax-Back subjects.
USA: 1-800-521-2846
From within Canada: 1-800-681-9838
The Brother Fax-Back System number (USA Only) has been preprogrammed on
One Touch key
01
.
Brother on the World Wide W eb
You can find more information about Brother products, from product specification
sheets to Frequently Asked Questions (FAQs), on the W orld Wide Web. Visit us at
http://www.brother.com
Brother Bulletin Board
Brother’s Bulletin Board Numbers are
USA: 1-888-298-3616
From within Canada: 1-514-685-2040
For Customer Service
USA: 1-800-284-4329 (voice)
1-908-575-8790 (fax)
From within Canada: 1-800-853-6660 (voice)
1-514-685-4898 (fax)
From within Montreal: 1-514-685-6464 (voice)

ii
Notice – Disclaimer of Warranties
(For USA and Canada)
BROTHER’S LICENSOR(S), AND THEIR DIRECTORS, OFFICERS, EMPLOYEES
OR AGENTS (COLLECTIVELY BROTHER’S LICENSOR) MAKE NO WARRANTIES,
EXPRESS OR IMPLIED, INCLUDING WITHOUT LIMITATION THE IMPLIED
WARRANTIES OF MERCHANTABILITY AND FITNESS FOR A PARTICULAR
PURPOSE, REGARDING THE SOFTWARE. BROTHER’S LICENSOR(S) DOES NOT
WARRANT, GUARANTEE OR MAKE ANY REPRESENTATIONS REGARDING THE
USE OR THE RESULTS OF THE USE OF THE SOFTWARE IN TERMS OF ITS
CORRECTNESS, ACCURACY, RELIABILITY, CURRENTNESS OR OTHERWISE. THE
ENTIRE RISK AS TO THE RESULTS AND PERFORMANCE OF THE SOFTWARE IS
ASSUMED BY YOU. THE EXCLUSION OF IMPLIED WARRANTIES IS NOT
PERMITTED BY SOME STATES IN THE USA AND SOME PROVINCES IN CANADA.
THE ABOVE EXCLUSION MAY NOT APPLY TO YOU.
IN NO EVENT WILL BROTHER’S LICENSOR(S) BE LIABLE TO YOU FOR ANY
CONSEQUENTIAL, INCIDENTAL OR INDIRECT DAMAGES (INCLUDING
DAMAGES FOR LOSS OF BUSINESS PROFITS, BUSINESS INTERRUPTION, LOSS
OF BUSINESS INFORMATION, AND THE LIKE) ARISING OUT OF THE USE OR
INABILITY TO USE THE SOFTWARE EVEN IF BROTHER’S LICENSOR HAS BEEN
ADVISED OF THE POSSIBILITY OF SUCH DAMAGES. BECAUSE SOME STATES IN
THE USA AND SOME PROVINCES IN CANADA DO NOT ALLOW THE EXCLUSION
OR LIMITATION OF LIABILITY FOR CONSEQUENTIAL OR INCIDENTAL
DAMAGES, THE ABOVE LIMITATIONS MAY NOT APPLY TO YOU. IN ANY EVENT
BROTHER’S LICENSOR’S LIABILITY TO YOU FOR ACTUAL DAMAGES FROM ANY
CAUSE WHATSOEVER, AND REGARDLESS OF THE FORM OF THE ACTION
(WHETHER IN CONTRACT, TORT (INCLUDING NEGLIGENCE), PRODUCT
LIABILITY OR OTHERWISE), WILL BE LIMITED TO $50.

iii
Ordering Accessories and
Supplies
For best quality results use only genuine Brother accessories, available at most
Brother retailers. If you cannot find the accessory you need and you have a Visa,
MasterCard, Discover, or American Express credit card, you can order accessories
directly from Brother. (In the USA, you can visit us online for a complete selection
of Brother accessories and supplies available for purchase.)
USA: 1-888-879-3232 (voice)
1-800-947-1445 (fax)
http://www.brothermall.com
From within Canada: 1-800-668-2768 (voice)
Description Item
Printing Cartridge PC 201
2-PK Refill Rolls PC 202 RF
4-PK Refill Rolls PC 204 RF
Telephone Line Cord Tell the Brother Representative your Model
number so you get the appropriate color.
Telephone Handset Tell the Brother Representative your Model
number so you get the appropriate color.
Handset Curled Cord Tell the Brother Representative your Model
number so you get the appropriate color.
Paper Wire Extension UL6856000
Document Support UF8048001
Paper Support UF8247001
Owner’s Manual UF8227001
Multi-Function Link
®
manual UF8483001 (MFC 1770)
MFL QuickStart manual LE0060001 (MFC 1780)
Multi-Function Link
®
Option MFL2D31
on Floppy Disks (Includes (Floppy Disks for Windows
®
3.1x)
Multi-Function Link
®
and MFL2D95
Visioneer
®
PaperPort
®
Only) (Floppy Disks for Windows
®
95/98)
* Multi-Function Link
®
is not available on Floppy Disks for Windows NT
®
Workstation Version 4.0.

Table of Contents
1
Introduction
Using This Manual.......................................................................................................1
Finding Information .......................................................................................................1
Test Sheet Procedures (for USA only)............................................................................. 1
About Fax Machines ........................................................................................................2
Fax Tones and Handshake.............................................................................................. 2
ECM (Error Correction Mode)........................................................................................ 3
FAX 1170 Control Panel Overview..................................................................... 4
FAX 1270 Control Panel Overview..................................................................... 5
MFC 1770/1780 Control Panel Overview....................................................... 6
2
Assembly
and
Connections
Caution ..............................................................................................................................7
Packing List.....................................................................................................................8
Choosing a Location.................................................................................................. 9
Assembly...........................................................................................................................9
Attach the document support ......................................................................................... 9
Attach recording paper support .................................................................................... 10
Install the printing cartridge........................................................................................ 10
Install recording paper ..................................................................................................11
Connect the handset ......................................................................................................12
Connect the power cord .................................................................................................12
Connect the telephone line........................................................................................... 13
Special Line Considerations.......................................................................................... 13
Roll Over Phone Lines............................................................................................ 13
Two-Line Phone System ......................................................................................... 13
Converting Telephone Wall Outlets........................................................................ 14
Installing Fax Machine, External Two-Line TAD,
and Two-Line Telephone..................................................................................... 14
Multi-Line Connections (PBX)..................................................................................... 15
If you are installing the machine to work with a PBX: .................................... 16
Custom Features on Your Phone Line.......................................................................... 16
Connecting an External Telephone Answering Device (TAD) ..................................... 16
Sequence..................................................................................................................16
Connections.............................................................................................................17
Outgoing Message (OGM)...................................................................................... 18
Connecting an External Telephone.............................................................................. 18
iv

v
TABLE OF CONTENTS
3
Fax
Settings
Fax Settings...................................................................................................................19
Setting Dialing Mode (Tone/Pulse) ............................................................................. 19
Setting Date and Time...................................................................................................19
Setting Station ID ..........................................................................................................20
Entering Text .................................................................................................................20
Inserting spaces.......................................................................................................21
Making corrections .................................................................................................21
Repeating letters......................................................................................................21
Special characters and symbols ............................................................................. 21
Storing One Touch Dial Numbers................................................................................ 22
One Touch Dialing..................................................................................................23
Storing Speed Dial Numbers......................................................................................... 24
Speed Dialing.................................................................................................................24
Changing One Touch and Speed Dial Numbers .......................................................... 25
Setting Groups for Broadcasting................................................................................... 25
Setting Beeper Level .......................................................................................................26
Memory Storage.............................................................................................................26
4
On-Screen
Programmin
g
User-Friendly Programming ............................................................................... 27
Function Mode...............................................................................................................27
Alternating Displays.......................................................................................................28
Function Selection Table.............................................................................................. 28
5
Basic Fax
Operation
Sending Faxes ..............................................................................................................33
Before you begin: ...........................................................................................................33
Contrast Setting .............................................................................................................34
Manual Transmission....................................................................................................34
Automatic Transmission............................................................................................... 35
Manual and Automatic Fax Redial .............................................................................. 35
Receiving Faxes...........................................................................................................35
Select Answer Mode........................................................................................................35
Easy Receive...................................................................................................................36
To select or change your Answer Mode.............................................................. 37
Setting Ring Delay .........................................................................................................37
Setting F/T Ring Time...................................................................................................37
Speaker Volume .............................................................................................................38
Setting the Handset Volume.......................................................................................... 38
Ring Volume..................................................................................................................39
Smoothing .....................................................................................................................39
Setting Recording Paper Size ....................................................................................... 39
Printing a Reduced Incoming Document ............................................................. 40
Recommended Reductions................................................................................ 40

vi
TABLE OF CONTENTS
6
Telephone
Operation
Dialing Options...........................................................................................................41
Manual Dialing .............................................................................................................41
One Touch Dialing ........................................................................................................42
Speed Dialing.................................................................................................................42
Hold................................................................................................................................42
Pause..............................................................................................................................42
Tone/Pulse.....................................................................................................................43
Searching Telephone Index.......................................................................................... 43
7
Advanced
Fax Operation
Sending Faxes ..............................................................................................................45
Quick Scan Fax Transmission...................................................................................... 45
Daily Timer....................................................................................................................45
Delayed Transmission....................................................................................................46
Interrupting Timer and Poll Waiting........................................................................... 46
Canceling a Delayed Fax .............................................................................................. 47
Broadcasting ..................................................................................................................47
Overseas Mode................................................................................................................47
Error Re-Transmission ..................................................................................................48
Composing Electronic Cover Page ............................................................................... 48
To Create a Custom Comment...................................................................................... 48
Always Send Cover Page.................................................................................................49
Temporary Cover Page...................................................................................................49
Printing a Cover Page....................................................................................................50
Call Reservation.............................................................................................................50
Print Call Back Message ............................................................................................... 51
Next-Fax Reservation.....................................................................................................51
Multiple Resolution Transmission ............................................................................... 52
Receiving Faxes...........................................................................................................52
Operation from Extension Telephone .......................................................................... 52
For F/T (Fax/Tel) Mode Only................................................................................. 52
Changing Remote Codes........................................................................................ 53
To change Remote Codes .................................................................................. 53
Printing a Fax in Memory
(Only for FAX 1270, MFC 1770 and MFC 1780)........................................................ 53
Distinctive Ring .............................................................................................................53
Registering the Distinctive Ring phone number .............................................. 54
Caller ID.........................................................................................................................55
Clearing Caller ID Information ............................................................................. 56
Polling ...........................................................................................................................56
Setup to Poll Another Fax ...................................................................................... 56
Setup to Be Polled (Poll Waiting).......................................................................... 57
Delayed Polling .......................................................................................................57
Copy Functions ..............................................................................................................58

vii
TABLE OF CONTENTS
Multiple Copies........................................................................................................58
Reducing and Enlarging Copies ............................................................................ 58
8
Remote Fax
Options
Remote Fax Options .................................................................................................59
Setting Fax Storage........................................................................................................59
Paging/Fax Forwarding.................................................................................................60
Programming Paging Number.............................................................................. 60
Programming a Fax Forwarding Number............................................................. 61
Remote Retrieval ...........................................................................................................61
Changing Remote Retrieval Access Code ..................................................................... 61
Using Remote Retrieval Access Code ............................................................................ 62
Remote Commands .......................................................................................................62
Change Paging/Fax Forwarding Setting........................................................... 62
Retrieve a Fax .....................................................................................................63
Check the Receiving Status ............................................................................... 63
Change Answer Mode......................................................................................... 63
Exit Remote Operation ...................................................................................... 63
Retrieving Memory Status List and Fax Messages........................................................ 63
Changing Fax Forwarding Number ............................................................................. 64
9
Printing
Reports
and Lists
Fax Machine Activity.................................................................................................65
To print a report.............................................................................................................66
Activity Report Interval ..................................................................................................66
Transmission Verification (Xmit) Report ..................................................................... 66
10
Important
Information
Standard Telephone and FCC Notices ............................................................ 67
These notices are in effect on models sold and used in the United States only........... 67
International ENERGY STAR
®
Compliance Statement ............................................... 68
WARNING ................................................................................................................69
Federal Comission Compliance Notice (For USA Only) ........................................ 69
Industry Canada Compliance Statement (For Canada Only)............................... 69
Important Safety Instructions................................................................................ 70
Compilation and Publication Notice..................................................................... 72
Trademarks..............................................................................................................72
11
Maintenance and
Troubleshooting
Fax-Back System............................................................................................................73
Brother on the World Wide Web.................................................................................... 73
Brother Bulletin Board ..................................................................................................73
Error Messages ...............................................................................................................74
If You Are Having Difficulty with Your Fax Machine ................................................... 77
Printing or Receiving Faxes................................................................................... 77
Condensed Print and Horizontal Streaks;
Top and Bottom of Sentences Cut Off............................................................. 77

viii
TABLE OF CONTENTS
Vertical Black Lines When Receiving ................................................................ 78
Phone Line or Connections.................................................................................... 78
Fax Machine Does Not Answer When Called..................................................... 78
No Dial Tone on the Handset............................................................................. 78
Sending Faxes .........................................................................................................79
Poor Transmitting Quality ................................................................................ 79
Dialing Does Not Work ...................................................................................... 79
Vertical Black Lines When Sending................................................................... 79
Handling Incoming Calls ...................................................................................... 79
Double Ring in FAX/TEL Mode ......................................................................... 79
Transferring a Call to the Fax Machine............................................................ 79
Fax Machine “Hears” Voice as CNG Tone ......................................................... 80
Transmission Verification Report Prints “Result: NG” ..................................... 80
Custom Features on a Single Line..................................................................... 80
For Customer Service......................................................................................... 80
To Order Brother Accessories ............................................................................. 80
Index.................................................................................................................................81
Multi-Function Link
®
(option) for FAX 1170 and FAX 1270 ........... 84
Specifications ...............................................................................................................85
Packing and Shipping the Fax Machine ........................................................ 86

1
1
CHAPTER ONE
Introduction
Using This Manual
Thank you for purchasing a Brother fax machine or multi-function center. This
machine has been designed to be simple to use, with LCD screen prompts to guide
you through functions. However, you can use your fax machine to its fullest
potential by taking a few minutes to read this manual. To simplify the manual
instrucions, all FAX and MFC models are referred to as “fax machine”.
Additionally, your fax machine has a Help Key. Press
Help
to print a list of basic
operational steps and functions.
Finding Information
All chapter headings and subheadings are listed in the Table of Contents. You will
be able to find information about a specific feature or function by checking the
Index at the back of this manual. Also, throughout this manual, you’ll see special
symbols alerting you to important information, cross-references, and warnings.
Illustrations of some screen displays also help you choose the correct key-presses.
T est Sheet Pr ocedures (for USA only)
After programming your Station ID, please fill out the TEST SHEET included with
your fax machine and fax it to Brother’s Automated Fax Response System as your
first transmission. This will verify that your fax machine is properly installed.
When this document is received a confirmation sheet will be sent back to your
machine. To get a response, be sure to set up your Station ID.
USA 1-908-685-9283 (fax)
See
Station ID
p. 20

2
CHAPTER ONE
About Fax Machines
If you’re a first-time fax machine user, fax operation might seem a little
mysterious. You’ll soon get used to the unusual fax tones on your phone line, and
be able send and receive faxes easily.
Fax T ones and Handshake
When someone is sending a fax, the fax machine sends fax calling tones,
(CNG tones) — soft, intermittent beeps at 4-second intervals. You’ll hear them
when you dial and press
Start
, and they continue for 30 seconds after dialing.
During that time, the sending machine must begin the “handshake” with the
receiving machine. Each time you use automatic procedures to send a fax, you
are sending CNG tones over the phone line. You’ll soon learn to listen for these
soft beeps each time you answer a phone on your fax line, so you can know if you
are receiving a fax message.
The receiving fax responds with fax receiving tones — loud, chirping sounds. A
receiving fax chirps for 40 seconds over the phone line, and the screen displays
“RECEIVE.” If your machine is set to the FAX ONLY Mode, it will answer every call
automatically with fax receiving tones. Even if the other party hangs up, your fax
machine continues to send the “chirps” for 40 seconds, and the screen continues
to display “RECEIVE.” To cancel the receiving mode, press
Stop
.
When your fax machine is in FAX/TEL (F/T), it answers with a short beep. After
this beep, the fax machine listens for CNG tones, and then responds with receiving
tones.
The fax “handshake” is the time in which the sending machine’s CNG tones and
the receiving machine’s “chirps” overlap. This must be for at least two to four
seconds, so the fax machines can understand how each is sending and receiving
the fax. The handshake cannot begin until the call is answered, and the CNG
tones only last for 30 seconds after the number is dialed. Therefore, it’s important
for the receiving machine to answer the call in as few rings as possible.
When you have an external telephone answering device (TAD) on your fax line,
your TAD will determine the number of rings before the call is answered. Pay
special attention to the directions in the Installation chapter for connecting a TAD
to your fax machine.

3
INTRODUCTION
ECM (Error Correction Mode)
The Error Correction Mode (ECM) is a way for the fax machine to check the
integrity of a fax transmission while it is in progress. ECM transmissions are
possible only between machines that both have the ECM feature. If they do, you
may send and receive fax messages that are continuously checked for their
integrity.
Sufficient memory must be available in your fax machine for this feature to work.
4
CHAPTER ONE
F AX 1170 Control Panel
Overview
Stop
Start
02
03
04
14
15
16
06
07
08
10
11
12
18
19
20
22
23
24
Hook
Hold
Speed Dial
1
4
7
5
6
2
3
8
9
0
ABC DEF
GHI JKL MNO
PQRS TUV WXYZ
Redial / Pause
Shift
Sort
Enlarge/
Reduce
Copy
Set Clear
Resolution ModeTel-index
Q.Scan
Function
Help
PLAIN PAPER FACSIMILE
1170
01
13
05
09
17
21
5
5
5
6
7
8
9
6
10
10
11
11
12 16
12
1718
19
2021 16 15
2
2
3
3
4
4
1
1
14
15
17
18
19
20
21
22
13
8977
13
14
22
Hook
Lets you dial telephone
and fax numbers
without lifting the
handset.
Hold
Lets you put calls on
hold.
Redial / Pause
Re-dials the last
number called. Also
inserts a pause in
autodial numbers.
Speed Dial
Lets you dial stored
phone numbers by
pressing a two-digit
number.
Dial Pad
Dials phone and fax
numbers, and can be
used as a keyboard for
entering information
into the fax machine.
Shift
To access memory
locations 13 through
24 in the One Touch
keys, hold down the
Shift key.
(Left Arrow)
(Right Arrow)
Moves the LCD cursor
to the left or right.
Set
Stores a function setting
into the fax machine.
Clear
Deletes entered data or
backs up one step in
function procedure.
Copy
Makes a copy.
Stop
Stops a fax, cancels an
operation, or exits from
function mode.
Start
Starts an operation,
such as sending a fax.
Sort
Use this key when you
want multiple copies of
a multiple page
original copied in order.
Enlarge/Reduce
Use this key to enlarge
or reduce copies
depending on the ratio
you select: 150%, 125%,
120%, 100%, 93%, 87%,
75% or 50%. To reduce
the image size
automatically select
AUTO.
One Touch
Dial Keys
These twelve keys give
you instant
access to previously
stored phone numbers.
Help
Prints a quick reference
Help List.
Q. Scan
Lets you take advantage
of memory transmission.
Mode
Use to select how fax
machine will handle
incoming calls.
Resolution
Sets the resolution when
you send a fax.
Function
Lets you access the function
and programming mode.
Tel-index
Lets you look up numbers
stored in the dialing memory.
Liquid Crystal Display
LCD displays messages to
help you set up and operate
your fax machine.

5
INTRODUCTION
F AX 1270 Control Panel
Overview
Stop
Start
02
03
04
14
15
16
06
07
08
10
11
12
18
19
20
22
23
24
Hook
Hold
Speed Dial
1
4
7
5
6
2
3
8
9
0
ABC DEF
GHI JKL MNO
PQRS TUV WXYZ
Redial / Pause
Shift
Sort
Enlarge/
Reduce
Copy
Set Clear
Resolution ModeTel-index
Q.Scan
Function
Help
PLAIN PAPER FACSIMILE
1270
01
13
05
09
17
21
5
5
6
7
8
9
10
11
12 16
2
3
4
1
14
15
17
18
19
20
21
22
13
1718
19
2021 16 1522
13
14
5 6
7 7
10
11 12
8
9
2
3
4
1
Hook
Lets you dial telephone
and fax numbers
without lifting the
handset.
Hold
Lets you put calls on
hold.
Redial / Pause
Re-dials the last
number called. Also
inserts a pause in
autodial numbers.
Speed Dial
Lets you dial stored
phone numbers by
pressing a two-digit
number.
Dial Pad
Dials phone and fax
numbers, and can be
used as a keyboard for
entering information
into the fax machine.
Shift
To access memory
locations 13 through
24 in the One Touch
keys, hold down the
Shift key.
(Left Arrow)
(Right Arrow)
Moves the LCD cursor
to the left or right.
Set
Stores a function setting
into the fax machine.
Clear
Deletes entered data or
backs up one step in
function procedure.
Copy
Makes a copy.
Stop
Stops a fax, cancels an
operation, or exits
from function mode.
Start
Starts an operation,
such as sending a fax.
Sort
Use this key when you
want multiple copies of
a multiple page
original copied in order.
Enlarge/Reduce
Use this key to enlarge
or reduce copies
depending on the ratio
you select: 150%, 125%,
120%, 100%, 93%, 87%,
75% or 50%. To reduce
the image size
automatically select
AUTO.
One Touch
Dial Keys
These twelve keys give
you instant access to
previously stored
phone numbers.
Help
Prints a quick reference
Help List.
Q. Scan
Lets you take advantage
of memory transmission.
Mode
Use to select how fax
machine will handle
incoming calls.
Resolution
Sets the resolution when
you send a fax.
Function
Lets you access the function
and programming mode.
Tel-index
Lets you look up numbers
stored in the dialing memory .
Liquid Crystal Display
LCD displays messages to
help you set up and operate
your fax machine.
6
CHAPTER ONE
MFC 1770/1780 Control Panel
Overview
Hook
Hold
Speed Dial
1
4
7
5
6
2
3
8
9
0
ABC DEF
GHI JKL MNO
PQRS TUV WXYZ
Redial / Pause
MFC 1770
FAX PRINTER COPIER SCANNER PC FAX
FIVE
IN
ONE
Plain
Paper
Shift
02
03
04
14
15
16
06
07
08
10
11
12
18
19
20
22
23
24
01
13
05
09
17
21
Stop
Start
Set Clear
Resolution ModeTel-index
Q.Scan
Function
Help
Copy
Sort
Enlarge/
Reduce
2
3
4
5 6
1
2
3
4
5 6
7 7
1
5
5
6
7
8
9
10
10
11
11
12 16
12
1718
19
20 16 15
2
3
4
1
14
15
17
18
19
20
21
22
13
8
9
22
13
14
21
Hook
Lets you dial telephone
and fax numbers
without lifting the
handset.
Hold
Lets you put calls on
hold.
Redial / Pause
Re-dials the last
number called. Also
inserts a pause in
auto-dial numbers.
Speed Dial
Lets you dial stored
phone numbers by
pressing a two-digit
number.
Dial Pad
Dials phone and fax
numbers, and can be
used as a keyboard for
entering information
into the fax machine.
Shift
(Left Arrow)
(Right Arrow)
Moves the LCD cursor
to the left or right.
Set
Stores a function setting
into the fax machine.
Clear
Deletes entered data or
backs up one step in
function procedure.
Copy
Makes a copy.
Stop
Start
Starts an operation,
such as sending a fax.
Sort
Enlarge/Reduce
Use this key to enlarge
or reduce copies
depending on the ratio
you select: 150%, 125%,
120%, 100%, 93%, 87%,
75% or 50%. To reduce
the image size
automatically select
AUTO.
One Touch
Dial Keys
These twelve keys give
you instant access to
previously stored
phone numbers.
Help
Q. Scan
Mode
Use to select how fax
machine will handle
incoming calls.
Resolution
Sets the resolution when
you send a fax.
Function
Tel-index
Lets you look up numbers
stored in the dialing memory .
Liquid Crystal Display
LCD displays messages to
help you set up and operate
your fax machine.
Lets you take advantage of
memory transmission.
Prints a quick reference
Help List.
Lets you access the function
and programming mode.
Use this key when you
want multiple copies of
a multiple page
original copied in order.
To access memory
locations 13 through
24 in the One Touch
keys, hold down the
Shift key.
Stops a fax, cancels an
operation, or exits from
function mode.

7
2
CHAPTER TWO
Assembly
and
Connections
Caution
1
Never install telephone wiring during a lightning storm.
2
We recommend that this product be used with a surge protection device to
protect the product against lightning storms.
3
Never install a telephone jack in a wet location unless the jack is specifically
designed for a wet location.
4
Never touch telephone wires or terminals that are not insulated unless the
telephone line has been disconnected at the network interface.
5
Use caution when installing or modifying telephone lines.
6
Avoid using a telephone (other than a cordless type) during an electrical
storm. There may be a remote risk of electric shock from lightning.
7
Do not use the telephone to report a gas leak in the vicinity of the leak.
8
For PLUGGABLE EQUIPMENT, the socket-outlet should be installed near the
equipment and should be easily accessible.
8
CHAPTER TWO
Packing List
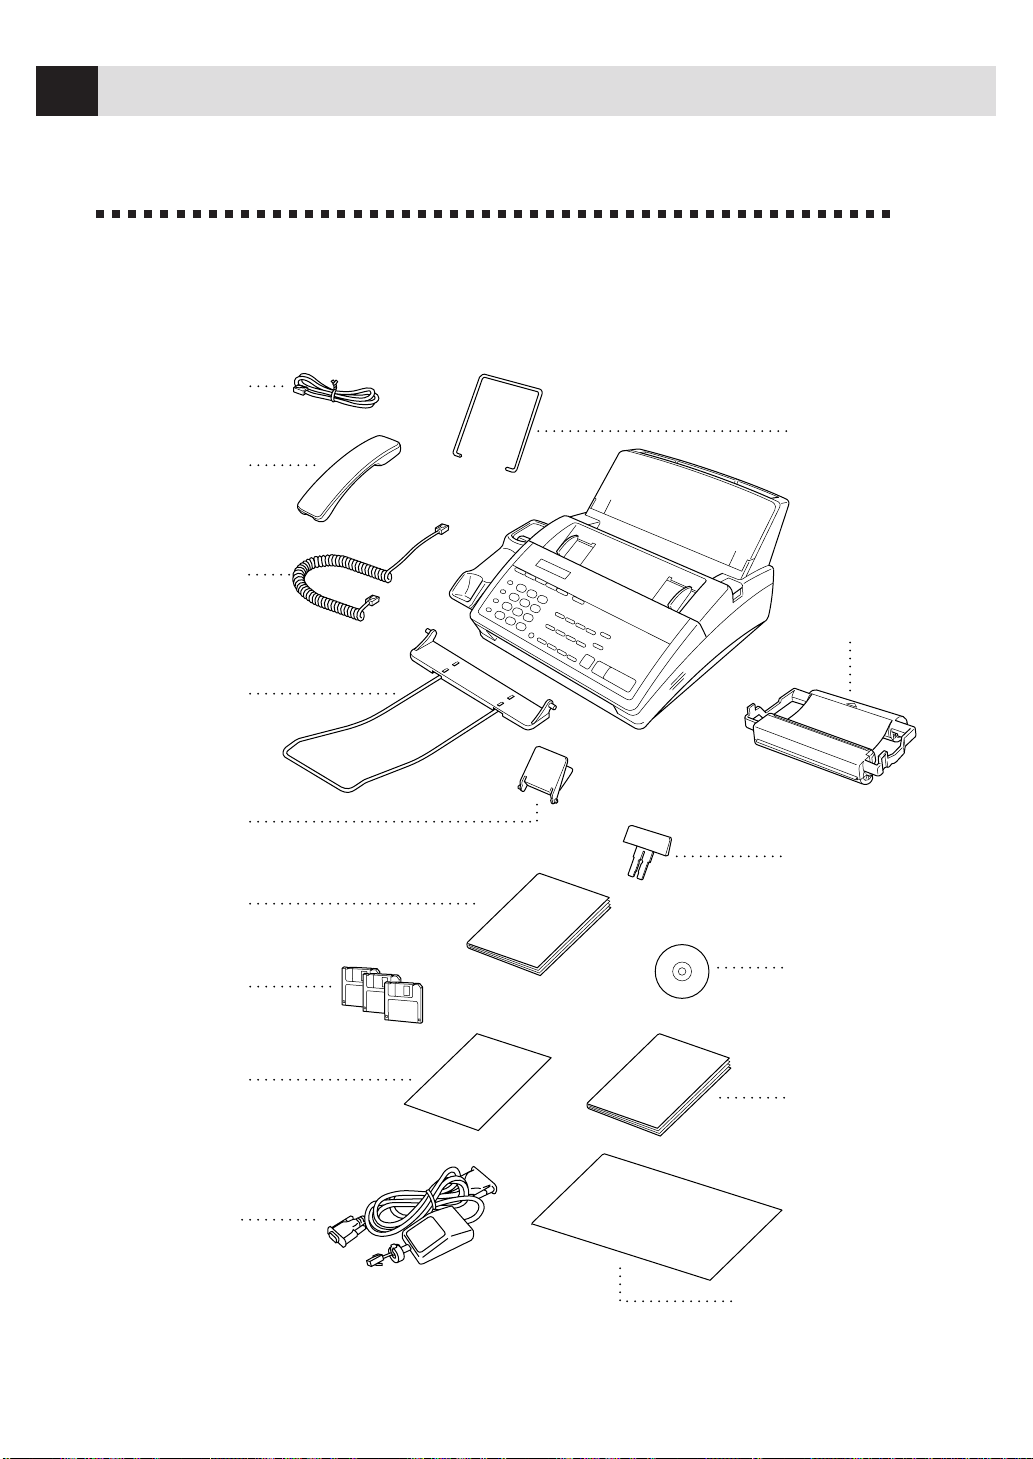
Make sure you have the following items:
Telephone
Line Cord
Telephone
Handset
Recording Paper
Wire Extension
Starter
Printing
Cartridge
(up to 100 pages)
Recording Paper
Support
Document
Support
Multi-Function
Link
®
Manual
(QuickStart Manual)
(MFC1770/1780)
Owner’s
Manual
Multi-Function
Link Disks
(MFC1770)
Quick Reference
Guide
(FAX1170 and MFC1770)
Cable &
PC I/F Box
(MFC1770/1780)
Document
Wire Extension
Handset
Curled Cord
Brother StartCard
(FAX1270 and MFC1780)
Multi-Function
Link
®
CD-ROM
(MFC1780)
9
ASSEMBLY AND CONNECTIONS
Choosing a Location
Place your fax machine on a flat, stable surface, such as a desk. Select a place
that is free of vibration and shocks. Locate the fax machine near a telephone jack
and a standard, grounded power outlet.
Avoid placing your fax machine in a high-traffic area. Do not place near heaters,
air conditioners, water, chemicals, or refrigerators. Do not expose the fax machine
to direct sunlight, excessive heat, moisture, or dust. Do not connect your fax
machine to electrical outlets controlled by wall switches or automatic timers.
Disruption of power can wipe out information in the unit’s memory. Do not
connect your fax machine to electrical outlets on the same circuit as large
appliances or other equipment that might disrupt the power supply. Avoid
interference sources, such as speakers or the base units of cordless phones.
Assembly
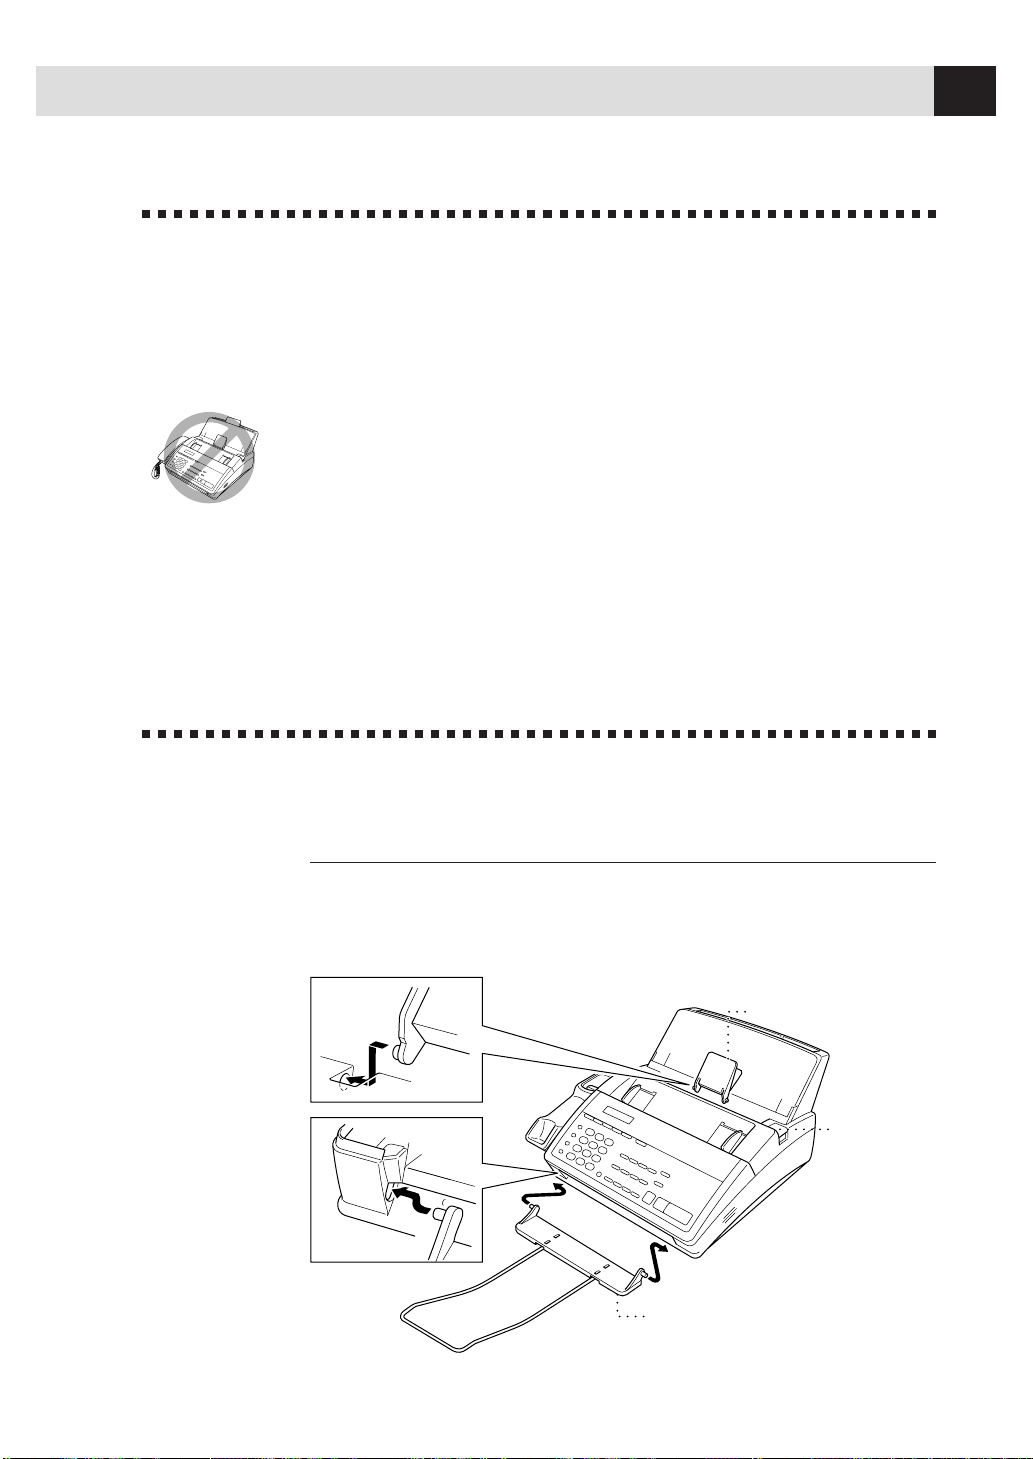
Attach the document support
Attach the document support and the document wire extension as shown in the
illustration below.
OPEN Button
Document Support
Document Wire
Extension
10
CHAPTER TWO
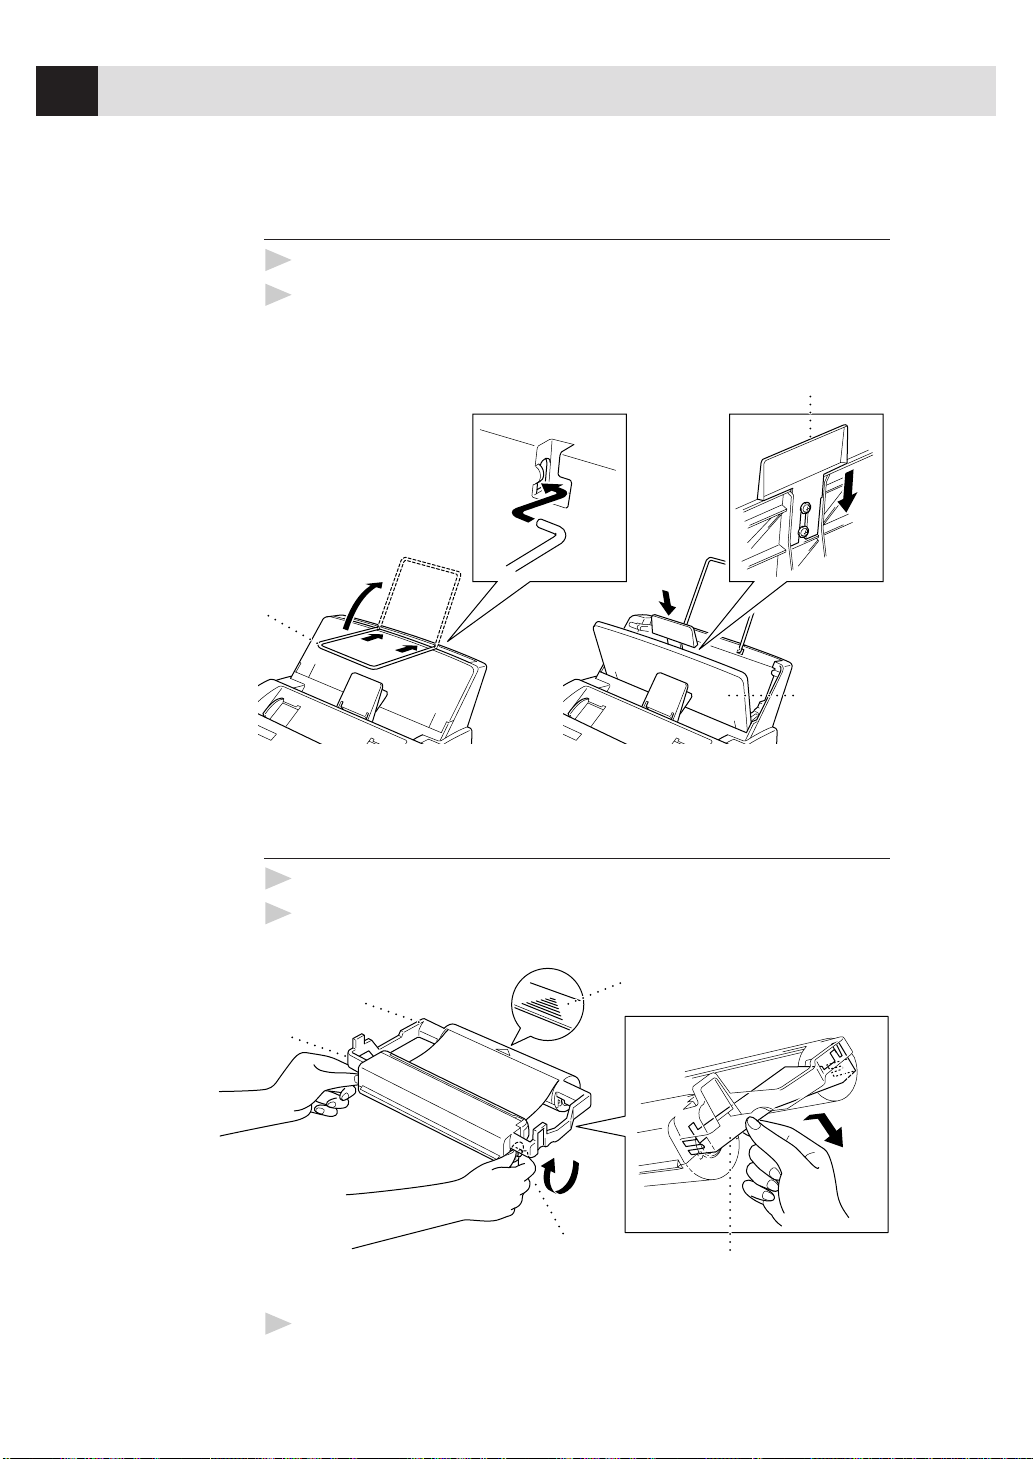
Attach recording paper support
1
Attach the recording paper wire extension.
2
Open the recording paper cover. Using the groove in the cover, insert the
recording paper support as shown.
Recording
Paper Cover
Recording Paper Support
Recording Paper
Wire Extension
Install the printing cartridge
1
Push the OPEN button to open the top cover.
2
Remove the stopper for the printing cartridge.
Stopper
Black Spool
Blue shaft
White shaft
Indented arrow
3
Turn the black spool on the right clockwise to tighten the ribbon, as shown.
11
ASSEMBLY AND CONNECTIONS
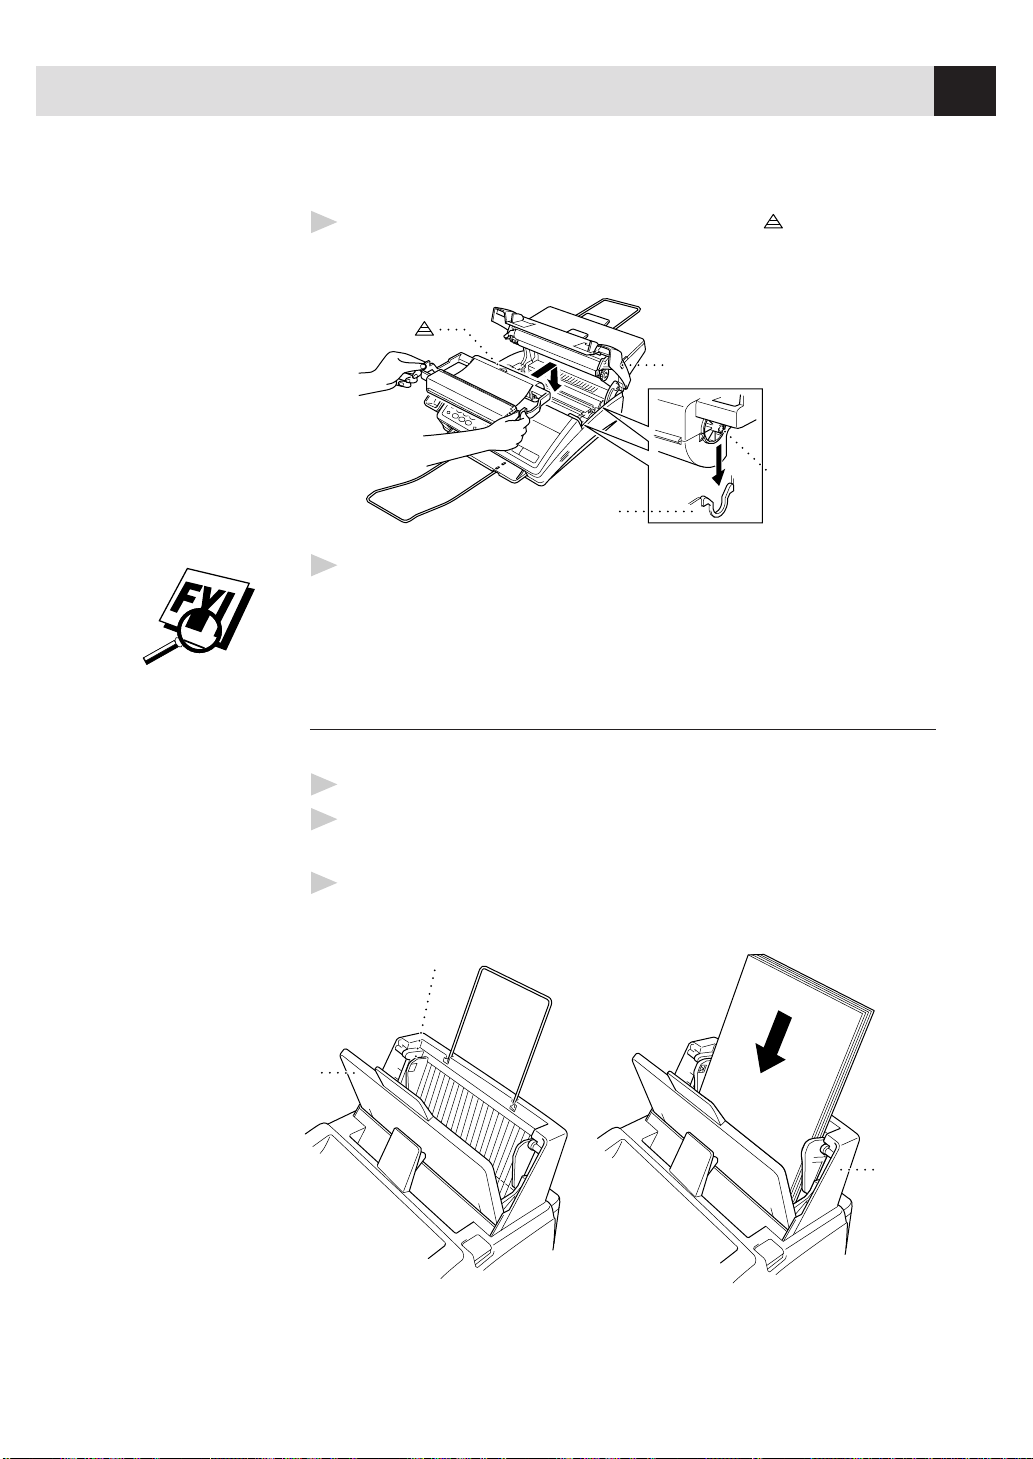
4
Install the printing cartridge by inserting the indented first and placing
the cartridge into its four holders.
Holder
OPEN button
Black Spool
ndented
5
Press down on both sides of the cover to close it securely.
The starter cartridge prints up to 100 pages.
Install recording paper
The paper cassette can hold about 200 sheets of 20-lb. paper.
1
Open the paper casette cover.
2
Place up to 200 sheets of paper in the casette. Do not allow level of paper to
pass the paper guide.
3
Close the paper casette cover.
Paper Guide
Paper
Casette
Cover
Paper
Casette

12
CHAPTER TWO
Connect the handset
Connect the curled handset cord to the bottom of the handset and the side of the
fax machine.
Connect the power cord
When you connect the power, the screen displays 01/01 00:00.
NOTICE:
1) This fax must be grounded using a 3-prong plug.
2) Since the machine is grounded through the power outlet, you can protect
yourself from potentially hazardous electrical conditions on the telephone
network by keeping the power to your fax machine on when you connect it to
a telephone line. Similarly, you can protect yourself when you want to move
your machine, by disconnecting the telephone line first, and then the power
cord.
3) Lightning and power surges can damage this product! We recommend that
you use a quality surge protection device on the AC power line as well as on
the telephone line, or unplug the lines during a lightning storm.
*
*PC I/F jack is for use only with Multi-Function
Link
®
, which is included with the MFC 1770/1780,
or with the Missing Link option. If you have not
purchased Missing Link or Multi-Function Link
®
for your FAX 1170/1270, then ignore this jack.

13
ASSEMBLY AND CONNECTIONS
Connect the telephone line
Connect one end of the telephone line cord to the jack labeled LINE on the left
side of the fax machine. Connect the other end to a modular wall jack.
Special Line Considerations
Roll Over Phone Lines
A roll over phone system is a group of two or more separate telephone lines that
pass incoming calls to each other if they are busy. The calls are usually passed
down or “rolled over” to the next available phone line in a preset order.
Your fax machine can work in a roll over system as long as it is the last number
in the sequence, so the call cannot roll away. Do not put the fax machine on any
of the other numbers; when the other lines are busy and a second fax call is
received, the fax call is transferred to a line that does not have a fax machine.
Your fax machine will work best on a dedicated line.
T wo-Line Phone System
A two-line phone system is nothing more than two separate phone numbers on
the same wall outlet. The two phone numbers can be on separate jacks (RJ11) or
combined into one jack (RJ14). Your fax machine must be plugged into an RJ11
jack. RJ11 and RJ14 jacks may be equal in size and appearance and both may
contain 4 wires (black, red, green, yellow). To test the type of jack, plug in a
two-line phone and see if it can access both lines. If it can, you must separate the
line for your fax machine.
14
CHAPTER TWO
Converting T elephone W all Outlets
There are three ways to convert to an RJ11 receptacle. The first two ways may
require assistance from the telephone company. You can change the wall outlets
from one RJ14 jack to two RJ11 jacks. Or, you can have an RJ11 wall outlet
installed and slave or jump one of the phone numbers to it.
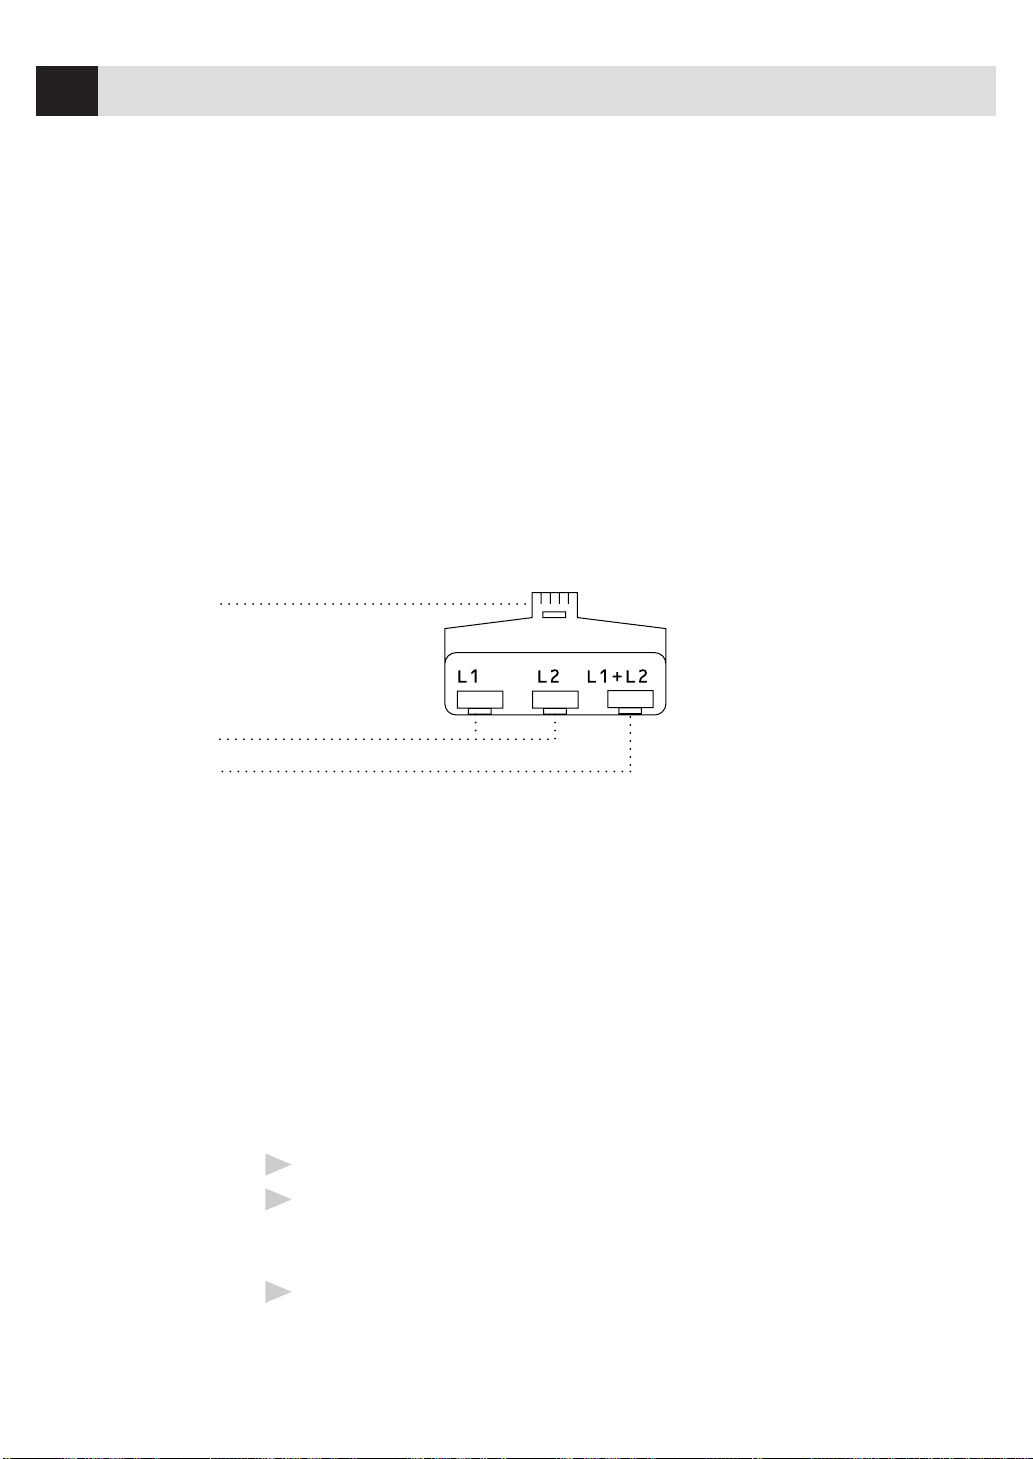
The third way is the easiest: Buy a triplex adapter. You can plug a triplex adapter
into an RJ14 outlet. It separates the wires into two separate RJ11 jacks (Line 1,
Line 2) and a third RJ14 jack (Lines 1 and 2). If your fax machine is on Line 1,
plug the fax machine into L1 of the triplex adapter. If your machine is on Line 2,
plug it into L2 of the triplex adapter.
RJ14
RJ11
Triplex Adapter
RJ14
Installing Fax Machine, External T wo-Line T AD,
and T wo-Line Telephone
When you are installing an external two-line telephone answering device (TAD)
and a two-line telephone, your fax machine must be isolated on one line at both
the wall jack and at the TAD. The most common connection is to put the fax
machine on Line 2, which is our assumption in the following steps. The back
of the two-line TAD must have two telephone jacks: one labeled L1 or L1/L2, and
the other labeled L2. You will need at least three telephone line cords, the one that
came with your fax machine and two for your external two-line TAD. You will
need a fourth line cord if you add a two-line telephone.
1
Place the two-line TAD and the two-line telephone next to your fax machine.
2
Plug one end of the telephone line cord for your fax machine into the L2
jack of the triplex adapter. Plug the other end into the LINE jack on the left
side of the fax machine.
3
Plug one end of the first telephone line cord for your TAD into the L1 jack of
the triplex adapter. Plug the other end into the L1 or L1/L2 jack of the
two-line TAD.
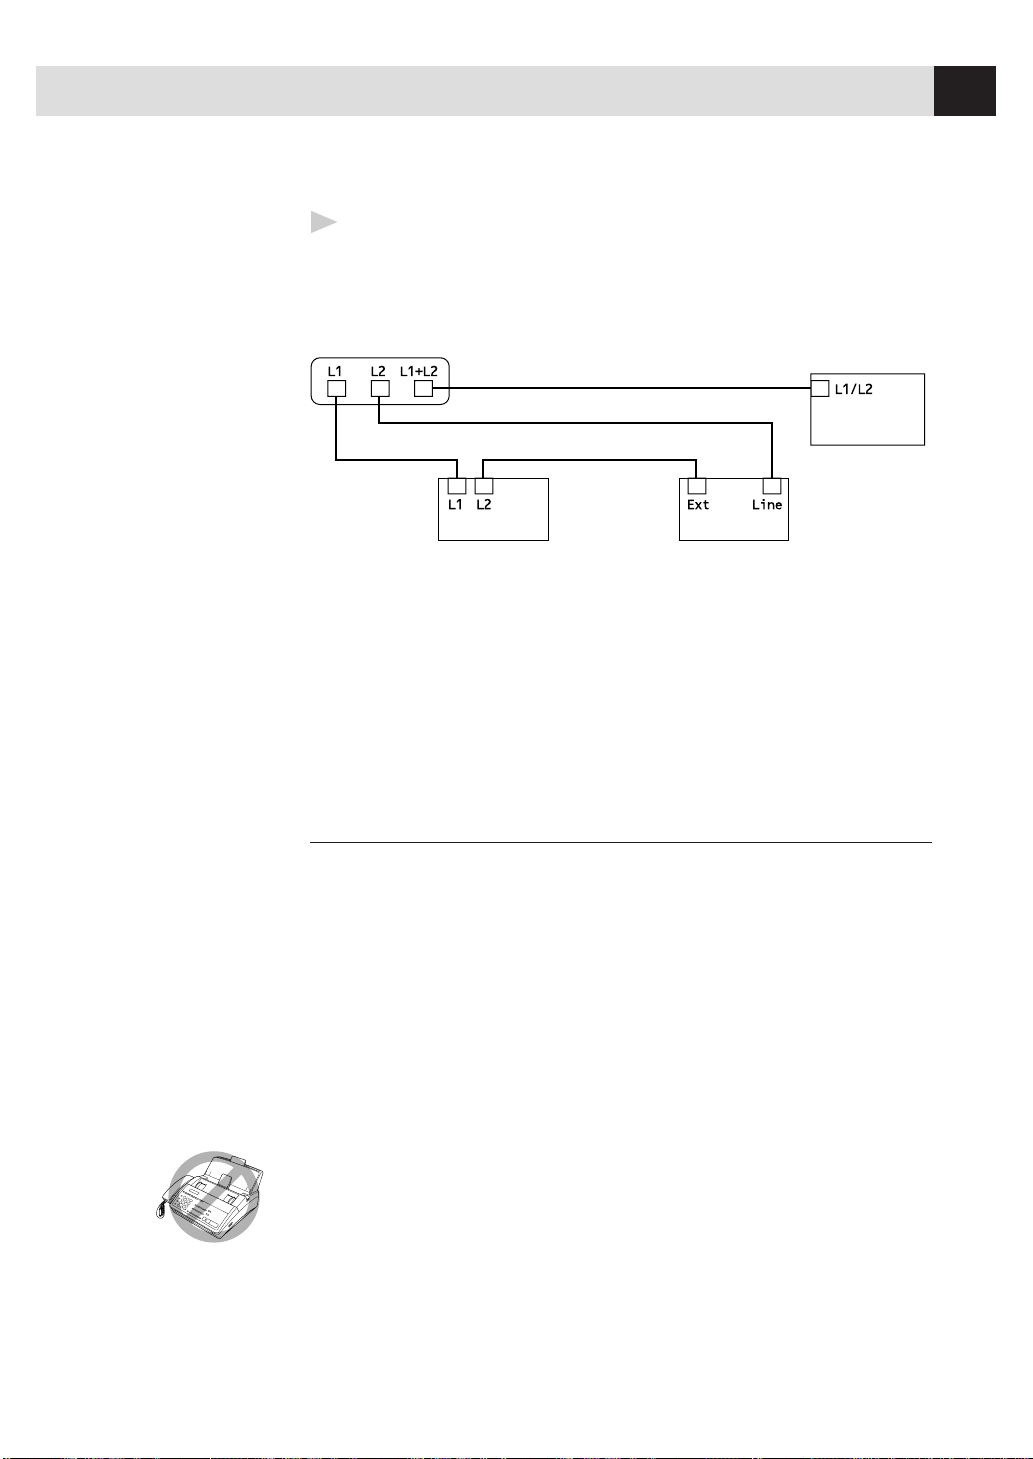
15
ASSEMBLY AND CONNECTIONS
4
Plug one end of the second telephone line cord for your TAD into the L2 jack
of the two-line TAD. Plug the other end into the EXT. jack on the left side of
the fax machine.
Triplex Adapter
Two Line Phone
Two Line External TAD Fax Machine
You can keep two-line telephones on other wall outlets as always. There are two
ways to add a two-line telephone to the fax machine’s wall outlet. You can plug
the telephone line cord from the two-line telephone into the L1+L2 jack of the
triplex adapter. Or, you can plug the two-line telephone into the TEL jack of the
two-line TAD.
Multi-Line Connections (PBX)
Most offices use a central telephone system. While it is often relatively simple to
connect the machine to a key system or a PBX (Private Branch Exchange), we
suggest that you contact the company that installed your telephone system and
ask them to connect the fax machine for you. It is advisable to have a separate
line for the fax machine. You can then leave the machine in FAX ONLY Mode to
receive faxes any time of day or night.
If the fax machine is to be connected to a multi-line system, ask your installer to
connect the unit to the last line on the system. This prevents the unit from being
activated each time a telephone call is received.
As with all fax units, this machine must be connected to a two wire system. If
your line has more than two wires, proper connection of the fax machine cannot
be made.
See
Easy Receive
p. 36

16
CHAPTER TWO
If you are installing the machine to work with a PBX:
1
It is not guaranteed that the unit will operate correctly under all
circumstances with a PBX. Any cases of difficulty should be reported first to
the company that handles your PBX.
2
If all incoming calls will be answered by a switchboard operator, it is
recommended that the Answer Mode be set to MANUAL. All incoming calls
should initially be regarded as telephone calls.
3
The unit may be used with either pulse or tone dialing telephone service.
Custom Features on Y our Phone Line
If you have Call Waiting, Ring Master, Voice Mail, an answering service, alarm
system or any other custom feature on your telephone line, it may create a
problem in the operation of your fax machine.
Connecting an External
T elephone Answering Device (T AD)
Sequence
You might choose to connect an additional answering system. When you have an
external TAD on the same telephone line as the fax machine, the TAD answers
all calls. The fax machine “listens” for fax calling (CNG) tones. If it hears them,
the fax machine takes over the call and receives the fax. If it doesn’t hear CNG
tones, the fax machine lets the TAD continue playing your outgoing message so
your caller can leave you a voice message.
The TAD must answer within 4 rings (the recommended setting is 2 rings). The
fax machine cannot hear CNG tones until the TAD has answered the call, and
with 4 rings there are only 8-10 seconds of CNG tones left for the fax
“handshake.” Make sure you carefully follow instructions in this manual for
recording your outgoing message. We do not recommend using the “toll-saver”
feature on your TAD if it exceeds 4 rings.
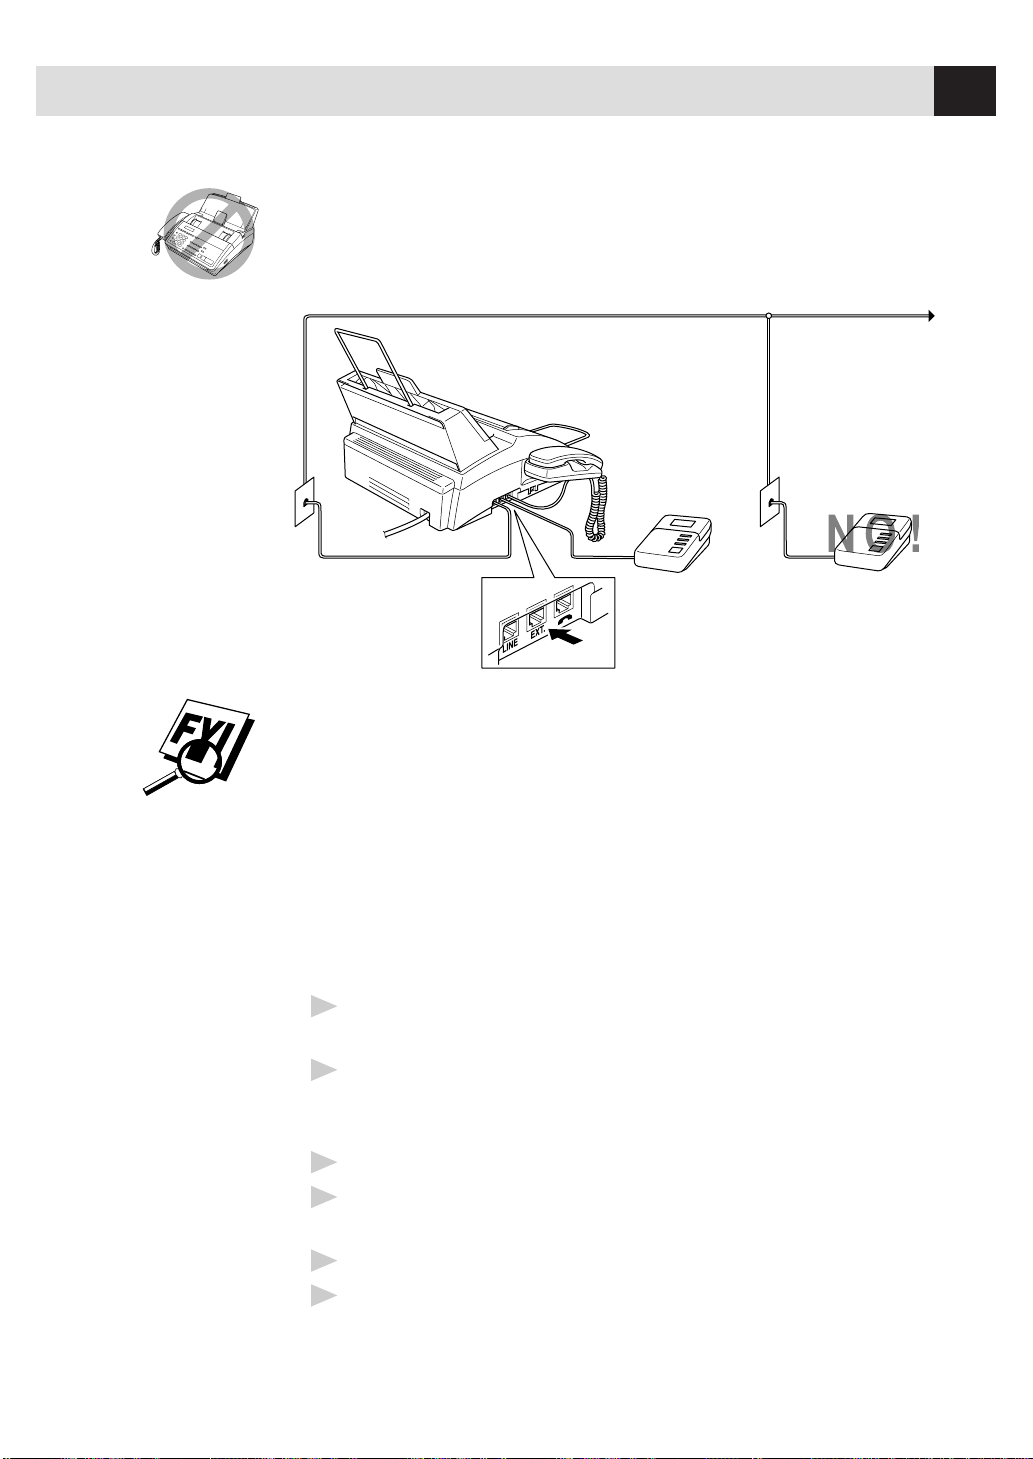
17
ASSEMBLY AND CONNECTIONS
Do not connect a TAD elsewhere on the same phone line — your
fax machine and TAD will both try to control the line.
You may connect an external TAD to a separate wall jack only if you subscribe to
your telephone company’s Distinctive Ring Service, have registered the distinctive
ring pattern on your fax machine, use that number as a fax number and set your
machine’s Answer mode to MANUAL.
Connections
The external TAD must be plugged into the left side of the fax machine, into the
jack labeled EXT. Your fax machine cannot work properly if you plug the TAD into
a wall jack.
1
Plug the telephone line cord from the wall jack into the left side of the fax
machine, in the jack labeled LINE.
2
Plug the telephone line cord from your TAD into the left side of the fax
machine, in the jack labeled EXT. (Make sure this cord is connected to the
TAD at the TAD’s telephone line jack, and not its telephone set jack.)
3
Set the Answer Mode to TAD.
4
Set your external TAD to 4 rings or less. (The fax machine’s Ring Delay
setting does not apply).
5
Set the TAD to answer calls.
6
Record the outgoing message (see below).

18
CHAPTER TWO
Outgoing Message (OGM)
Timing is important in recording this message. The message sets up the ways to
handle both manual and automatic fax reception.
1
Record 5 seconds of silence at the beginning of your message. (This allows
your fax machine time to listen for the fax CNG tones of automatic
transmissions before they stop.)
2
Limit your speaking to 20 seconds.
3
End your 20-second message by giving your Remote Activation Code for
people sending manual faxes. For example:
“After the beep, leave a message or send a fax by pressing ✳ 5 1.”
We recommend beginning your OGM with an initial 5-second silence because the
Brother machine cannot hear fax tones over a resonant or loud voice. You may try
omitting this pause, but if your machine has trouble receiving, then you must
rerecord the OGM to include it.
Connecting an External T elephone
Your fax machine is equipped with a handset that you can use as a regular
phone. However, you can also connect a separate telephone (or telephone
answering device) directly to your fax machine.
Connect the modular plug on the telephone’s line cord to the jack labeled EXT. on
the left side of the fax machine.
Whenever this phone (or TAD) is in use, the screen displays “EXT. TEL IN USE,”
and, if the fax handset is lifted, an alarm sounds. To disconnect the call on the
external phone and switch to the fax, press
Hook
.
19
Fax Settings
Setting Dialing Mode (T one/Pulse)
Your fax machine comes set to accommodate tone (multi-frequency) dialing
service. If you have pulse (rotary) dialing service, you must change the dialing
mode.
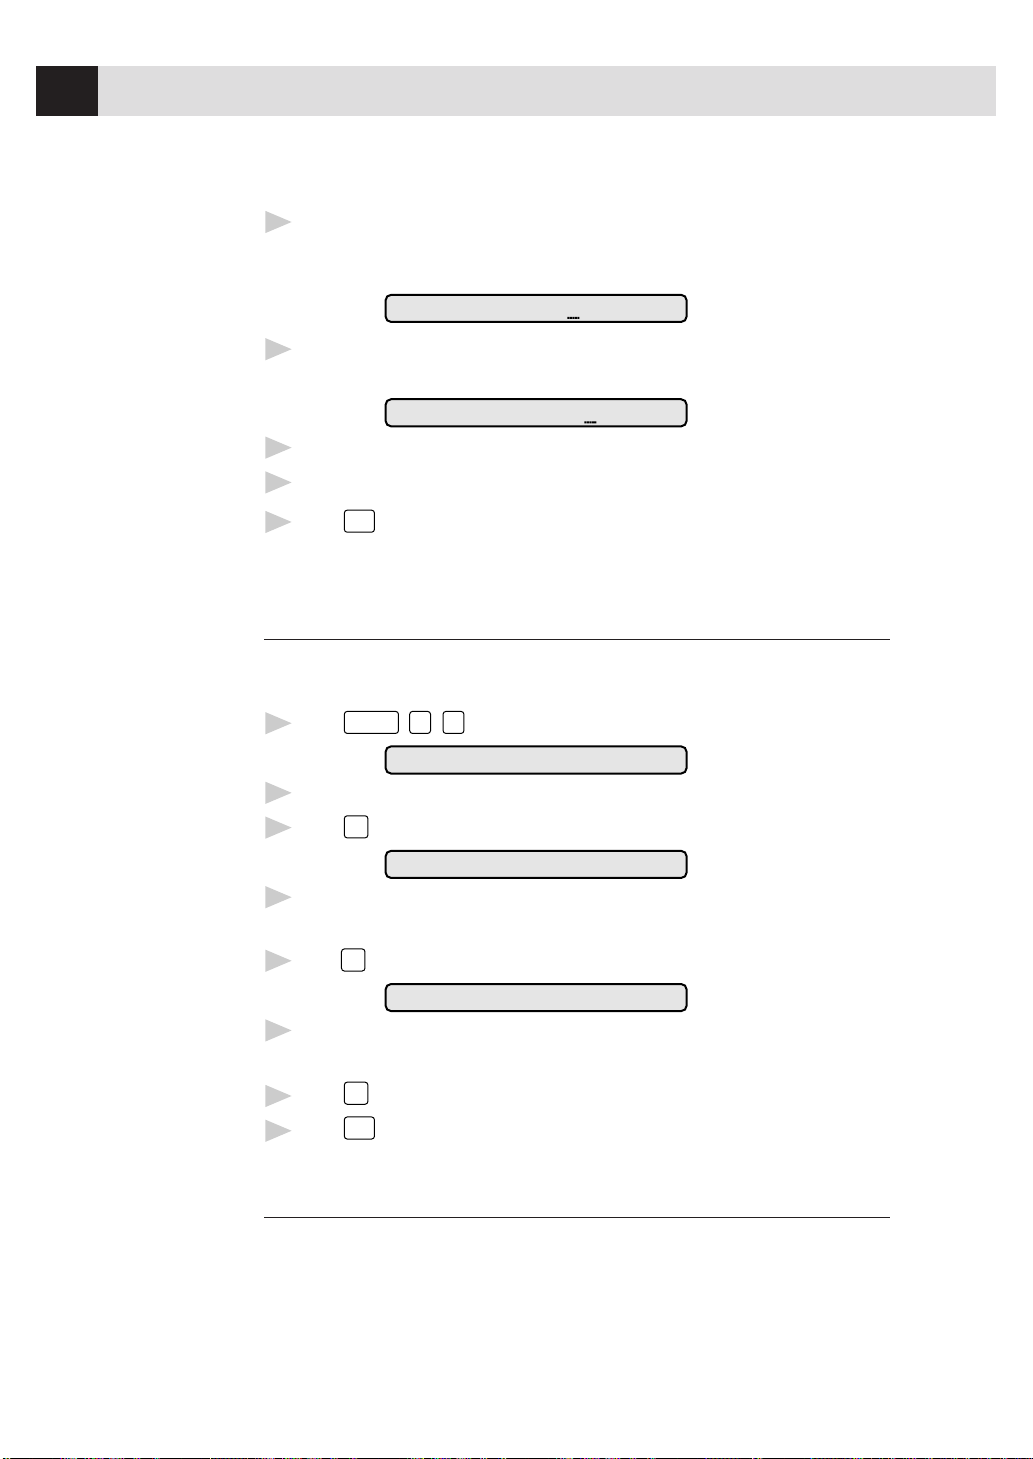
1
Press
Function
,
6
,
1
. The screen prompts you to select TONE or PULSE.
DIALING:TONE
DIALING:PULSE
2
Use or to select dialing mode.
3
Press
Set
when the screen displays the dialing mode you want.
4
Press
Stop
.
Setting Date and Time
Your fax machine displays the date and time, and prints it on every fax you send.
In the event of a power failure, the fax machine maintains date and time
information for about one hour. All other settings remain unaffected.
1
Press
Function
,
7
,
1
. The screen prompts you to enter the year.
ENTER YEAR:XX
2
Enter the last two digits of the year. The screen displays your entry, then
prompts you to enter the month.
ENTER MONTH:XX
3
CHAPTER THREE
Fax
Settings
20
CHAPTER THREE
3
Enter two digits for the month (for example, enter 09 for September, or 10 for
October). The screen displays your entry, then prompts you to enter
the day.
ENTER DAY:XX
4
Enter two digits for the day (for example, 06). The screen displays your entry,
then prompts you to set the time.
ENTER TIME:XX:XX
5
Enter the time in 24-hour format (for example, enter 15:25 for 3:25 PM).
6
Wait two seconds.
7
Press
Stop
. The screen now displays the date and time you set, and displays it
whenever the fax machine is standing by.
Setting Station ID
You can store your name, fax number, and telephone number to be printed on the
fax Cover Page, and on all fax pages.
1
Press
Function
,
7
,
4
. The screen prompts you to enter your fax number.
FAX:
2
Enter your fax number (up to 20 digits). The screen displays your entry.
3
Press
Set
. The screen prompts you to enter your telephone number.
TEL:
4
Enter your telephone number (up to 20 digits). If your telephone number
and fax number are the same, enter the same number again.
5
Press
Set
. The screen prompts you to enter your name or your company name.
NAME:
6
Use the keypad to enter your name (up to 20 characters). (You can use the
chart on page 21 to help you enter letters.)
7
Press
Set
to confirm.
8
Press
Stop
. The screen returns to the date and time.
Entering T ext
When you are setting certain functions, such as the Station ID, you may need to
enter text into the fax machine. Most number keys have three or four letters
printed above them. The keys for 0, #, and ✳ don’t have printed letters because
they are used for special characters.
See
Composing
Electronic
Cover Page
p. 48
See
Entering
Text
p. 20
Loading...