


 Loading...
Brother Laser Printer
HL-5130
HL-5140
HL-5150D
HL-5170DN
User's Guide
For visually-impaired users
You can read this manual with Screen Reader ‘text-to-speech’ software.
You must set up the hardware and install the driver before you can use the printer.
Please use the Quick Setup Guide to set up the printer. You can find a printed copy in the box.
Please read this User’s Guide thoroughly before you use the printer. Keep the CD-ROM in a convenient place so you can use it quickly if you need to.
Please visit our web site at http://solutions.brother.com where you can get answers to Frequently Asked Questions (FAQs), Product Support and Technical Questions, and the latest Driver Updates and Utilities.
Version 0

Laser printer
HL-5100 series
User's Guide
Definitions of warnings, cautions, and notes
We use the following terms throughout this User’s Guide:
 You must follow these warnings to prevent possible personal injury.
You must follow these instructions to make sure you use the printer properly and do not damage it.
 Remember these useful tips when you use the printer.
I
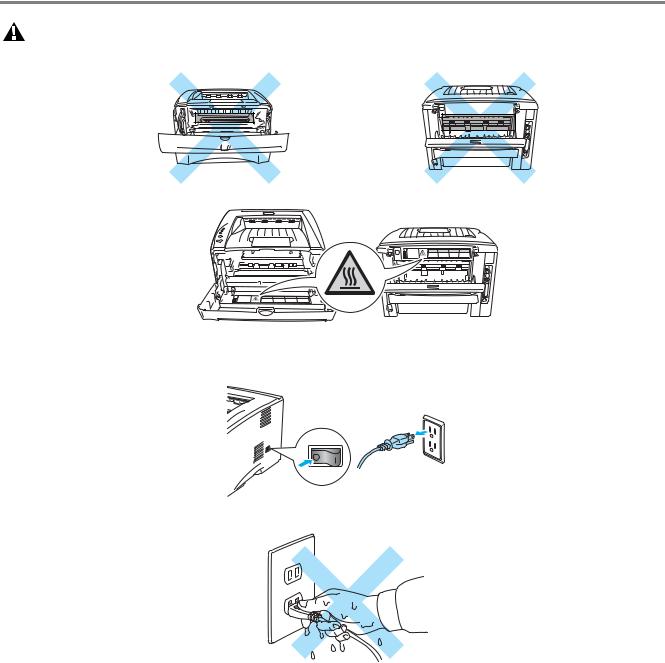
To use the printer safely
After you have just used the printer, some parts inside the printer will be extremely hot. When you open the front or back cover of the printer, never touch the shaded parts shown in the illustrations below.
There are high voltage electrodes inside the printer. Before you clean the printer, clear a paper jam or replace parts, make sure you have turned off the power switch and unplugged the printer from the AC power outlet.
Do not handle the plug with wet hands - it might give you an electrical shock.
 Caution
Use water or neutral detergents for cleaning. Cleaning with volatile liquids such as thinner or benzene will damage the surface of the printer.
Do not use cleaning materials that contain ammonia. They will damage the printer and the toner cartridge.
II
Trademarks
The Brother logo is a registered trademark of Brother Industries, Ltd.
Apple, the Apple Logo, Macintosh® and other countries, and TrueType®
and RendezvousTM are registered trademarks in the United States is a trademark of Apple Computer, Inc.
Epson is a registered trademark and FX-80 and FX-850 are trademarks of Seiko Epson Corporation.
Hewlett Packard is a registered trademark and HP LaserJet 6P, 6L, 5P, 5L, 4, 4L 4P, III, IIIP, II, and IIP are trademarks of Hewlett-Packard Company.
IBM, IBM PC, and Proprinter are registered trademarks of International Business Machines Corporation.
Microsoft® , MS-DOS® , Windows® and Windows NT® are registered trademarks of Microsoft Corporation in the U.S. and other countries.
PostScript® and PostScript® 3TM are trademarks of Adobe Systems Incorporated.
ENERGY STAR is a U.S. registered mark.
All other terms and brand and product names mentioned in this User’s Guide are registered trademarks of their respective companies.
Compilation and Publication Notice
Under the supervision of Brother Industries Ltd., this manual has been compiled and published, covering the latest product’s descriptions and specifications.
The contents of this manual and the specifications of this product are subject to change without notice.
Brother reserves the right to make changes without notice in the specifications and materials contained herein and shall not be responsible for any damages (including consequential) caused by reliance on the materials presented, including but not limited to typographical and other errors relating to the publication.
©2003 Brother Industries Ltd.
Shipment of the Printer
If for any reason you must ship your Printer, carefully package the Printer to avoid any damage during transit. We recommend that you save and use the original packaging. The Printer should also be adequately insured with the carrier.
III
Table of Contents
1 About this printer .................................................................................................................................... |
1-1 |
What is in the box? ....................................................................................................................... |
1-1 |
Interface cable .................................................................................................................... |
1-1 |
Front view ............................................................................................................................... |
1-2 |
Back view ............................................................................................................................... |
1-3 |
Positioning the printer ................................................................................................................... |
1-4 |
Power supply .......................................................................................................................... |
1-4 |
Environment ........................................................................................................................... |
1-4 |
What kind of paper can I use? ...................................................................................................... |
1-5 |
Type and size of paper ........................................................................................................... |
1-5 |
Recommended paper ............................................................................................................. |
1-6 |
Printable area ......................................................................................................................... |
1-7 |
Printing methods ........................................................................................................................... |
1-8 |
Printing on plain paper ............................................................................................................ |
1-8 |
Printing on plain paper from the paper tray ........................................................................ |
1-8 |
Printing on plain paper from the manual feed tray (For HL-5130 and HL-5140) .............. |
1-12 |
Printing on plain paper from the multi-purpose tray (MP tray) (For HL-5150D and HL-5170DN) |
|
1-14 |
|
Printing on thicker paper and card stock .............................................................................. |
1-17 |
Printing on thicker paper and card stock from the manual feed tray |
|
(For HL-5130 and HL-5140) ......................................................................................... |
1-17 |
Printing on thicker paper and card stock from the multi-purpose tray (MP tray) |
|
(For HL-5150D and HL-5170DN) ................................................................................. |
1-20 |
Printing on envelopes ........................................................................................................... |
1-24 |
Types of envelopes to avoid ............................................................................................. |
1-24 |
Printing on envelopes from the manual feed tray (For HL-5130 and HL-5140) ............... |
1-25 |
Printing on envelopes from the MP tray (For HL-5150D and HL-5170DN) ...................... |
1-29 |
Printing on transparencies .................................................................................................... |
1-33 |
Printing on transparencies from the paper tray ................................................................ |
1-33 |
Printing on transparencies from the manual feed tray (For HL-5130 and HL-5140) ........ |
1-36 |
Printing on transparencies from the MP tray (For HL-5150D and HL-5170DN) ............... |
1-39 |
Duplex Printing ........................................................................................................................... |
1-43 |
Guidelines for printing on both sides of the paper ............................................................ |
1-43 |
Printing on both sides of the paper (manual duplex printing) ............................................... |
1-43 |
Manual duplex printing from the paper tray ...................................................................... |
1-43 |
Manual duplex printing from the manual feed tray (For HL-5130 and HL-5140) .............. |
1-44 |
Manual duplex printing from the multi-purpose tray (For HL-5150D and HL-5170DN) .... |
1-45 |
Printing on both sides of the paper (automatic duplex printing) ........................................... |
1-47 |
Guidelines for automatic duplex printing .......................................................................... |
1-47 |
2 Driver and software ................................................................................................................................ |
2-1 |
Printer driver ................................................................................................................................. |
2-1 |
For Windows® 95/98/Me, Windows NT® 4.0 and Windows® 2000/XP ............................... |
2-1 |
For Macintosh® ............................................................................................................................. .......................................... |
2-1 |
For Windows® ............................................................................................................................. ................................................... |
2-2 |
Features in the PCL printer driver ...................................................................................... |
2-2 |
Features in the PS printer driver ...................................................................................... |
2-11 |
For Macintosh® ............................................................................................................................. .............................................. |
2-17 |
Software ..................................................................................................................................... |
2-20 |
Software for Networks .......................................................................................................... |
2-20 |
BRAdmin Professional ..................................................................................................... |
2-20 |
Driver Deployment Wizard ............................................................................................... |
2-20 |
Web BRAdmin .................................................................................................................. |
2-20 |
Automatic Emulation Selection ............................................................................................. |
2-21 |
IV
3 Control panel ........................................................................................................................................... |
3-1 |
Service call indications ........................................................................................................... |
3-5 |
Control panel buttons ................................................................................................................... |
3-7 |
Print a test page ..................................................................................................................... |
3-8 |
Using control panel button .................................................................................................. |
3-8 |
Using the printer driver ....................................................................................................... |
3-8 |
Printer Settings ....................................................................................................................... |
3-9 |
Using the control panel button ............................................................................................ |
3-9 |
Using the printer driver ....................................................................................................... |
3-9 |
Print fonts (Not available for HL-5130) ................................................................................. |
3-10 |
Using the control panel button .......................................................................................... |
3-10 |
Using the printer driver (Not available for HL-5130) ......................................................... |
3-10 |
Network factory default setting (For HL-5170DN) ................................................................ |
3-11 |
Disabling the APIPA protocol (For HL-5170DN) ................................................................... |
3-11 |
4 Options .................................................................................................................................................... |
4-1 |
DIMM ............................................................................................................................................ |
4-1 |
Installing additional memory ................................................................................................... |
4-2 |
Lower tray unit (LT-5000) (Not available for HL-5130) ................................................................. |
4-4 |
Print server (NC-2100p) ............................................................................................................... |
4-5 |
5 Routine maintenance .............................................................................................................................. |
5-1 |
Toner cartridge ............................................................................................................................. |
5-2 |
Toner Low message ............................................................................................................... |
5-2 |
Toner Empty message ........................................................................................................... |
5-3 |
Replacing the toner cartridge ................................................................................................. |
5-3 |
Drum unit ...................................................................................................................................... |
5-8 |
Change Drum message ..................................................................................................... |
5-8 |
Replacing the drum unit .......................................................................................................... |
5-9 |
Cleaning ..................................................................................................................................... |
5-12 |
Replacing periodic maintenance parts ....................................................................................... |
5-13 |
6 Troubleshooting ...................................................................................................................................... |
6-1 |
Identifying your problem ............................................................................................................... |
6-1 |
Error messages in the status monitor ........................................................................................... |
6-2 |
...................................................................................................................................................... |
6-3 |
...................................................................................................................................................... |
6-3 |
Error message printouts ............................................................................................................... |
6-3 |
Paper handling ............................................................................................................................. |
6-5 |
Paper jams and how to clear them ............................................................................................... |
6-6 |
Other problems ........................................................................................................................... |
6-11 |
For Macintosh® with USB ..................................................................................................... |
6-11 |
Improving the print quality .................................................................................................... |
6-11 |
Solving print problems ................................................................................................................ |
6-17 |
7 Appendix .................................................................................................................................................. |
A-1 |
Printer specifications .................................................................................................................... |
A-1 |
Important information for choosing your paper ............................................................................. |
A-6 |
8 Appendix (For Europe and Other Countries) ....................................................................................... |
B-1 |
Brother Numbers .......................................................................................................................... |
B-1 |
Important information: Regulations ............................................................................................... |
B-2 |
Radio interference (220 to 240 volt model only) ..................................................................... |
B-2 |
International ENERGY STAR® Compliance Statement .......................................................... |
B-2 |
IEC 60825 specification (220 to 240 volt model only) ............................................................ |
B-3 |
IMPORTANT - For Your Safety .................................................................................................... |
B-4 |
V
Geräuschemission / Acoustic noise emission (for Germany only) ..................................... |
B-4 |
Wiring information (for UK) ................................................................................................. |
B-5 |
9 Appendix (For USA and Canada) .......................................................................................................... |
C-1 |
Brother Numbers .......................................................................................................................... |
C-1 |
Register your product ............................................................................................................. |
C-1 |
Frequently asked questions (FAQs) ....................................................................................... |
C-1 |
Customer Service ................................................................................................................... |
C-1 |
Service center locator (USA only) .......................................................................................... |
C-2 |
Service center locations (Canada only) .................................................................................. |
C-2 |
Brother fax back system (USA only) ....................................................................................... |
C-2 |
Important information: Regulations ............................................................................................... |
C-3 |
Federal Communications Commission (FCC) Declaration of Conformity (For USA) ............. |
C-3 |
Industry Canada Compliance Statement (For Canada) ......................................................... |
C-4 |
International ENERGY STAR® Compliance Statement .......................................................... |
C-4 |
Laser Notices ................................................................................................................................ |
C-5 |
Laser Safety (100 to 120 volt model only) .............................................................................. |
C-5 |
FDA Regulations (100 to 120 volt model only) ....................................................................... |
C-5 |
IMPORTANT - For Your Safety .................................................................................................... |
C-6 |
Disconnect device .............................................................................................................. |
C-6 |
Caution for LAN connection ............................................................................................... |
C-6 |
10 INDEX ........................................................................................................................................................ |
I-1 |
VI
\ 1 About this printer
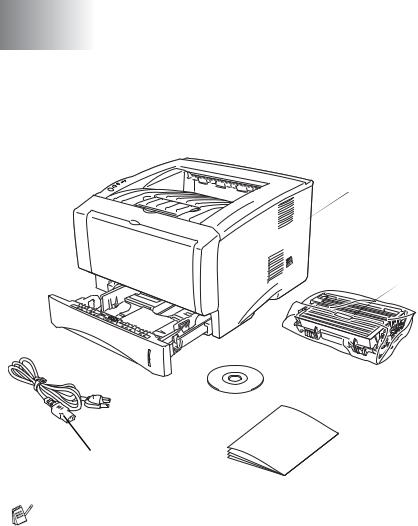
What is in the box?
When you unpack the printer, check to see that you have all of the following parts.
1
 3 4
3 4 
5
|
1 |
Printer |
|
2 |
Drum unit and |
|
3 |
toner cartridge assembly |
|
Quick Setup Guide |
|
|
4 |
CD-ROM |
2 |
5 |
AC power cord |
|
|
Components may differ from one country to another.
The power cord may be slightly different than the one in the figure above, depending on which country the printer was bought in.
Interface cable
■An interface cable is not a standard accessory.
■Some computers have a USB and a parallel port. Please buy the appropriate cable for the interface you are going to use.
■Most parallel cables support bi-directional communication, but some might have an incompatible pin assignment or may not be IEEE 1284-compliant.
■It is recommended to use a Parallel interface cable or USB interface cable that is no longer than 6 feet (2 meters).
■When you use a USB cable, make sure that you connect it to the USB connector of your PC.
■Please make sure that you use a Hi-Speed USB 2.0 certified cable if your computer uses a Hi-Speed USB 2.0 interface.
■Do not connect the USB cable to a non-powered hub or a Mac® keyboard.
1 - 1 ABOUT THIS PRINTER

Front view
Front View*
1 |
8 |
|
2
 7 3
7 3 

4 |
6 |
|
5
1
2
3
4
5
6
7
8
Figure 1-1
Face-down Output Tray Support Flap (Support Flap)
Control Panel
Front Cover Release Button
(HL-5130 and HL-5140) Manual Feed Tray
(HL-5150D and HL-5170DN) Multi-purpose Tray (MP Tray)
Paper Tray
Power Switch
Front Cover
Face-down Output Tray
* The printer illustration is based on HL-5150D and HL-5170DN.
ABOUT THIS PRINTER 1 - 2
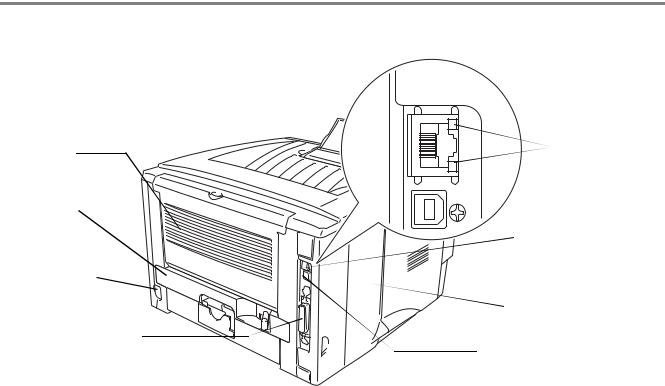
Back view
Back view*
1 |
8 |
2
7
3
6
4
5
Figure 1-2
1 Face-up Output Tray
2 Duplex Tray (For HL-5150D and HL-5170DN)
3 AC Power Connector
4 Parallel Interface Connector
5 USB Interface Connector
6 Side Cover
7 (HL-5170DN) 10/100BASE-TX Port
8 (HL-5170DN) LED (Light-emitting Diode)
* The printer illustration is based on HL-5170DN.
1 - 3 ABOUT THIS PRINTER
Positioning the printer
Please read the following before you use the printer.
Power supply
Use the printer within the recommended power range.
Power source: USA and Canada: AC 110 to 120 V, 50/60 Hz
Europe and Australia: AC 220 to 240 V, 50/60 Hz
The power cord, including extensions, should be no longer than 5 meters (16½ feet).
Do not share the same power circuit with other high-power appliances, such as an air conditioner, copier, shredder and so on. If you cannot avoid using the printer with these appliances, we recommend that you use a voltage transformer or a high-frequency noise filter.
Use a voltage regulator if the power source is not stable.
Environment
■Make sure that the power outlet is near the machine and is easy to get to so that, if there is an emergency, it can be easily unplugged.
■Only use the printer within the following ranges of temperature and humidity:
Temperature: 10 °C to 32.5 °C (50 °F to 90.5 °F)
Humidity: 20% to 80% (without condensation)
■The printer should be used in a well-ventilated room.
■Put the printer on a flat, horizontal surface.
■Keep the printer clean. Do not put the printer in a dusty place.
■Do not put the printer where the ventilation hole of the printer is blocked. Keep a gap of approximately 100 mm (4 in.) between the ventilation hole and the wall.
■Do not put the printer in direct sunlight. If you have to put it near a window, use a blind or a heavy curtain to protect the printer from direct sunlight.
■Do not put the printer near devices that contain magnets or generate magnetic fields.
■Do not subject the printer to strong physical shocks or vibrations.
■Do not expose the printer to open flames or salty or corrosive gasses.
■Do not put objects on top of the printer.
■Do not put the printer near an air conditioner.
■Keep the printer horizontal when you carry it.
ABOUT THIS PRINTER 1 - 4

What kind of paper can I use?
Type and size of paper
The printer loads paper from the installed paper tray, manual feed tray or optional lower tray unit. The names for the paper trays in the printer driver and this Guide are as follows:
Paper tray |
Tray 1 |
|
|
Manual feed tray |
Manual (HL-5130 and HL-5140) |
|
|
Multi-purpose tray (MP tray) |
MP Tray (HL-5150D and HL-5170DN) |
|
|
Optional lower tray unit |
Tray 2 (Not available for HL-5130) |
|
|
While looking at this page on the CD-ROM, you can jump to the page for each printing method by clicking in the table.
Media type |
Tray 1 |
Manual |
MP tray |
Tray 2 |
Select the Media type from the |
|
|
feed tray |
|
|
printer driver |
|
|
|
|
|
|
Plain paper |
|
|
|
|
Plain paper |
60 g/m2 to 105 g/m2 |
|
|
|
|
|
(16 to 28 lb) |
|
|
|
|
|
|
|
|
|
|
|
Recycled paper |
|
|
|
|
|
|
|
|
|
|
|
Bond paper |
|
|
|
|
Bond paper |
|
|
|
|
|
|
Thick paper |
|
|
|
|
Thick paper or Thicker paper |
105 g/m2 to 161 g/m2 |
|
|
|
|
|
(28 to 43 lb) |
|
|
|
|
|
|
|
|
|
|
|
Transparency |
|
|
|
|
Transparencies |
|
Up to 10 sheets |
A4 or Letter |
Up to 10 sheets |
|
|
|
A4 or Letter |
|
A4 or Letter |
|
|
|
|
|
|
|
|
Labels |
|
|
|
|
Thicker paper |
|
|
A4 or Letter |
A4 or Letter |
|
|
|
|
|
|
|
|
Envelopes |
|
|
|
|
Envelopes |
|
|
|
Up to 3 envelopes |
|
Envelopes - Thin |
|
|
|
|
|
Envelopes - Thick |
|
|
|
|
|
|
Card stock |
|
|
|
|
Thick paper or Thicker paper |
|
|
|
|
|
|
|
Tray 1 |
Manual feed tray |
MP tray |
Tray 2 |
|
|
|
|
|
Paper size |
A4, Letter, Legal, B5 |
Width: 69.9 to 215.9 |
Width: 69.9 to 215.9 |
A4, Letter, Legal, B5 |
|
(ISO), Executive, |
mm (2.75 to 8.5 in.) |
mm (2.75 to 8.5 in.) |
(ISO), Executive, A5 |
|
A5, A6, B6 |
Length: 116 to |
Length: 116 to |
|
|
|
406.4 mm |
406.4 mm |
|
|
|
(4.57 to 16 in.) |
(4.57 to 16 in.) |
|
|
|
|
|
|
Number of sheets |
250 sheets |
Single sheet |
50 sheets |
250 sheets |
|
(80 g/m2 or 21 lb) |
|
(80 g/m2 or 21 lb) |
(80 g/m2 or 21 lb) |
1 - 5 ABOUT THIS PRINTER

Recommended paper
|
Europe |
USA |
|
|
|
Plain paper |
Xerox Premier 80 g/m2 |
Xerox 4200DP 20 lb |
|
Xerox Business 80 g/m2 |
Hammermill Laser Paper 24 lb |
|
Modo DATACOPY 80 g/m2 |
|
|
IGEPA X-Press 80 g/m2 |
|
Recycled paper |
Xerox Recycled Supreme 80 g/m2 |
|
Transparency |
3M CG3300 |
3M CG 3300 |
|
|
|
Labels |
Avery laser label L7163 |
Avery laser label #5160 |
|
|
|
■Before you buy a lot of paper, please test some to make sure that the paper is suitable.
■Use paper that is made for plain-paper copying.
■Use paper that is 75 to 90 g/m2 (20 to 24 lb).
■Use neutral paper. Do not use acidic or alkaline paper.
■Use long-grain paper.
■Use paper with a moisture content of approximately 5%.
■This printer can use recycled paper that meets the DIN 19309 specification.
 Caution
Do not use ink jet paper, or it may cause a paper jam and damage your printer.
To help you choose which paper to use with this printer, see Important information for choosing your paper on page A-6.
ABOUT THIS PRINTER 1 - 6
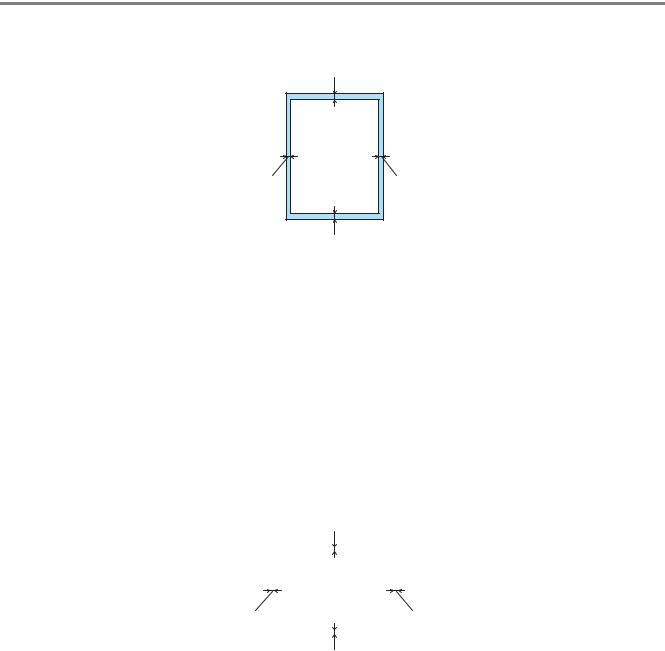
Printable area
When using PCL emulation, the edges of the paper that cannot be printed on are shown below.
Portrait
1
2 |
4 |
3
Figure 1-3
|
A4 |
Letter |
Legal |
B5 (ISO) |
Executive |
A5 |
A6 |
B6 |
|
|
|
|
|
|
|
|
|
1 |
4.2 mm |
4.2 mm |
4.2 mm |
4.2 mm |
4.2 mm |
4.2 mm |
4.2 mm |
4.2 mm |
|
(0.17 in.) |
(0.17 in.) |
(0.17 in.) |
(0.17 in.) |
(0.17 in.) |
(0.17 in.) |
(0.17 in.) |
(0.17 in.) |
2 |
6.01 mm |
6.35 mm |
6.35 mm |
6.01 mm |
6.35 mm |
6.01 mm |
6.01 mm |
6.01 mm |
|
(0.24 in.) |
(0.25 in.) |
(0.25 in.) |
(0.24 in.) |
(0.25 in.) |
(0.24 in.) |
(0.24 in.) |
(0.24 in.) |
3 |
4.2 mm |
4.2 mm |
4.2 mm |
4.2 mm |
4.2 mm |
4.2 mm |
4.2 mm |
4.2 mm |
|
(0.17 in.) |
(0.17 in.) |
(0.17 in.) |
(0.17 in.) |
(0.17 in.) |
(0.17 in.) |
(0.17 in.) |
(0.17 in.) |
4 |
6.01 mm |
6.35 mm |
6.35 mm |
6.01 mm |
6.35 mm |
6.01 mm |
6.01 mm |
6.01 mm |
|
(0.24 in.) |
(0.25 in.) |
(0.25 in.) |
(0.24 in.) |
(0.25 in.) |
(0.24 in.) |
(0.24 in.) |
(0.24 in.) |
Landscape
1
|
|
|
2 |
|
|
|
|
|
4 |
|
|
|
|
|
|
|
|
|
|
|
|
|
|
||
|
|
|
|
|
|
|
|
|
|
|
|
|
|
|
|
|
|
|
3 |
|
|
|
|
|
|
|
|
|
|
|
Figure 1-4 |
|
|
|
|
|||
|
|
|
|
|
|
|
|
|
|
|
|
|
|
A4 |
Letter |
Legal |
B5 (ISO) |
|
Executive |
|
A5 |
A6 |
B6 |
||
|
|
|
|
|
|
|
|
|
|
|
|
|
1 |
4.2 mm |
4.2 mm |
4.2 mm |
4.2 mm |
|
4.2 mm |
|
4.2 mm |
4.2 mm |
4.2 mm |
||
|
(0.17 in.) |
(0.17 in.) |
(0.17 in.) |
(0.17 in.) |
|
(0.17 in.) |
|
(0.17 in.) |
(0.17 in.) |
(0.17 in.) |
||
2 |
5.0 mm |
5.08 mm |
5.08 mm |
5.0 mm |
|
5.08 mm |
|
5.0 mm |
5.0 mm |
5.0 mm |
||
|
(0.19 in.) |
(0.2 in.) |
(0.2 in.) |
(0.19 in.) |
|
(0.2 in.) |
|
(0.19 in.) |
(0.19 in.) |
(0.19 in.) |
||
3 |
4.2 mm |
4.2 mm |
4.2 mm |
4.2 mm |
|
4.2 mm |
|
4.2 mm |
4.2 mm |
4.2 mm |
||
|
(0.17 in.) |
(0.17 in.) |
(0.17 in.) |
(0.17 in.) |
|
(0.17 in.) |
|
(0.17 in.) |
(0.17 in.) |
(0.17 in.) |
||
4 |
5.0 mm |
5.08 mm |
5.08 mm |
5.0 mm |
|
5.08 mm |
|
5.0 mm |
5.0 mm |
5.0 mm |
||
|
(0.19 in.) |
(0.2 in.) |
(0.2 in.) |
(0.19 in.) |
|
(0.2 in.) |
|
(0.19 in.) |
(0.19 in.) |
(0.19 in.) |
||
1 - 7 ABOUT THIS PRINTER
Printing methods
Printing on plain paper
You can print on plain paper from the paper tray or manual feed tray. For the paper you want to use, see
What kind of paper can I use? on page 1-5.
Printing on plain paper from the paper tray
 Illustrations in this section are based on HL-5150D and HL-5170DN.
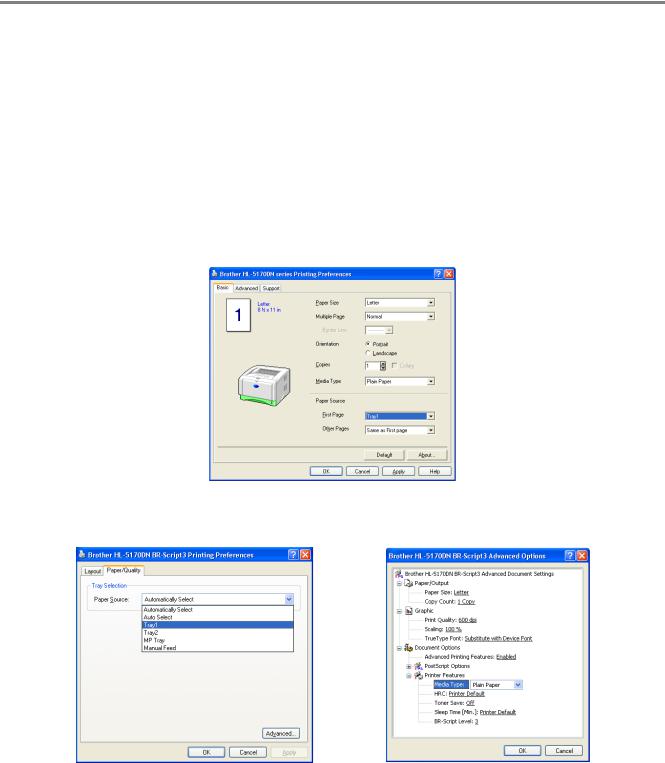
1 Select the Paper Size, Media Type, Paper Source, and other settings in the printer driver.
Media Type: Plain Paper
Paper Source: Tray1
PCL driver
PS driver (For HL-5150D and HL-5170DN)
ABOUT THIS PRINTER 1 - 8

2 Pull the paper tray completely out of the printer.
Figure 1-5
3 While pressing the blue paper-guide release lever, slide the paper guides to fit the paper size. Check that the guides are firmly in the slots.
Figure 1-6
1 - 9 ABOUT THIS PRINTER
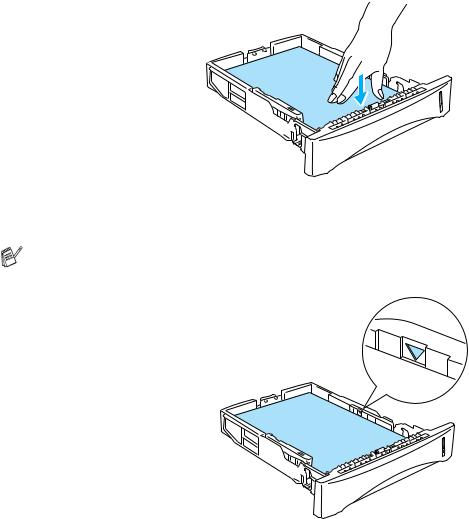
4 Put paper in the tray. Check that the paper is flat in the tray at all four corners.
Figure 1-7
Do not put more than 250 sheets of paper (80 g/m2 or 21 lb) in the tray, or paper jams may occur. Check that paper is below the maximum paper mark (▼).
Figure 1-8
When you use pre-printed paper, put the side that is going to be printed on (blank side) face down, with the top of the paper at the front of the tray.
5 Put the paper tray firmly back in the printer. Check that it is inserted fully into the printer.
ABOUT THIS PRINTER 1 - 10
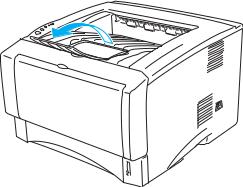
 Pull up the output tray support flap to prevent paper from sliding off the face-down output tray.
Figure 1-9
If you choose not to pull out the output tray support flap, we recommend that you remove printed pages immediately after they come out of the printer.
6 Send the print data to the printer.
1 - 11 ABOUT THIS PRINTER
Printing on plain paper from the manual feed tray (For HL-5130 and HL-5140)
The printer automatically turns on the Manual Feed mode when you put paper in the manual feed tray.
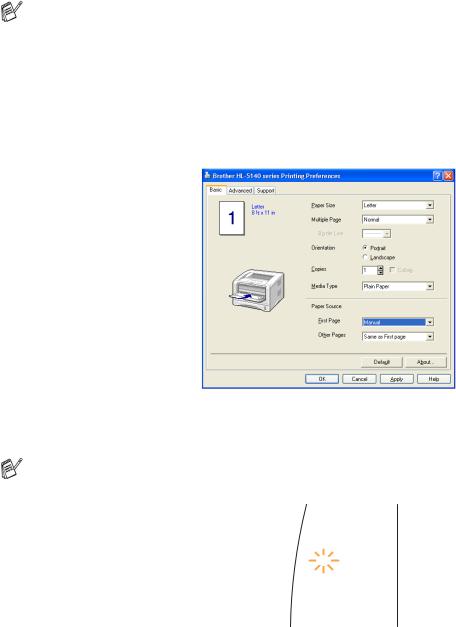
1 Select the Paper Size, Media Type, Paper Source, and other settings in the printer driver.
Media Type: Plain Paper
Paper Source: Manual
PCL driver
2 Send the print data to the printer.
A NO PAPER message is shown in the Status Monitor and indicated by the control panel LEDs until you put a sheet of paper in the manual feed tray.
 Toner
Toner
 Drum
Drum
 Paper
Paper
 Status
Figure 1-10
ABOUT THIS PRINTER 1 - 12
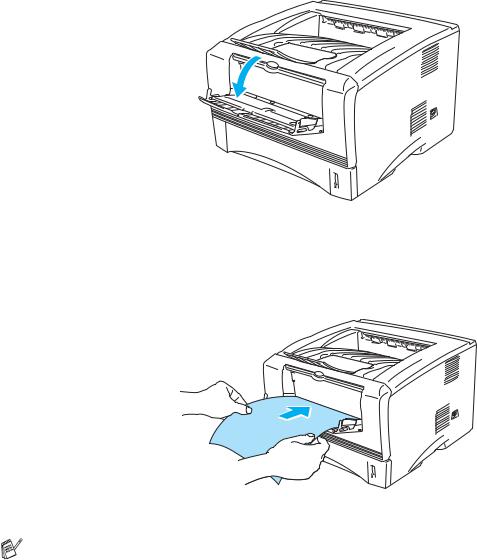
3 Open the manual feed tray. Slide the paper guides to fit the paper size.
Figure 1-11
4 Using both hands put paper in the manual feed tray until the front edge of the paper touches the paper feed roller. Hold the paper in this position until the printer automatically feeds the paper in for a short distance, and then let go of the paper.
Figure 1-12
■Make sure that the paper is straight and in the proper position on the manual feed tray. If it is not, the paper may not be fed properly, resulting in a skewed printout or a paper jam.
■Do not put more than one piece of paper in the manual feed tray at the same time, or it may cause a jam.
■If you put any Media (paper, transparency and so on) in the manual feed tray before the printer is in the Ready state, the media may be ejected without being printed on.
5 After the printed page comes out of the printer, put in the next sheet of paper as in Step 4 above. Repeat for each page that you want to print.
1 - 13 ABOUT THIS PRINTER
Printing on plain paper from the multi-purpose tray (MP tray) (For HL-5150D and HL-5170DN)
 The printer automatically turns on the MP Tray mode when you put paper in the multi-purpose tray.
1 Select the Paper Size, Media Type, Paper Source, and other settings in the printer driver.
Media Type: Plain Paper
Paper Source: MP Tray
PCL driver
PS driver
ABOUT THIS PRINTER 1 - 14

2
3
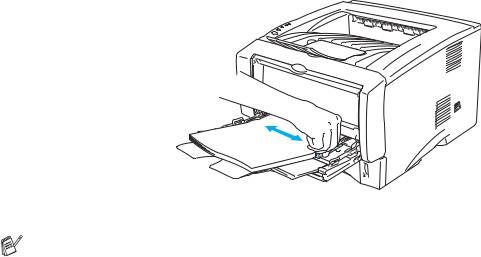
Open the MP tray and lower it gently.
Figure 1-13
Pull out the MP tray support flap.
MP tray support flap 
Figure 1-14
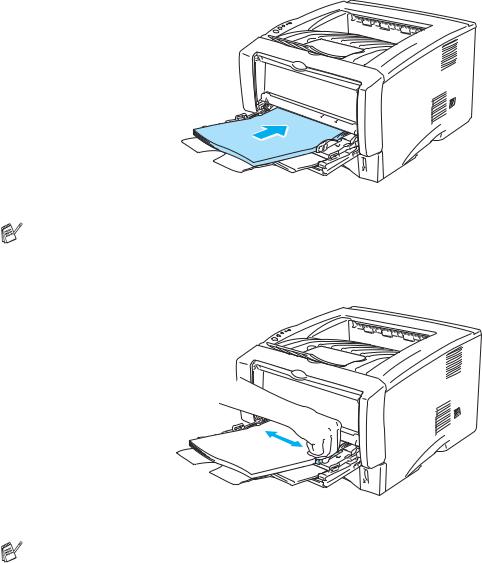
4 When putting paper in the MP tray, make sure it touches the back of the tray and remains under the maximum paper height guides on both sides of the tray.
Figure 1-15
Make sure that the paper is straight and in the proper position on the MP tray. If it is not, the paper may not be fed properly, resulting in a skewed printout or a paper jam.
1 - 15 ABOUT THIS PRINTER
5
6
While pressing the paper-guide release lever, slide the paper guide to fit the paper size.
Figure 1-16
When you put paper in the MP tray, please remember the following:
■The side to be printed on must be face up.
■During printing, the inside tray rises to feed paper into the printer.
■Put the leading edge (top of the paper) in first and push it gently into the tray.
■The top of the paper stack must be under the maximum paper height guides that are on both sides of the tray.
Send the print data to the printer.
ABOUT THIS PRINTER 1 - 16
Printing on thicker paper and card stock
When the face-up output tray is pulled down, the printer has a straight paper path from the manual feed tray or the MP tray through to the back of the printer. Use this paper feed and output method when you want to print on thicker paper or card stock.
When you select the paper you want to use, see What kind of paper can I use? on page 1-5.
Printing on thicker paper and card stock from the manual feed tray (For HL-5130 and HL-5140)
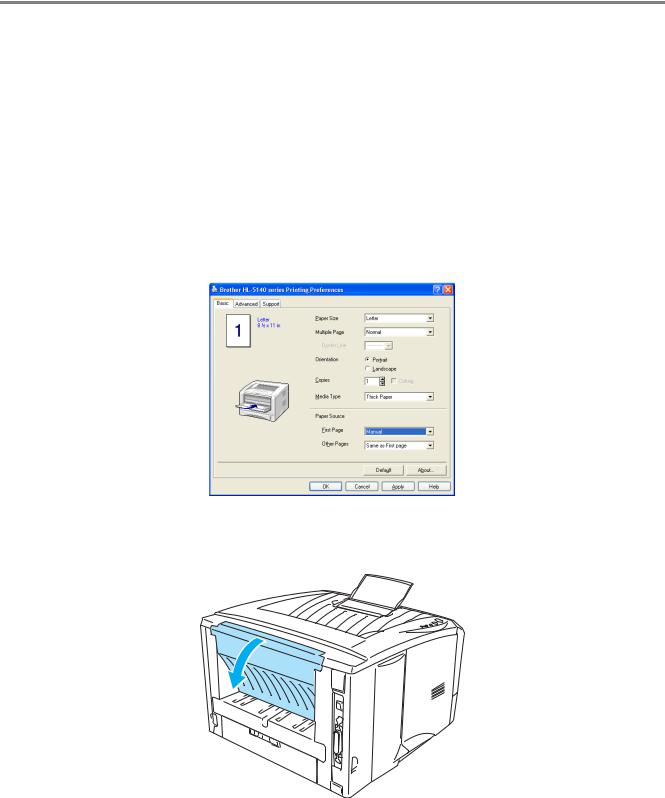
1 Select the Paper Size, Media Type, Paper Source, and other settings in the printer driver.
Media Type: Thick paper or Thicker paper
Paper Source: Manual
PCL driver
2 Open the face-up output tray.
Figure 1-17
1 - 17 ABOUT THIS PRINTER

3 Send the print data to the printer.
A NO PAPER status is shown by the control panel LEDs until you put a sheet of paper in the manual feed tray.
 Toner
Toner
 Drum
Drum
 Paper
Paper
 Status
Figure 1-18
4 Open the manual feed tray. Slide the paper guides to fit the paper size.
Figure 1-19
5 Using both hands put the paper in the manual feed tray until the front edge of the paper touches the paper feed roller. Hold the paper in this position until the printer automatically feeds the paper in for a short distance, and then let go of the paper.
Figure 1-20
ABOUT THIS PRINTER 1 - 18

■Make sure that the paper is straight and in the proper position in the manual feed tray. If it is not, the paper may not be fed properly, resulting in a skewed printout or a paper jam.
■Do not put more than one piece of paper in the manual feed tray at the same time, or it may cause a jam.
■If you put any Media (paper, transparency and so on) in the manual feed tray before the printer is in the Ready state, the media may be ejected without being printed on.
6 After the printed page comes out of the printer, put in the next sheet of paper as in Step 5 above. Repeat for each page that you want to print.
7 Close the face-up output tray.
 Caution
Remove each sheet immediately after printing. Stacking the sheets may cause a paper jam or the paper to curl.
Figure 1-21
1 - 19 ABOUT THIS PRINTER
Printing on thicker paper and card stock from the multi-purpose tray (MP tray) (For HL-5150D and HL-5170DN)
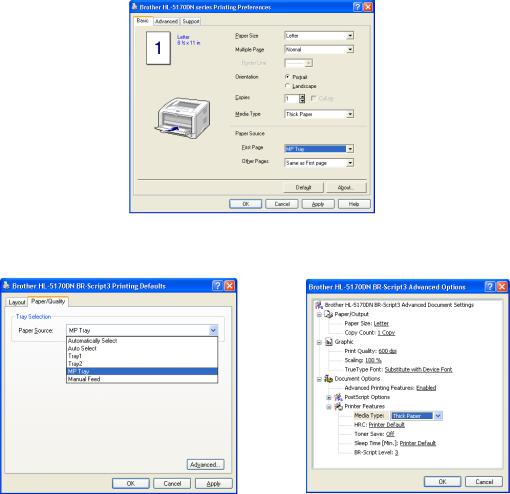
1 Select the Paper Size, Media Type, Paper Source, and other settings in the printer driver.
Media Type: Thick paper or Thicker paper
Paper Source: MP Tray
PCL driver
PS driver
ABOUT THIS PRINTER 1 - 20

2 Open the face-up output tray, and then pull out the face-up output tray support if necessary.
Figure 1-22
3 Open the MP tray and lower it gently.
Figure 1-23
4 Pull out the MP tray support flap.
MP tray support flap
Figure 1-24
1 - 21 ABOUT THIS PRINTER
5 When putting paper in the MP tray, make sure it touches the back of the tray and remains under the maximum paper height guides on both sides of the tray.
Figure 1-25
6
7
8
Make sure that the paper is straight and in the proper position in the MP tray. If it is not, the paper may not be fed properly, resulting in a skewed printout or a paper jam.
While pressing the paper-guide release lever, slide the paper guide to fit the paper size.
Figure 1-26
When you put paper in the MP tray, please remember the following;
■During printing, the inside tray rises to feed paper into the printer.
■The side to be printed on must be face up.
■Put the leading edge (top of the paper) in first and push it gently into the tray.
■The top of the paper stack must be under the maximum paper height guides that are on both sides of the tray.
Send the print data to the printer.
Close the face-up output tray.
ABOUT THIS PRINTER 1 - 22
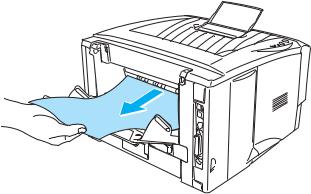
 Caution
Remove each sheet immediately after printing. Stacking the sheets may cause a paper jam or the paper to curl.
Figure 1-27
1 - 23 ABOUT THIS PRINTER
Loading...