


GS2500
Please visit us at http://solutions.brother.com where you can get product
support and answers to frequently asked questions (FAQs).
Operation Manual
Product Code: 885-X03/X13/X23
Sewing Machine

———————————————————————————————————————————————————————————————————————————————————————————————————————————————————————————————————————————————————————————————————————————————————————————————————————————————————————————————————————————————————————————————————————
—————
1
IMPORTANT SAFETY
INSTRUCTIONS
Please read these safety instructions
before attempting to use the machine.
DANGER - To reduce the
risk of electric shock:
1 Always unplug the machine from
the electrical outlet immediately after
using, when cleaning, when making
any user servicing adjustments
mentioned in this manual, or if you are
leaving the machine unattended.
WARNING - To reduce the
risk of burns, fire, electric shock, or
injury to persons.
2 Always unplug the machine from
the electrical outlet when making any
adjustments mentioned in the
instruction manual:
• To unplug the machine, switch the
machine to the symbol “O” position
to turn it off, then grasp the plug and
pull it out of the electrical outlet. Do
not pull on the cord.
• Plug the machine directly into the
electrical outlet. Do not use an
extension cord.
• Always unplug your machine if the
power is cut.
3 Never operate this machine if it has
a damaged cord or plug, if it is not
working properly, if it has been
dropped or damaged, or water is spilled
on the unit. Return the machine to the
nearest authorized dealer or service
center for examination, repair,
electrical or mechanical adjustment.
• While the machine is stored or in use
if you notice anything unusual, such
as an odor, heat, discoloration or
deformation, stop using the machine
and immediately unplug the power
cord.
• When transporting the machine, be
sure to carry it by its handle. Lifting
the machine by any other part may
damage the machine or result in the
machine falling, which could cause
injuries.
• When lifting the machine, be careful
not to make any sudden or careless
movements, otherwise you may
injure your back or knees.
4 Always keep your work area clear:
• Never operate the machine with any
air openings blocked. Keep
ventilation openings of the machine
and foot control free from the build
up of lint, dust, and loose cloth.
• Do not store objects on the foot
controller.
• Do not use extension cords. Plug the
machine directly into the electrical
outlet.
• Never drop or insert any object into
any opening.
• Do not operate where aerosol (spray)
products are being used or where
oxygen is being administered.
• Do not use the machine near a heat
source, such as a stove or iron;
otherwise, the machine, power cord
or garment being sewn may ignite,
resulting in fire or an electric shock.
• Do not place this machine on an
unstable surface, such as an unsteady
or slanted table, otherwise the
machine may fall, resulting in
injuries.
5 Special care is required when
sewing:
• Always pay close attention to the
needle. Do not use bent or damaged
needles.

2
————————————————————————————————————————————————————————————————————————————————————————————————————————————————————
—
——————————————————————————————————————————————————————————————————————————————————————————————————————————————————————————————————————————————————————————
• Keep fingers away from all moving
parts. Special care is required around
the machine needle.
• Switch the machine to the symbol
“O” position to turn it off when
making any adjustments in the needle
area.
• Do not use a damaged or incorrect
needle plate, as it could cause the
needle to break.
• Do not push or pull the fabric when
sewing, and follow careful instruction
when freehand stitching so that you
do not deflect the needle and cause it
to break.
6 This machine is not a toy:
• Your close attention is necessary
when the machine is used by or near
children.
• The plastic bag that this machine was
supplied in should be kept out of the
reach of children or disposed of.
Never allow children to play with the
bag due to the danger of suffocation.
• Do not use outdoors.
7 For a longer service life:
• When storing this machine, avoid
direct sunlight and high humidity
locations. Do not use or store the
machine near a space heater, iron,
halogen lamp, or other hot objects.
• Use only neutral soaps or detergents
to clean the case. Benzene, thinner,
and scouring powders can damage
the case and machine, and should
never be used.
• Always consult the operation manual
when replacing or installing any
assemblies, the presser feet, needle,
or other parts to assure correct
installation.
8 For repair or adjustment:
• If the Light unit (light-emitting diode)
is damaged, it must be replaced by
authorized dealer.
• In the event a malfunction occurs or
adjustment is required, first follow the
troubleshooting table in the back of
the operation manual to inspect and
adjust the machine yourself. If the
problem persists, please consult your
local authorized Brother dealer.
Use this machine only for its intended
use as described in this manual.
Use accessories recommended by the
manufacturer as contained in this
manual.
The contents of this manual and
specifications of this product are
subject to change without notice.
For additional product information,
visit our web site at www.brother.com
SAVE THESE
INSTRUCTIONS
This machine is intended
for household use.
This appliance is not intended for use by
persons (including children) with
reduced physical, sensory or mental
capabilities, or lack of experience and
knowledge, unless they have been given
supervision or instruction concerning use
of the appliance by a person responsible
for their safety.
Children should be supervised to ensure
that they do not play with the appliance.
FOR USERS IN THE UK, EIRE,
MALTA AND CYPRUS ONLY
IMPORTANT
• In the event of replacing the plug fuse, use a fuse
approved by ASTA to BS 1362, i.e. carrying the
mark, rating as marked on plug.
• Always replace the fuse cover. Never use plugs with
the fuse cover omitted.
• If the available electrical outlet is not suitable for the
plug supplied with this equipment, you should
contact your authorized dealer to obtain the correct
lead.

———————————————————————————————————————————————————————————————————————————————————————————————————————————————————————————————————————————————————————————————————————————————————————————————————————————————————————————————————————————————————————————————————————
—————
3
CONTENTS
IMPORTANT SAFETY INSTRUCTIONS ...........1
1. KNOWING YOUR SEWING
MACHINE .................................. 4
ACCESSORIES .................................................4
Optional accessories .......................................... 4
THE MAIN PARTS ...........................................5
Flat bed attachment ............................................ 5
USING YOUR SEWING MACHINE ................ 6
Connecting plugs ............................................... 6
Main power and sewing light switch .................. 7
Foot controller .................................................... 7
Checking the needle ........................................... 7
Replacing the needle .......................................... 7
Changing the presser foot ................................... 8
THE CONTROLS .............................................9
Pattern selection dial .......................................... 9
Stretch stitching .................................................. 9
Patterns and stitch names ................................. 10
Stitch length dial .............................................. 11
Reverse sewing lever ........................................ 11
THREADING THE MACHINE .......................12
Winding the bobbin ......................................... 12
Lower threading ............................................... 14
Lower threading (for models equipped with a
quick-set bobbin) ............................................. 15
Upper threading ............................................... 16
Using the needle threader (for models equipped
with a needle threader) ..................................... 18
Drawing up the lower thread ............................ 19
FABRIC, THREAD, AND NEEDLE
COMBINATIONS .........................................21
2. SEWING BASICS ...................... 22
Please read before sewing ................................ 22
Starting sewing ................................................. 22
Trial sewing ...................................................... 23
Changing the sewing direction ......................... 23
Sewing thick fabrics ......................................... 23
Sewing thin fabrics ........................................... 24
Sewing stretch fabrics ....................................... 24
Stitching cylindrical pieces ............................... 24
Sewing with a twin needle (Option) ................. 24
Thread tension ................................................. 26
3. BUILT-IN STITCHES ................. 27
Straight stitching ............................................... 27
Zigzag stitching ................................................. 27
Blind hem stitching ........................................... 27
Shell tuck stitching ............................................ 29
Elastic stitching .................................................29
Double action stitching ..................................... 30
Fagoting ............................................................ 30
Overedge stitching ............................................ 31
Feather stitching ................................................ 31
Triple zigzag stretch stitching ............................ 32
Decorative stitching .......................................... 32
4. SEWING BUTTONHOLES AND
BUTTONS ............................... 33
Making a buttonhole ......................................... 33
Adjusting buttonholes ....................................... 34
Sewing buttons ................................................. 35
5. USING ATTACHMENTS AND
APPLICATIONS ....................... 36
Zipper insertion ................................................ 36
Gathering .......................................................... 37
Darning ............................................................ 37
Appliqués ......................................................... 37
OPTIONAL ACCESSORIES ........................... 38
Using the blind stitch foot ................................. 38
6. APPENDIX ................................ 40
MAINTENANCE ........................................... 40
Restrictions on oiling ........................................ 40
Precautions on storing the machine .................. 40
Cleaning ...........................................................40
TROUBLESHOOTING .................................. 42
INDEX .......................................................... 45
4
——————————————————————————————————————————————————————————————————————————
—
————————————————————————————————————————————————————————————————————————————————————————————————————————————————————————————————————————————————————————————————————————————————————————————————————
1
1 KNOWING YOUR SEWING MACHINE
ACCESSORIES
We have designed these accessories to help you easily perform most sewing tasks.
Note
● The included accessories vary depending on the machine model.
Optional accessories
The following are available as optional accessories to be purchased separately. Depending on the model you
purchased, the following accessory may be included with your machine.
1. 2. 3. 4. 5.
6. 7. 8. 9.
No. Part Name
Part Code
Americas Others
1
Zigzag foot “J”
(on machine)
XC4901-021
2 Buttonhole foot “A” X59369-321
3 Zipper foot “I” XE9369-001
4 Darning Plate XC6063-021
5 Button sewing foot “M” XE2137-001
6
Bobbin
(One is on machine)
SA156
SFB:
XA5539-151
7
Needle set
(90/14 needle)
3-piece set: XE5328-001
2-piece set: XE7064-001
8 Oval screwdriver XE5241-001
9 Foot controller See page 5
No. Part Name
Part Code
Americas Others
1. 2. 3. 4. 5.
6. 7. 8.
No. Part Name
Part Code
Americas Others
1 Extra spool pin XE2241-001
2
Twin needle
(2.0/75 needle)
X57521-021
3 Walking Foot SA107
F034N:
XC2165-002
4 Quilting Foot SA129
F005N:
XC1948-002
5 1/4-inch Quilting Foot SA125
F001N:
XC1944-052
6 Narrow Hemmer Foot SA127
F003N:
XC1945-002
7 Blind Stitch Foot SA134
F018N:
XC1976-052
8 Quilting guide SA132
F016N:
XC2215-002
No. Part Name
Part Code
Americas Others
KNOWING YOUR SEWING MACHINE ————————————————————————————————————————————————————————————————————————————————————————————————————————————————————————————————
—
————————————————————————————————————————————————
—————
5
THE MAIN PARTS
1 Bobbin winder (Page 12)
This winds the thread onto the bobbin for use as the
lower thread.
2 Stitch length dial (Page 11)
Rotate the dial to control the stitch length.
3 Spool pin (Page 12, 16)
This holds the spool of thread.
4 Upper tension-control dial (Page 26)
This controls the tension of the upper thread.
5 Thread guide (Page 12, 16)
This is used when winding the thread onto the
bobbin and then threading the machine.
6 Thread take-up lever (Page 17)
7 Thread cutter (Page 23)
Pass the threads through the thread cutter to cut
them.
8 Needle threader (Page 18)
(This is only available on certain models.)
9 Quick-set bobbin (Page 15, 20)
(This is only available on certain models.)
0 Flat bed attachment with accessory compartment
(Page 5)
A Presser foot (Page 8)
B Reverse sewing lever (Page 11)
Push this lever to stitch in the reverse direction.
C Pattern selection dial (Page 9)
Rotate the dial in either direction to choose the
stitch you want.
D Handwheel
Used to manually raise and lower the needle.
E Buttonhole fine-adjustment screw (Page 34)
F Main power and sewing light switch (Page 7)
You can turn the main power and sewing light
switch on and off.
G Foot controller jack / socket (Page 6)
Plug in the foot controller plug and connect the
machine to the power supply.
H Presser foot lever (Page 16)
Used to raise and lower the presser foot.
I Foot controller (Page 7)
You can use this to control the sewing speed, and to
start and stop sewing.
Foot Controller: Model KD-1902 for 110/120V area
Model KD-2902 for 220/240V area
The foot controller part code differs depending on the
country or region. Contact your dealer or the nearest
authorized service center.
Flat bed attachment
The accessories can be stored in a compartment inside
the flat bed attachment.
1
Slide the flat bed attachment to the left to
open it.
1 Flat bed attachment
2 Storage compartment
1
3
2
4
5
6
7
8
9
0
A
B
C
D
G
F
H
I
E
1
2
6
——————————————————————————————————————————————————————————————————————————
—
————————————————————————————————————————————————————————————————————————————————————————————————————————————————————————————————————————————————————————————————————————————————————————————————————
1
USING YOUR SEWING MACHINE
WARNING
CAUTION
Connecting plugs
1
Connect the foot controller plug to the
machine.
2
Connect the power supply plug to a wall
outlet.
Note
● If a power outage occurs while the sewing
machine is being operated, turn off the main
power and unplug the power supply cord.
When restarting the sewing machine, follow
the necessary procedure to correctly operate
the machine.
(For U.S.A. only)
● This appliance has a polarized plug (one
blade wider than the other). To reduce the
risk of electric shock, this plug is intended to
fit in a polarized outlet only one way. If the
plug does not fit fully in the outlet, reverse
the plug.
If it still does not fit, contact a qualified
electrician to install the proper outlet. Do
not modify the plug in any way.
● Use only regular household electricity for the power source. Using other power sources may
result in fire, electric shock, or damage to the machine.
● Make sure that the plugs on the power cord are firmly inserted into the electrical outlet and
the power supply jack on the machine.
● Do not insert the plug on the power cord into an electrical outlet that is in poor condition.
● Turn off the main power and remove the plug in the following circumstances:
• When you are away from the machine
• After using the machine
• When the power fails during use
• When the machine does not operate correctly due to a bad connection or a disconnection
• During electrical storms
● Use only the power cord included with this machine.
● Do not use extension cords or multi-plug adapters with many other appliances plugged in to
them. Fire or electric shock may result.
● Do not touch the plug with wet hands. Electric shock may result.
● When unplugging the machine, always turn off the main power first. Always grasp the plug to
remove it from the outlet. Pulling on the cord may damage the cord, or lead to fire or electric
shock.
● Do not allow the power cord to be cut, damaged, modified, forcefully bent, pulled, twisted,
or bundled. Do not place heavy objects on the cord. Do not subject the cord to heat. These
things may damage the cord and cause fire or electric shock. If the cord or plug is damaged,
take the machine to your authorized dealer for repairs before continuing use.
● Unplug the power cord if the machine is not to be used for a long period of time. Otherwise
a fire may result.
2
1
KNOWING YOUR SEWING MACHINE ————————————————————————————————————————————————————————————————————————————————————————————————————————————————————————————————
—
————————————————————————————————————————————————
—————
7
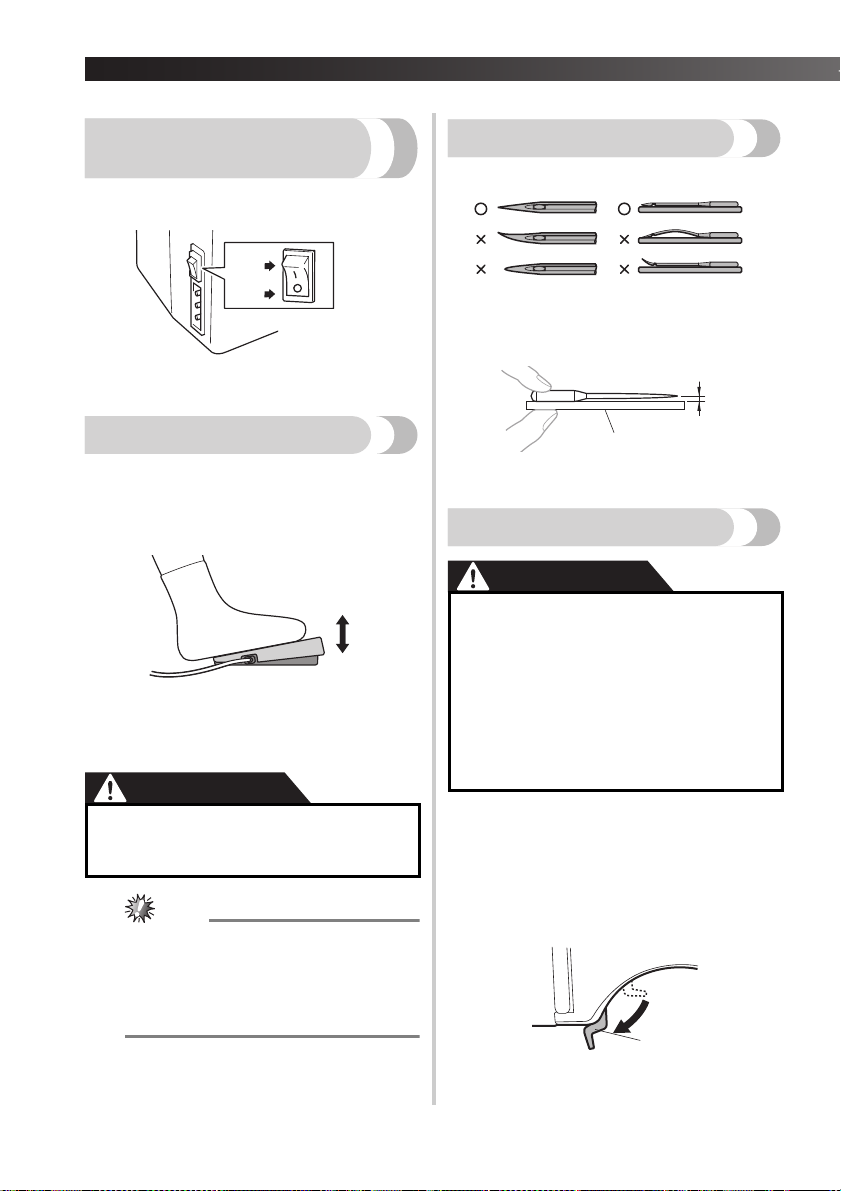
Main power and sewing
light switch
This switch turns the main power and sewing light on or
off.
1 Turn on (toward the ‘I’ mark)
2 Turn off (toward the ‘O’ mark)
Foot controller
When you press the foot controller down lightly, the
machine will run at a low speed. When you press
harder, the machine’s speed will increase. When you
take your foot off the foot controller, the machine will
stop.
1 Slower
2 Faster
You should make sure that nothing is placed on the foot
controller when the machine is not in use.
CAUTION
Note
(For U.S.A. only)
● Foot Controller: Model KD-1902
This foot controller can be used on the
machine with product code 885-X13.
The product code is mentioned on the
machine rating plate.
Checking the needle
The sewing needle must always be straight and sharp
for smooth sewing.
■ Checking the needle correctly
Put the flat side of the needle on a flat surface.
Check the needle from the top and the sides.
Dispose of any bent needles safely.
1 Parallel space
2 Level surface (bobbin cover, glass, etc.)
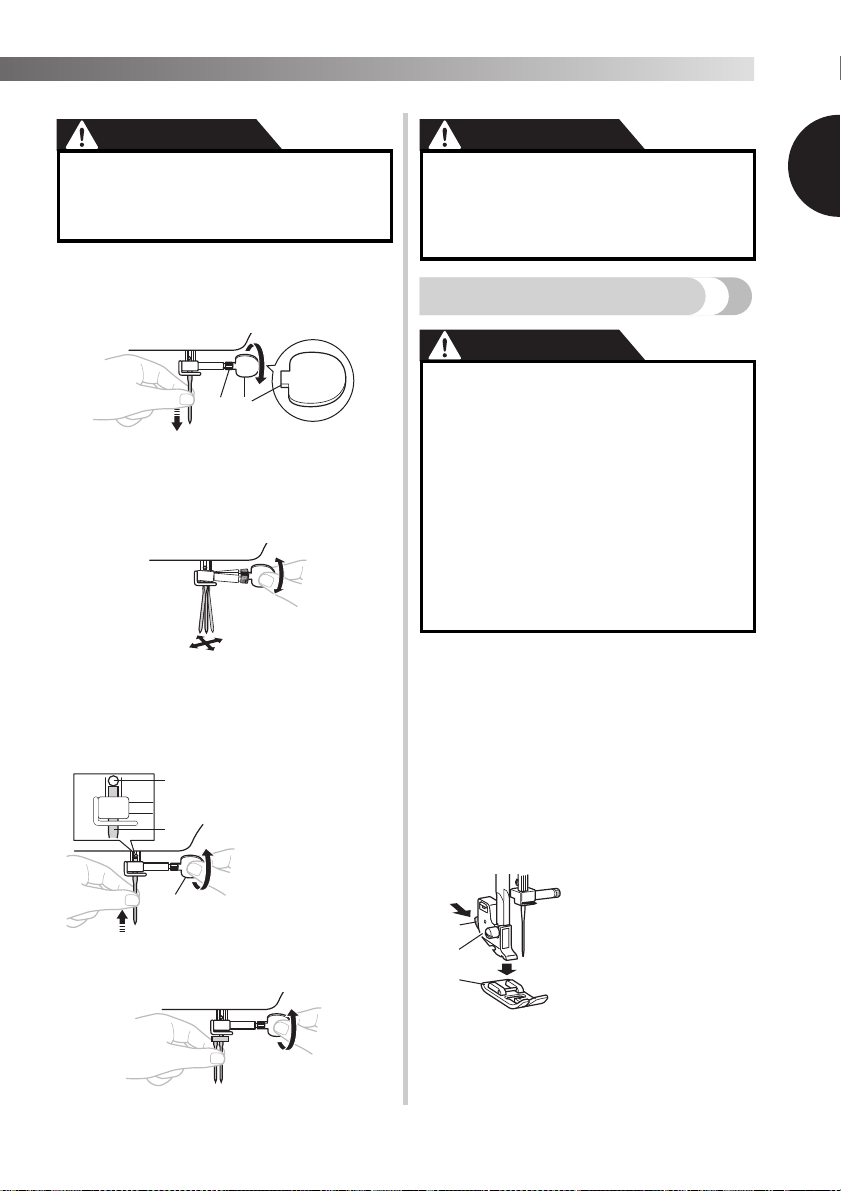
Replacing the needle
CAUTION
1
Turn off the machine.
2
Raise the needle by turning the
handwheel toward you
(counterclockwise) so that the mark on
the wheel points up.
3
Lower the presser foot lever.
1 Presser foot lever
● Do not allow pieces of cloth and dust to
build up on the foot controller. Doing so
could cause a fire or an electric shock.
2
1
1
2
● Always turn off the machine before you
change the needle. Otherwise, injuries
may occur if the foot controller is
accidentally pressed and the machine
starts sewing.
● Only use sewing machine needles for
home use. Other needles may bend or
break and cause injury.
● Never sew with a bent needle. A bent
needle will easily break and cause injury.
1
2
1
8
——————————————————————————————————————————————————————————————————————————
—
————————————————————————————————————————————————————————————————————————————————————————————————————————————————————————————————————————————————————————————————————————————————————————————————————
1
CAUTION
4
Hold the needle with your left hand, and
then use an oval screwdriver to turn the
needle clamp screw counterclockwise to
remove the needle.
1 Use an oval screwdriver
2 Needle clamp screw
• Do not use excessive force when loosening
or tightening the needle clamp screw,
otherwise certain parts of the sewing
machine may be damaged.
5
With the flat side of the needle toward the
back of the machine, insert the needle
until it touches the needle stopper. Next,
tighten the needle clamp using an oval
screwdriver.
Install the twin needle in the same way.
CAUTION
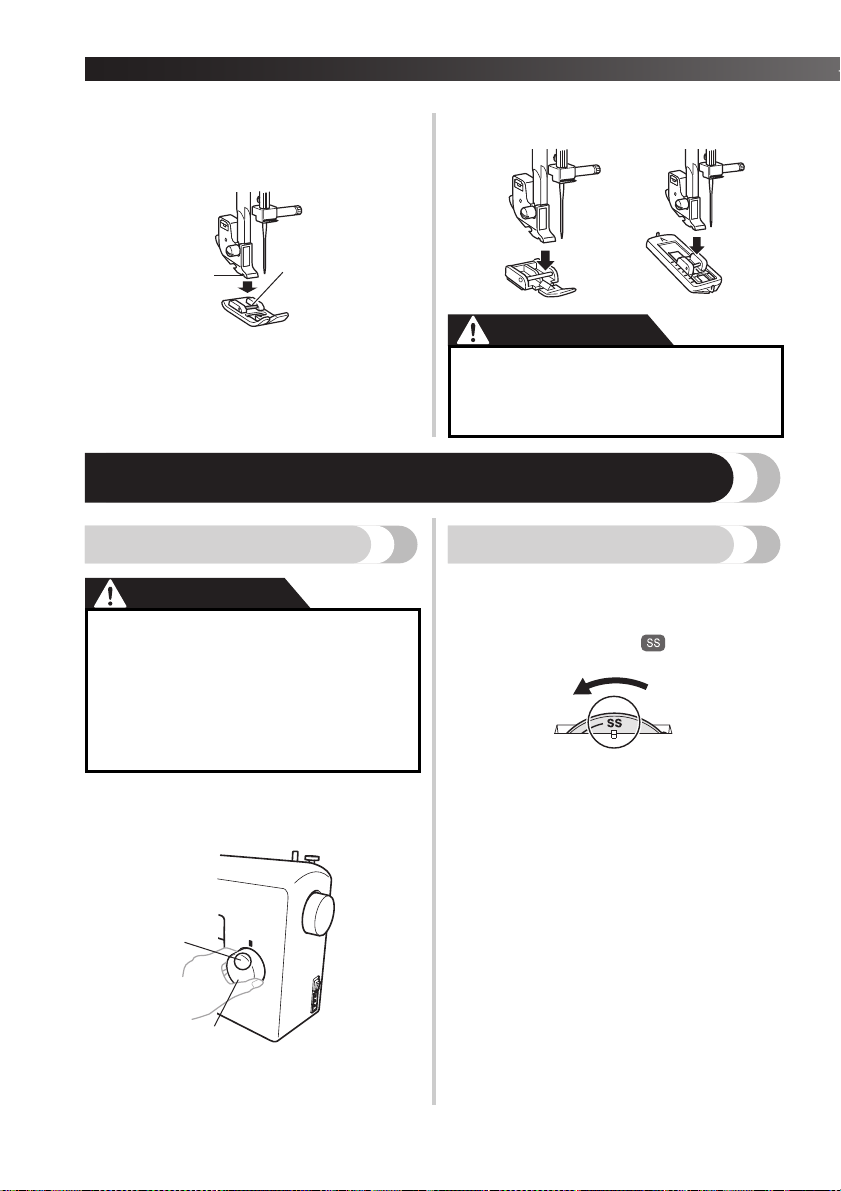
Changing the presser foot
CAUTION
You will have to change the presser foot depending on
what you want to sew and how.
1
Turn off the machine.
Raise the presser foot lever.
2
Raise the needle by turning the
handwheel toward you
(counterclockwise) so that the mark on
the wheel points up.
3
Press the black button at the back of the
presser foot holder to release the presser
foot.
4
Put a different presser foot on the needle
plate so that the bar on the presser foot is
in line with the slot on the shank.
● Before replacing the needle, place fabric
or paper under the presser foot to
prevent the needle from falling into the
hole in the needle plate.
1 Use an oval
screwdriver
2 Needle stopper
3 Needle
21
2
3
1
● Make sure you insert the needle until it
touches the stopper, and securely tighten
the needle clamp screw with an oval
screwdriver, otherwise the needle may
break or the machine may be damaged.
● Always turn off the machine before you
change the presser foot. If you leave the
power on and step on the controller, the
machine will start and you may be
injured.
● Always use the correct presser foot for
the stitch pattern you have chosen. If
you use the wrong presser foot, the
needle may strike the presser foot and
bend or break, and may cause injury.
● Only use presser feet that have been
designed to be used with this machine.
Using any other presser foot may cause
accident or injury.
1 Black button
2 Presser foot holder
3 Presser foot
1
2
3
KNOWING YOUR SEWING MACHINE ————————————————————————————————————————————————————————————————————————————————————————————————————————————————————————————————
—
————————————————————————————————————————————————
—————
9
5
Lower the presser foot lever and fix the
presser foot onto the shank. If the presser
foot is in the correct place, the bar should
snap in.
1 Shank
2 Bar
■ Presser foot installation orientation
CAUTION
THE CONTROLS
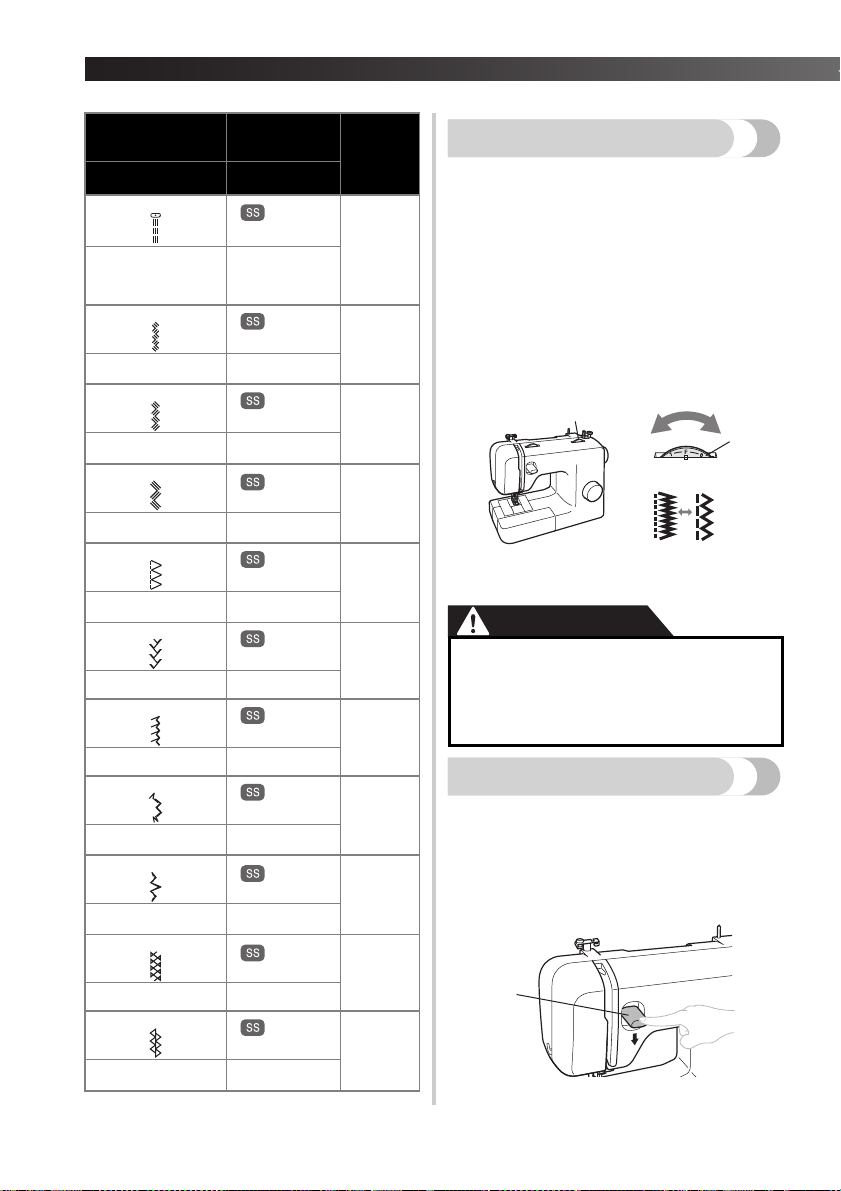
Pattern selection dial
CAUTION
To choose a stitch, simply turn the pattern selection dial
in either direction. The next section shows
recommended stitch lengths.
1 Pattern selection dial
2 Chosen pattern number
Stretch stitching
Raise the needle by turning the handwheel toward you
(counterclockwise) so that the mark on the wheel points
up.
Setting the stitch length dial to “ ” changes the
selected pattern to a stretch stitch.
1
2
● If the presser foot is not installed with
the correct orientation, the needle may
strike the presser foot, which may bend
or break the needle and cause injury.
● When you use the pattern selection dial
to choose a pattern, raise the needle by
turning the handwheel toward you
(counterclockwise) so that the mark on
the wheel points up. If the needle is in
the down position when you turn the
pattern selection dial, the needle, presser
foot or fabric may be damaged.
2
1

10
——————————————————————————————————————————————————————————————————————————
—
————————————————————————————————————————————————————————————————————————————————————————————————————————————————————————————————————————————————————————————————————————————————————————————————————
1
Patterns and stitch names
■ 25 Stitches
1
2
3
4
5
6
7
8
9
10
11
12
13
14
15
16
17
18
19
20
21
22
23
24
25
Pattern
Recommended
Length
(mm (inch))
Reference
Page
Stitch Name
Preset Width
(mm (inch))
F-1.5 (1/64-1/16)
33
4-STEP AUTOMATIC
BUTTONHOLE
5 (3/16)
1-4 (1/16-3/16)
27, 37
STRAIGHT STITCH
(Left Needle Position)
—
1-4 (1/16-3/16)
27, 36, 37,
38
STRAIGHT STITCH
(Center Needle
Position)
—
F-4 (1/64-3/16)
27, 35, 37,
38
ZIGZAG STITCH 1.5 (1/16)
F-4 (1/64-3/16)
27, 35, 37,
38
ZIGZAG STITCH 3.5 (1/8)
F-4 (1/64-3/16)
27, 35, 37,
38
ZIGZAG STITCH 5 (3/16)
F-3 (1/64-1/8)
29
SHELL TUCK STITCH 5 (3/16)
1
2
3
4
5
6
7
F-2.5 (1/64-3/32)
29
ELASTIC STITCH 5 (3/16)
F-1.5 (1/64-1/16)
27, 38
STRETCH BLIND
HEM STITCH
5 (3/16)
F-1.5 (1/64-1/16)
32
SCALLOP STITCH 5 (3/16)
F-1.5 (1/64-1/16)
32
BEAD STITCH 5 (3/16)
F-3 (1/64-1/8)
30
DOUBLE ACTION
STITCH
5 (3/16)
F-3 (1/64-1/8)
30
BRIDGING STITCH 5 (3/16)
Fixed 2.5
(3/32)
27
TRIPLE STRETCH
STITCH
(Left Needle Position)
—
Pattern
Recommended
Length
(mm (inch))
Reference
Page
Stitch Name
Preset Width
(mm (inch))
8
9
10
11
12
13
14
KNOWING YOUR SEWING MACHINE ————————————————————————————————————————————————————————————————————————————————————————————————————————————————————————————————
—
————————————————————————————————————————————————
—————
11
Stitch length dial
Depending on the selected stitch, you may need to
adjust the stitch length for best results.
The numbers marked on the stitch length dial represent
the stitch length in millimeters (mm) (1/25 inch).
THE HIGHER THE NUMBER, THE LONGER THE
STITCH. With the “0” setting, material is not fed. This is
used when sewing a button.
The “F”-“1” range is for making a satin stitch (closed
zigzag stitch), which is used for making buttonholes
and decorative stitches. The position needed for making
the satin stitch varies according to the material and
thread being used. To determine the exact dial position,
first test the stitch and length settings on a scrap piece of
fabric to observe the feeding of the material.
1 Stitch length dial
2 Shorter
3 Longer
CAUTION
Reverse sewing lever
You can use reverse sewing for back tacking and
reinforcing seams.
To sew in reverse, push the reverse sewing lever in as
far as possible and hold it in that position while you
lightly push the foot controller. To sew forward, release
the reverse sewing lever. The machine will then sew
forward.
1 Reverse sewing lever
Fixed 2.5
(3/32)
27
TRIPLE STRETCH
STITCH
(Center Needle
Position)
—
Fixed 2.5
(3/32)
32
TRIPLE ZIGZAG
STRETCH STITCH
1.5 (1/16)
Fixed 2.5
(3/32)
32
TRIPLE ZIGZAG
STRETCH STITCH
3.5 (1/8)
Fixed 2.5
(3/32)
32
TRIPLE ZIGZAG
STRETCH STITCH
5 (3/16)
Fixed 2.5
(3/32)
31
ELASTIC OVERLOCK
STITCH
5 (3/16)
Fixed 2.5
(3/32)
31
FEATHER STITCH 5 (3/16)
Fixed 2.5
(3/32)
31
COMB STITCH 5 (3/16)
Fixed 2.5
(3/32)
32
DECORATIVE
STITCH
5 (3/16)
Fixed 2.5
(3/32)
32
DECORATIVE
STITCH
5 (3/16)
Fixed 2.5
(3/32)
30
FAGOTING STITCH 5 (3/16)
Fixed 2.5
(3/32)
30
DECORATIVE
STITCH
5 (3/16)
Pattern
Recommended
Length
(mm (inch))
Reference
Page
Stitch Name
Preset Width
(mm (inch))
15
16
17
18
19
20
21
22
23
24
25
● If the stitches are bunched together,
lengthen the stitch length and continue
sewing. Do not continue sewing without
lengthening the stitch length, otherwise
the needle may break and cause injury.
1
2
3
1
1
12
——————————————————————————————————————————————————————————————————————————
—
————————————————————————————————————————————————————————————————————————————————————————————————————————————————————————————————————————————————————————————————————————————————————————————————————
1
THREADING THE MACHINE
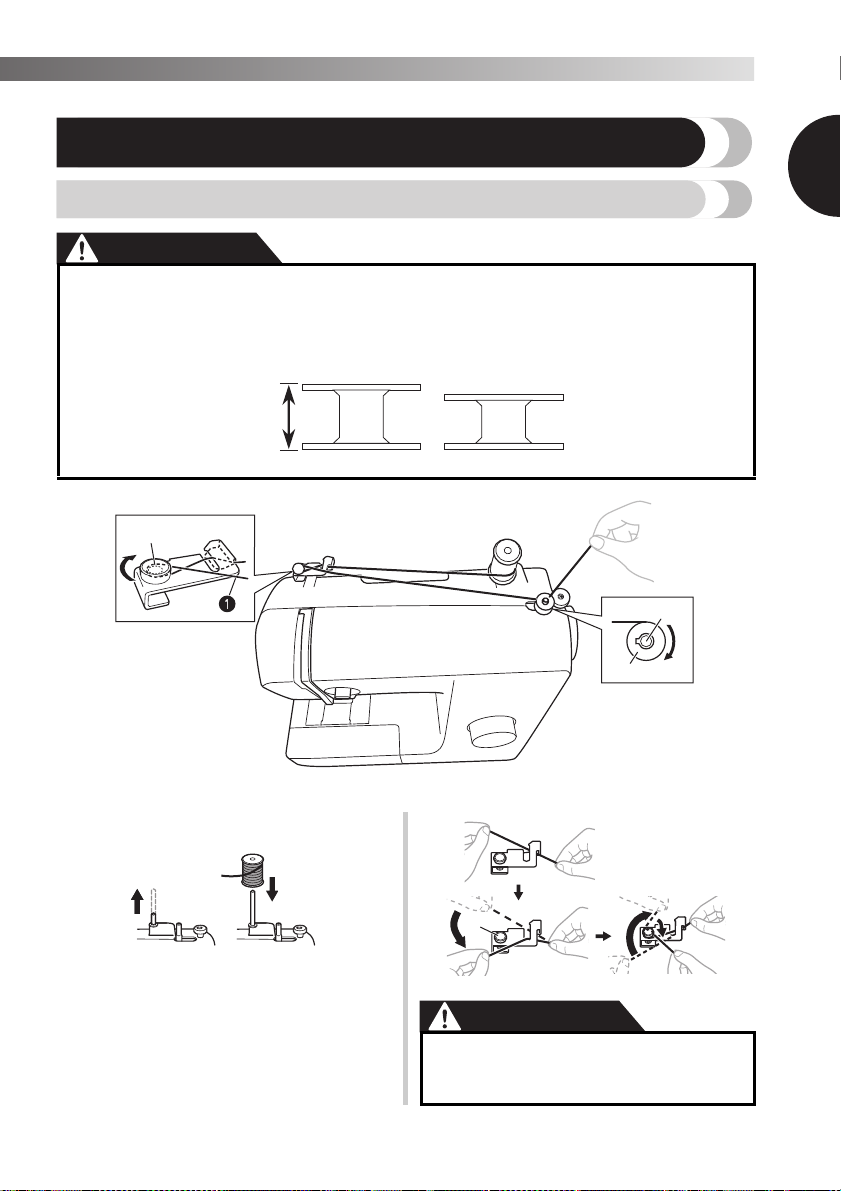
Winding the bobbin
CAUTION
1
Pull up the spool pin and put a spool of
thread on this pin.
2
While holding the thread from the spool
with your right hand, pass the thread
toward you, in the groove on the thread
guide. Then, pass the thread around the
pre-tension disk and pull the thread in
completely.
1 Pre-tension disk
CAUTION
● We designed the bobbin that comes with this machine. If you use bobbins from other models,
the machine will not work properly. Only use the bobbin that comes with this machine or
bobbins of the same type (part code: SA156, SFB: XA5539-151). Using other bobbins may
cause damage to the machine.
Actual size
11.5 mm
(7/16 inch)
This model Other models
1 Pre-tension disk 2 Bobbin winder shaft 3 Bobbin
1
3
2
1 Pull the thread
in completely.
● If the spool of thread is in the wrong
place, or is set incorrectly, the thread
may tangle on the spool pin.
1
KNOWING YOUR SEWING MACHINE ————————————————————————————————————————————————————————————————————————————————————————————————————————————————————————————————
—
————————————————————————————————————————————————
—————
13
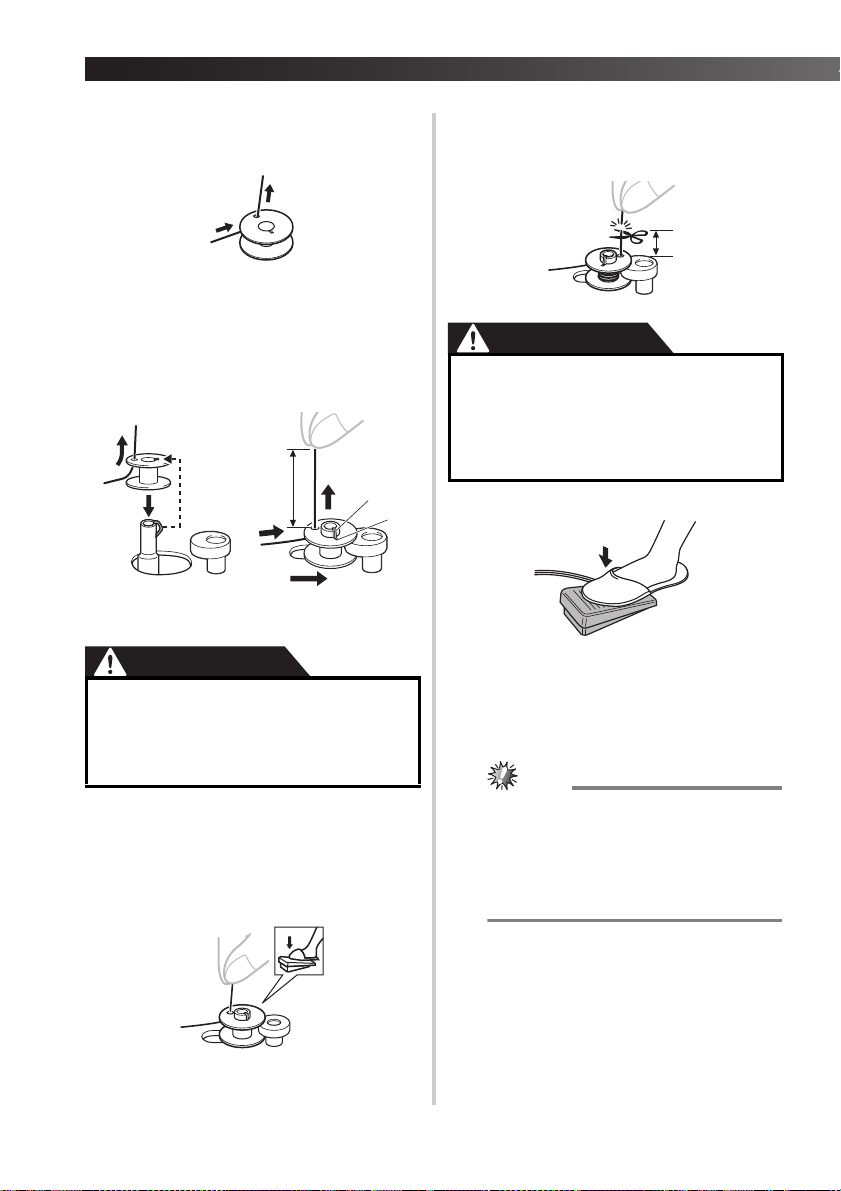
3
Pass the end of the thread through the
hole on the bobbin from the inside of the
bobbin.
4
Put the bobbin onto the bobbin winder
shaft and slide the bobbin winder shaft to
the right. Turn the bobbin clockwise, by
hand, until the spring on the shaft slides
into the notch of the bobbin.
• Make sure to pull out 7 to 10 cm (3-4 inches)
of thread from the hole on the bobbin.
1 Spring on the shaft
2 Notch
3 7-10 cm (3 – 4 inches)
CAUTION
5
Turn on the machine.
6
While holding the end of the thread,
gently press the foot controller to wind
the thread around the bobbin a few times.
Then stop the machine.
7
Trim the excess thread above the bobbin.
• Leave 1 cm (1/2 inch) of thread from the hole
on the bobbin.
1 1 cm (1/2 inch)
CAUTION
8
Press the foot controller to start.
9
When the bobbin seems full and begins
spinning slowly, take your foot off the foot
controller.
0
Cut the thread, slide the bobbin winder
shaft to the left and remove the bobbin.
Note
● When the sewing machine is started or the
handwheel is turned after winding the
thread around the bobbin, the machine will
make a clicking sound; this is not a
malfunction.
● The needle bar does not move when you
slide the bobbin winder shaft to the right.
● Pull the thread taut and hold the end of
the thread straight up. If the thread is too
short, not pulled taut or held at an angle,
injuries may occur when the thread is
wound around the bobbin.
3
1
2
● Make sure you follow the instructions
carefully. If you do not cut the excess
thread completely before winding the
bobbin, when the thread runs low it may
tangle around the bobbin and cause the
needle to break.
1
14
——————————————————————————————————————————————————————————————————————————
—
————————————————————————————————————————————————————————————————————————————————————————————————————————————————————————————————————————————————————————————————————————————————————————————————————
1
CAUTION
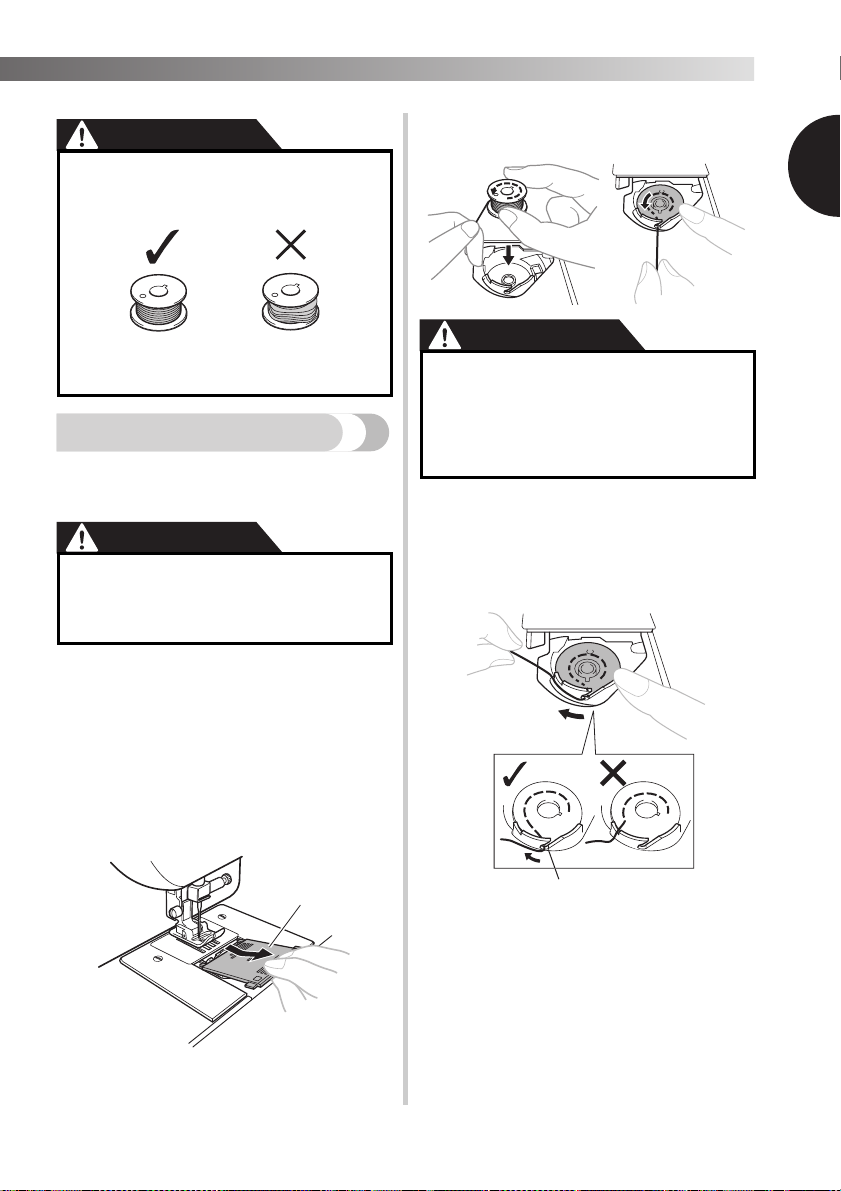
Lower threading
Install the bobbin wound with thread.
• For more details on using the quick-set
bobbin, see page 15.
CAUTION
1
Prepare the bobbin wound properly
before threading the lower thread.
• See page 12 for the details about bobbin
winding.
2
Raise the needle by turning the
handwheel toward you
(counterclockwise) and raise the presser
foot lever.
3
Remove the bobbin cover by sliding it and
lift toward you.
1 Bobbin cover
4
Put the bobbin in so the thread comes out
in the direction shown by the arrow.
CAUTION
5
Hold the end of the thread, push the
bobbin down with your finger, and then
pass the thread through the slit, as shown.
• If the thread is not correctly inserted through
the tension-adjusting spring of the bobbin
case, it may cause incorrect thread tension.
1 Tension-adjusting spring
● Not winding the bobbin properly may
cause the thread tension to loosen, and
may break the needle.
1 Wound evenly
2 Wound poorly
● Make sure you turn off the machine
while threading. If you accidentally step
on the foot controller and the machine
starts to sew, you could be injured.
1
2
1
● Make sure you set the bobbin so the
thread unrolls in the right direction. If
the thread unrolls in the wrong
direction, it may cause the thread
tension to be incorrect or break the
needle.
1
 Loading...