


Breville is a registered trademark of Breville Pty. Ltd.
ABN 98 000 092 928
Breville Customer Service Centre
Australian Customers
Breville Customer Service Centre Locked Bag 2000
Botany NSW 2019 AUSTRALIA
Customer Service: 1300 139 798
Fax (02) 9384 9601
Email Customer Service askus@breville.com.au
New Zealand Customers
Breville Customer Service Centre Private Bag 94411
Greenmount
AUCKLAND, NEW ZEALAND
Customer Service: 09 271 3980
Fax 0800 288 513
Email Customer Service askus@breville.com.au
www.breville.com.au
|
|
|
© Copyright. Breville Pty. Ltd. 2003 |
PRINTED ON |
|
|
|
||
|
|
|
|
|
|
|
|
|
RECYCLED PAPER |
|
|
|
Due to continual improvements in design or otherwise, |
Model ESP2 |
|
|
|
the product you purchase may differ slightly from |
|
|
|
|
the one illustrated in this booklet. |
Issue 1/01 |
|
|
|
Espresso/Cappuccino Maker
INSTRUCTIONS FOR USE
MODEL ESP2

CONTENTS |
|
|
Page |
Breville recommends safety first ............................................................................................ |
2 |
Know your Breville Espresso/Cappuccino maker................................................................... |
3 |
Operating your Breville Espresso/Cappuccino maker ............................................................ |
4 |
Coffee making tips ............................................................................................................... |
8 |
Care and cleaning ................................................................................................................. |
8 |
Trouble shooting chart......................................................................................................... |
10 |
Drinks to try......................................................................................................................... |
11 |
BREVILLE RECOMMENDS SAFETY FIRST
Congratulations on your purchase of a new Breville Espresso/Cappuccino maker. We at Breville are very safety conscious. We
design and manufacture consumer products with the safety of you, our valued customer foremost in mind. In addition, we ask that you exercise a degree of care when using any electrical appliance and adhere to the following precautions.
READ THESE INSTRUCTIONS BEFORE OPERATING AND SAVE FOR FUTURE REFERENCE.
•This appliance is for household use only.
•Do not use this appliance for other than its intended use. Do not use outdoors.
•The appliance is not intended for use by young children or infirm persons without supervision.
•Young children should be supervised to ensure that they do not play with the appliance.
•Do not leave the appliance unattended when in use.
•Do not touch hot surfaces. Use handles.
•Always use the appliance on a dry, level surface.
•Do not place this appliance on or near a hot gas or electric burner, or where it could touch a heated oven.
•Do not let the cord hang over the edge of a table or counter, touch hot surfaces or become knotted.
•Do not immerse cord, plug or base in water or any other liquid.
•Always switch the appliance to “OFF”, switch the power off at the power outlet and then remove the plug when the appliance is not being used and before cleaning.
•Before use fully unwind power cord.
•If supply cord, plug or actual appliance becomes damaged in any way, return the entire appliance to the nearest authorised Breville Service Centre for examination, replacement or repair.
•Any maintenance other than cleaning should be performed at an authorised Breville Service Centre.
SPECIAL SAFETY INSTRUCTIONS
•Only use cold water in the water tank. Do not use any other liquid.
•Never use the machine without water in it.
•Ensure the water tank cap and filter holder is firmly secured when using the machine.
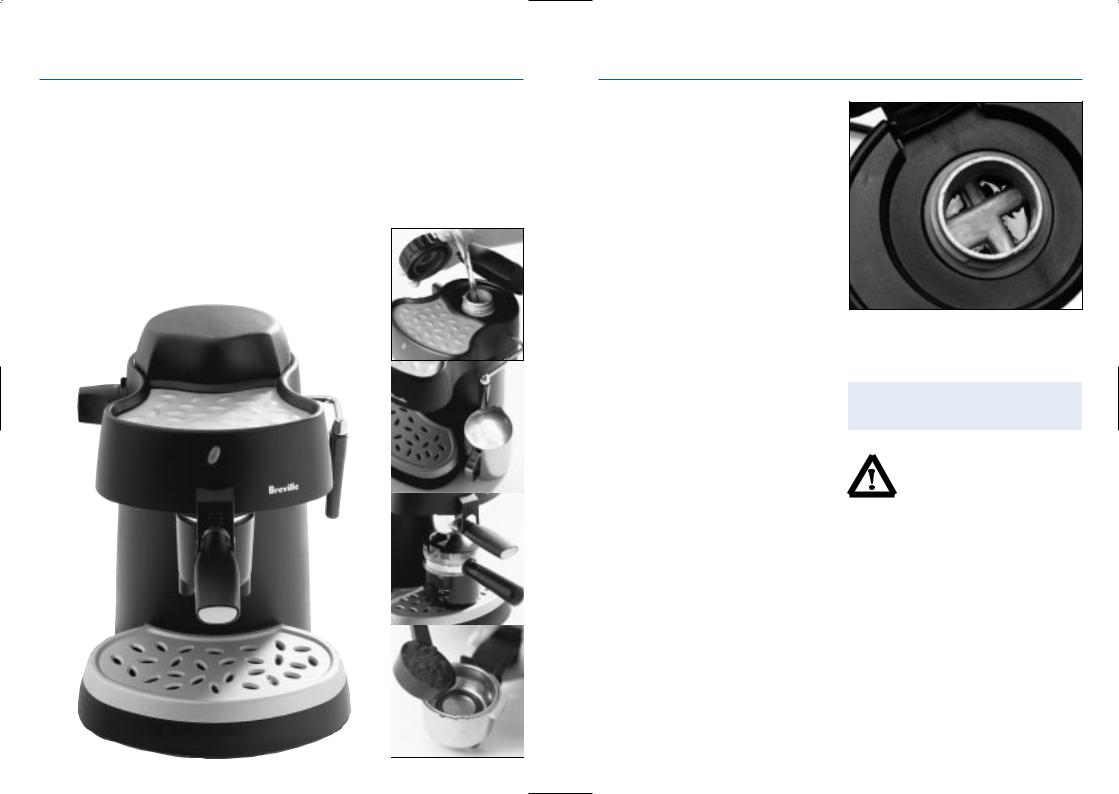
•Always ensure the water tank cap is clean around the seal & the centre valve area (never use if the seal is damaged or faulty).
•As part of regular maintenance, it is recommended that this unit be taken into a service centre near you for checking of the “pressure relief valve” once every two years.
TO AVOID POSSIBLE BURNS FROM HOT STEAM AND WATER, NEVER OPEN THE WATER TANK CAP WHILE THERE IS PRESSURE IN THE  WATER TANK. REMOVE ALL PRESSURE FIRST.
To remove all pressure, proceed as follows:
1.Switch “OFF” at the power outlet.
2.Place frothing jug under steam wand.
3.Set control to “STEAM” position and allow steam to escape.
4.Set control to “BREW” position to ensure pressure is released, then back to the “OFF” position.
5.Wait for pressure indicator to drop down before removing cap.
Pressure indicator down
6. The pressure is now removed.
1 |
2 |
KNOW YOUR BREVILLE ESPRESSO/CAPPUCCINO MAKER
1.3.5 bar steam pressure system
2.Water tank hinged cover
3.Water tank cap
4.Cup warming plate
5.3 position Brew/Steam selector control
6.Power ‘on’ light
7.Filter holder and 2 stainless steel filters
(1-2 cup filter and 2-4 cup filter)
8.Twin cup nozzle adaptor for brewing directly into 2 cups
9.4 cup glass carafe for brewing up to 4 cups of coffee
2.
5.
4.
6.
10.Steam nozzle with removable cappuccino froth enhancer
11.Stainless steel milk frothing jug
12.Removable drip tray
13.Bonus espresso cup set (not shown)
14.Coffee measuring spoon
3.
10. |
11.. |
|
1.
8.
9.
14.
12.
7.
OPERATING YOUR BREVILLE ESPRESSO/CAPPUCCINO MAKER
BEFORE USING YOUR
ESPRESSO/CAPPUCCINO MAKER
Wash the filter holder, stainless filters, glass carafe, twin nozzle adaptor and frothing jug in mild detergent and water. Rinse thoroughly.
It is recommended to carry out a complete brewing operation with cold water but without any coffee before making your first espresso or cappuccino (see ‘Brewing Coffee’). By doing so, any residual dust left inside the Espresso/Cappuccino maker will
be removed.
Fig 1
Pre-warming cups
For optimal coffee temperature, use the cup warming plate on top of the machine to prewarm the cups. When using the glass carafe, place your cups onto the warming plate, which will heat up as the coffee is being brewed into the carafe.
HOW TO MAKE AN ESPRESSO
Filling the water tank
•Turn off at the power outlet and unplug the power cord.
•Ensure the Brew/Steam selector control is in the “OFF” position.
•Unscrew the water tank cap and pour cold water into the tank using the carafe provided. Fill to 5mm below the visible water pipes (fig 1). Do not fill to the top of the tank or there will not be enough area to generate steam.
•Screw the water tank cap back on top of the water tank, making sure it is secured firmly before operating the machine.
Never use warm or hot NOTE! water to fill the water tank.
DO NOT POUR WATER INTO
THE WATER TANK WHILE THE
SELECTOR CONTROL IS IN
THE BREW OR STEAM
POSITION.
3 |
4 |
 Loading...