


Aqua Fountain
Instructions for Use
PLEASE RETAIN THESE INSTRUCTIONS FOR FUTURE REFERENCE.
These instructions refer to the Breville Water Filter/Chillers AF5 and AF6

INTRODUCTION
Congratulations on the purchase of your Breville BRITA Aqua Fountain chiller. In the unlikely event of experiencing any difficulties, call:
BRITA Customer Careline: 0844 7424800 for expert advice
(Monday - Friday 8.30am - 5.30pm. Local rates apply)
Also remember to REGISTER your chiller online or by the enclosed card
www.brita.co.uk
QUICKSET-UPGUIDE
Detailed instructions are included but for a quick set up, follow these key tips:
1Before use, make sure water tanks are thoroughly washed and that water is flushed through the entire chiller system (the removable bottom plug will aid this). See page 4 for full instructions.
2For optimum taste and filtration speed, ensure your BRITA Maxtra cartridge is properly prepared before insertion into the top water tank. See page 5 for full instructions.
3When positioning the Aqua Fountain ensure it has a minimum of 15cm clearance for the ventillation slots at the back for efficient air circulation and maximum water cooling performance. See page 4 for full instructions.
4Use a jug to fill the tanks with cold water and take care not to spill down the tank sides or fill beyond the MAX FILL LEVEL. Add the water until all tanks are full.
To prevent air locks in the internal chilled water tank, depress the dispense lever until the water flows out. See page 6 for full instructions.
5Keep your Aqua Fountain out of direct sunlight and away from any heat sources.
See page 6 for full instructions.
6Cooling time will vary depending on your ambient and water temperature. See page 6 for full instructions.
2
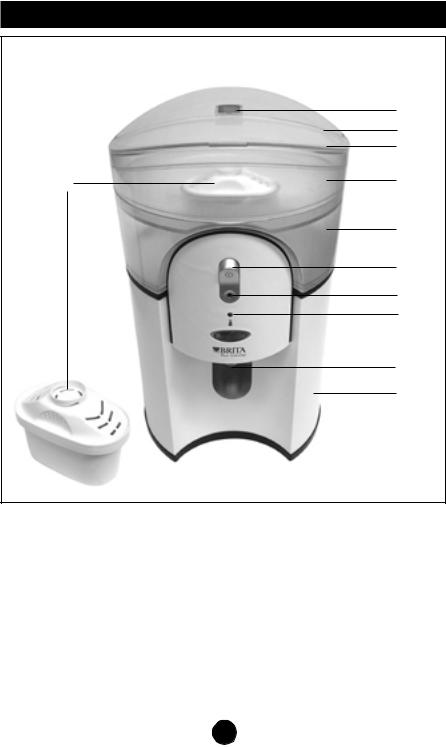
FEATURES
Fig 1
q
w e
s |
r |
t
y
u i
o a
1. |
BRITA Memo - cartridge exchange |
6. |
ON/OFF switch |
|
|
indicator |
7. |
Red power on indicator |
|
2. |
Upper water tank cover |
|||
8. |
Chilled water indicator |
|||
3. |
Hinged lid |
|||
9. |
Water dispenser lever |
|||
4. |
1 litre upper water tank |
|||
10. |
1 litre chilled filtered water tank |
|||
5. |
2 litre filtered water tank |
|||
11. BRITA MAXTRA water filter |
||||
|
|
|||
3
BEFOREUSINGYOURWATERFILTER/CHILLER
Before using your water filter/chiller for the first time, it is recommended that the unit is flushed through with fresh water. Please ensure that you read the following instructions before flushing your water filter/chiller several times.
1.Remove your water filter/chiller carefully from the box. You may wish to store the packaging for future use.
2.Check the contents:
•Water filter/chiller
•BRITA MAXTRA water filter cartridge
•User guide
•BRITA brochure
•BRITA registration card
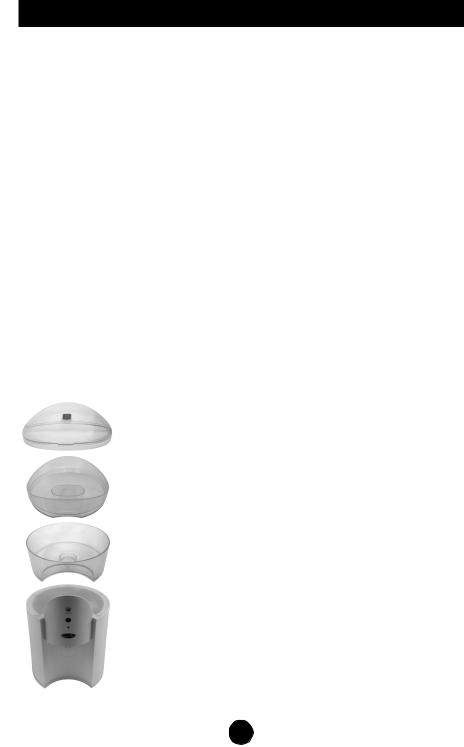
3.Wash the clear plastic lid, upper and filtered water tanks in warm soapy water, rinse and dry thoroughly.
4.Reassemble the tanks as shown below.
Upper water tank cover
Upper water tank
Filtered water tank
5.Position the water filter/chiller on a stable flat surface, close to a mains power socket, not in direct sunlight and out of the reach of children.
6.Make sure that there is sufficient space around the water filter/chiller to allow the heat extracted during the chilling process to dissipate. Leave a gap of at least 15 cm between the ventilation slots on the rear of the chiller and any wall or surface.
Do not plug the unit in or install the filter cartridge yet.
7.Lift the hinged lid and using a suitable jug, pour 2 litres of clean water into the tank. Place a glass under the dispenser and push the dispensing lever back to drain all of the water. It may take some time for the water to initially flow through.
8.Repeat this process one more time.
Chilled and filtered water tank
4
PREPARINGTHEFILTERCARTRIDGE
1.Remove the cartridge from its wrapping (it is normal for the cartridge to appear moist during storage - this is simply condensation).
2.Immerse the cartridge in cold water and agitate gently to remove any air bubbles.
NOTE
There is no need to pre-soak this cartridge before use.
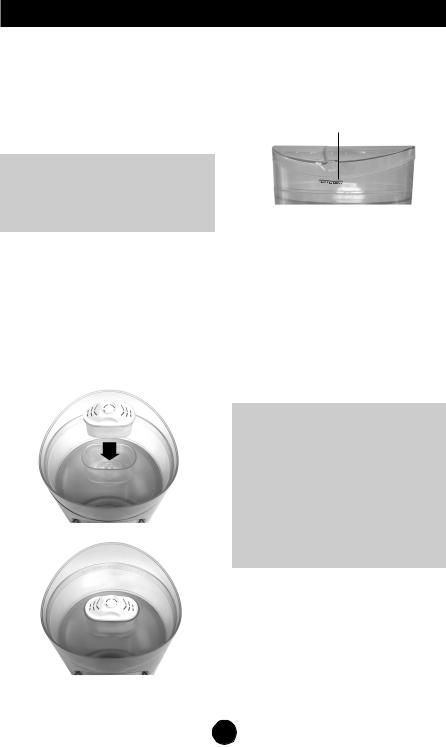
3.Remove the lid from the upper water tank.
4.Insert the filter cartridge into the water tank as shown below. Push it firmly into place. When correctly fitted, the cartridge should remain in place when the tank is turned upside down.
1.Place the upper tank on a suitable bowl or jug. Fill with cold tap water up to the MAX FILL LEVEL mark on the upper water tank and allow the water to filter through.
Maximum fill level mark
Discard the first two fillings. These first two fillings are used to flush the filter cartridge. Place the upper tank back into the unit.
2.Replace the upper water tank lid.
3.Press and hold the START button on the BRITA Memo on the lid until all of the bars on the display appear and flash twice, see “Using the Memo function” on page 8.
NOTE
When it is time to replace the cartridge after 4 weeks use, simply lift the ring pull handle on top of the cartridge to remove. The cartridge may be disposed of in household waste or contact the BRITA-Care customer service for advice on recycling schemes.
5
USINGYOURWATERFILTER/CHILLER
1.Lift the hinged lid and using a suitable jug, carefully pour water into the tank up to the MAX FILL LEVEL. This may take some time due to the action of the filter.
2.Keep adding water until all the tanks are full. Water flows through the cartridge at a set rate. This is to achieve the best possible filtration. Because of this it may take some time to fill all the tanks on first use. During normal use top up the tanks regularly.
NOTE
After filling, it is important to vent any air in the unit otherwise the chiller will not function correctly. Do this by pressing the dispensing lever until the water flows from the dispenser without any air bubbles present. Once the water is clear of any air bubbles, the dispensing lever may be released. Top up the water tank if necessary.
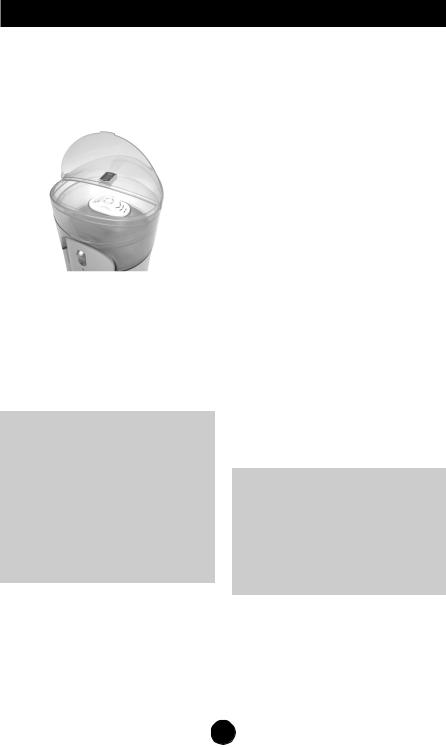
3. Close the hinged lid.
4.Plug the unit into the mains supply. Press the chiller ON/OFF switch on the front of the unit. The switch will illuminate and the machine will begin to chill the water.
5.Dispense 2 litres of water from the unit to remove any unfiltered water from the unit that was used to prepare the chiller as instructed on page 4.
6.Within approximately 3 hours the blue indicator on the front of the unit will light indicating that the water has chilled to approximately 10OC, although this may take longer in very hot weather. The indicator will cycle on and off as the unit maintains its temperature, but the unit will continue to chill the water down to 8OC then stop. If the water temperature rises above 8OC the unit will start to chill again.
We recommend that the water chiller be kept out of direct sunlight and away from any heat source.
7.Place a glass under the dispenser and push the lever back to dispense water.
NOTE
It is normal for the indicator to go off when water is drawn. Water inside the unit will remain chilled but the indicator will not come on again until the optimum temperature has been reached.
8. Top up the water tank as necessary.
6
 Loading...