Bradford White RE2H50S10, RE2H65T10, RE2H80T10 User Manual

Attention Installer
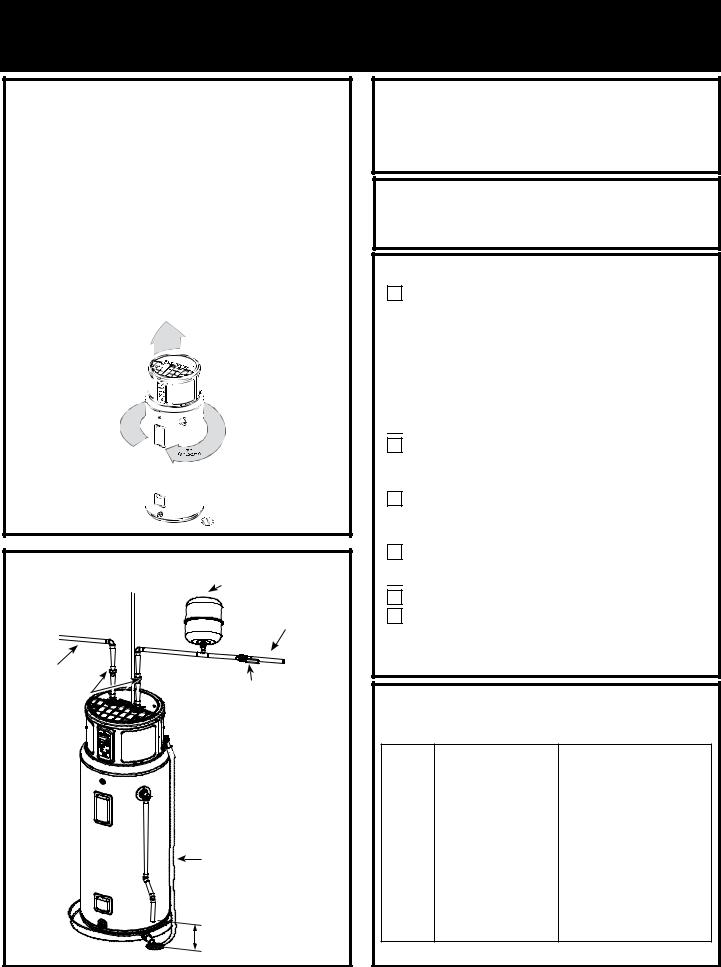
Required clearances:
There must be a 7” (17.8 cm) clearance between any object and the rear and sides of the water heater in the event service is needed. A minimum 8“ (20.3cm) clearance above the
water heater to remove the filter for cleaning and for service access, and clear access to the front of the water heater, is recommended. Installations that require 6” clearance on the sides or rear of the water heater for earthquake straps are also acceptable. In these cases, additional clearance must be provided on the opposite side of the unit to allow for service access. The hot and cold water plumbing and electrical connections must not interfere with the removal of the filter.
If a separate ducting kit is purchased, additional space is required above and to the rear of the water heater for installation. Consult the ducting kit manual for specific instructions.
8” (20.3cm)
|
Model appearance may vary. |
|
Typical installation |
Thermal |
|
To Electrical Junction |
||
Box (use only copper |
expansion tank |
|
conductors) |
|
|
|
To cold |
|
|
water supply |
|
Hot water |
|
|
outlet to |
Shut-off valve |
|
fixtures Union |
||
|
(suggested)

 3/4” FNPT fitting to
Condensate Drain Pan

 Temperature &
Pressure Relief Valve
Condensate Drain
Tube
Relief Valve discharge
6” (15.2 cm) minimum from the floor
Room size:
Because this unit draws in air from the room to heat the water, the room must be at least 10’ x 10’ x 7’ (700ft³) [3.05m x 3.05m x 2.13m (19.82m³)] or larger. If the room is smaller there must be a louvered door or a ducting kit installed.
Protect Unit:
During installation cover and protect upper part of the unit from potential installation debris.
Installation Checklist:
1. Tank location:
–Does room size require louvered door, ducting, or similar ventilation? 10’ x 10’ x 7’ (700 cu. ft.) or 240 square inches (0.15 m2) open air-flow area needed.
–Back of unit away from wall by 7 inches (17.5 cm), and sides have at least 7 inches (17.5 cm) clearance. (6 inches clearance for earthquake strap installations).
–Front of unit is free and clear.
–Is the water heater level? If no, add shims under the
base of the unit to ensure proper function of sensors.

 2. Verify Air Filter is installed. (Located in packaging).
3.Plumbing connections:
–Does not prevent air filter removal.
–No leaks after filling the tank with water, either when water is flowing or not.
4.Condensate lines are in place:
–Main flexible or rigid drain line installed and directed to a drain or condensate pump. Reducer fittings are not recommended.
5. Temperature and pressure-relief valve is working and drain line completed per local code.

 6. Electrical: Verify 208/240 VAC to L1 and L2 at tank.
7. Electrical connection does not prevent air filter removal.
8.Verify control panel displays 120°F (49°C) Hybrid mode. Assist user in how to adjust temperature and modes
(see “About the Water Temperature Setting” section on page 7 of the Owner’s Manual).
Normal Startup Conditions:
Once the tank is full and power is energized, you may experience the following:
Elapsed |
HEWH Actions |
Comments |
Time |
|
|
0 to 2 |
Unitwill gothrough |
This 2-minute off-time prevents |
minutes |
self-check and display |
compressordamage. |
|
countdown. |
|
2 to 22 |
Compressor and fan |
This 20-minute period is used to |
minutes |
turn on. |
ensure the tank is full of water |
|
|
(Dry-firepreventionalgorithm). |
22 |
Compressor and fan turn |
The water heater is operat- |
minutes |
off,heating elementsturn |
ing in Hybrid mode, quickly |
and |
on. After initial heat-up, |
providing an initial amountof |
beyond |
elements turn off and |
hot water before switching to |
|
compressor turns on. |
the efficient heat pump for the |
|
|
majority of heating. |
NOTE: Heat Pump operating range is 35°F - 120°F (2°C-49°C).
238-52325-00 02/18
Printed in USA
 Loading...