


SoundWare XL
High Performance Indoor / Outdoor Speaker
For great sound anywhere
Español
Excelente sonido en cualquier lugar
Parlante para interiores/ exteriores
Francais
Un son sublime à tout endroit Haut-parleur d’intérieur/ extérieur
Italiano |
Deutsch |
Per un suono fantastico |
Überall großartiger Sound |
ovunque |
Hochleistungslautsprecher |
Altoparlante dalle eccellenti |
für den Einsatz drinnen und |
prestazioni da interni / |
draußen |
all’aperto |
|
Svenska |
|
För toppenljud överallt |
|
Högpresterande inomhus/ |
|
utomhushögtalare |
|
E n
Owner’sg
l i
Manuals
h
Information Compliance / Instructions Safety /
|
|
|
|
|
|
142-003539-0_SoundWare_XL_Manual.indd 1 |
|
|
9/9/08 5:56:26 PM |
|
|
|
|
|
|||
|
|
|
|
|
|
|
|
|
|
|
|
|
|
|
|
|
|
|
|
|
|
|
|
|
|
|
|
|
|
|
|
|
|
|
|
|
|
|
|
|
|
|
|
|
|
|
|
|
|
|
|
|
|
|
|
|
|
|
|
|
|
|
|
|
|
|
|
|
|
|
|
|
|
|
|
|
|
|
|
|
|
|
|
|
|
|
|
|
|
|
|
|
|
|
|
|
|
|
|
|
|
|
|
|
|
|
|
|
|
|
|
|
|
|
E |
|
|
|
|
|
|
|
|
|
|
|
|
|
|
|
|
|
|
|
|
|
|
|
|
|
|
|
|
|
|
|
|
|
|
|
|
|
|
|
|
|
|
|
|
|
|
|
|
|
|
|
|
|
|
|
|
|
|
||
|
|
|
|
|
|
|
n |
|
|
|
|
|
|
|
|
|
|
|
|
|
|
|
|
|
|
|
|
|
|
|
|
|
|
|
|
|
|
|
|
|
g |
|
Description |
|
|
|
|
|
|
|
|
|
|
|
|
|
|
|
|||||||||
|
|
|
|
|
|
|
l |
|
The Boston Acoustics® SoundWare XL is truly a go everywhere, do everything speaker. All of its parts |
||||||||||||||||||||||||
|
|
|
|
|
|
|
i |
|
|||||||||||||||||||||||||
|
|
|
|
|
|
|
|
are weather resistant so they’re at home indoors and out, in situations from outdoor entertainment to |
|||||||||||||||||||||||||
|
|
|
|
|
|
|
s |
|
|||||||||||||||||||||||||
|
|
|
|
|
|
|
|
home theater systems. |
|
|
|
|
|
|
|
|
|
|
|
|
|
|
|
||||||||||
|
|
|
|
|
|
|
h |
|
|
|
|
|
|
|
|
|
|
|
|
|
|
|
|
||||||||||
|
|
|
|
|
|
|
|
|
|
|
|
|
|
|
|
|
|
|
|
|
|
|
|
|
|
|
|
|
|
|
|
||
|
|
|
|
|
|
|
|
|
|
The reasonable size and flexible mounting system of the SoundWare XL give you many options |
|||||||||||||||||||||||
|
|
|
|
|
|
|
|
|
|||||||||||||||||||||||||
|
|
|
|
|
|
|
|
|
|
for installation locations. You can just set them on a shelf or use the supplied brackets and mount |
|||||||||||||||||||||||
|
|
|
|
|
|
|
|
|
|
them in a corner or on a flat wall. The pivoting mounts let you tilt and swivel the speakers to suit |
|||||||||||||||||||||||
|
|
|
|
|
|
|
|
|
|
the installation. If one of the available colors doesn’t work in your décor, then SoundWare XL can be |
|||||||||||||||||||||||
|
|
|
|
|
|
|
|
|
|
painted in a matching or complementary color. |
|||||||||||||||||||||||
|
|
|
|
|
|
|
|
|
|
In addition the SoundWare XL has a built-in transformer that allows it to be used in conventional |
|||||||||||||||||||||||
|
|
|
|
|
|
|
|
|
|
audio systems or 100V/70V Constant Voltage systems. So they are well suited for multi-speaker |
|||||||||||||||||||||||
|
|
|
|
|
|
|
|
|
|
commercial installations. |
|
|
|
|
|
|
|
|
|
|
|
|
|
|
|
||||||||
|
|
|
|
|
|
|
|
|
|
Specifications |
|
|
|
|
|
|
|
|
|
|
|
|
|
|
|
||||||||
|
|
|
|
|
|
|
|
|
|
Frequency Response |
70Hz-25kHz (±3dB) |
||||||||||||||||||||||
|
|
|
|
|
|
|
|
|
|
Recommended Amp Power |
15 – 150 watts |
||||||||||||||||||||||
|
|
|
|
|
|
|
|
|
|
Nominal Impedance |
8 ohms |
||||||||||||||||||||||
|
|
|
|
|
|
|
|
|
|
Sensitivity |
86dB |
||||||||||||||||||||||
|
|
|
|
|
|
|
|
|
|
Woofer |
61⁄2” (165mm) Driver |
||||||||||||||||||||||
|
|
|
|
|
|
|
|
|
|
Tweeter |
1” (25mm) dome |
||||||||||||||||||||||
|
|
|
|
|
|
|
|
|
|
Crossover Frequency |
2kHz |
||||||||||||||||||||||
|
|
|
|
|
|
|
|
|
|||||||||||||||||||||||||
|
|
|
|
|
|
|
|
|
|
Net Weight |
8.4 lbs (3.9kg) |
||||||||||||||||||||||
|
|
|
|
|
|
|
|
|
|
Dimensions (H x W x D) |
77⁄8 x 77⁄8 x 89⁄16” (201 x 201 x 217mm) |
||||||||||||||||||||||
Placement Options
The SoundWare XL speaker can be wall mounted using the supplied hardware or simply placed on a shelf. If it is being placed on a shelf you can simply attach the adhesive-backed rubber feet and connect the speaker wires.
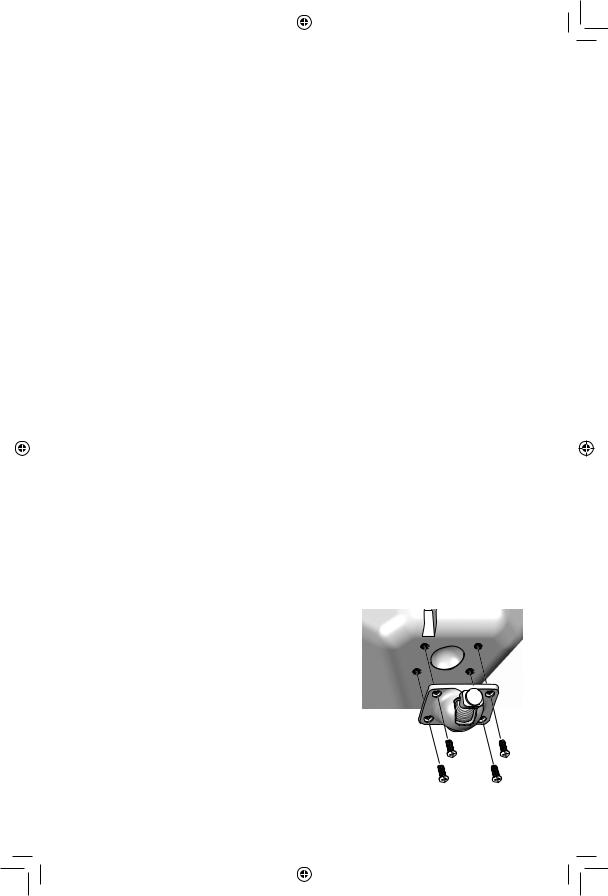
Attaching the Pivoting Ball Mount
If you plan to use the mounting brackets you must attach the pivoting ball mount to the speaker. Use the four supplied flat-head machine screws as shown in the illustration.
142-003539-0_SoundWare_XL_Manual.indd 2 |
|
|
9/9/08 5:56:27 PM |
|
|
Mounting the Wall Bracket
Brackets for mounting the speakers on a flat wall or in a corner are supplied. One thing that is not supplied is hardware to attach the bracket to the wall. Why? Because there are so many different kinds of surfaces on which the speakers could be mounted. It could be basic drywall which may or may not have a stud behind it. It could be a wood panel or even a concrete foundation wall. There is no one type of fastener that we could supply that would work in all the possible situations.
Taking into account the surface the speaker is being mounted on, acquire the appropriate type of fasteners. You’ll need four for each speaker. If you’re not sure what type of fastener to use, take the mounting bracket to a friendly hardware store. Tell them about the surface you’re mounting the speaker on and the weight of the speaker and ask them to recommend an appropriate fastener.
In some communities construction codes may require specific types of mounting hardware and methods. In addition, some communities require a secondary security support, such as a safety cable between the speaker and a structural element of the wall. The SoundWare XL has a metal bar molded into the top of the cabinet to serve as an attachment point for such a secondary support. Consult local construction codes to see if there are required mounting methods or secondary supports.
Boston Acoustics will not be held accountable for any damage caused by incorrect installation.
Speaker Wires
The type of speaker wire that should be used depends on whether the SoundWare XL is used in a conventional audio system or in a 100V/70V Constant Voltage commercial system.
Conventional Audio Systems
For short runs of less then 20 feet or so you can use 16 gauge wire. But typically you should use heavier 14 gauge wire. That is good enough for runs up to 50 feet or so. For runs of more than 50 feet use 12 gauge wire.
100V/70V Constant Voltage Systems
The electrical codes in your community may require the use of special wire that is appropriate for higher voltage applications and resistant to exposure. Such wire is often called “plenum rated” wire. Check with an electrical safety inspector in your area to see if such wiring is required.
One of the main advantages of 100V/70V Constant Voltage systems is that relatively light gauge wire can be used, even over long distances. In most installations 18 gauge wire will be more than enough. Only in very high power systems is anything heavier needed.
E n g l i s h
142-003539-0_SoundWare_XL_Manual.indd 3 |
|
|
9/9/08 5:56:27 PM |
|
|
|
|
|
|
|
|
|
|
|
|
|
|
|
|
|
|
|
|
|
|
|
|
|
|
|
|
|
|
|
|
|
|
|
|
|
|
|
|
|
|
|
|
|
|
|
|
|
|
|
|
|
|
|
|
|
|
|
|
|
|
|
|
|
|
|
|
|
|
|
|
|
|
|
|
|
|
|
|
|
|
|
|
|
|
|
|
|
|
|
|
|
|
|
|
|
|
|
|
|
|
|
|
|
|
|
E |
|
|
|
|
|
|
|
|
|
|
|
|
|
|
|
|
|
|
|
|
|
|
|
|
|
|
|
|
|
|
|
|
|
|
|
|
|
|
|
|
|
|
|
|
|
|
|
|
|
|
|
|
|
|
|
|
|
||
|
|
|
|
|
|
n |
|
|
|
|
|
|
|
|
|
|
|
|
|
|
|
|
|
|
|
|
|
|
|
|
|
|
|
|
|
|
|
|
g |
|
Speaker Connection Polarity |
||||||||||||||||||||||||
|
|
|
|
|
|
l |
|
All the speakers in a system must be hooked up with the same polarity or “in phase.”The terminals |
||||||||||||||||||||||||
|
|
|
|
|
|
i |
|
|||||||||||||||||||||||||
|
|
|
|
|
|
|
on the SoundWare XL speakers are color coded to identify the “+” (red) and “–” (black) connections. |
|||||||||||||||||||||||||
|
|
|
|
|
|
s |
|
|||||||||||||||||||||||||
|
|
|
|
|
|
|
All wire is marked in some way so you can tell one conductor from the other. The marking may be a |
|||||||||||||||||||||||||
|
|
|
|
|
|
h |
|
|||||||||||||||||||||||||
|
|
|
|
|
|
|
ridge molded into the insulation of one conductor, or it may have a stripe on the insulation, or it may |
|||||||||||||||||||||||||
|
|
|
|
|
|
|
|
|
||||||||||||||||||||||||
|
|
|
|
|
|
|
|
|
be color coded. Use the marking on the speaker wires to be sure that the “+” terminal of the amplifier |
|||||||||||||||||||||||
|
|
|
|
|
|
|
|
|||||||||||||||||||||||||
|
|
|
|
|
|
|
|
|
is connected to the “+” terminal of the speaker, and “–” is connected to “–”, at every connection. |
|||||||||||||||||||||||
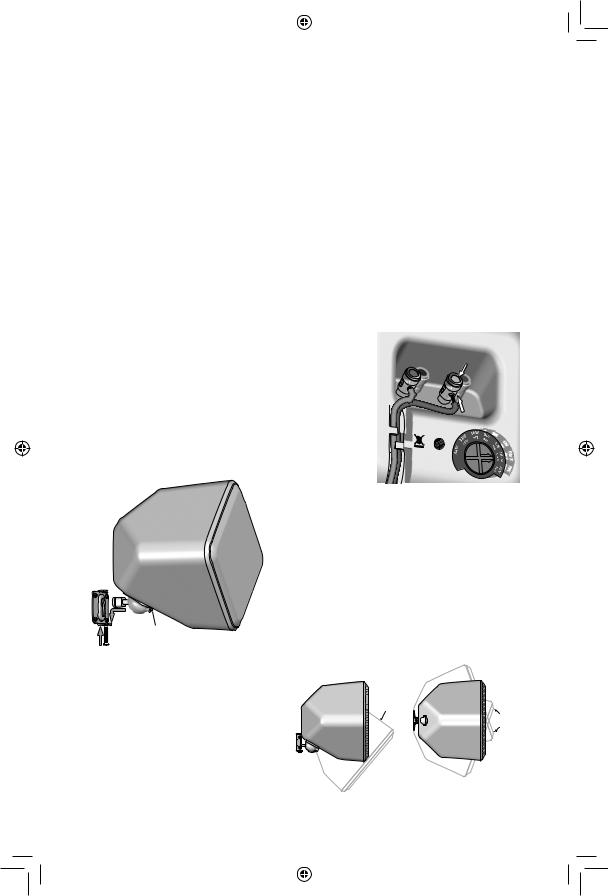
Connecting the Speakers
Before connecting the speakers:
1 Turn off all the system components.
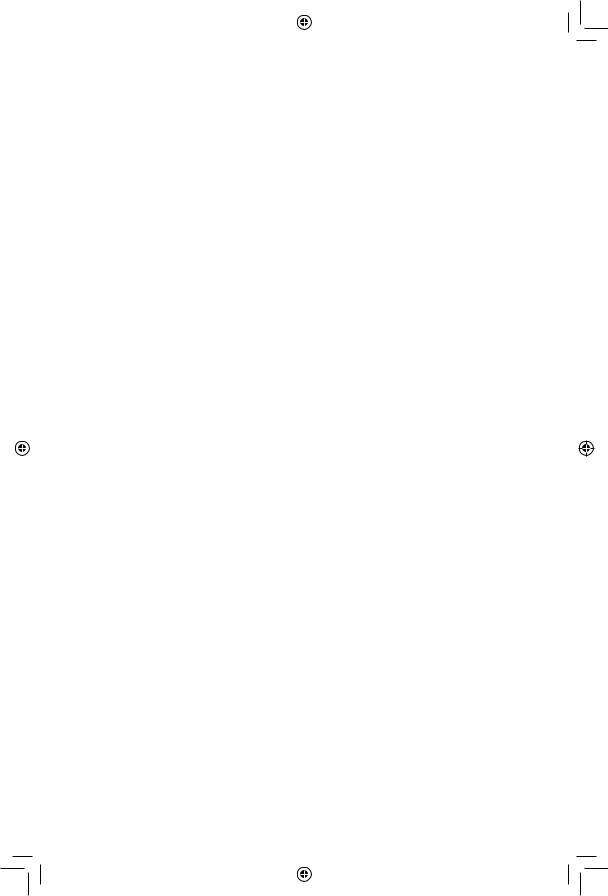
2 Set the transformer switch to the appropriate position. If the speaker is being connected to a conventional audio system, set the switch to the Dir X position. This overrides the transformer and sends the signal directly to the crossover. If the speaker is part of a 100V/70V Constant Voltage system, see the information on the following page.
Separate the two conductors of the wire. Remove about 3/8” of insulation from the end of the wire. Push down on the top of the terminal to open the hole for the wire. Insert the wire and release the terminal to secure it. Be sure there are no loose strands of wire. Tuck the wire into the channel in the back of the speaker to keep it neat and out of sight.
1 
2 |
Pivot Set |
Screw |
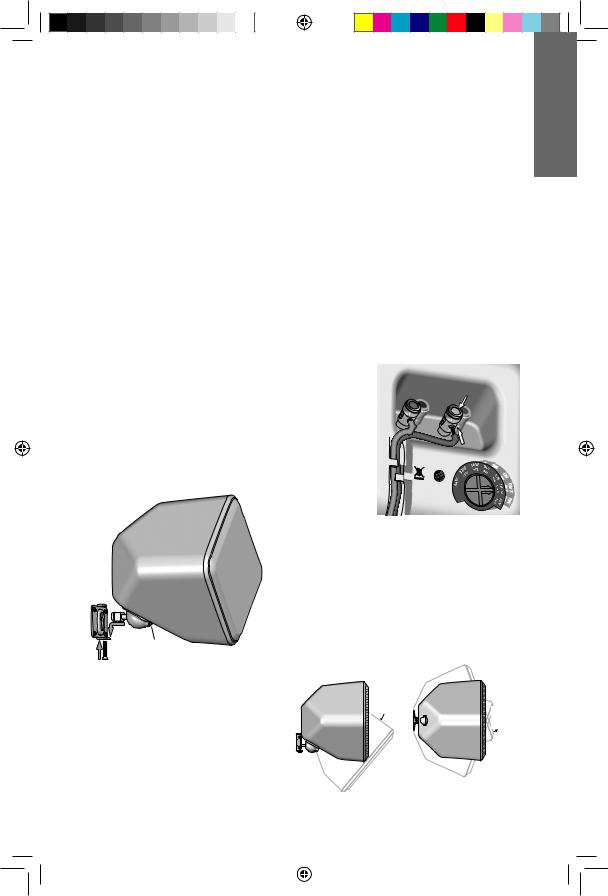
The SoundWare XL can pivot on its mount. Vertically it can go from facing straight out, to being tilted down 40 degrees. When the flat wall mounting bracket is used they can pivot side-to-side 20 degrees. (Note: Corner mounting will not allow the speaker to pivot side-to-side.) Loosen the pivot set screw, pivot the speaker into position and retighten the screw.
Mounting the Speakers
Once you have the bracket mounted and the speaker connected the rest is easy.
1Put the rounded end of the speaker mount in the bracket and slide it down to lock it in place.
2Optional – Insert and tighten the screw to secure everything.

 pivots
 down 40°
pivots 20° each way
142-003539-0_SoundWare_XL_Manual.indd 4 |
|
|
9/9/08 5:56:29 PM |
|
|

100V/70V Constant Voltage System Usage
The SoundWare XL is equipped with a 60 watt transformer for use in 100V/70V Constant Voltage applications.
70 Volt |
64W |
32W |
16W |
8W |
4W |
Direct 8 ohms |
100 Volt |
– |
16W |
8W |
4W |
2W |
Direct 8 ohms |
Adjust the tap switch on the rear of the speaker to the desired setting so it will be matched to the speaker wiring coming from the power amplifier. In conventional audio systems, set the tap switch to the Dir X position. This bypasses the transformer, sending the signal directly to the speaker crossover.
In 100V/70V Constant Voltage systems where multiple speakers are used, the speakers must be connected in parallel. Never use series connections in multi-speaker 100V/70V Constant Voltage systems.
E n g l i s h
 4 OHMS
 COM
COM
70V amplifier
This shows the “chain” type parallel speaker connection method. It is the simplest method and uses the least amount of wire. The “home run” method, where every speaker wire goes from a speaker directly to the amplifier, may also be used. However that method uses more wire and can be difficult to connect to the amplfier terminals if more than two pairs of speaker are being connected.
Note: 100V/70V Constant Voltage systems may be considered high voltage wiring by local building codes. It is the responsibility of the installer to insure that the proper wiring is used when doing the installation. Reference: National Electrical Code (NEC) Section 640.9.
142-003539-0_SoundWare_XL_Manual.indd 5 |
|
|
9/9/08 5:56:30 PM |
|
|
|
|
|
|
|
|
|
|
|
|
|
|
|
|
|
|
|
|
|
|
|
|
|
|
|
|
|
|
|
|
|
|
|
|
|
|
|
|
|
|
|
|
|
|
|
|
|
|
|
|
|
|
|
|
|
|
|
|
|
|
|
|
|
|
|
|
|
|
|
|
|
|
|
|
|
|
|
|
|
|
|
|
|
|
|
|
|
|
|
|
|
|
|
|
|
|
|
|
|
|
|
|
|
|
|
|
|
|
|
|
|
|
|
|
|
E |
|
|
|
|
|
|
|
|
|
|
|
|
|
|
|
|
|
|
|
|
|
|
|
|
|
|
|
|
|
|
|
|
|
|
|
|
|
|
|
|
|
|
|
|
|
|
|
|
|
|
|
|
|
|
|
|
|
|
|
|
|
|
||
|
|
|
|
|
|
|
n |
|
|
|
|
|
|
|
|
|
|
|
|
|
|
|
|
|
|
|
|
|
|
|
|
|
|
|
|
|
|
|
|
|
|
|
g |
|
Limited Warranty |
||||||||||||||||||||||||||
|
|
|
|
|
|
|
l |
|
Boston Acoustics warrants to the original purchaser of our SoundWare XL loudspeakers that they will |
||||||||||||||||||||||||||
|
|
|
|
|
|
|
i |
|
|||||||||||||||||||||||||||
|
|
|
|
|
|
|
|
be free of defects in materials and workmanship for a period of 5 years from the date of purchase. |
|||||||||||||||||||||||||||
|
|
|
|
|
|
|
s |
|
|||||||||||||||||||||||||||
|
|
|
|
|
|
|
|
|
|
|
|
|
|
|
|
|
|
|
|
|
|
|
|
|
|
|
|
|
|
|
|
|
|
||
|
|
|
|
|
|
|
h |
|
Your responsibilities are to install and use them according to the instructions supplied, to provide safe |
||||||||||||||||||||||||||
|
|
|
|
|
|
|
|
|
|
||||||||||||||||||||||||||
|
|
|
|
|
|
|
|
|
|
and secure transportation to an authorized Boston Acoustics service representative, and to present |
|||||||||||||||||||||||||
|
|
|
|
|
|
|
|
|
|||||||||||||||||||||||||||
|
|
|
|
|
|
|
|
|
|
proof of purchase in the form of your sales slip when requesting service. |
|||||||||||||||||||||||||
|
|
|
|
|
|
|
|
|
|
Excluded from this warranty is damage that results from abuse, misuse, improper installation, |
|||||||||||||||||||||||||
|
|
|
|
|
|
|
|
|
|
accidents, shipping, or repairs/modifications by anyone other than an authorized Boston Acoustics |
|||||||||||||||||||||||||
|
|
|
|
|
|
|
|
|
|
service representative. |
|||||||||||||||||||||||||
|
|
|
|
|
|
|
|
|
|
This warranty is limited to the Boston Acoustics product and does not cover damage to any |
|||||||||||||||||||||||||
|
|
|
|
|
|
|
|
|
|
associated equipment. This warranty does not cover the cost of removal or reinstallation. This |
|||||||||||||||||||||||||
|
|
|
|
|
|
|
|
|
|
warranty is void if the serial number has been removed or defaced. This warranty gives you specific |
|||||||||||||||||||||||||
|
|
|
|
|
|
|
|
|
|
legal rights, and you may also have other rights which vary from state to state. |
|||||||||||||||||||||||||
|
|
|
|
|
|
|
|
|
|
If Service Seems Necessary |
|||||||||||||||||||||||||
|
|
|
|
|
|
|
|
|
|
First, contact the dealer from whom you purchased the product. If that is not possible, write to: |
|||||||||||||||||||||||||
|
|
|
|
|
|
|
|
|
|
|
|
|
Boston Acoustics, Inc. |
||||||||||||||||||||||
|
|
|
|
|
|
|
|
|
|
|
|
|
D & M Holdings |
||||||||||||||||||||||
|
|
|
|
|
|
|
|
|
|
|
|
|
100 Corporate Drive |
||||||||||||||||||||||
|
|
|
|
|
|
|
|
|
|
|
|
|
|||||||||||||||||||||||
|
|
|
|
|
|
|
|
|
|
|
|
|
Mahwah, NJ 07430 USA |
||||||||||||||||||||||
|
|
|
|
|
|
|
|
|
|
Or contact us via e-mail at: |
|||||||||||||||||||||||||
|
|
|
|
|
|
|
|
|
|
US: |
|
support@bostona.com |
|||||||||||||||||||||||
|
|
|
|
|
|
|
|
|
|
Japan: |
|
ba_info@dm-holdings.com |
|||||||||||||||||||||||
|
|
|
|
|
|
|
|
|
|
Asia Pacific: service@dm-singapore.com |
|||||||||||||||||||||||||
|
|
|
|
|
|
|
|
|
|
We will promptly advise you of what action to take. If it is necessary to return your SoundWare XL |
|||||||||||||||||||||||||
|
|
|
|
|
|
|
|
|
|
speaker to the factory, please ship it prepaid. After it has been repaired, we will return it freight |
|||||||||||||||||||||||||
|
|
|
|
|
|
|
|
|
|
prepaid in the United States and Canada. |
|||||||||||||||||||||||||
|
|
|
|
|
|
|
|
|
|
|
|
|
|
|
For EU Countries Only |
||||||||||||||||||||
|
|
|
|
|
|
|
|
|
|
|
|
|
|
|
This symbol found on the product indicates that the product must not be disposed of with |
||||||||||||||||||||
|
|
|
|
|
|
|
|
|
|
|
|
|
|
|
household waste. Instead, it may be placed in a separate collection facility for electronic waste |
||||||||||||||||||||
|
|
|
|
|
|
|
|
|
|
|
|
|
|
||||||||||||||||||||||
|
|
|
|
|
|
|
|
|
|
|
|
|
|
|
or returned to a retailer when purchasing similar product. The producer paid to recycle this |
||||||||||||||||||||
|
|
|
|
|
|
|
|
|
|
|
|
|
|
|
product. Doing this contributes to reuse and recycling, minimizes adverse effects on the |
||||||||||||||||||||
|
|
|
|
|
|
|
|
|
|
|
|
|
|
||||||||||||||||||||||
|
|
|
|
|
|
|
|
|
|
|
|
|
|
||||||||||||||||||||||
|
|
|
|
|
|
|
|
|
|
|
|
|
|
|
environment and human health and avoids any fines for incorrect disposal. |
||||||||||||||||||||
142-003539-0_SoundWare_XL_Manual.indd 6 |
|
|
9/9/08 5:56:30 PM |
|
|

Descripción
SoundWare XL de Boston Acoustics® es verdaderamente un parlante para llevar a cualquier lugar, para lo que necesite. Todas sus partes son impermeables y de ese modo cumplen su cometido en interiores y exteriores y funcionan en sistemas que incluyen desde entretenimiento al aire libre hasta cine en casa.
El tamaño razonable y el sistema de montaje flexible de SoundWare XL le brindan muchas opciones a la hora de elegir el lugar de instalación. Puede simplemente armarlos sobre un estante o usar los soportes suministrados y montarlos en un rincón o en una pared plana. Los soportes giratorios le permiten inclinar y bascular los parlantes para adaptarlos a las necesidades de la instalación. Si uno de los colores disponibles no se adapta a su decorado, puede pintar SoundWare XL en un color que combine o complementario.
Además, SoundWare XL tiene un transformador incorporado que le permite usarlo en sistemas de audio convencionales o en sistemas de voltaje constante de 100V/70V. Se adaptan muy bien a las instalaciones comerciales con múltiples parlantes.
Especificaciones
Respuesta de frecuencia |
70Hz-25kHz (±3dB) |
Potencia de amperaje recomendada |
15 – 150 vatios |
Impedancia nominal |
8 ohms |
Sensibilidad |
86dB |
Woofer |
control de 61⁄2” (165mm) |
Tweeter |
cúpula de 1” (25mm) |
Frecuencia de transición |
2kHz |
Peso neto |
8,4 lbs (3,9kg) |
Dimensiones (Alto x ancho x profundidad) |
77⁄8 x 77⁄8 x 89⁄16” (201 x 201 x 217mm) |
Opciones de colocación
El parlante SoundWare XL se puede montar en la pared, con los elementos de ferretería suministrados, o simplemente sobre un estante. Si se lo coloca en un estante, simplemente adose el pie de goma con reverso adhesivo y
conecte los cables del parlante.
Colocación del soporte esférico giratorio
Si tiene pensado usar los soportes de montaje debe acoplar el soporte esférico giratorio al parlante. Use los cuatro tornillos mecánicos de cabeza plana que se suministran tal como se muestra en la ilustración.
E s P A
ñ
O
L
142-003539-0_SoundWare_XL_Manual.indd 7 |
|
|
9/9/08 5:56:31 PM |
|
|
|
|
|
|
|
|
|
|
|
|
|
|
|
|
|
|
|
|
|
|
|
|
|
|
|
|
|
|
|
|
|
|
|
|
|
|
|
|
|
|
|
|
|
|
|
|
|
|
|
|
|
|
|
|
|
|
|
|
|
|
|
|
|
|
|
|
|
|
|
|
|
|
|
|
|
|
|
|
|
|
|
|
|
|
|
|
|
|
|
|
|
|
|
|
|
|
|
|
|
|
|
|
|
|
|
|
|
|
|
E |
|
|
|
|
|
|
|
|
|
|
|
|
|
|
|
|
|
|
|
|
|
|
|
|
|
|
|
|
|
|
|
|
|
|
|
|
|
|
|
|
|
|
|
|
|
|
|
|
|
|
|
|
|
|
|
|
|
|
||
|
|
|
|
|
|
|
s |
|
|
|
|
|
|
|
|
|
|
|
|
|
|
|
|
|
|
|
|
|
|
|
|
|
|
|
|
|
|
|
|
|
P |
|
Montaje del soporte de pared |
||||||||||||||||||||||||
|
|
|
|
|
|
|
A |
|
Se suministran soportes para montar los parlantes en una pared plana o en un rincón. No se |
||||||||||||||||||||||||
|
|
|
|
|
ñ |
|
|
||||||||||||||||||||||||||
|
|
|
|
|
|
|
suministran elementos de ferretería para acoplar el soporte a la pared. ¿Por qué? Porque hay muchos |
||||||||||||||||||||||||||
|
|
|
|
|
|
|
O |
|
|||||||||||||||||||||||||
|
|
|
|
|
|
|
|
tipos de superficies diferentes en las cuales pueden instalarse los parlantes. Se puede tratar de una |
|||||||||||||||||||||||||
|
|
|
|
|
|
|
L |
|
|||||||||||||||||||||||||
|
|
|
|
|
|
|
|
pared de mampostería básica con o sin resalto. Puede ser un panel de madera o hasta una pared con |
|||||||||||||||||||||||||
|
|
|
|
|
|
|
|
|
|
||||||||||||||||||||||||
|
|
|
|
|
|
|
|
|
|
base de hormigón. No existe un único tipo de sujetador que podríamos suministrar y que funcionaría |
|||||||||||||||||||||||
|
|
|
|
|
|
|
|
|
|||||||||||||||||||||||||
|
|
|
|
|
|
|
|
|
|
en todas las situaciones posibles. |
|||||||||||||||||||||||
|
|
|
|
|
|
|
|
|
|
Tenga en cuenta la superficie en la que se instalará el parlante para adquirir el tipo apropiado de |
|||||||||||||||||||||||
|
|
|
|
|
|
|
|
|
|
sujetadores. Necesitará cuatro para cada parlante. Si no está seguro de qué tipo de sujetador debe |
|||||||||||||||||||||||
|
|
|
|
|
|
|
|
|
|
usar, lleve el soporte de montaje a una ferretería conocida. Dígales el tipo de superficie sobre la cual |
|||||||||||||||||||||||
|
|
|
|
|
|
|
|
|
|
va a instalar el parlante y el peso del parlante para que ellos le recomienden el sujetador apropiado. |
|||||||||||||||||||||||
|
|
|
|
|
|
|
|
|
|
En algunas comunidades los códigos de edificación pueden exigir el uso de tipos de elementos de |
|||||||||||||||||||||||
|
|
|
|
|
|
|
|
|
|
ferretería y métodos de instalación específicos. Además, tal vez le exijan un soporte de seguridad |
|||||||||||||||||||||||
|
|
|
|
|
|
|
|
|
|
secundario, por ejemplo, un cable de seguridad entre el parlante y el elemento estructural de la |
|||||||||||||||||||||||
|
|
|
|
|
|
|
|
|
|
pared. SoundWare XL tiene una barra de metal moldeada en la parte superior del gabinete, la cual |
|||||||||||||||||||||||
|
|
|
|
|
|
|
|
|
|
sirve como punto de sujeción para tal soporte secundario. Consulte los códigos de edificación locales |
|||||||||||||||||||||||
|
|
|
|
|
|
|
|
|
|
para ver si es necesario aplicar métodos de instalación o soportes secundarios. |
|||||||||||||||||||||||
|
|
|
|
|
|
|
|
|
|
Boston Acoustics no asume responsabilidad alguna por los daños que puedan resultar de una instalación |
|||||||||||||||||||||||
|
|
|
|
|
|
|
|
|
|
incorrecta. |
|||||||||||||||||||||||
|
|
|
|
|
|
|
|
|
|
Cables de los parlantes |
|||||||||||||||||||||||
|
|
|
|
|
|
|
|
|
|
||||||||||||||||||||||||
|
|
|
|
|
|
|
|
|
|||||||||||||||||||||||||
|
|
|
|
|
|
|
|
|
|
El tipo de cable de parlante que se debe utilizar depende de que SoundWare XL se use en un sistema |
|||||||||||||||||||||||
|
|
|
|
|
|
|
|
|
|
de audio convencional o en un sistema comercial de voltaje constante de 100V/70V. |
|||||||||||||||||||||||
|
|
|
|
|
|
|
|
|
|
Sistemas de audio convencionales |
|||||||||||||||||||||||
|
|
|
|
|
|
|
|
|
|
Para tramos cortos de menos de 20 pies o distancias similares se puede usar cable de calibre 16. |
|||||||||||||||||||||||
|
|
|
|
|
|
|
|
|
|
Típicamente se debe usar cable de calibre superior a 14. Esa medida es correcta para recorridos de |
|||||||||||||||||||||||
|
|
|
|
|
|
|
|
|
|
hasta unos 50 pies. Para recorridos de más de 50 pies se debe usar cable de calibre 12. |
|||||||||||||||||||||||
|
|
|
|
|
|
|
|
|
|
Sistemas de voltaje constante de 100V/70V |
|||||||||||||||||||||||
|
|
|
|
|
|
|
|
|
|
Los códigos eléctricos de su comunidad pueden exigir el uso de cable especial que sea apropiado |
|||||||||||||||||||||||
|
|
|
|
|
|
|
|
|
|
para aplicaciones de mayor voltaje y que resistan la exposición. Tal cable a menudo se denomina |
|||||||||||||||||||||||
|
|
|
|
|
|
|
|
|
|
"cable con clasificación plenum". Consulte con un inspector de seguridad eléctrica de su área para |
|||||||||||||||||||||||
|
|
|
|
|
|
|
|
|
|
saber si es necesario usar ese tipo de cable. |
|||||||||||||||||||||||
|
|
|
|
|
|
|
|
|
|
Una de las principales ventajas de los sistemas de voltaje constante de 100V/70V es que se puede |
|||||||||||||||||||||||
|
|
|
|
|
|
|
|
|
|
usar cable de calibre relativamente ligero, aún en distancias más largas. En la mayoría de las |
|||||||||||||||||||||||
|
|
|
|
|
|
|
|
|
|
instalaciones será más que suficiente usar cable de calibre 18. Solamente se necesita cable de mayor |
|||||||||||||||||||||||
|
|
|
|
|
|
|
|
|
|
calibre en sistemas de muy alta potencia. |
|||||||||||||||||||||||
142-003539-0_SoundWare_XL_Manual.indd 8 |
|
|
9/9/08 5:56:31 PM |
|
|
Polaridad de conexión de los parlantes
Todos los parlantes de un sistema se deben conectar con la misma polaridad o "en fase". Los terminales de los parlantes SoundWare XL están codificados por color para identificar las conexiones “+” (rojo) y “–” (negro). Todos los cables vienen marcados de alguna forma y de esa manera se puede distinguir entre un conductor y otro. La marcación puede consistir en una estría en la aislación de un conductor o puede ser una raya sobre la aislación o codificación por color. Use las marcas de los cables de los parlantes para estar seguro de que el terminal "+" del amplificador esté conectado al terminal "+" del parlante y que "-" esté conectado a "-", en cada conexión.
E s P A
ñ
O
L
Conexión de los parlantes
Antes de conectar los parlantes:
1Apague todos los componentes del sistema.
2Coloque el interruptor del transformador en la posición apropiada. Si el parlante se está conectando a un sistema de audio convencional, coloque el interruptor en la posición Dir X. Esto cancela el efecto del transformador y envía la señal directamente a la transición. Si el parlante
es parte de un sistema de voltaje constante de 100V/70V, consulte la información de la página siguiente.
Separe los dos conductores del cable. Desprenda aproximadamente 3/8” de la aislación del extremo del cable. Empuje hacia abajo sobre el extremo superior del terminal para abrir el orificio para el cable. Inserte el cable y suelte el terminal para ajustarlo. Asegúrese de que no queden filamentos de cable sueltos. Meta el cable dentro del canal en la parte posterior del parlante para una terminación prolija, que no se vea.
|
1 |
2 |
Tornillo dePivotfijaciónSet |
de rotaciónScrew |
SoundWare XL puede girar sobre el soporte. En sentido vertical puede moverse desde una posición recta hacia afuera hasta una inclinación hacia abajo de 40 grados. Cuando se usa el soporte de montaje en pared plana el parlante puede rotar lado a lado 20 grados. (Nota: Si se instala en un rincón el parlante no podrá rotar lado a lado.) Afloje el tornillo de fijación de rotación, gire el parlante a su lugar y vuelva a ajustar el tornillo.
Instalación de los parlantes
Una vez que haya instalado el soporte y conectado el parlante, el resto es fácil.
1Coloque el extremo redondeado del soporte del parlante en el soporte y deslícelo hacia abajo para que quede fijo en su lugar.
2Opcional - Inserte y ajuste el tornillo para fijar todo.
gira 40º |
|
pivots |
|
down 40° |
gira 20º a |
hacia abajo |
|
|
pivots 20° |
|
each way |
|
cada lado |
142-003539-0_SoundWare_XL_Manual.indd 9 |
|
|
9/9/08 5:56:32 PM |
|
|
 Loading...