


Classic Series II
CS Sub10 II
Subwoofer
Español |
Italiano |
Deutsch |
Subwoofer / |
Subwoofer / |
Subwoofer / |
Manual del Propietario / |
Manuale dell’utente / |
Sicherheitshinweise / |
Instrucciones de Seguridad / |
Istruzioni di sicurezza / |
Konformitätserklärung |
Información de Cumplimiento |
Informazioni sulla conformità |
|
Français
Caissons de graves / Guide de l’utilisateur / Instructions de sécurité / Informations relatives à la conformité
Svenska
Subwoofrar / Bruksanvisning / Säkerhetsanvisningar / Information om överensstämmelse
/ Manual Owner’s
at io n

E |
|
|
|
N |
|
|
|
G |
|
|
|
L |
IMPORTANT SAFETY INSTRUCTIONS |
||
I |
|||
S |
|
|
|
H |
|
|
This symbol found on the apparatus indicates hazards |
|
|
|
|
|
|
|
arising from dangerous voltages. |
|
|
|
This symbol found on the apparatus indicates the user |
|
|
|
should read all safety statements found in the user |
|
|
|
manual. |
|
|
|
This symbol found on the apparatus indicates double |
|
|
|
|
|
|
|
insulation. |
|
|
|
|
|
1. |
|
Read these instructions. |
|
2. |
|
Keep these instructions. |
|
3. |
|
Heed all warnings. |
|
4. |
|
Follow all instructions. |
|
5. |
|
Do not use this apparatus near water. |
|
6. |
|
Clean only with dry cloth. |
|
7. |
|
Do not block any ventilation openings. Install in accordance |
|
|
|
with the manufacturer’s instructions. |
|
8. |
|
Do not install near any heat sources such as radiators, heat |
|
|
|
registers, stoves, or other apparatus (including amplifiers) that |
|
|
|
produce heat. |
|
9. |
|
Do not defeat the safety purpose of the polarized or grounding |
|
|
|
type plug. A polarized plug has two blades with one wider |
|
|
|
than the other. A grounding-type plug has two blades and |
|
|
|
a third grounding prong. The wide blade or the third prong |
|
|
|
is provided for your safety. If the provided plug does not fit |
|
|
|
into your outlet, consult an electrician for replacement of the |
|
|
|
obsolete outlet. |
|
10. |
Protect the power cord from being walked on or pinched |
|
|
|
|
particularly at plugs, convenience receptacles, and the point |
|
|
|
where they exit from the apparatus. |
|
11. |
Only use attachments/accessories specified by the |
|
|
|
|
manufacturer. |
|
12. |
Unplug this apparatus during lightning storms or when |
|
|
|
|
unused for long periods of time. |
Warning! To reduce the risk of fire or electrical shock, do not expose this apparatus to rain or moisture.
This symbol found on the apparatus indicates that the apparatus must be placed in a separate collection facility for electronic waste and not disposed with household waste.
13.Refer all servicing to qualified service personnel. Servicing is required when the apparatus has been damaged in any way, such as power-supply cord or plug is damaged, liquid has been spilled or objects have fallen into the apparatus, the apparatus has been exposed to rain or moisture, does not operate normally, or has been dropped.
14.Maintain a minimum distance of 2” (50mm) around the front, rear, and sides of the apparatus for sufficient ventilation. The ventilation should not be impeded by covering the ventilation openings or placing on or around the apparatus items such as newspapers, table-cloths, curtains, etc.
15.No open flame sources, such as lighted candles, should be placed on the apparatus.
16.The apparatus shall not be exposed to dripping or splashing. No objects filled with liquids, such as vases, shall be placed on the apparatus.
17.Either the power inlet connector on the rear of the apparatus or the power plug at the wall must remain accessible, to be able to disconnect power from the apparatus.
18.To completely disconnect this apparatus from the AC Mains, disconnect the power supply cord plug from the AC receptacle.
19.The mains plug of the power supply cord shall remain readily operable.
Specifications |
Subwoofer |
|
|
Frequency Response: |
35Hz150Hz |
|
|
Crossover Frequency: |
60Hz - 180Hz 24dB/octave lowpass |
|
|
Amplifier Output: |
100 watts RMS, 250 watts peak |
|
BassTrac® circuitry eliminates distortion |
|
|
Woofer: |
10” (254mm) |
|
|
Dimensions: (H x W x D) |
161⁄16 x 1415⁄16 x 155⁄8” |
|
(408 x 380 x 397mm) |
|
|
Weight: |
26.5 lbs (12kg) |
|
|
Introduction
Thank you for choosing Boston Acoustics. The CS Sub10 II subwoofer incorporates high-quality components that produce the famous Boston Sound. The subwoofer is ideally suited for use in a high-quality 5.1 channel home theater or stereo music system. It is capable of impressive deep bass and high output from a remarkably compact enclosure. In addition, it features BassTrac®, a proprietary Boston-designed circuit that tracks the input signal to the subwoofer and prevents its amplifier from being driven into audible distortion. The benefit: the bass stays clean and strong at any listening level.
Unpacking the System
Carefully unpack the system. If there is any sign of damage from transit, report it immediately to your dealer and/or delivery service. Keep the shipping carton and packing materials for future use.
E N G L I S H
2 |
3 |

E |
|
N |
|
G |
|
L |
Connections |
I |
|
S |
NOTE: Power is always supplied to the subwoofer electronics unless it is unplugged or switched to the off position using |
H |
the power switch located on the rear panel. The auto-on circuitry only activates or deactivates the power amplifier. |
|
Make sure your subwoofer and receiver are unplugged when making the connection. |
|
Power: When plugging your subwoofer in be sure to use a wall outlet, or dedicated electrical outlet. Some receivers will |
|
provide a switched outlet. Do not use this. These on board electrical outlets do not offer the amount of current or proper |
|
isolation required by a power amplifier, such as the one in your amplifier. |
|
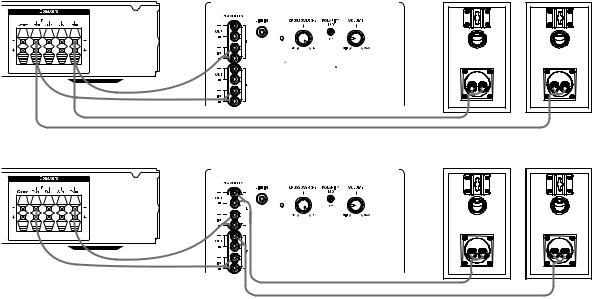
Speaker Level |
|
Use these high-level terminals with receivers that do not have a subwoofer output. The speaker inputs accept both left and |
|
right channel speaker signals from your receiver. When using a home theater receiver, set the speaker type to “Large.” |
|
The large setting will produce a fuller sound. |
Receiver |
|
|
|
|
|
|
|
|
|
|
|
|
|
|
|
|
|
|
|
|
|
|
|
Subwoofer Ampli er |
|||||||||||||
|
|
|
|
|
|
|
|
|
|
|
|
|
|
|
|
|
|
|
|
|
|
|
|
|
|
|
|
|
|
|
|
|
|
|
|
|
|
|
|
|
|
|
|
|
|
|
|
|
|
|
|
|
|
|
|
|
|
|
|
|
|
|
|
|
|
|
|
|
|
|
|
|
|
|
|
|
|
|
|
|
|
|
|
|
|
|
|
|
|
|
|
|
|
|
|
|
|
|
|
|
|
|
|
|
|
|
|
|
|
|
|
|
|
|
|
|
|
|
|
|
|
|
|
|
|
|
|
|
|
|
|
|
|
|
|
|
|
|
|
|
|
|
|
|
|
|
|
|
|
|
|
|
|
|
|
|
|
|
|
|
|
|
|
|
|
|
|
|
|
|
|
|
|
|
|
|
|
|
|
|
|
|
|
|
|
|
|
|
|
|
|
|
|
|
|
|
|
|
|
|
|
|
|
|
|
|
|
|
|
|
|
|
|
|
|
|
|
|
|
|
|
|
|
|
|
|
|
|
|
|
|
|
|
|
|
|
|
|
|
|
|
|
|
|
|
|
|
|
|
|
|
|
|
|
|
|
|
|
|
|
|
|
|
|
|


 CS SUB10 II
Receiver |
Subwoofer Ampli er |
|||||||||||||||||||||||||||||||||||||||||||
|
|
|
|
|
|
|
|
|
|
|
|
|
|
|
|
|
|
|
|
|
|
|
|
|
|
|
|
|
|
|
|
|
|
|
|
|
|
|
|
|
|
|
|
|
|
|
|
|
|
|
|
|
|
|
|
|
|
|
|
|
|
|
|
|
|
|
|
|
|
|
|
|
|
|
|
|
|
|
|
|
|
|
|
|
|
|
|
|
|
|
|
|
|
|
|
|
|
|
|
|
|
|
|
|
|
|
|
|
|
|
|
|
|
|
|
|
|
|
|
|
|
|
|
|
|
|
|
|
|
|
|
|
|
|


 CS SUB10 II
Left |
Left |
Right |
Right |
Optional: Connect the speakers to the output speaker terminals on the subwoofer.
Adjusting the Crossover Control
When using the Speaker Level inputs (not the LINE input) the subwoofer’s built-in crossover is engaged. Use 120Hz or 150Hz for small speakers, 80Hz for large bookshelf speakers and 50-60Hz for floorstanding speakers. Fine-tune the crossover setting by ear for the smoothest blend with your main speakers. The best setting of the crossover control will depend on speaker placement and personal preference.
Line Level
Select ”subwoofer-yes” from your receiver’s set-up menu. If the receiver gives a choice of crossover filter frequency, Use 120Hz or 150Hz for small speakers, 80Hz for large bookshelf speakers and 50-60Hz for floorstanding speakers. Hooked up this way, the receiver’s amplifier is relieved of having to reproduce the difficult low bass signals that can drive the receiver into audible distortion. In some cases, it can also depend on several other settings within a receiver. We recommend consulting your receiver manual for further assistance in this area.
Turn off all power. Use a subwoofer cable, as shown, to connect your digital receiver’s LFE subwoofer output to the subwoofer. Connect the other end to the Line Level In.
Receiver |
|
|
|
|
|
|
|
|
|
|
Subwoofer Ampli er |
||||||||||||||||||||||||||||||||||||
|
|
|
|
|
|
|
|
|
|
|
|
|
|
|
|
|
|
|
|
|
|
|
|
|
|
|
|
|
|
|
|
|
|
|
|
|
|
|
|
|
|
|
|
|
|
|
|
|
|
|
|
|
|
|
|
|
|
|
|
|
|
|
|
|
|
|
|
|
|
|
|
|
|
|
|
|
|
|
|
|
|
|
|
|
|
|
|
|
|
|
|
|
|
|
|
|
|
|
|
|
|
|
|
|
|
|
|
|
|
|
|
|
|
|
|
|
|
|
|
|
|
|
|
|
|
|
|
|
|
|
|
|
|
|
|
|
|
|
|
|
|
|
|


 CS SUB10 II
Operation
Power On/Off
Plug the subwoofer’s AC cord into a wall outlet. Do not use the outlets on the back of the receiver. Set the power switch to the desired setting.
OFF – The subwoofer is off and will not produce any sound. You may want to turn your subwoofer off if you will not be using it for some time or wish to conserve electricity.
ON – The subwoofer is always on. If no signal is detected after several minutes, it will automatically enter the Mute mode.
An LED indicator indicates what mode the subwoofer is in:
OFF – The subwoofer is off
RED – Mute (No signal detected, Amp Off )
GREEN – Audio On (Signal detected, Amp On)
The subwoofer will automatically enter the Mute mode after several minutes when no signal is detected from your system. The subwoofer audio will then turn ON instantly when a signal is detected.
Crossover Control
Adjusts the frequency of the low pass filter for the subwoofer Speaker Level Input. Note: This control is not active when using the LFE input jack.
Volume Control
Turn the subwoofer Volume control to the 9 o’clock position. If the subwoofer makes no sound, check the AC-line cord, Power switch, and input cables. (Are the connectors on the cables making proper contact? Is the AC-line cord connected to a “live” receptacle, is the subwoofer in either the Auto or On position?)
Adjust the subwoofer Volume control until you hear a match between the main speaker and subwoofer. Bass response should not overpower the room but rather be adjusted so there is a natural blend across the entire musical range.
Polarity Control
(0° or 180°): Selects regular (0°) or inverted (180°) phase for the subwoofer. Set this switch to provide the fullest, most dynamic bass. The effect of phase will be most audible on low-frequency percussion instruments or music with a continuously repeating bass line.
E N G L I S H
4 |
5 |

E |
|
N |
|
G |
|
L |
Maintenance and Service |
I |
|
S |
All wiring connections should be inspected and cleaned or remade at least once a year. |
H |
|
|
If a problem does occur, make sure that all connections are properly made, secure and clean. If a problem occurs in one |
|
|
|
loudspeaker, rewire that speaker in a different location within the system. Should the problem persist in this speaker the |
|
problem is within the speaker. If the speaker sounds fine in the new position it is a strong indication of a more in depth issue |
|
with the electronics in the system. In the event that your CS Sub10 II ever needs service, contact your local Boston Acoustics |
|
dealer or visit bostonacoustics.com for a list of dealers in your area. |
|
If your subwoofer does not play, check that all the connectors on the cables are making proper contact and that the AC plug |
|
connected to a “live” receptacle. |
Limited Warranty
Boston Acoustics warrants to the original purchaser of our CS Sub10 II Powered Subwoofer that it will be free of defects in materials and workmanship in its mechanical parts for a period of 5 years from the date of purchase. The warranty period for the electrical components of the CS Sub10 II is 1 year.
Your responsibilities are to install and use them according to the instructions supplied, to provide safe and secure transportation to an authorized Boston Acoustics service representative, and to present proof of purchase in the form of your sales slip when requesting service.
Excluded from this warranty is damage that results from abuse, misuse, improper installation, accidents, shipping, or repairs/ modifications by anyone other than an authorized Boston Acoustics service representative.
This warranty is limited to the Boston Acoustics product and does not cover damage to any associated equipment. This warranty does not cover the cost of removal or reinstallation. This warranty is void if the serial number has been removed or defaced. This warranty gives you specific legal rights, and you may also have other rights which vary from state to state.
If Service Seems Necessary
First, contact the dealer from whom you purchased the product. If that is not possible, write to:
Boston Acoustics, Inc.
100 Corporate Drive
Mahwah, NJ 07430 USA
Or contact us via e-mail at:
US: |
customerservice@bostonacoustics.com |
Japan: |
ba_info@dm-holdings.com |
Asia Pacific: |
service@dm-singapore.com |
We will promptly advise you of what action to take. If it is necessary to return your CS Sub10 II to the factory, please ship it prepaid. After it has been repaired, we will return it freight prepaid in the United States and Canada.
Boston Acoustics continually strives to update and improve its products. The specifications and construction details are subject to change without notice.
INSTRUCCIONES DE SEGURIDAD IMPORTANTES
Este símbolo que aparece en el aparato indica peligros derivados de tensiones peligrosas.
Este símbolo que aparece en el aparato indica que el usuario debe leer todos los avisos de seguridad del manual del usuario.
Este símbolo que aparece en el aparato indica doble aislamiento.
1.Lea estas instrucciones.
2.Guarde estas instrucciones.
3.Preste atención a todas las advertencias.
4.Siga todas las instrucciones.
5.No use este aparato cerca de agua.
6.Limpie únicamente con una tela seca.
7.No obstruya las aberturas para ventilación. Instale de acuerdo con las instrucciones del fabricante.
8.No instale cerca de fuentes de calor como radiadores, rejillas de calefacción, estufas u otros aparatos (incluidos amplificadores) que emitan calor.
9.No anule el propósito de seguridad del enchufe polarizado o de puesta a tierra. Un enchufe polarizado tiene dos patas, una más ancha que la otra. Un enchufe de puesta a tierra tiene dos patas y una tercera de puesta a tierra. La pata ancha o la tercera pata es para su seguridad. Si el enchufe provisto no encaja en el toma, consulte a un electricista para reemplazar el toma obsoleto.
10.Proteja el cable de alimentación para que no se pise ni se apriete, especialmente en los enchufes, en los receptáculos, y en el punto donde salen del aparato.
11.Utilice únicamente aditamentos o accesorios especificados por el fabricante.
12.Desenchufe el aparato durante tormentas eléctricas o cuando no se lo utilice durante períodos largos.
¡Advertencia! Para reducir el riesgo de incendio o descarga eléctrica, no exponga el aparato a la lluvia o a la humedad.
Este símbolo que aparece en el aparato indica que el aparato se debe colocar en un punto de recolección separada para desechos electrónicos y no debe ser arrojado junto con los residuos domésticos.
13.Todas las actividades de asistencia técnica deben ser realizadas por personal de servicio calificado. Se requiere asistencia técnica cuando el aparato se ha dañado de cualquier manera, por ejemplo por daño del cable de alimentación o del enchufe, derrame de un líquido o caída de objetos en el aparato, exposición del aparato a lluvia o humedad, o mal funcionamiento o caída del aparato.
14.Mantenga una distancia mínima de 2” (50mm) en el frente, la parte posterior y los lados del aparato, para que reciba suficiente ventilación. La ventilación no debe ser impedida cubriendo las aberturas para ventilación ni colocando sobre o alrededor del aparato elementos como periódicos, manteles, cortinas, etc.
15.No se deben colocar fuentes de llama abierta, como velas encendidas, sobre el aparato.
16.El aparato no se debe exponer a goteos ni salpicaduras. No se deben colocar objetos llenos de líquido, como floreros, sobre el aparato.
17.Ya sea el conector de entrada de potencia en la parte posterior del aparato o el enchufe de la pared debe permanecer accesible, para poder desconectar la potencia del aparato.
18.Para desconectar el aparato por completo de la red de AC, desconecte el cable de alimentación del receptáculo de AC.
19.El enchufe del cable de alimentación debe permanecer listo para funcionar.
E S P A
ñ
O
L
6 |
7 |
E |
|
|
|
S |
|
|
|
P |
|
|
|
A |
|
Especificaciones |
Subwoofer |
ñ |
|
||
O |
|
|
|
|
|
|
|
L |
|
Respuesta de frecuencia: |
35Hz - 150Hz |
|
|
|
|
|
|
Frecuencia de transición: |
60Hz - 180Hz 24dB/octava pasa bajo |
|
|
|
|
|
|
Salida del amplificador: |
100 vatios RMS, 250 vatios pico |
|
|
|
BassTrac® los circuitos eliminan la distorsión |
|
|
|
|
|
|
Bafle de bajos: |
10” (254mm) |
|
|
|
|
|
|
Dimensiones: |
161⁄16 x 1415⁄16 x 155⁄8” |
|
|
(Alto x Ancho x Profundidad) |
(408 x 380 x 397mm) |
|
|
|
|
|
|
Peso: |
26.5 lbs (12kg) |
|
|
|
|
Introducción
Gracias por escoger Boston Acoustics. CS Sub10 II incorporan componentes de alta calidad que producen el famoso sonido de Boston. CS Sub 10 II es ideales para el uso en un sistema musical estéreo o home theater de 5.1 canales de alta calidad. Pueden producir unos bajos profundos impresionantes y una intensidad elevada desde una caja muy compacta. Además, presentan BassTrac®, un circuito patentando diseñado por Boston que sigue la señal de entrada hasta el subwoofer e impide que su amplificador sufra una distorsión audible. La ventaja: los bajos es que se mantienen limpios y resistentes con cualquier nivel de sonido.
Desembalaje del sistema
Desembale cuidadosamente el sistema. Si hay alguna señal de daños debidos al transporte, comuníqueselo inmediatamente a su distribuidor y/o a su servicio de entrega. Conserve el cartón de envío y los materiales de embalaje para una futura utilización.
|
E |
|
S |
|
P |
Conexiones |
A |
ñ |
|
NOTA: Siempre se suministra potencia al subwoofer a menos que se desenchufe o se cambie a la posición apagado con el |
O |
interruptor del panel posterior. Los circuitos de encendido automático únicamente activan o desactivan el amplificador de |
L |
potencia. Asegúrese de que el subwoofer y el receptor estén desenchufados al realizar la conexión. |
|
Potencia: Cuando enchufe el subwoofer, asegúrese de que use un toma de pared o un toma eléctrico dedicado. Algunos |
|
receptores le ofrecerán un toma con interruptor. No lo utilice. Estos tomas eléctricos en tablero no ofrecen la cantidad de |
|
corriente o la aislación correcta que requiere un amplificador de potencia, tal como el de su amplificador. |
|
Nivel de altavoz |
|
Utilice estos terminales de nivel alto con los receptores que no tienen salida del subwoofer. Las entradas del parlante aceptan |
|
señales del parlante de los canales tanto derecho como izquierdo desde su receptor. Cuando utiliza un receptor para un sistema |
|
de cine, coloque el tipo de parlante en “Grande”. El ajuste en grande producirá un sonido más potente. |
|
Recepción |
|
|
|
|
|
|
|
|
|
|
|
|
|
|
|
|
|
|
|
|
Ampli cador Subwoofer |
||||||||||||||||
|
|
|
|
|
|
|
|
|
|
|
|
|
|
|
|
|
|
|
|
|
|
|
|
|
|
|
|
|
|
|
|
|
|
|
|
|
|
|
|
|
|
|
|
|
|
|
|
|
|
|
|
|
|
|
|
|
|
|
|
|
|
|
|
|
|
|
|
|
|
|
|
|
|
|
|
|
|
|
|
|
|
|
|
|
|
|
|
|
|
|
|
|
|
|
|
|
|
|
|
|
|
|
|
|
|
|
|
|
|
|
|
|
|
|
|
|
|
|
|
|
|
|
|
|
|
|
|
|
|
|
|
|
|
|
|
|
|
|
|
|
|
|
|
|
|
|
|
|
|
|
|
|
|
|
|
|
|
|
|
|
|
|
|
|
|
|
|
|
|
|
|
|
|
|
|
|
|
|
|
|
|
|
|
|
|
|
|
|
|
|
|
|
|
|
|
|
|
|
|
|
|
|
|
|
|
|
|
|
|
|
|
|
|
|
|
|
|
|
|
|
|
|
|
|
|
|
|
|
|
|
|
|
|
|
|
|
|
|
|
|
|
|
|
|
|
|
|
|
|
|
|
|
|
|
|
|
|
|
|
|
|
|
|
|
|


 CS SUB10 II
Recepción |
Ampli cador Subwoofer |
|||||||||||||||||||||||||||||||||||||||||||
|
|
|
|
|
|
|
|
|
|
|
|
|
|
|
|
|
|
|
|
|
|
|
|
|
|
|
|
|
|
|
|
|
|
|
|
|
|
|
|
|
|
|
|
|
|
|
|
|
|
|
|
|
|
|
|
|
|
|
|
|
|
|
|
|
|
|
|
|
|
|
|
|
|
|
|
|
|
|
|
|
|
|
|
|
|
|
|
|
|
|
|
|
|
|
|
|
|
|
|
|
|
|
|
|
|
|
|
|
|
|
|
|
|
|
|
|
|
|
|
|
|
|
|
|
|
|
|
|
|
|
|
|
|
|


 CS SUB10 II
Izquierdo |
Izquierdo |
Derecho |
Derecho |
Opcional: Conecte los altavoces a los terminales de salida del parlante en el subwoofer.
Ajuste del Control de Transiciones
Al utilizar las entradas Nivel de altavoz (no la entrada LINE (BF)), entra en funcionamiento el circuito de división de frecuencias incorporado del subwoofer. El uso de 120Hz o 150Hz para altavoces pequeños, 80Hz para altavoces de estantería grande
y 50-60Hz para altavoces para suelo. Realice el ajuste fino de la transición a oído, para lograr la combinación más uniforme con sus parlantes principales. La mejor configuración del control de transición depende de la ubicación del parlante y la preferencia personal.
8 |
9 |

E |
|
|
|
S |
|
|
|
P |
|
|
|
A |
Recepción |
Ampli cador Subwoofer |
|
ñ |
|||
|
|
||
O |
|
|
|
L |
|
|
|
|
|
CS SUB10 II |
Nivel de Línea
Seleccione ”subwoofer-sí” del menú de configuración de su receptor. El uso de 120Hz o 150Hz para altavoces pequeños, 80Hz para altavoces de estantería grande y 50-60Hz para altavoces para suelo. Conectado de esta manera, el amplificador del receptor no tiene la carga de reproducir las difíciles señales de graves bajos que pueden ocasionar la distorsión audible del receptor. En algunos casos, también puede depender de otros ajustes de un receptor. Recomendamos consultar el manual de su receptor.
Funcionamiento
Enchufe el cable AC del subwoofer en un toma de pared. No use tomas en la parte trasera del receptor. Coloque el interruptor de encendido en la configuración deseada.
OFF – El subwoofer está apagado y no producirá ningún sonido. Tal vez desee apagar el subwoofer si no lo usará por algún tiempo o desea ahorrar electricidad.
ON – El subwoofer siempre está encendido. Si no se detecta señal alguna, después de varios minutos cambiará automáticamente al modo de ahorro de energía Mute.
Un indicador LED indica en qué modo se encuentra el subwoofer:
OFF – El subwoofer está apagado
ROJO – MUDO (ninguna señal detectada, amplificador desactivado)
VERDE – AUDIO ON (señal detectada, amplificador activado)
El subwoofer ingresará automáticamente al modo MUTE luego de varios minutos cuando no se detecte señal proveniente de su sistema. A continuación, el subwoofer se activará instantáneamente cuando se detecte una señal.
Control de Transición
Ajusta la frecuencia del filtro de pasa bajo para el subwoofer Nivel del parlante. Nota: este control no está activo al utilizar el conector de entrada LFE (BF).
Control de Volumen
Gire el control de Volumen del subwoofer a la posición de las 9 en punto. Si no emana ningún sonido del subwoofer, verifique el cable de AC, el interruptor de Potencia y los cables de entrada. (¿Los conectores de los cables están haciendo contacto correctamente? ¿El cable de AC está conectado a un receptáculo "vivo"? ¿El subwoofer está en la posición Auto o Encendido?
Ajuste el control del Volumen del subwoofer hasta que escuche una coincidencia entre el parlante principal y el subwoofer. La respuesta de graves no debe dominar el sonido de la habitación, sino que se deben ajustar de manera que exista una combinación natural en todo el rango musical.
Control de Polaridad
(0° ó 180°): Selecciona la fase regular (0°) o invertida (180°) para el subwoofer. Ajuste este interruptor para producir los bajos más completos y dinámicos. El efecto de la fase será más audible en los instrumentos de percusión de baja frecuencia o en la música con una línea de repetición constante de bajos.
Mantenimiento y Servicio
Todas las conexiones de cableado deben inspeccionarse y limpiarse o establecerse de nuevo por lo menos una vez al año.
Si se produce algún problema, asegúrese de que todas las conexiones se han realizado adecuadamente y que están sujetas y limpias. Si se produce un problema en un parlante, vuelva a cablear ese parlante en una ubicación diferente dentro del sistema. Si el problema persiste en este parlante, el problema está en el parlante. Si suena bien en la nueva posición, es una indicación muy clara de que hay un problema de mayor calado en la electrónica del sistema. En el caso de que su sistema CS Sub10 II necesite asistencia técnica, póngase en contacto con su distribuidor local de Boston Acoustics o visite bostonacoustics.com para conseguir un listado de distribuidores en su zona.
Si el subwoofer no funciona, verifique que todos los conectores en los cables están haciendo contacto correctamente y que el enchufe de AC está conectado a un receptáculo "vivo".
Garantía Limitada
Boston Acoustics garantiza al comprador original de CS Sub10 II que no tendrá defectos de materiales ni de mano de obra en sus piezas mecánicas durante un período de 5 años desde la fecha de compra. El período de garantía de los componentes eléctricos del CS Sub10 II es de 1 año.
Es responsabilidad suya instalarlos y utilizarlos de acuerdo con las instrucciones suministradas, proporcionar un transporte seguro hasta un representante de servicio autorizado de Boston Acoustics, y presentar la prueba de compra en forma de recibo de compra cuando sea necesario este servicio.
Quedan excluidos de esta garantía los daños que resulten del abuso, del mal uso, de una instalación inadecuada, de accidentes, del transporte, o de reparaciones/modificaciones por parte de cualquiera que no sea el representante de servicio autorizado de Boston Acoustics.
Esta garantía se limita al producto de Boston Acoustics y no cubre daños de equipos afines. Esta garantía no cubre los costos de desinstalación o reinstalación. Esta garantía será nula cuando se haya retirado o borrado el número de serie. Esta garantía le otorga derechos legales específicos y también le podrían corresponder otros derechos que varían de un país a otro.
Si cree que necesita asistencia técnica
Primero, póngase en contacto con el distribuidor al cual ha comprado el producto. Si esto no es posible, escriba a:
Boston Acoustics, Inc.
100 Corporate Drive
Mahwah, NJ 07430 USA
O póngase en contacto con nosotros por medio de un correo electrónico:
Estados Unidos: |
customerservice@bostonacoustics.com |
Japón: |
ba_info@dm-holdings.com |
Asia Pacífico: |
service@dm-singapore.com |
Le indicaremos de inmediato qué acción tomar. Si fuera necesario devolver su sistema CS Sub10 II a fábrica, le pedimos que lo envíe con franqueo pago. Después de la reparación, lo devolveremos con costos de transporte pagados sólo en Estados Unidos y Canadá.
Boston Acoustics busca continuamente mejorar y actualizar sus productos. Las especificaciones y detalles de construcción están sujetos a cambios sin previo aviso.
E S P A
ñ
O
L
10 |
11 |
 Loading...