

Boss Audio MR752UAB Instruction Manual

INSTRUCTION MANUAL
MR752UAB
ANTI-THEFT DETACHABLE SYSTEM
CD/MP3/WMA PLAYER,USB PORT
WITH ELECTRONIC ANTI-SHOCK FUNCTION,
BLUE-TOOTH HANDS-FREE SYSTEM,
AM/FM-RDS DIGITAL PLL TUNING RADIO
1
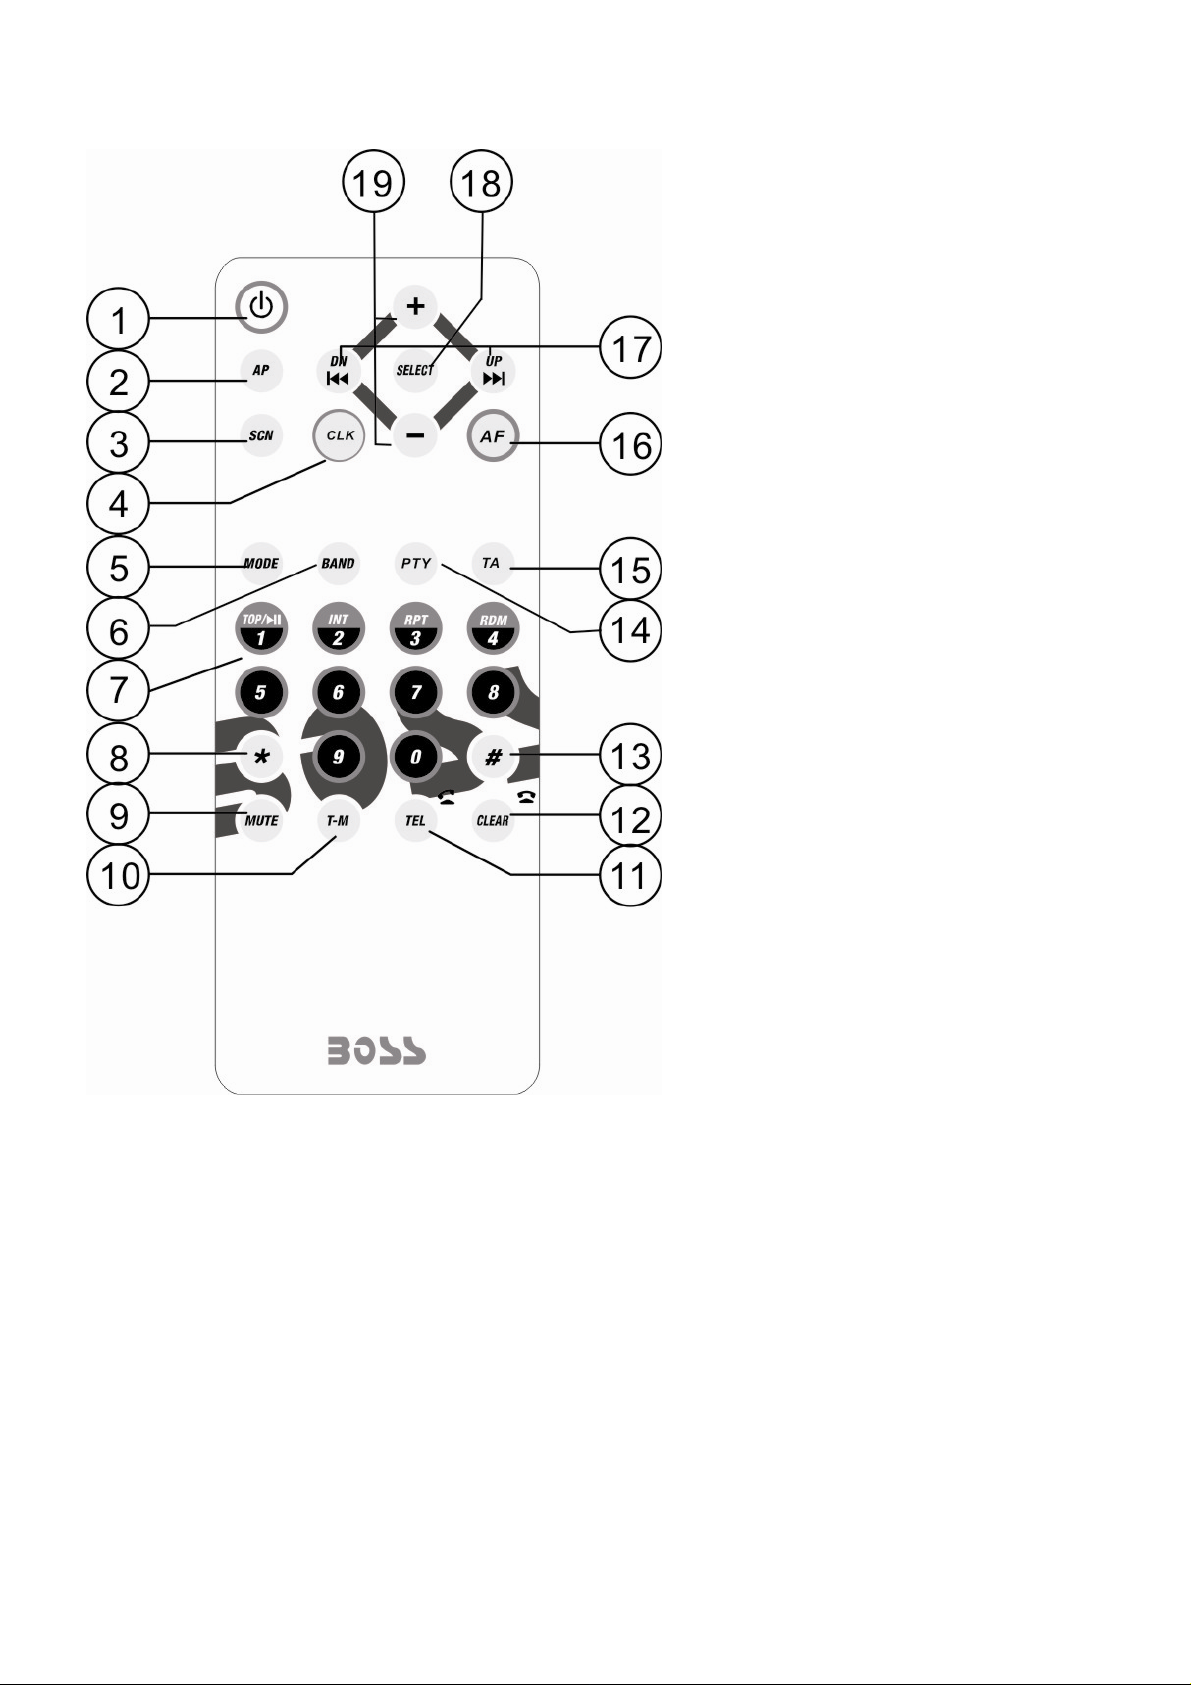
DESCRIPTION OF BUTTONS ON REMOTE CONTROL
1. POWER button
2. A.P button
3. SCN(SCAN) button
4. CLK button
5. MODE button
6. BND(BAND) button
7. Number(0~9) buttons
8. * button
9. MUTE button
10. T -M button
11. TEL button
12. CLEAR button
13. # button
14. PTY button
15. TA button
16. AF button
17. >>|/ DN and |<< /UP buttons
18. SEL button
19. + and - buttons
2
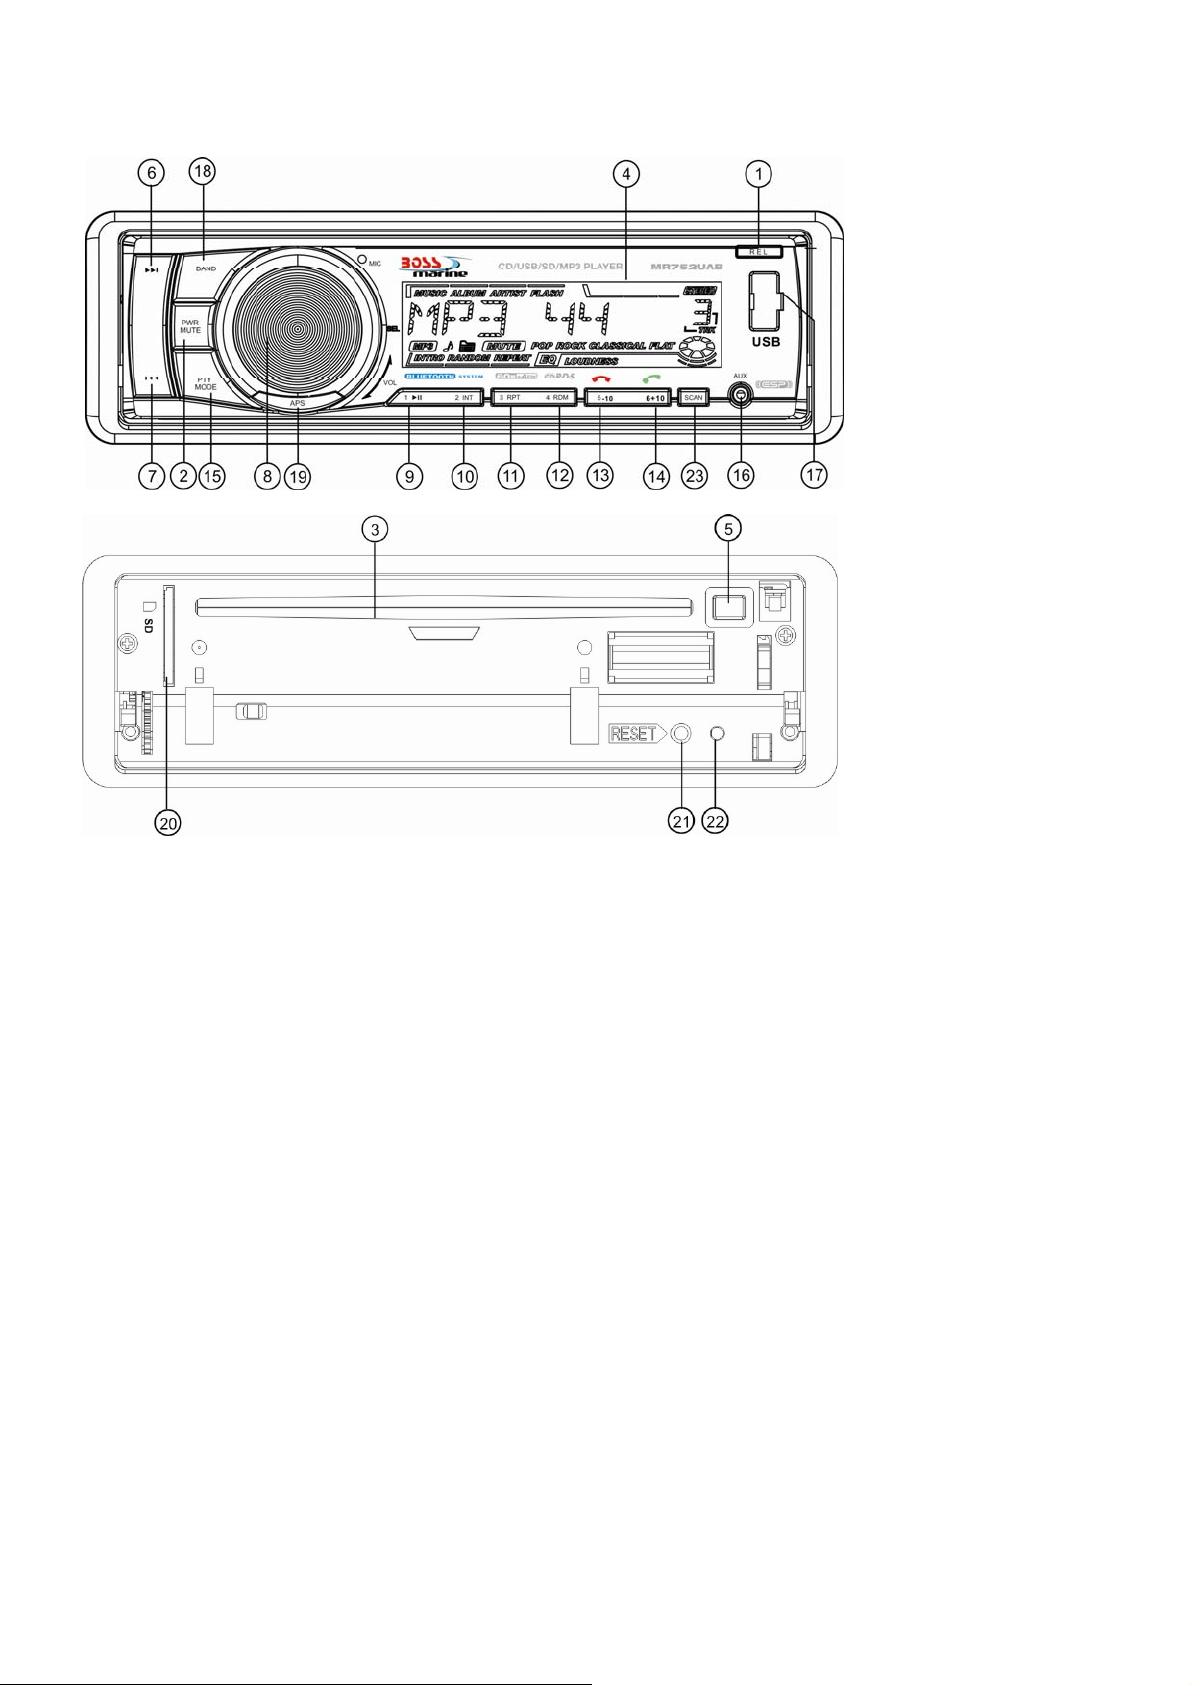
LOCATION AND FUNCTION OF CONTROLS
1. RELEASE BUTTON
2 .POWER/MUTE BUTTON
3. CD slot
4. LCD
5. EJECT button
6&7. >>| or |<< buttons
8、SEL button and VOL knob
9. 1/TOP/>|| button
10. 2/INT button
11. 3/RPT button
12. 4/RDM button
13. 5/ HANGD UP button
14. 6/ TEL button
15. PTY/ MODE
16. AUX INPUT Jack
17. USB Port
18. BAND button
19.APS button
20. SD Card slot
21. RESET button
22.LED Indicator
23.SCAN button
Common Operation:
1. To turn on/off the unit
Press any button except the EJECT/ RELEASE button to turn on the unit. The unit will also turn on
when a disc, SD card or USB stick is inserted.
Press
2. To select playback mode
Press MODE button to select RADIO(TUNER), DISC, CARD(after inserting SD card), USB(after
inserting USB stick) and AUX mode.
and hold the power button for more than 0.5 seconds to turn off the unit.
3

3. To adjust the volume level
Rotate the VOL knob to adjust the volume level during playback.
4. To mute or resume the sound
Press the MUTE button to eliminate or resume the sound immediately during playback.
To resume the sound immediately, user can also rotate the VOL knob.
5. To select and adjust the mode of the sound and menu
A) To select and adjust the sound mode:
Press SEL button shortly and repeatedly to select the mode of VOL(volume), BAS(bass), TRE(treble),
BAL(balance) and FAD(fader) in the sequence and circulation.
In each mode, the waiting time is about 5 seconds, and when the waiting time is over, it will return to
the last display mode.
After select a desired sound item, rotate VOL knob to adjust level of the selected sound item.
B) To select and adjust the menu mode:
Press SEL button and hold for about 2 second to turn on MENU mode, and the LCD will display
INVOL, then press SEL button repeatedly to select DSP/BEEP (ALL/OFF/2ND)/TAVOL/EON
(ON/OFF)/REG(ON/OFF)/AF(ON/OFF)/TA(ON/OFF) /EQ(ON/OFF)/LOUD(ON/OFF)/LOC
(ON/OFF,only for FM mode) /MONO/STEREO(only for FM mode) /AREA(EUR/USA)
After selecting a desired mode, rotate the VOL knob to select one setup item of the desired mode.
DSP: in this mode, you can set the clock time. Rotate the VOL knob clockwise/counter clockwise to
adjust the hours/minutes.
BEEP ALL: the beep is generated when every key is pressed(except the power button, REL key and
EJECT key).
BEEP 2ND: the beep is only generated when an allotted double key is pressed long(1second).
BEEP OFF: the beep sound is disabled.
TAVOL: This function is to set the TA volume level from 0-45. When TA function is activated, if a TA
program is tuned in at the volume level set regardless of the volume of the other source at
the time.
EON: In RDS mode, when EON is ON, the EON programs will scan automatically.
Select EON OFF to stop the scan.
LOUD: When the volume level is below half level, select LOUD ON mode to enhance bass sound. It is
advised that LOUD ON mode not be select when the volume level is high.
LOC: LOC ON mode improves reception in some areas where the signal is too strong.
(Note:LOC function only for FM mode.)
STEREO/MONO: Select STEREO mode to improve the sound effect. Select MONO mode to
decrease noise and make the sound more clear when the station signal is weak.
6. To reset the system
Before operating the unit for the first time, or after replacing the car battery or changing the connect ions,
you must reset the unit,
Press the RESET button with a cuspidal object. This operation will erase the clock setting and some
stored contents.
7. To remove the front panel
Press the REL button to flip down the front panel from the unit chassis, then pull it up a little to remove it
from the unit. And the anti-theft LED indicator will flash all the t ime till the front p anel is assembled back.
4

Radio Operation:
1. To select radio band
In RADIO mode, press the BAND button shortly and repeatedly to select your desired radio band in
sequence and circulation as follows:
-->FM1-->FM2-->FM3-->AM1-->AM2-->
2. To select for radio station manually or automatically
Press >>| or |<< button to automatically search up or down for radio station frequency,
Press >>| or |<< button and hold for about 2 seconds to activate MANUAL searching mode.
Then press >>| or |<< button repeatedly to manually search up or down for your desired station from the
current frequency.( If in MANUAL Mode and without further operation, the unit will change to AUTO mode
a few seconds later.)
3. To store the current station or turn on the preset station In RADIO mode:
A) Press one of 1-6 number buttons and hold for about 1 second to store the current station in the
preset memory bank of the number button for the current band.
When a RDS station is being stored, PI, PS, AF list are stored.
B) Press one of 1-6 number buttons to turn on the preset station stored in the preset memory bank of
the number button for the current band.
In RDS mode, the strongest AF is turned on after AF searching.
4. To automatically store for the strongest stations and scan for each stations
A) Press APS button and hold for about 1 second, it will search from the current frequency and check
the signal strength until 1 cycle search is finished on current band. Then, the 6 strongest available
stations will be preset to the corresponding preset numbers. When the Auto-storage operation is
completed, it will execute the Preset Scan continuously.
B) Press the APS button to scan all preset stations in the memory of the current band and stay on each
memory stations for about 5 seconds.
To stop preset scan, press this button again.
C) Press the SCAN button to scan the radio frequency . If a v alid signal has detected, the current frequency
will be hold and blinking for 5 seconds, then press SCAN again to stop and remain the current frequency;
otherwise, the radio will go on to scan the other radio frequency 5 seconds later.
5. To tune for RDS station
Press and hold PTY button for about 1 second,
to select one of the following mode:
<-->NEWS<-->AFFAIRS<-->INFO<-->SPORT<-->EDUCATE<-->DRAMA<-->CULTURE
<-->SCIENCE<--> VARIED<-->WEATHER<--> FINANCE<-->CHILDREN<-->SOCIAL
<-->RELIGION<-->PHONE IN<-->TRAVEL<-->LEISURE<-->DOCUMENT< -->ALARM
<-->POP M< -->ROCK M<-->EASY M<-->LIGHT M<--> CLASSICS<-->OTHER M
<-->JAZZ<-->COUNTRY<-->NATION M<-->OLDIES<-->FOLK M<-->TEST
After selecting one of the PTY programs, press >>| or |<<,it will automatically search for the station of the
PTY program. If the station of the PTY program does to exist, it will display PTY NONE and then return back to
the
previous radio.
6. To alternate the weak signal in RDS station with a strong one
Press SEL button and hold for about 1 second to turn on MENU mode, then press SEL button
repeatedly to select AF mode, rotate the VOL knob to select AF ON, then AF flash in display.
When AF switching mode is selected, the radio checks the signal strength of AF all the time. The
the PTY group is on, then rotate the VOL knob
5
 Loading...