

Boss Audio 721CA User Manual


CONTENTS LIST
PAGE CONTENTS
2 BUTTONS LOCATION AND FUNCTIONS
3 HANDLING COMPACT DISCS
4 ACCESSORY INCLUDED
5 INSTALLATION
7 DETACHABLE CONTROL PANEL
8 WIRING DIAGRAM
9 BASIC OPERATIONS
10 AUDIO OPERATIONS
11 RADIO OPERATIONS
12 CD OPERATIONS
13 REMOTE CONTROL
14 SPECIFICATIONS
15 TROUBLE SHOOTING
1

1. BUTTONS LOCATION AND FUNCTIONS
1
2
12
16
5
10
1. Panel ReleaseButton
2. Mute Button
3. CD EjectButton
4. Audio Button
5. Display Button
6. Local /Distant Button
7. Preset MemoryButtons
8. Mono /Stereo Button
9. Scan Button
10. Volume Knob
11. AutomaticallyStore / PresetScanButton
12. PowerButton
13. Band/LoudnessButton
14. TuningUp/Down&Track Up / Down Buttons
15. RemoteControl Receiver
16. SourceButton
17. PresetEqualizer Button
18. AuxIn Jack
4
17
6
14
8 15
13
11
3
7
1.Teclapara removero painelfrontal
2.TeclaMute
3.Teclapara ejetaro disco
4.Teclade ajustede audio
5.TeclaDisplay
6.TeclaLocal/Distante
7.Teclasde memóriade estações
8.Teclaestéreo/mono
9.TeclaScan
10.Controle devolume
11.Teclaautomática (As)/ PresetScan (Ps)
12.TeclaLigar/desligar
13.TeclaBanda /Loudness
14.Teclasde sintonizaçãode estações/
15.Sensor docontrole remoto
16.TeclaSource
17.TeclaEqualizador pré-programado
18.Entrada Auxiliar
9
18
mudançade faixasde música
1. Entriegel-Taste Bedienteil
2. Stumm-Taste
3. CD-Auswurftaste
4. Audio-Taste
5. Display-Taste
6. Local/ Distant-Taste
7. Senderspeichertasten
8. Mono/ Stereo-Taste
9. Scan-Taste
10. Lautstärkenregler
11. AMSTaste
12. Einschalt-Taste
13. Frequenzband-Taste
14. TitelAUF / AB- Taste
15. Fernbedienungs-Taste
16. Source-Taste
17. PEQ-Taste
18. Front-Audio-Anschluss
1. BoutonDe DéclenchementDu Panneau
2. BoutonD'assourdissement
3. BoutonÉjection D'unCd
4. BoutonDe SélectionAudio
5. BoutonD'écran /Affichage D'information
6. BoutonLocal/distant
7. BoutonsDes StationsPréréglées (m1~m6)
8. BoutonDe LaStéréo DuMono
9. BoutonDu Scanner
10.BoutonDe Volume
11.BoutonDe StockageDes StationsDans LaMémoire
12.BoutonD'alimentation
13.BoutonDe Bande
14.BoutonDe RechercheDes Stations/pistes: EnAvant /En Arrière
15.RécepteurDe LaCommande ÀDistance
16.BoutonDe Régime
17.BoutonDe PEQ
18.AuxA Jack
1. Extraccióndel panel frontal
2. Mute/ silenciamiento desonidoinstantaneo.
3. Aperturadel panel motorizadoyexpulsióndeldisco
4. TeclaAudio
5. Seleccióninformación Display
6. BotónDistancia/Local
7. Botonesde estaciones memorizadas
8. Botónselección mono/estéreo
9. BotónDe Búsqueda
10. BotónDe Volumen
11. Automáticade emisoras/ seleccióndememorias
12. Encendido/Apagado
13. SelectorBandas
14. Botónde selección deemisoras&bandademúsica
15. Receptorde control remoto
16. Selecciónmodos Radio/CD/Entrada auxiliar
17. Teclade ecualización
18. Entradade auxiliar
1. TastoRilascio Frontalino
2. TastoMute
3. TastoEject
4. AudioControlla
5. TastoDisplay
6. BottoneDistante Locale
7. TastiStazioni Memorie Preimpostate
8. Bottonedi Stereo/Mono
9. TastoScan
10. TastoVolume
11. TastoAS/PS
12. TastoPower
13. TastoBanda/Forte
14. Tastosintonizzazione su/gui &tracciasu/gui
15. Destinatariodi controllo remoto
16. TastoMode
17. Bottonedi equilizzatore preprogrammato
18. EntradaAux
2

2. HANDLING COMPACT DISCS
MOISTURE CONDENSATION
On a rainy day or in a very damp area, moisture may condenseon the lenses inside the unit. Should this
occur, the unit will not operate properly. In such a case, remove the disc and wait for about an hour until
the moisture has evaporated.
NOTES ON CDs
1.
A dirty or defective disc may cause sound
dropouts while playing. To enjoy optimum
sound, handle the discasfollows.
Handle the disc by its edge. To keep the disc
clean, do not touchthesurface(P.1).
P. 1
Do not stick paperortapeonthe disc (P.2).
2.
P. 2
Do not expose the discs to direct sunlight or
3.
heat sources such as hot air-ducts, or leave
them in a car parked in direct sunlight where
there can be a considerable rise in
temperature inside the car (P.3).
P. 3
4.
Before playing, clean the discs with an
optional cleaning cloth. Wipe each disc from
the center out (P.4).
P. 4
Do not use solvents such as benzine,
5.
thinner,commercially available cleaners, or
antistatic spray intended for analog discs.
NOTES ON DISCS
If you use the discs explained below, the sticky
residue can cause the CD to stop spinning and
may cause malfunction orruinyourdiscs.
Do not use second-handorrentalCDs that have a
sticky residue on the surface (for example, from
peeled-off stickers or from ink, or glue leaking
from under the stickers).
There are paste residue.
Inkissticky(P.5).
P. 5
Do not useCDs with oldlabelsthat are beginning
to peel off.
Stickers that are beginning
to peel away, leaving a
sticky residue (P.6).
P. 6
Do not use your CDs with labels or stickers
attached.
Labels are attached (P.7).
Do Not Use Special Shape CDs
P. 7
Be sure to use round shape CDs only for this
unit and do not use any special shape CDs.
Use of special shape CDs may cause the unit
to malfunction.(P.8).
P. 8
Be sure to use CDs with disc mark
CD-Rs and CD-RWs which have not undergone
finalization processing cannot be played. (For
more information onfinalization processing, refer
to the manual for your CD-R/CD-RW writing
software or CD-R/CD-RW recorder.) Additionally,
depending on the recording status, it may prove
impossible to play certain CDsrecord on CD-Ror
CD-RW.
****
*******
*******
*******
*******
**************
*******
*******
*******
*******
*******
*******
*******
*******
3
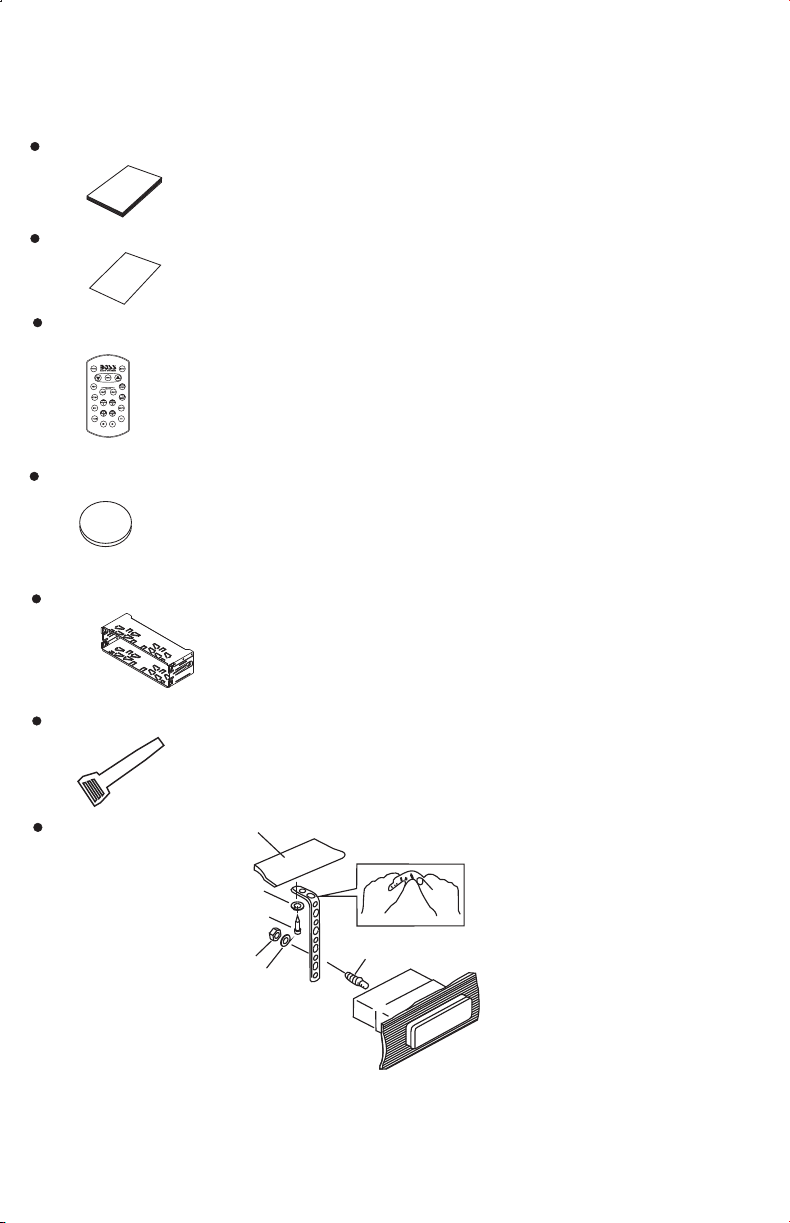
3. ACCESSORY INCLUDED
When first unpacking your new head unit, please check first that the package contains all of the
items below. If something is missing, contact the store where you purchased the player.
Owner’s Manual
O
wn
m
e
r’s
a
n
u
a
l
Warranty Card
W
a
rra
nty
Card
Remote control
Lithium Battery
0
2
2
R
5
C
+
3V
Half Sheeve
Insert Key
1. Dashboard
2. Nut (5mm)
3. Spring washer
4. Screw (4X12mm)
5. Screw
6. Support Strap
7. Plain washer
1
6
7
4
2
5
3
4

4. INSTALLATION
Before finally installing the unit, connect the wiring temporarily and make sure it is all connected up
properly and the unitandsystemworkproperly.
Use only the parts included with the unit to ensure proper installation. The use of unauthorized parts
can cause malfunctions.
Consult with yournearest dealer ifinstallation requires thedrillingof holes orother modifications ofthe
vehicle.
Install the unit where it does not get in the driver's way and cannot injure the passenger if there is a
sudden stop, like anemergencystop.
If installation angle exceeds30°fromhorizontal,the unit might notgiveitsoptimumperformance.
30°
Avoid installing the unit where it wouldbe subjectto high temperature, such as from directsunlight, or
from hot air,fromheater, orwhere it would be subjecttodustdirt or excessive vibration.
Be sure to removethefrontpanelbefore installing the unit.
DIN FRONT/REAR-MOUNT
This unit canbe property installedeither from “Front” (conventionalDIN Front-mount) or “Rear”(DIN
Rear-mount installation, utilizing threaded screw holes at the sides of the unit chassis). For
details, refer tothe following illustratedinstallation methods A andB.
DIN FRONT-MOUNT (Method A)
Installation the unit
1
2
182
53
3
1. Dashboard
2. Holder
After inserting the half sleeve into the
dashboard, select the appropriate tab according
to the thickness of the dashboard material and
bend them inwards to secure the holder in
place.
3. Screw
1
7
4
2
3
6
5
1. Dashboard
2. Nut (5mm)
3. Spring washer
4. Screw (5x15mm)
5. Screw
6. Support Strap
Be sure to use the support strap to secure the
back of the unit in place. The strap can be bent
by hand to the desired angle.
7. Plain washer
5
 Loading...