


DISHWASHER
Installation
Instructions
LAVE-VAISSELLE |
LAVADORA DE PLATOS |
Instructions |
Instrucciones |
d’installation |
de instalación |
|
Cycle Countdown |
|
|
|
|
|
|
|
|
|
|
|
|
On/Off |
|
Power |
Scrub |
Regular |
Delicate/ |
Quick |
Rinse |
Refill |
|
On /Off |
|
|
|
|
|
Scrub |
Wash |
Wash |
Econo |
Wash |
& Hold |
Rinse |
|
|
|
|
|
|
|
Plus |
|
|
|
|
|
Agent |
|
|
High |
Regular |
Rinse |
|
|
|
|
|
|
|
|
|
|
|
Temp |
Temp |
& |
|
|
|
|
|
|
|
|
|
Power Scrub |
|
Wash |
Wash |
Hold |
|
|
|
|
|
|
|
|
|
|
|
|
|
|
|
|
|
|
|
|
|
|
Rinse |
Regular |
|
|
|
|
|
Delay |
Top |
|
|
|
|
|
& Hold |
Wash |
|
|
|
|
Power |
Start |
Rack |
|
Cancel |
|
|
|
|
|
Power |
Temp.Options |
|
|
Hours |
Only |
|
|
|
|
|
|
|
|
||||
|
|
|
|
Drain |
|
|
|
|
Cycles |
|
|
|
|
|
|
|
|
|
|
|
|
|
|
|
|
|
|
SHI66A,
SHU33A, SHU43C, SHU53A, SHU66C, SHU43E, SHU53E, SHU66E, SHV46C, SHV66A,
SHX33A, SHX46A, SHX46B, SHX56B, SHY56A, SHY66C

TABLE OF CONTENTS |
|
INTRODUCTION .................................................. |
.2 |
TOOLS AND MATERIALS NEEDED ......................... |
.3 |
MATERIALS SUPPLIED .......................................... |
.4 |
CHOOSING LOCATION ......................................... |
.5 |
PLUMBING PREPARATION .................................... |
.6 |
ELECTRICAL PREPARATION .................................. |
.7 |
PLACING THE DISHWASHER ................................ |
.8 |
DRAIN HOSE CONNECTION ................................. |
.9 |
HOT WATER CONNECTION .................................. |
10 |
ELECTRICAL SUPPLY CONNECTION ...................... |
11 |
GROUNDING INSTRUCTIONS............................... |
11 |
DOOR PANEL INSTALLATION........................ |
12 & 13 |
FINAL ADJUSTMENTS .......................................... |
14 |
BASE AND TOE PANEL.......................................... |
15 |
TOE PANEL AND HANDLE ..................................... |
16 |
FINAL CHECKLIST ................................................ |
17 |
IMPORTANT: Before you begin, read these instructions completely and carefully. INSTALLER: Please leave this manual with owner for future reference.
OWNER: Save these installation instructions for local electrical inspector’s use and for future reference.
www.boschappliances.com ENGLISH - 1
INTRODUCTION
THESE INSTALLATION INSTRUCTIONS ARE INTENDED
FOR USE BY QUALIFIED INSTALLERS.
In addition to these instructions the dishwasher shall be installed:
•In the United States, in accordance with the National Electric Code/State and Municipal codes and/or local codes.
•In Canada, in accordance with the Canadian Electric Code C22.1 -latest edition/Provincial and Municipal codes and/or local codes.
Please read these installation instructions completely and carefully. They will save you time and effort and help to ensure optimum dishwasher performance.
Be sure to observe all listed warnings and cautions. (Look for the triangles with exclamation marks inside.)

 WARNING

 CAUTION
IMPORTANT
•NEW INSTALLATION - If the dishwasher is a new installation, most of the work
must be done before the dishwasher is moved into place.
•REPLACEMENT - If the dishwasher is replacing another dishwasher, the
connections for the dishwasher being replaced must be checked for compatibility with the new dishwasher and replaced as necessary.
INSPECT THE DISHWASHER
After unpacking the dishwasher and prior to installation, thoroughly inspect the dishwasher for possible freight or cosmetic damage. Report any damage immediately. Cosmetic defects must be reported within 5 days of installation.
NOTE: Please do not discard any bags or items that come with the original package until after the entire installation has been completed!
2 - ENGLISH www.boschappliances.com

TOOLS & MATERIALS NEEDED
Tools Needed for Installation
Hammer Hole saw or 1î hole cutter
Pipe wrench, 2 reqd. |
Tape Measure Slotted screwdriver (#2) |
|
Adjustable wrench, |
Wire Cutter |
Phillips screwdriver (#2) |
|
||
(size med., 2 reqd.) |
|
|
|
Torx screwdriver, #20 |
Wire stripper |
Electric Drill |
|
|
|
Level |
Figure 1
Materials Needed
1 |
Electric Connection - 2 conductor, 1 ground |
insulated electrical supply cable (30” or |
|
|
sufficient length for your installation). |
2 |
Hot Water Supply Line - Minimum 3/8” |
O.D. copper tubing or metal braided |
|
|
dishwasher supply line. |
3 |
Shut-off valve and fittings for hot water |
supply line. |
4
5
6
7
TAPE
90° elbow with 3/8” N.P.T. external threads on one end and sized to fit your water supply line on the other end.
Teflon tape or other pipe thread compound which help seal plumbing connections.
3 twist-on wire connectors for 16 AWG wire.
UL listed conduit connector or strain relief.
Additional materials may be required to comply with local codes.
Figure 2
www.boschappliances.com ENGLISH - 3
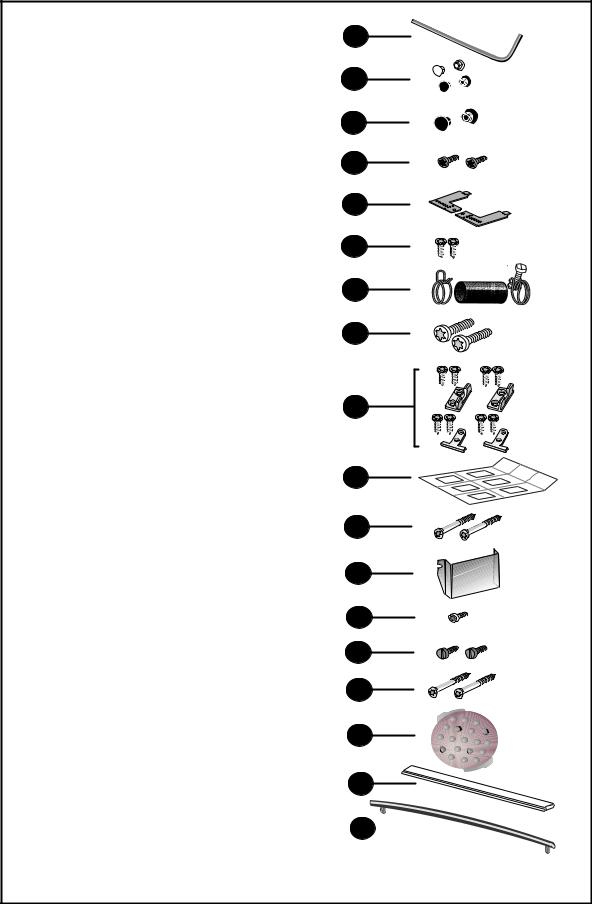
MATERIALS SUPPLIED
Accessory Parts Supplied
Accessory Parts for your model dishwasher will come in one or more plastic bags. Check to make sure that the parts supplied for your model are all there. See Figure 3. If any parts are missing contact your dealer immediately.
A
B
C D
DISHWASHER
INSTALLATION KIT (Clear Bag)
D.Toe Panel Screws (8mm) (2)
E.Mounting Brackets (1L & 1R)
F.Mounting Bracket Screws (2)
G.Rubber Connection Hose (1) and Drain Hose Clamps (2)
SHY66 & SHX56 Models
•Dishwasher Installation Kit (1) and
•(Green Bag) w/ the following:
L.J-Box Cover (1)
M.J-Box Screw (8mm) (1)
N.Toe Panel Screw (4x16) (2)
SHV and SHI Models
•Dishwasher Installation Kit and
•Outer Door Installation Kit (Blue bag):
J.SHI/SHV Panel Installation Template
C.Cap (2 Blk)
K.Wood Screws (2)
I.Mounting Door Brackets(2 plastic) w/Screws (4) and;
Mounting Door Brackets (2 metal)
w/Screws (4)
H.Spring Tension Screw (2)
Manual Bag
All Dishwashers come with a manual bag. The following contents are located in every bag:
•Use & Care Manual
•Installation Instructions P. Tall Item Sprinkler (1)
SHY66 & SHX56 models have an additional part:
Q.Cotton Insulation Strip (1)
Note: Pictures are not to scale.
E
F
G
H
I
J
K
L
M
N
O
P
Q
R
Figure 3
4 - ENGLISH www.boschappliances.com

CHOOSING A LOCATION
THESE INSTALLATION
INSTRUCTIONS ARE
INTENDEDFORUSEBY
QUALIFIEDINSTALLERS
Choosing the Location
Select a location as close to the sink as possible for ready access to water and drain lines.
Most of the installation work is done before the dishwasher is moved into place.
Any built-in dishwasher must be fully enclosed on the top, both sides and back. Therefore the cabinet space below your counter is probably the best location.
For proper operation and appearance of the dishwasher, the cabinet opening should be square and have dimensions as shown in Figure 5.
If the dishwasher is to be installed in a corner, make sure there is adequate clearance to open the door. See Figure 6.
3-1/2” (90mm) |
1-15/16” (49mm) |
4” (102mm) |
Figure 4
23-9/16” (598 mm) |
||
90° |
|
90° |
33-15/16” (862mm) |
minimum |
|
23-5/8” - 24-1/8” |
(600-613 mm) |
|
Figure 5
Clearance |
|
for door |
Dishwasher |
opening |
|
Door in |
|
open |
|
position |
|
|
Countertop |
Figure 6
www.boschappliances.com ENGLISH - 5
 Loading...