


|
|
||||||||
a ad a a |
a |
! |
|||||||
a a |
|
a |
a |
|
|||||
|
a |
|
a |
|
|
|
|
|
|
|
|
d ! |
|
a |
a ! |
a Y |
|
||
|
a a d |
|
|
d d a ! |
|
||||
|
a |
d |
|
|
! |
|
a |
|
|
! |
|
|
|
|
|
|
|||
a ad a a d
" d d a d
d
! a a
a ! a !
d a d |
a ! d ! a! |
|
a d |
! |
|
! |
! |
a |
BC K

Table |
of contents |
|
|
|
|
|
|
|
|
Important |
information |
5 |
||
|
|
|
||
Before installation. . . . . . . . . . . . . . . |
. 5. . . . . . . . . |
|||
|
|
|
|
|
Safety information. . . . . . . . . . . . . . . . 5. . . . . . . . .
Safety information for microwave operation. . . . . . . 7
Causes of damage. . . . . . . . . . . . . . . . 9. . . . . . . .
Your new microwave oven 1
The control panel. . . |
. |
. |
. . . . . . . . . . . 10. . . . . . . . . |
||||||
|
|
|
|
|
|
|
|
|
|
Buttons |
for selecting |
|
the |
|
microwave |
wattage. . |
. |
. . |
10 |
|
|
|
|
|
|
|
|
|
|
Function |
selector . . |
. |
. |
. |
. . . . . |
. . . . |
. |
.11. . . . . . . . . |
|
|
|
|
|
|
|
|
|
|
|
Rotary knob. . . . . . . . . . . . . . . . . . 11. . . . . . . . .
Control buttons and display panel. . . . . . . . . . 12. . . .
Fold away control knobs. . . . . . . . . . . . . .12. . . . . . . .
Types of heating. . . . . . . . . . . . . . . . .13. . . . . . . .
Oven and Accessories. . . . . . . . . . . . . . 16. . . . . . . . .
Cooling fan . . . . . . . . . . . . . . . . . . 17. . . . . . . . .
Before using for the first time 1
Set the time. . . . . . . . . . . . . . . . . . 18. . . . . . . . .
Selecting the language for the text display. . . . . . . . 18
Heating up the oven. . . . . . . . . . . . . . . .18. . . . . . . .
Pre-cleaning the accessories. . . . . . . . . . . 19. . . . . . .
The microwave 1
Ovenware . . . . . . . . . . . . . . . . . . 20. . . . . . . . . .
Setting procedure. . . . . . . . . . . . . . . .20. . . . . . . . .
Selecting several follow-on microwave
power settings. . . . . . . . . . . . . . . . . 22. . . . . . . . .
2

Table of |
contents |
|
|
|
|
|
|
|
|
|
|
|
|
|
|
|
|
|
|
|
|
|
|
|
|
|
|
||
Setting the oven |
|
|
|
23 |
|
|
|
|
|
|
|
|||
|
|
|
||||||||||||
Setting procedure. . . . . . |
. . . . . . . . . .23. . . . . . . . . |
|||||||||||||
|
|
|
|
|
|
|
|
|
||||||
If the |
oven |
is to switch off |
automatically. . . . . . . . . .25 |
|
|
|
|
|||||||
|
|
|
|
|
|
|
|
|
|
|
|
|
||
If the oven is to switch on |
and |
|
off |
automatically. . . . |
|
|
26 |
|
|
|
|
|||
|
|
|
|
|
|
|
|
|
|
|
|
|
|
|
Rapid |
heating |
|
|
|
27 |
|
|
|
|
|
|
|
||
|
|
|
|
|
|
|
|
|
|
|
|
|
|
|
Setting procedure. . . . . . . . . . . . . . . .28. . . . . . . . .
Setting the oven and microwave in combination 28
Setting procedure. . . . . . . . . . . . . . . .29. . . . . . . . .
Automatic programming 31
Setting procedure. . . . . . . . . . . . . . . .31. . . . . . . . .
Notes on Automatic programs. . . . . . . . . . . 34. . . . . .
Program table. . . . . . . . . . . . . . . . . 37. . . . . . . . . .
Memory 41
Storing memory settings. . . . . . . . . . . . . 41. . . . . . . . .
Starting |
the |
Memory |
function. . . . . |
. . |
. . |
. |
. .43. . . . . . |
|
|
|
|
|
|
|
|
|
|
Clock |
|
|
|
|
|
|
44 |
|
|
|
|
|
|
|
|
|
|
Setting procedure. . . . . . . . . . . . . . . .45. . . . . . . . . |
|
|||||||||||||||||||||||||||
|
|
|
|
|
|
|
|
|
|
|
|
|
|
|
|
|
|
|
|
|
|
|
|
|
|
|
||
Auto start |
|
|
|
|
|
|
|
|
|
|
|
|
|
|
46 |
|
|
|
|
|
|
|
|
|
||||
|
|
|
|
|
|
|
|
|
|
|
|
|
|
|
|
|
|
|
|
|
|
|
|
|
||||
Basic |
settings |
|
|
|
|
|
|
|
|
|
|
|
46 |
|
|
|
|
|
|
|
|
|
||||||
|
|
|
|
|||||||||||||||||||||||||
Setting procedure. . . . . . . . . . . . . . . .47. . . . . . . . . |
|
|||||||||||||||||||||||||||
|
|
|
|
|
|
|
|
|
|
|
|
|
|
|
|
|
|
|
|
|
|
|
|
|
|
|
|
|
Childproof lock |
|
|
|
|
|
|
|
|
|
|
|
|
|
|
|
48 |
|
|
|
|
|
|
|
|
|
|||
|
|
|
|
|
|
|
|
|
|
|
|
|
|
|
|
|
||||||||||||
Timer |
|
|
|
|
|
49 |
|
|
|
|
|
|
|
|
|
|||||||||||||
|
|
|
||||||||||||||||||||||||||
Setting procedure. . . . . . . . . . . . . . . .49. . . . . . . . . |
|
|||||||||||||||||||||||||||
|
|
|
|
|
|
|
|
|
|
|
|
|
|
|
|
|
|
|
|
|
|
|
|
|
|
|
||
Safety |
switch*off |
|
|
|
|
|
|
|
|
|
|
|
|
|
|
5 |
|
|
|
|
|
|
|
|
|
|||
3

Tab e f te ts
Care a d ea i g |
|
|
|
|
|
51 |
|
|
|
|
|
|
|
|
|
|
|
|
||||||||||||||||||||
|
|
|
|
|
|
|
|
|
|
|
|
|
|
|
|
|
|
|
|
|
|
|
|
|
|
|
|
|
||||||||||
Appliance exterior |
|
|
|
|
|
|
|
|
|
|
|
51 |
|
|
|
|
|
|
|
|
|
|
|
|
|
|||||||||||||
|
|
|
|
|
|
|
|
|
|
|
|
|
|
|
|
|
|
|
|
|
|
|
|
|||||||||||||||
Oven |
|
|
|
|
|
|
|
|
|
|
|
51 |
|
|
|
|
|
|
|
|
||||||||||||||||||
|
|
|
|
|
|
|
|
|
|
|
|
|
|
|
|
|
|
|
|
|
|
|
|
|
||||||||||||||
Cleaning the glass panels |
|
|
|
|
|
|
|
|
|
54 |
|
|
|
|
|
|
|
|
|
|
|
|||||||||||||||||
|
|
|
|
|
|
|
|
|
|
|
|
|
|
|
|
|
|
|
|
|
||||||||||||||||||
Seal |
|
|
|
|
|
|
|
|
56 |
|
|
|
|
|
|
|
|
|||||||||||||||||||||
|
|
|
|
|
|
|
|
|
|
|
|
|
|
|
|
|
|
|
|
|||||||||||||||||||
Accessories |
|
|
|
|
|
56 |
|
|
|
|
|
|
|
|
|
|
||||||||||||||||||||||
|
|
|
|
|
|
|
|
|
|
|
|
|
|
|
|
|
|
|
|
|
|
|||||||||||||||||
Tr ub esh ti g |
|
|
|
|
56 |
|
|
|
|
|
|
|
|
|
|
|
|
|
||||||||||||||||||||
|
|
|
|
|
|
|
|
|
|
|
|
|
|
|
|
|
|
|
|
|
|
|||||||||||||||||
Replacing the oven lightbulb |
|
|
|
|
|
|
58 |
|
|
|
|
|
|
|
|
|
|
|
||||||||||||||||||||
|
|
|
|
|
|
|
|
|
|
|
|
|
|
|
|
|
|
|
|
|
|
|||||||||||||||||
Changing the door seal |
|
|
|
|
|
|
59 |
|
|
|
|
|
|
|
|
|
|
|
|
|||||||||||||||||||
|
|
|
|
|
|
|
|
|
|
|
|
|
|
|
|
|
|
|
|
|
|
|||||||||||||||||
After"Sa es |
Servi e |
|
|
|
|
|
|
|
|
|
|
|
|
6 |
|
|
|
|
|
|||||||||||||||||||
|
|
|
|
|
|
|
|
|
|
|
|
|
|
|
|
|
|
|
|
|
|
|
|
|
|
|
||||||||||||
Tab es |
a d tips |
|
|
|
|
|
|
|
|
|
|
|
|
|
|
|
61 |
|
|
|
|
|
|
|
||||||||||||||
|
|
|
|
|
|
|
|
|
|
|
|
|
|
|
|
|
|
|
|
|
|
|
||||||||||||||||
Defrosting heating up and cooking |
with |
|
|
|
|
|
|
|
|
|
|
|
|
|
|
|
|
|
|
|
|
|
||||||||||||||||
the microwave |
|
|
|
|
|
|
|
|
|
|
|
61 |
|
|
|
|
|
|
|
|
|
|
|
|
|
|||||||||||||
|
|
|
|
|
|
|
|
|
|
|
|
|
|
|
|
|
|
|
|
|
|
|
|
|
|
|
|
|
||||||||||
Tips |
for |
microwave |
operation |
|
|
|
|
|
|
|
|
|
|
|
|
66 |
|
|
|
|
|
|
|
|
|
|
|
|
||||||||||
|
|
|
|
|
|
|
|
|
|
|
|
|
|
|
|
|
|
|
|
|
|
|
|
|
||||||||||||||
Meat poultry fish |
|
|
|
|
|
|
|
|
66 |
|
|
|
|
|
|
|
|
|
|
|
|
|
||||||||||||||||
|
|
|
|
|
|
|
|
|
|
|
|
|
|
|
|
|
|
|
|
|
|
|
|
|
|
|
|
|||||||||||
Advice |
on |
roasting |
and |
grilling |
|
|
|
|
|
|
|
|
|
|
|
70 |
|
|
|
|
|
|
|
|
|
|
|
|||||||||||
|
|
|
|
|
|
|
|
|
|
|
|
|
|
|
|
|
|
|
|
|
|
|
|
|
|
|
|
|
|
|
||||||||
Cakes |
and |
pastries |
|
|
|
|
|
|
|
|
|
|
|
|
|
70 |
|
|
|
|
|
|
|
|
|
|
|
|
||||||||||
|
|
|
|
|
|
|
|
|
|
|
|
|
|
|
|
|
|
|
|
|
|
|
|
|
|
|
|
|||||||||||
Baking tips |
|
|
|
|
|
|
|
|
|
|
|
73 |
|
|
|
|
|
|
|
|
|
|
|
|
|
|||||||||||||
|
|
|
|
|
|
|
|
|
|
|
|
|
|
|
|
|
|
|
|
|
|
|
|
|
|
|
|
|
|
|
|
|||||||
Energy |
saving |
tips |
|
|
|
|
|
|
|
|
|
|
|
|
|
74 |
|
|
|
|
|
|
|
|
|
|
|
|
|
|||||||||
|
|
|
|
|
|
|
|
|
|
|
|
|
|
|
|
|
|
|
|
|
|
|
|
|
|
|
|
|
|
|
|
|||||||
Bakes |
gratins |
|
toast |
|
|
|
|
|
|
|
|
|
|
|
|
74 |
|
|
|
|
|
|
|
|
|
|
|
|
|
|||||||||
|
|
|
|
|
|
|
|
|
|
|
|
|
|
|
|
|
|
|
|
|
|
|
|
|
|
|
|
|
|
|
|
|
|
|
||||
Deep2Frozen |
|
|
|
|
|
|
|
|
|
|
|
|
|
|
|
|
|
|
|
|
|
|
|
|
|
|
|
|
|
|
|
|
|
|
||||
Ready Meals |
|
|
|
|
|
|
|
|
75 |
|
|
|
|
|
|
|
|
|
|
|
|
|
||||||||||||||||
|
|
|
|
|
|
|
|
|
|
|
|
|
|
|
|
|
|
|
|
|
|
|
|
|
|
|
|
|
|
|
|
|
|
|
||||
Braising |
|
|
|
|
|
|
|
|
|
|
|
|
|
|
|
|
|
|
76 |
|
|
|
|
|
|
|
|
|
|
|
|
|
||||||
|
|
|
|
|
|
|
|
|
|
|
|
|
|
|
|
|
|
|
|
|
|
|
|
|
|
|
|
|
|
|
|
|
||||||
Tips |
for |
braising |
|
|
|
|
|
|
|
|
|
|
|
|
|
|
77 |
|
|
|
|
|
|
|
|
|
|
|
|
|
||||||||
|
|
|
|
|
|
|
|
|
|
|
|
|
|
|
|
|
|
|
|
|
|
|
|
|
|
|
|
|
|
|
||||||||
A ry a ide |
i |
|
f d |
|
|
|
|
|
|
|
|
|
|
|
|
78 |
|
|
|
|
|
|
|
|
|
|
|
|
||||||||||
|
|
|
|
|
|
|
|
|
|
|
|
|
|
|
|
|
|
|
|
|
|
|
|
|
|
|
|
|
|
|
|
|||||||
What |
can |
you |
|
do? |
|
|
|
|
|
|
|
|
|
|
|
|
|
|
78 |
|
|
|
|
|
|
|
|
|
|
|
|
|||||||
|
|
|
|
|
|
|
|
|
|
|
|
|
|
|
|
|
|
|
|
|
|
|
|
|
|
|
|
|
|
|
|
|
||||||
Test |
dishes |
|
|
|
|
|
|
|
|
|
|
|
|
|
|
|
|
8 |
|
|
|
|
|
|
|
|
|
|
|
|
|
|||||||
4

Important information
Read this instruction manual carefully. Only then wil you be able to operate your appliance safely and correctly.
Please |
keep |
the |
instruction |
and installation |
manual i |
a safe place. Please pass on these instruction |
|||||
manuals |
to |
the |
new owner |
if you sell the |
applianc |
Before installation
Disposing in an environmentally responsible manner
Transport damage
Electrical connection
Installing and connecting your microwave oven
Unpack |
the appliance and dispose of the packaging |
in an |
environmentally1responsible manner. |
This appliance is labelled in accordance with the European Directive 2002/96/EG concerning used
electrical and electronic appliances |
(waste electrical |
|||||
and electronic equipment - WEEE). |
|
|
|
|
||
The guideline determines the framework |
for the |
retu |
||||
and recycling of used appliances as applicable. |
|
|||||
Check the appliance for damage |
after unpacking |
it. |
||||
Do |
not connect the appliance if |
it |
has |
been |
dama |
|
in |
transport. |
|
|
|
|
|
If |
the power cable is damaged, |
it |
must |
be |
replace |
|
a specialist trained by the manufacturer in order to prevent hazards.
Please observe the special installation manual.
Safety information
|
This |
appliance is |
intended for domestic use only. |
||
|
Only |
use the |
microwave oven for preparing foodstuf |
||
Environment |
Never expose |
the |
appliance |
to excessive heat or |
|
|
moisture. There is |
a risk of |
short1circuiting. |
||
5

Children and the microwave
Children are only permitted to use the solo microw function if they have been instructed how to do so They must be able to operate the microwave oven correctly They must understand the hazards indicated in the instruction manual
Children must be supervised by adults at all times during combination oven operation There is a risk burning
Hot oven |
Open the oven door carefully Hot steam may esca |
Damaged microwave door or door seal
Inadequate cleaning
Never touch the surfaces of heating and cooking appliances
Never touch the internal surfaces of the microwave oven or the heating elements There is a risk of burning
Children must be kept at a safe distance from the appliance
Never place combustible items in the microwave oven Risk of fire!
Never open the microwave oven door if there is smoke inside There is a risk of burning Switch of
microwave |
oven Pull |
out the mains plug or switch |
|||
the |
appliance by |
the |
fuse in the fuse box |
||
Never |
trap |
cables |
of |
electrical appliances in the ho |
|
oven door The cable |
insulation could melt There i |
||||
risk |
of |
short'circuiting |
|
||
oven Never use the microwave if the microwave oven do
is open or if the door seal is damaged Otherwise microwave energy may escape Do not use the
microwave again until it has been repaired
Clean the appliance on |
a regular basis The surfac |
the appliance could be destroyed and the appliance |
|
could corrode over time if it is not cleaned with |
|
sufficient care Microwave |
energy could escape |
Repairs |
Incorrect repairs |
are |
dangerous |
There is |
a |
risk of |
|
electrocution! |
|
|
|
|
|
|
Repairs may only be carried out by after'sales serv |
|||||
|
technicians who |
have |
been fully |
trained |
by |
us |
6

Safety information for microwave operation
Microwave power and time
Ovenware
Packaging
If the appliance is faulty, switch it off by the fuse fuse box or disconnect the appliance at the mains. Contact the after+sales service.
You must not open the casing. The oven is a hig voltage appliance. Risk of electrocution!
Use of the microwave is intended exclusively for th preparation of foodstuffsd . Using the microwave for other purposes may be dangerous and may result damage e.g. grains or cereals could catch fire whe heated. Risk of fire
Do |
not |
select |
a microwave power |
or time |
setting t |
is |
higher |
then |
d |
could |
catch fire |
necessary. The food |
The appliance could be damaged. Risk of fire Follow the information provided in the instruction manual.
Only use ovenwaredthat is suitable for use in a microwave.
Porcelain or ceramic ovenware can have small perforations in the handles or lid. These perforations conceal a cavity below. Any liquid that penetrates t cavity could cause the ovenware to crack. There is risk of injury.
Meals heated in the microwave oven give off heat. ovenware can become hot. There is a risk of burn Always use an oven cloth or oven gloves to remov ovenware and accessories from the microwave.
Never heat meals din heat+retaining packages. Risk o fire.
Do not leave food heating unattended in containers made of plastic, paper or other combustible materia
Airtight packaging may burst when food is heated. There is a risk of burning.
Follow the information provided on the
packaging. |
Always use an oven cloth or oven glove |
to remove |
meals. |
7
Drinks
Baby food
Foods with shells or skin
Drying food
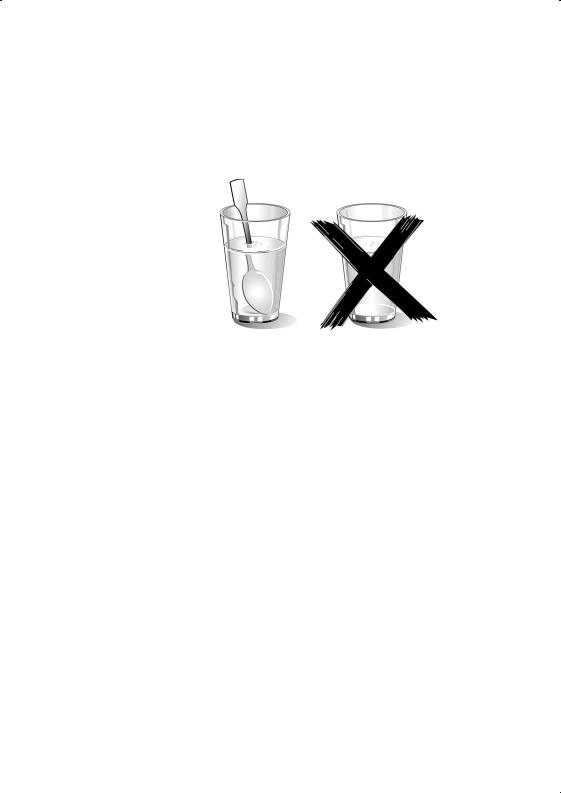
There is a possibilityd of delayed boiling when a liq heated This means that the liquid reaches boiling
temperature |
without |
the usual steam |
bubbles rising |
|
the |
surface |
Even |
if the container only vibrates a li |
|
the |
hot liquid can |
suddenly boil over |
or spatter T |
|
is a risk of burning
When heating liquids always place a spoon in the container This will prevent delayed boiling
Never heat drinks in containers that have been tigh sealed There is a risk of explosion
Never overheat alcoholic drinks There is a risk of explosion
Never heat baby food in closed containers lways remove the lid or teat
Stir |
or |
shake well after the food |
has |
been heated |
|||
is |
the |
only |
way to |
ensure |
even |
heat |
distribution T |
is a risk of burning |
|
|
|
|
|||
Check |
the |
temperature of |
the food before it is giv |
||||
the |
child |
|
|
|
|
|
|
Never |
cook |
eggs in |
their |
shells |
Never |
reheat |
|
hard$boiled eggs asdthey may crack or explode Th
same |
applies to shellfish and crustaceans There is |
||
risk of |
burning |
|
|
lways |
prick |
the |
yoke when frying or poaching egg |
lways |
prick |
the |
skin of foodstuffs with peels or s |
such as apples tomatoes potatoes and sausages before cooking to prevent the peel or skin from bursting
Never use the microwaved to dry food Risk of fire
8

Food with a low water |
Do |
not |
defrost |
or heat food |
at |
too high a power |
||
content |
too |
long |
if |
the |
d |
low |
water content, e.g. |
|
|
food has a |
|||||||
|
bread. |
Risk |
of |
fire |
|
|
||
Cooking oil |
Never |
use |
the |
d |
|
|
||
microwave to heat cooking oil on its |
||||||||
|
own. |
Risk |
of fire |
|
|
|||
Causes of damage
Baking |
tray |
or |
aluminium Do |
not |
place baking trays on |
the microwave |
floor. |
||||||||||
foil on |
the |
microwave |
floor |
line |
the microwave floor with aluminium foil. |
|
|||||||||||
|
|
|
|
|
|
not |
|
||||||||||
|
|
|
|
|
|
This causes heat to accumulate. Baking and roastin |
|||||||||||
|
|
|
|
|
|
times will no longer be correct and the enamel will |
|||||||||||
|
|
|
|
|
|
damaged. |
|
|
|
|
|
|
|
|
|
||
Water |
in the |
oven |
Never pour water directly into a hot microwave. Thi |
||||||||||||||
|
|
|
|
|
|
could damage |
the |
enamel. |
|
|
|
|
|
||||
Fruit |
juice |
|
|
|
Do not place too much on the universal pan when |
||||||||||||
|
|
|
|
|
|
baking very moist fruit cakes. |
Fruit juice |
dripping |
fro |
||||||||
|
|
|
|
|
|
the universal pan leaves stains that cannot be |
|
||||||||||
|
|
|
|
|
|
removed. |
|
|
|
|
|
|
|
|
|
||
Cooling |
with |
the |
Only leave the microwave oven to cool with the do |
||||||||||||||
microwave |
oven |
door |
openclosed. |
Do |
not |
allow anything |
to become |
trapped |
in |
||||||||
|
|
|
|
|
|
the microwave oven door. The |
fronts |
of |
adjacent |
un |
|||||||
|
|
|
|
|
|
may be damaged over time even if you only leave |
|||||||||||
|
|
|
|
|
|
microwave oven door open slightly. |
|
|
|
|
|||||||
Very |
dirty |
oven |
seal |
If the oven door seal is very |
dirty, the door will no |
||||||||||||
|
|
|
|
|
|
longer close properly when the microwave is in |
|
||||||||||
|
|
|
|
|
|
operation. The front of adjacent units could be |
|
||||||||||
|
|
|
|
|
|
damaged. Keep the seal clean. |
|
|
|
|
|||||||
Using |
the |
microwave |
oven Do |
not |
stand |
or |
sit on |
the microwave oven |
door. |
||||||||
door |
as |
a |
seat |
|
|
|
|
|
|
|
|
|
|
|
|
|
|
Using |
the |
microwave |
oven Do |
not |
switch |
on |
the microwave unless |
there |
is |
fo |
|||||||
without |
food |
|
|
inside. The microwave could be overloaded if it is |
|||||||||||||
|
|
|
|
|
|
||||||||||||
|
|
|
|
|
|
switched |
on |
without any |
food |
inside. |
An |
exception |
|||||
|
|
|
|
|
|
this |
rule |
is |
for |
short(term |
testing of |
ovenware |
(see |
||||
notes on ovenware).
9
Your new microwave oven
He e |
y |
i ea e ab y e |
ic a |
e . |
The |
c a e a d i i che |
a d |
i dica a e ex ai ed he e. The y e f hea i g
a ai ab e |
a d he |
acce ie i c ded i h y |
i be |
ex ai ed |
he e. |
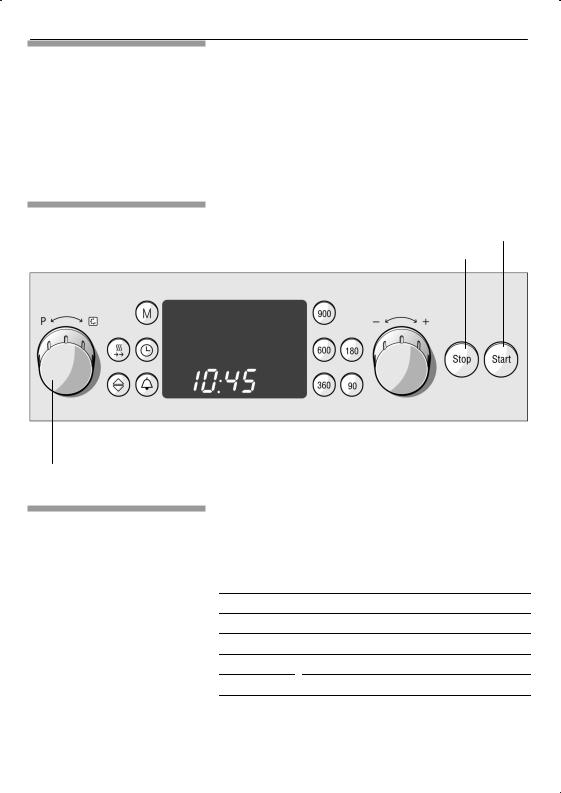
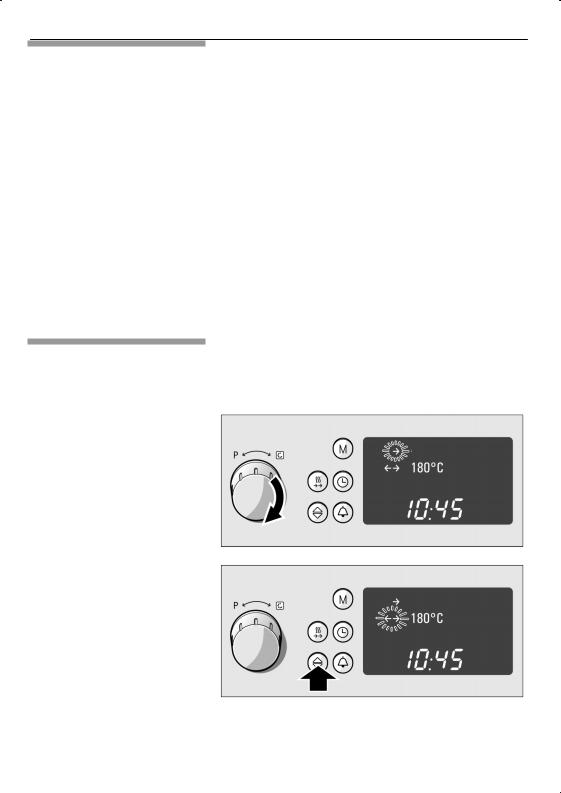
The control panel
S a b
S b
|
|
|
|
|
|
|
|
|
|
|
|
|
|
|
|
|
|
|
|
|
|
|
|
|
|
|
F c i |
|
Di ay |
a e a d |
B f |
|
R a y b |
||
|
||||||||
e ec |
|
c |
b |
ic a e |
||||
|
||||||||
|
|
|
|
|
|
f c i |
||
Buttons for selecting the microwave wattage
U e he e b e ec he ic a e |
a age |
e i ed. |
|
90 W for defrosting delicate foods
180 W for defrosting and continued cooking
360 W for cooking meat and heating delicate foods
600 W for heating and cooking food
900 W for heating liquids
The |
a age e ec ed i h i he di ay he |
b |
i e ed. |
10
Function selector
Set the mode of operation and the temperature usi the function selector Turning the function selector clockwise shows the type of heating and anticlockwise the programmes
In the display you will see the type of heating you selected and in the second line a temperature or le as a default value
Mode of operation |
|
Temperature |
range/levels |
|||||||
|
|
|
|
|
|
|
|
|
||
Top/bottom |
heating |
30 |
3 |
300 |
ºC |
|
|
|||
|
|
|
|
|
|
|
|
|
||
Intensive |
heat |
100 |
3 |
300 |
ºC |
|
|
|||
|
|
|
|
|
|
|
|
|
|
|
Hot |
air |
|
|
30 |
3 |
250 |
ºC |
|
|
|
|
|
|
|
|
|
|
|
|
||
3D hot |
air |
30 |
3 |
250 |
ºC |
|
|
|||
|
|
|
|
|
|
|
|
|
||
Bottom |
heating |
30 |
3 |
200 |
ºC |
|
|
|||
|
|
|
|
|
|
|
|
|
|
|
Hot |
air |
grilling |
100 |
3 |
250 |
ºC |
|
|
||
|
|
|
|
|
|
|
|
|||
Grill, |
small |
area |
|
low, |
moderate, |
high |
||||
|
|
|
|
|
|
|
|
|||
Grill, |
large |
area |
|
low, |
moderate, |
high |
||||
|
|
|
|
|
|
|
|
|
|
|
Braising |
|
|
70 |
3 |
100 |
ºC |
|
|
||
|
|
|
|
|
|
|
|
|||
Plate |
warming |
30 |
3 |
70 ºC |
|
|
||||
|
|
|
|
|
|
|
|
|
||
Keep |
warm |
60 |
3 |
100 |
ºC |
|
|
|||
|
|
|
|
|
|
|
||||
Automatic |
programme |
11 |
Program |
groups |
||||||
|
|
|
|
51 |
Programs |
|
|
|||
|
|
|
|
|
|
|
|
|
|
|
Rotary knob
You use the rotary knob to set the time duration time timer and weight for the automatic programs
Ranges
1 |
sec |
3 |
10.00 |
h |
|
Duration |
|
|
|
|
|
|
|
|
|
|
|
1 |
sec |
3 |
1.30 |
h |
|
Microwave |
duration |
|
|
|
|
|
|
|
Exception: 900 W = 1 sec 3 30 min |
||
|
|
|
|
|
|
|
|
|
Weight |
|
|
|
|
Depending |
on the program |
||
|
|
|
|
|
|
|
|
|
1 |
sec |
3 |
10.00 |
h |
|
Timer period |
||
|
|
|
|
|
|
|
|
|
11
Control buttons and display panel
button |
Use to change line in the text |
|||||||
|
|
display |
|
|
|
|
|
|
|
|
|
|
|
|
|
|
|
Rapid |
heating button |
Use |
to |
heat |
the |
oven |
quickly |
|
|
|
|
|
|
|
|
|
|
Clock |
buttonj |
Use |
to |
select |
the |
time |
or the end |
|
|
|
time ! |
|
|
|
|
|
|
|
|
|
||||||
M button |
Use to select a memory mode |
|||||||
|
|
|
|
|||||
Timer |
buttona |
Use to select the kitchen timer |
||||||
|
|
function independent of the oven |
||||||
|
|
|
|
|||||
Stop |
button |
Use to stop oven operation or to |
||||||
|
|
cancel |
a setting |
|
|
|
||
|
|
|
|
|
|
|
|
|
Start |
button |
Use |
to |
start |
oven |
operation |
||
|
|
|
|
|
|
|
|
|
Fold away control knobs
The values set can be seen in the display panel
The text display guides you through the setting It shows the selected mode of operation and temperature or level It shows the automatic program dishes and gives you information on settings The te displays can be shown in severallanguages
The heating indicator provides a visual display of th temperature increase The heating indicator does not appear during grilling or the automatic programme
The |
control |
knobs fold |
away To move them in and |
out |
press |
the control |
knob |
You can turn the control knob clockwise or anti clockwise
12
Types of heating
Different |
types of |
heating |
are available with the ove |
|
You |
can |
therefore |
select |
the best method for cooki |
any |
dish |
|
|
|
Microwaves
Microwaves are converted into heat in foodstuffs Microwaves are suitable for rapid defrosting warming melting and cooking
Top/bottom |
heating |
|
||||
This |
ensures |
the even distribution of heat onto the |
||||
cake |
or |
|
roast |
from |
the top and bottom of the ove |
|
This |
is |
the |
optimal |
method for cooking sponge cak |
||
in tins |
and |
sponge |
flans and cakes in the universa |
|||
pan |
Top |
and |
bottom heating is also suitable for le |
|||
joints |
of |
beef |
veal |
and game |
||
Intensive heat
The strong heat from below gives baked goods a particularly crispy base Savoury cakes such as Quiche Lorraine no longer require pre$baking Intensive heat is also the ideal type of heating for baking in moulds made from tin glass or porcelain which reflect heat or are poor heat conductors
1

Hot |
air |
|
|
|
A an on t a k wall |
d str ut s |
t at |
rom t |
|
top and ottom l m nts |
qually t rou out |
t |
||
ov n |
You an us ot |
a r to ak |
spon |
ak s |
t ns |
|
|
|
|
3D hot |
air |
|
|
|
|
|
|
|
A v nt lator on t a k |
|
wall d str ut s |
at rom |
|||||
upp r and |
low r |
l m nts |
and t r n |
|
l m nt v |
|||
n t ov n |
|
|
|
|
|
|
||
Us n 3D ot a r |
you an ak ak s |
|
and s u ts |
|||||
two l v ls |
T |
r qu r d |
ov n t mp ratur s ar low |
|||||
t an t os |
or |
top and |
ottom at n |
|
Add t onal |
|||
ak n trays may o ta n d rom sp al st s ops |
||||||||
Bottom |
heating |
|
|
|
|
|
||
Us n t ottom |
at n |
l m nt you |
|
an ak o |
||||
rown m als rom |
low |
T s s also |
su ta l or |
|||||
ook n |
m als |
n |
a wat r |
at |
|
|
||
Hot |
air |
grilling |
|
|
|
|
|
|
T s |
typ o at n nvolv s |
t r ll l m nt and |
||||||
an |
sw t n on and o alt rnat ly Dur n |
t |
pau |
|||||
n at n t |
an |
r ulat s |
t at |
n rat d |
y |
|||
t |
r ll |
around |
t |
ood T s nsur s |
t at |
p s |
||
m at ar |
r sp d and rown |
on all s d s |
|
|
||||
14
Grill, small area
Only the middle section of the grill heating element switched on
This type of heating is ideal for cooking small quantities and saves energy Place the items to be grilled in the centre of the wire rack
Grill, large area
The entire area under the grill heating element becomes hot This is ideal if you wish to cook se steaks sausages pieces of fish or slices of toast
Braising
Braising in the temperature range from 70 ºC to 100 ºC produces particularly succulent results with all types of meat
Plate warming
You can use temperatures from 30 ºC to 70 ºC to warm porcelain dishes
Food does not cool down as quickly in warmed dishes and drinks also remain warm longer Always use an oven cloth or oven glove when removing dishes from the oven
15

Keep w rm
You can use temperatures from 60ºC to 100 ºC to keep food warm Remember that warm food spoils more easily so you should therefore not keep dish warm for longer than two hours
Oven nd
A essories
3 |
2 |
1 |
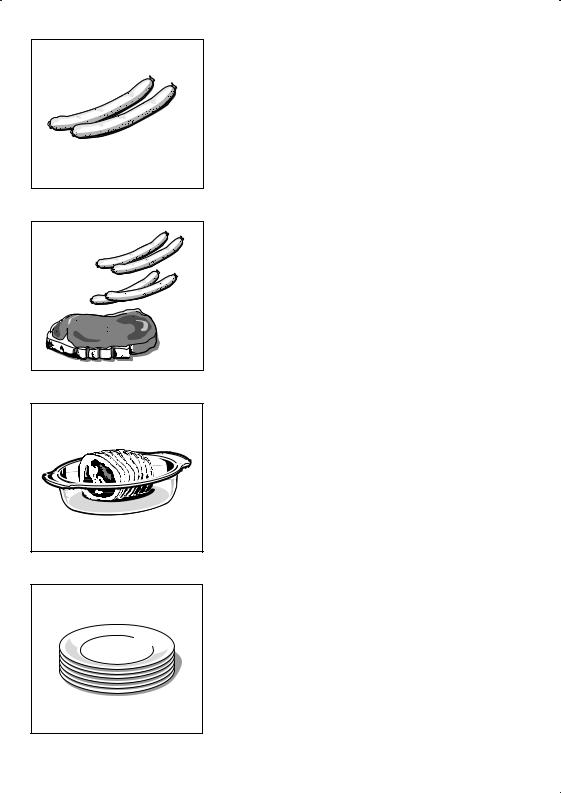
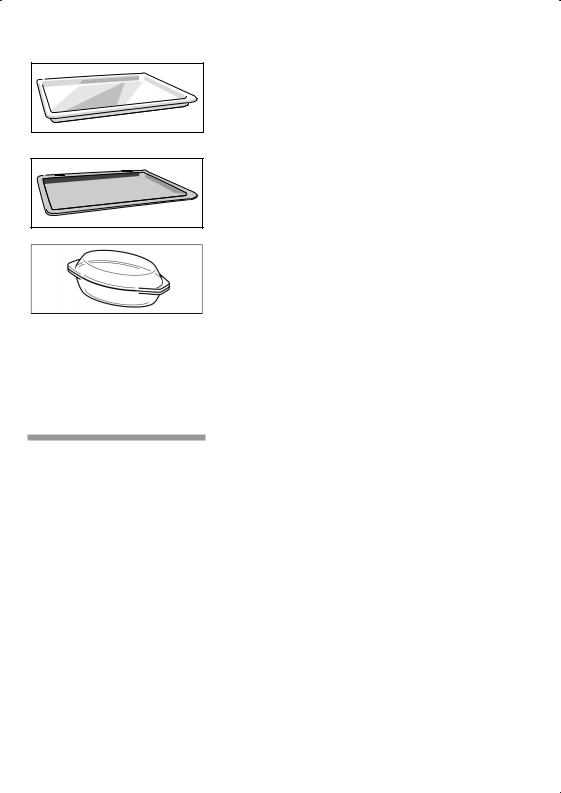
A essories |
The accessories can be inserted into the oven at 3 different levels
You can pull the accessories out by two thirds wit causing them to tip This enables easy removal of dishes from the oven
Accessories may be purchased at a later date from the after,sales service or from specialist shops Plea specify the HEZ/HMZ number
Wire |
r k |
|
For ovenware cake tins roasting tins and grilled |
||
foods |
The wire |
rack can be used with the curvatu |
facing |
upor |
down( |
Univers l p n HEZ8 2000
For large roasts dry and moist cakes bakes and
gratins It can also act as a splashguard |
if you ar |
||
grilling |
meat directly on the wire rack To |
do |
this |
the universal pan at level 1 |
|
|
|
Insert |
the universal pan into the oven with |
the |
tap |
edge |
facing the oven door |
|
|
1
Special |
accessory |
|
|
|
|
|
|
|
|
|
Glass |
pan |
HEZ863000 |
|
|
|
|
||
|
F a ge a d ! a d i ca e ba e a d |
||||||||
|
g a i I ca a ac a a |
a hg a d |
if ! a |
||||||
|
g i i g ea di ec ! he |
i e |
ac T |
d |
hi |
||||
|
he i e a a a e e 1 |
|
|
|
|
||||
|
Enamel |
baking |
trayHEZ861000 |
|
|
|
|
||
|
f ca e |
|
a d |
bi c i |
|
|
|
|
|
|
P h he |
ba i g a! a fa |
a |
ib e |
i |
he |
|||
|
i h he i g edge faci g a d he e d |
||||||||
|
Glass roasting dish H Z21 |
GB |
|
|
|||||
|
f b ai ed di he a d ba e |
ha a e c ed i h |
|||||||
|
e Thi i a ic a ! i ab e f a a ic |
|
|||||||
|
g a |
|
|
|
|
|
|
|
|
Note |
C de a i a! a ea he d a e i e i |
|
a a d f Thi i a a d d e affec |
|
e a i f he ic a e Wi e a a! he |
|
c de a i af e c i g |
Cooling fan
The |
e |
i |
e i ed |
i h |
a c i g fa I |
i ch |
||
|
a d ff |
a a ica ! |
he |
ece a ! |
The |
a |
||
ai e ca e ab e he d |
|
|
|
|||||
The |
e |
e ai c d |
he |
he ic |
a e i |
i |
||
e a i |
The c i g |
fa |
a! i ch a ! |
a! |
||||
The |
fa a! e e |
he ic a e e a i |
||||||
ha |
e ded |
|
|
|
|
|
|
|
17

Before using for the first time
Set the time
Selecting the language for the text display
Changing the language
This |
section tells |
you |
everything you need to do b |
using |
the cooker |
for |
the first time. |
Heat the oven and clean the accessories. Read the safety instructions in the •Important information" section.
Firstly, check to see ifjtheclock symbol and three zeros are flashing in the display. •Set time" appear the display.
1 Set the time using the rotary knob.
2 Press thej clock button.
The oven is now ready for use.
The |
texts appearing in the display of your applianc |
are |
in German. |
You can choose different languages for the text display.
1 Press the •M" button until •Sprache auswählen" appears in the first line.
2 Use |
the |
button to change to the second line. |
|
3 Use |
the |
function selector to choose the languag |
|
4 Press |
the |
•M" |
button. |
The language |
is saved. |
||
Heating up |
the oven |
|
|
|
Heat |
the |
empty oven with the door closed to rem |
|
the |
new |
oven smell. |
Method |
1 Using |
the function selector, choose hot air. |
|
1

Pre cleaning the accessories
2 Use button to change |
to the |
second line. |
|
|
||||
3 Using the function selector, set |
the temperature |
|
||||||
250 ºC. |
|
|
|
|
|
|
|
|
4 Press thej clock button. |
The display |
shows |
|
|||||
20.00 |
minutes. |
|
|
|
|
|
|
|
5 Press the Start button. |
|
|
|
|
|
|||
After 20 minutes, the oven |
switches itself off. |
|
|
|||||
The display reads •End time". A signal sounds. |
|
|||||||
Press the |
Stop button. |
The |
signal |
stops |
and |
the |
ti |
|
is displayed |
again. |
|
|
|
|
|
|
|
Ventilate the |
kitchen for |
as |
long as the |
oven |
is |
he |
||
Please wash the accessories thoroughly with soapy water and a cleaning cloth before using them.
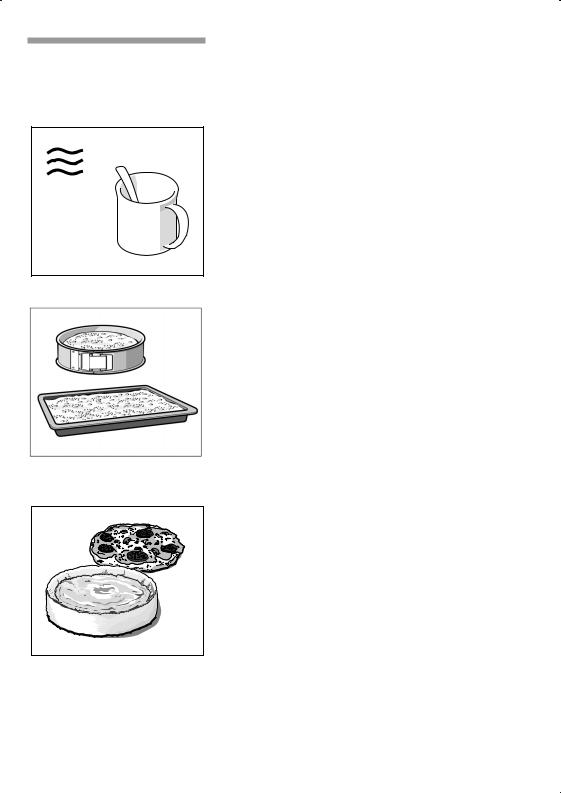
The |
microwave |
|
|
|
|
|
The microwave can be used solo, i.e. on its own, |
||
|
|
combination with a different type of heating. |
||
|
|
Here you will find information |
about |
ovenware and |
|
|
how to set the microwave. |
|
|
Tables |
and tips |
The Tables and tips section |
contains |
a number of |
|
|
examples of how to defrost, heat and cook using |
||
|
|
microwave. |
|
|
1

Ovenware
Suitable ovenware |
Suitable dishes are heat,resistant ovenware |
|
|
|
|||||
|
|
made of glass glass ceramic porcelain ceramic or |
|||||||
|
|
heat,resistant plastic These materials do not reflect |
|||||||
|
|
microwaves |
|
|
|
|
|
|
|
|
|
You can also use serving dishes This saves you |
|
||||||
|
|
having to transfer |
food from one dish to |
another |
|
||||
|
|
You should only |
use ovenware |
with |
gold |
or |
silver |
r |
|
|
|
if the manufacturer guarantees |
that |
they |
are |
suitable |
|||
|
|
for use in microwave ovens |
|
|
|
|
|
|
|
Unsuitable |
ovenware |
Metal ovenware is unsuitable |
|
|
|
|
|
|
|
|
|
Metal reflects microwaves Food in covered metal |
|
||||||
|
|
containers will remain cold |
|
|
|
|
|
|
|
|
|
Important Metal , e g a spoon in |
a glass |
, |
must |
||||
|
|
kept at least 2 cm from the |
oven |
walls |
and |
the |
i |
||
|
|
of the door Sparks could destroy the glass |
on the |
||||||
|
|
inside of the door |
|
|
|
|
|
|
|
Ovenware |
test |
Do not switch on the microwave unless |
there |
is |
fo |
||||
|
|
inside |
|
|
|
|
|
|
|
|
|
The following ovenware test is the |
only exception |
to |
|||||
|
|
this rule |
|
|
|
|
|
|
|
|
|
Perform the following test if you are unsure |
whethe |
||||||
|
|
your ovenware is unsuitable for use |
in the |
microwa |
|||||
|
|
heat the empty ovenware at maximum power for |
|
||||||
|
|
between 30 and |
60 seconds |
Check the |
temperatur |
||||
|
|
of the ovenware during this period The ovenware |
|
||||||
|
|
should still be cold or warm to the touch The |
|
||||||
|
|
ovenware is unsuitable if it becomes hot or sparks |
|||||||
|
|
generated |
|
|
|
|
|
|
|
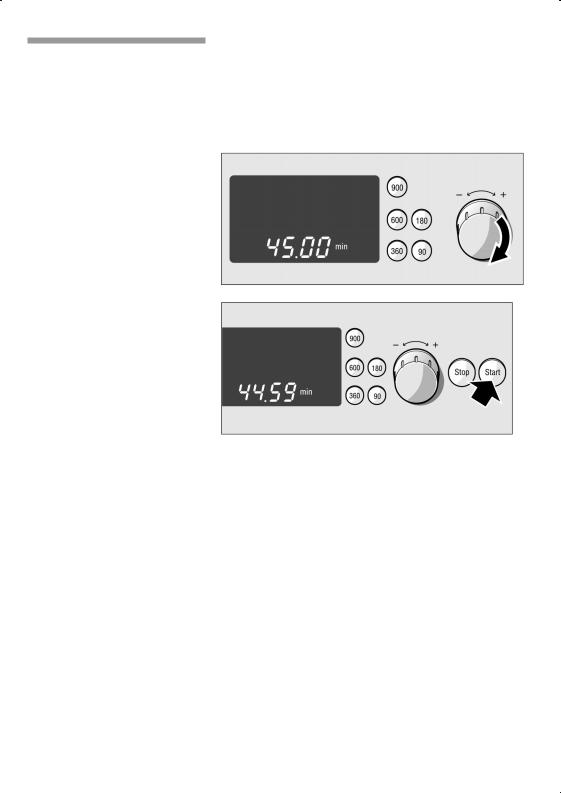
Setting procedure
Microwave power can be set to 900 watts for a maximum of 30 minutes A cooking time of 90+minutes is possible with all other power settings
20
Example:
Microwave power 600 W, 3 minutes
1 Press the button for the microwave power setting you require.
2 Set |
the cooking time using |
the |
rotary knob. |
3 Press the Start button.
The cooking time counts down in the display.
The cooking time has elapsed
To change the cooking time
A signal sounds. The oven switches off. The displa shows •End time" or •Oven cooling". The clock reappears in the display if you press the Stop butt or open the oven door.
You may change the cooking time at any time.
21

Pausing
Cancelling the setting
Notes
Selecting several follow on microwave power settings
Note
Open the oven door. The program is interrupted. T cooling fan may run on. Press the Start button ag once you have closed the door. The program will continue.
If you forget to |
press the Start button, you will he |
|||||
signal after three seconds. •Press Start button" |
||||||
appears in the |
display. |
|
|
|
||
Press the |
Stop |
button twice or open the oven doo |
||||
and press the Stop button once. |
||||||
Cooking time is |
displayed |
as |
follows: |
|||
up to 1.00 |
min |
in |
blocks |
of |
1 |
second |
up to 15.00 min |
in |
blocks |
of |
10 |
seconds |
|
up to 1.00 |
h |
in |
blocks |
of |
30 |
seconds |
up to 1.30 |
h |
in |
blocks |
of |
5 |
minutes. |
You can also set the cooking time first and then microwave power.
You can select up to three power settings and cooking times for your dish.
Make settings as described in steps 1 and 2. The select a second power setting and cooking time an necessary a third.
Now press the Start button.
The total cooking time appears in the display. It counts back to zero. The active power setting light
up |
more |
brightly. |
|
|
You |
can |
also select the same power setting twice: |
||
e.g. |
600 |
watts / 360 watts / |
600 |
watts. |
The |
900 |
W power setting can |
only |
be selected on |
Once the oven has been started, you can no long change the cooking time.
22
Setting |
the |
oven |
|
|
|
|
|
|
|
||||
|
|
|
|
|
There are various ways in which you can set your |
||||||||
|
|
|
|
|
oven. |
|
|
|
|
|
|
|
|
Switching |
off |
the |
oven |
The |
oven switches |
off automatically when the |
meal |
||||||
manually |
|
|
|
ready. |
|
|
|
|
|
|
|
||
|
|
|
|
|
|
|
|
|
|
|
|
||
The |
oven |
switches |
off |
You |
can |
leave the |
kitchen |
for |
a long time. |
|
|||
automatically |
|
|
|
|
|
|
|
|
|
|
|
||
The |
oven |
switches |
on |
andYou |
can |
set |
the oven so |
that |
you |
place the |
meal |
||
off |
automatically |
|
oven |
in |
the |
morning and |
it is |
ready |
at lunch |
time. |
|||
|
|
|
|
|
|||||||||
Tables and tips |
|
In the •Tables and tips" section, you will find suitab |
|||||||||||
|
|
|
|
|
settings |
for many |
dishes. |
|
|
|
|
||
Setting procedure
Example:
Top/bottom heating, 190 ºC
1 Turn the function selector clockwise until the required type of heating appears.
The default temperature or setting is displayed in the second line.
2 Press the9 button to move to the second line.
o o om
o o om
23
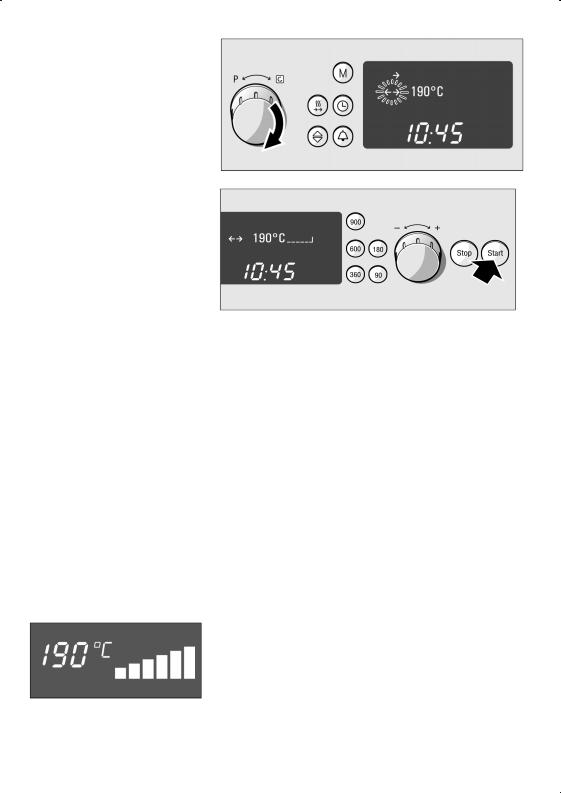
Use the function selector to set the required temperature or setting.
4 ress the Start button.
o o om
o o om
Switching |
off |
|
When the |
dish is ready, press the Stop button twi |
||||||||
|
|
|
open |
the |
oven |
door and press the Stop button on |
||||||
|
|
|
The |
display |
goes |
out. |
|
|
|
|
||
Changing |
the |
setting |
You |
may |
change |
the |
temperature |
or |
grill setting |
at |
||
|
|
|
time. |
|
|
|
|
|
|
|
|
|
Pausing |
|
|
Open |
the |
oven |
door. |
The cooling |
fan |
may run |
on. |
||
|
|
|
ress the Start button again once you have closed |
|||||||||
|
|
|
door. |
The |
program will then continue. |
|
|
|||||
|
|
|
If you forget |
to |
|
press the Start button, you will he |
||||||
|
|
|
signal after three seconds. • ress Start button" |
|
||||||||
|
|
|
appears in |
the |
display. |
|
|
|
||||
Cancelling |
the |
setting |
ress the |
Stop |
button twice or open the oven doo |
|||||||
|
|
|
and press the Stop button once. |
|
|
|
||||||
|
|
|
The |
display |
goes |
out. |
|
|
|
|
||
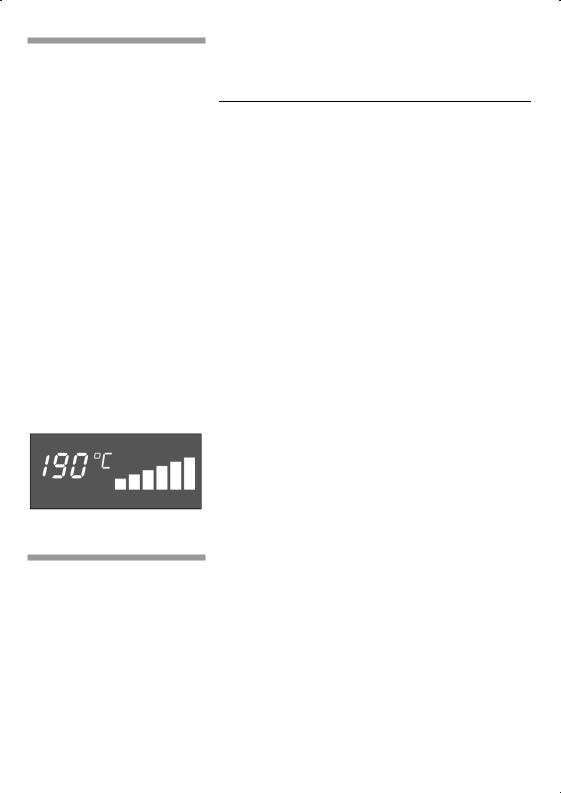
Heating indicator |
The |
heating |
indicator |
provides a visual display of |
|
|||||||
|
|
|
increasing |
oven |
temperature. |
|
|
|
||||
|
|
|
The heating indicator does not appear if you are |
|||||||||
|
|
|
grilling. |
|
|
|
|
|
|
|
|
|
24
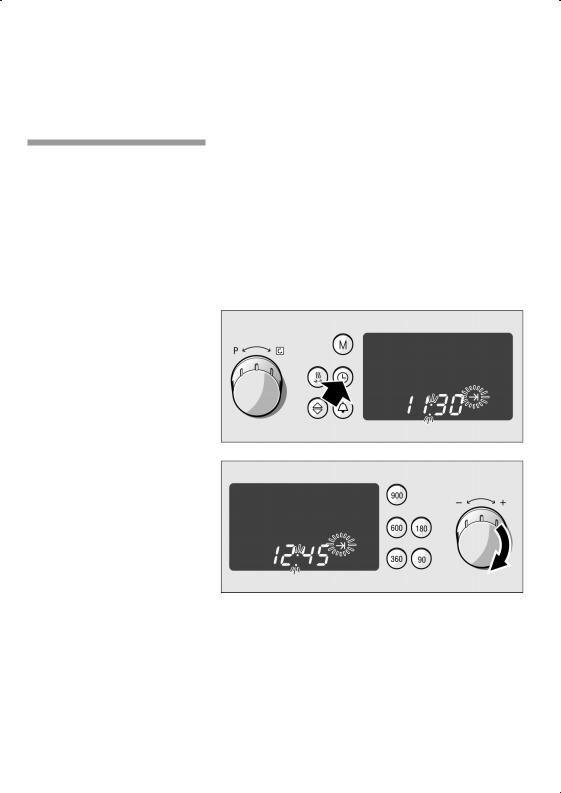
If the oven is to switch off automatically
Make the settings as described in steps 1 to 3 S cooking time for your dish
Example:
Cooking time 45 minutes
4 Press thej clock button
20 minutes appears in the display Set the required cooking time using the rotary knob
5 Press the Start button
The cooking time counts down in the display
The cooking time has elapsed
Changing the setting
Pausing
Cancelling the setting
A signal sounds The oven switches off The displa shows •End time" or •Oven cooling" The clock reappears in the display if you press the Stop butt or open the oven door
You |
may |
change the |
cooking time |
and temperature |
any time |
|
|
|
|
Press |
the |
Stop button |
or open the |
oven door Pre |
the Start button after closing the door |
||||
Press |
the |
Stop button twice or open the door and |
||
press |
the |
Stop button |
once |
|
25
Note |
You can also set |
the cooking time first and |
then t |
|
type of heating and temperature. Set the cooking ti |
||
|
using the rotary knob and then the type of |
heating |
|
|
using the function |
selector. Press thebutton and |
|
|
change the temperature. Start the oven. |
|
|
If the oven is to
switch on and off Please remember that |
easily |
spoiled |
foods |
must |
not |
|||
automatically |
be allowed |
to remain |
in the |
oven |
for too |
long. |
|
|
|
Make the |
settings as |
described in |
steps 1 |
to |
4. |
||
|
Do not start the oven yet. |
|
|
|
|
|
||
|
Example: |
|
|
|
|
|
|
|
|
It's 10:45 a.m. The dish will take |
45,minutes |
to |
co |
||||
|
and must |
be ready at |
12:45 p.m. |
|
|
|
|
|
5 Press thej clock button until •Set end time" is
displayed. |
Set end time |
The ! end |
time symbol |
flashes in the display and the end time is shown.
This |
is the time at which |
|
the |
dish will be ready. |
|
Use |
the |
rotary knob to set |
a later |
end time. |
|
Set end time
2
 Loading...