


TW120
ROTARY CUTTER
Published 01/11 |
Part NO. 00762120C |
OPERATOR’S MANUAL
This Operator's Manual is an integral part of the safe operation of this machine and must be maintained with the unit at all times. READ, UNDERSTAND, and FOLLOW the Safety and Operation Instructions contained in this manual before operating the equipment. C01Cover
RHINO®
1020 S. Sangamon Ave.
Gibson City, IL 60936 800-446-5158
E-mail: parts@servis-rhino.com
©2011 Alamo Group Inc. |
$0.00 |
To the Owner/Operator/Dealer
This Operator's Manual is an integral part of the safe operation of this machine and must be maintained with the implement at all times. A Manual canister is provided on the implement where this manual can be properly stored. If you lose or damage this manual a free replacement manual can be obtained from an authorized Rhino dealer or by down loading the manual from the Rhino website www.servis-rhino.com
BEFORE YOU START! READ, UNDERSTAND, and FOLLOW the information provided in this manual, the AEM Mower Safety manual and the tractor operator's manual carefully to learn how to operate and service your machine properly. Failure to do so could result in personal injury to you and bystanders. All implements with moving parts are potentially hazardous. Every effort has been made to ensure that the machine is safe but operators must avoid engaging in unsafe practices and follow the written instructions provided. The manufacturer has designed this implement to be used with all its safety equipment properly attached to minimize the chance of accidents.
SAFETY FIRST. Completely read and understand the safety section of this manual before operating this equipment. Do not allow anyone to operate this equipment who has not fully read and understood this manual. Contact your Dealer to explain any instructions that you do not fully understand.
The care you give your Rhino Implement will greatly determine your satisfaction with its performance and its service life. Carefully read and follow the instructions in this manual to provide you with a thorough understanding of your new implement and its intended use and service requirements.
All references made in this manual to right, left, front, rear, top or bottom are as viewed facing the direction of forward travel with the implement properly attached to the tractor.
Replacement Parts information is located in a separate Parts Manual. Rhino mowers use balanced and matched system components for blade carriers, blades, cuttershafts, knives, knife hangers, rollers, drivetrain components, and bearings. These parts are made and tested to Rhino specifications. Non-genuine “will fit” parts do not consistently meet these specifications. The use of “will fit” parts may reduce mower performance, void warranties, and present a safety hazard. Use genuine Rhino mower parts for economy and safety.
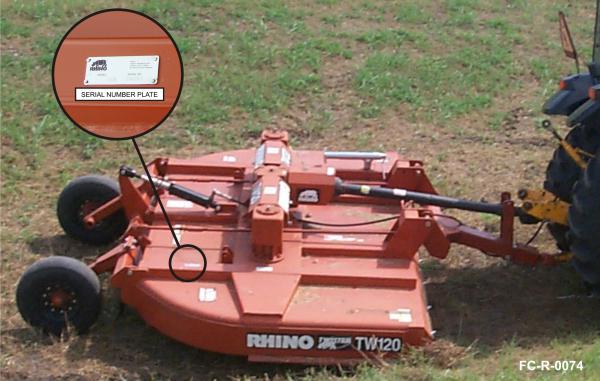
For future reference, record your Rhino product model number and serial number.
Dealer |
|
Telephone |
|
Model Number |
|
|
|
|
|
|
|
Owner |
|
Purchase Date: |
|
Serial Number |
|
|
|
|
|
|
|

In order to reduce accidents and enhance the safe operation of mowers, Alamo Group Ag Division, in cooperation with other industry manufacturers has developed the AEM/FEMA Industrial and Agricultural Mower Safety Practices video and guide book.
The video will familiarize and instruct mower-tractor operators in safe practices when using industrial and agricultural mowing equipment. It is important that Every Mower Operator be educated in the operation of their mowing equipment and be able to recognize the potential hazards that can occur while operating a mower. This video, along with the mower operator’s manual and the warning messages on the mower, will significantly assist in this important education.
Your Authorized Rhino Dealer may have shown this video and presented you a DVD Video when you purchased your mower. If you or any mower operator have not seen this video, Watch the Video, Read this Operator’s Manual, and Complete the Video Guidebook before operating your new mower. If you do not understand any of the instructions included in the video or operator’s manual or if you have any questions concerning safety of operation, contact your supervisor, dealer or Alamo Group Ag.
If you would like a VHS video tape of the video, please email AEMVideo@alamo-group.com or Fax AEM VHS Video at (830) 372-9529 or mail in a completed copy of the form on the back of this page to AEM VHS Video 1502 E Walnut Street, Seguin, TX 78155. and request the VHS video version. Please include your name, mailing address, mower model and serial number.
Every operator should be trained for each piece of equipment (Tractor and Mower), understand the intended use and the potential hazards before operating the equipment.
The information and material listed above along with this Operator’s Manual can assist you in meeting the OSHA requirement for Operator annual training.
OSHA TRAINING REQUIREMENTS
The following training requirements have been taken from Title 29, Code of Federal Regulations Part 1928.57 (a)(6). www.osha.gov
Operator Instructions. At the time of initial assignment and at least annually thereafter, the employer shall instruct every employee who operates an agricultural tractor or implement in the safe operating practices and servicing of equipment with which they are or will be involved, and of any other practices dictated by the work environment.

|
Alamo Group Ag. Division will provide |
|
one (1) AEM Mower Safety Practices Video |
Please Send Me: |
VHS Format – AEM/FEMA Mower Operator Safety Video |
|
DVD Format – AEM/FEMA Mower Operator Safety Video |
|
Mower Operator’s Manual |
|
AEM Mower Operator’s Safety Manual |
Requester Name:______________________________________Phone:____________________________
Requester Address:___________________________________________
City:_______________________________
State:______________________________
Zip Code:___________________________
Mower Model:__________________________Serial Number:______________________________
Date Purchased:_________________________Dealer Salesperson:___________________________
Dealership Name:_______________________ Dealership Location:__________________________
Mail to:
AEM Video Services
1502 E. Walnut Street
Seguin, TX 78155
Or Fax to:
(830) 372-9529
Or E-mail to:
AEMVideo@alamo-group.com
AEM Mower Video
DEALER to CUSTOMER Pre-Delivery/ Operation Instructions
Dealer should inform the Purchaser of this product of Warranty terms, provisions, and procedures that are applicable. Dealer should inform Purchaser to review the contents of the Operator’s Manual including safety equipment, safe operation and maintenance, to review the Safety Signs on the implement (and tractor if possible) and of Purchaser’s responsibility to train his/her operators’s of safe operation procedures.
•IMPLEMENTS: I have explained that Deflectors, Chain Guards, or Solid Skirts must be installed and maintained in good repair.
•DRIVELINES: I have made certain that all driveline, gearbox, and other shields are in good repair and fastened securely in place to prevent injuries from entanglement or thrown objects.
•HYDRAULIC MACHINES: I have explained the necessity of using clean hydraulic oil, changing filters as instructed, stopping leaks, damage caused by operating with over-heated oil, caring for hoses, using hoses of proper rating, maintaining the specified operating pressure and the potential hazard of oils penetrating the skin.
•FOLDING-TYPE IMPLEMENTS: I have explained that it is not possible to guard against thrown objects when the head is lifted off ground and that operator is responsible to watch out for persons in the area. I have explained that the lifted mower head or boom can contact overhead obstructions with damage to cables and telephone lines and possible injury. I have explained that the extended head or boom or retracted boom can contact power lines resulting in electrocution, injury or death and that operator is responsible for keeping clear of such hazards.
PRE-DELIVERY SERVICE
CHECK AND ADJUST OR LUBRICATE AS REQUIRED
See Operator’s Manual for Details
Inspection Performed - Warranty and Safety Procedures Explained - Installation Complete
LUBRICATION & HYDRAULICS |
MOWER TO TRACTOR CONNECTIONS |
|||
Gearbox (Oil Levels) |
|
Draw Bar Length (Check And Set) |
||
Hydraulic Oil Level (External Tank) |
|
A-Frame Pivot & Links |
||
Tractor Hydraulic Oil Level |
|
Control Rods (Adjusted Equal) |
||
Hydraulic Hoses (Not Kinked Tighten Connections) |
|
Axle Height (Adjusted) |
||
|
Front Pump Drive (Assembly Is Tight And Shaft Properly |
Cutting Height (Adjust) |
||
Aligned) |
|
Mount Kit-Pre-Operation Check Complete |
||
MOWER |
|
Mower Wing (Adjust Level With The Center) |
||
Spindle And Motor Bolts Properly Torqued |
|
Mower Wing (Check For Proper Raising Operation) |
||
|
C.V. Drivelines (Check Max Turn Radius) |
|||
Spindle Oil Level |
||||
|
Pull Type Hitch (Height Adjustment) |
|||
Blade Carrier Bolts Properly Torqued/Retaining Pin In |
||||
|
Mounting Hardware Properly Torqued |
|||
Place |
SAFETY ITEMS |
|||
Mower Cutting Height And Level Adjusted |
||||
Cutting Shaft Bearings Lubricated |
|
Protective Shields (Operation And Installation) |
||
All Hardware Properly Torqued |
|
Driveline Clutch (Torque Limiter) (Adjust And Run In) |
||
Tire and Air Pressure/Lug Nuts (Correct Torque) |
|
Safety Decals (Installed) |
||
Wheel Bearings (Check, Grease, and Preload) |
|
Operator’s Manual (Supplied) |
||
ATTACHMENTS & INSTALLATION |
|
Tractor PTO Shield (Installed) |
||
Deflectors Front And Rear |
|
S.M.V. Emblem (Installed If Needed) |
||
|
Tongue Jack (Installation and Operation) |
|||
Shredding Attachments |
||||
|
Safety Tow Chain (Installed) |
|||
Correct Blade Rotation Direction |
||||
|
ADMA Driveline Safety Manual Supplied |
|||
Axle Arms And Beams |
||||
|
AEM Mower Safety Manual (Supplied in Canister) |
|||
Tongue And Control Rods (Installed And Adjusted) |
||||
|
AEM Mower Safety Video has been shown to Purchaser |
|||
All Bolts - Pins And Nuts (Proper Torque) |
||||
|
|
|||
Table of Contents
SAFETY SECTION ............................................................................................................. |
1-1 |
GENERAL SAFETY INSTRUCTIONS AND PRACTICES ................................................................................ |
1-2 |
OPERATOR SAFETY ....................................................................................................................................... |
1-3 |
CONNECTION OR DISCONNECTING IMPLEMENT SAFETY ....................................................................... |
1-4 |
CRUSHING HAZARDS ..................................................................................................................................... |
1-5 |
THROWN OBJECTS HAZARDS ...................................................................................................................... |
1-6 |
THROWN OBJECTS HAZARDS (CONTINUED) ............................................................................................. |
1-7 |
RUN OVER HAZARDS ..................................................................................................................................... |
1-8 |
PTO ENTANGLEMENT HAZARDS .................................................................................................................. |
1-9 |
MOWER BLADE CONTACT HAZARDS ........................................................................................................ |
1-10 |
HIGH PRESSURE OIL LEAK HAZARDS ....................................................................................................... |
1-11 |
ELECTRICAL & FIRE HAZARDS ................................................................................................................... |
1-12 |
TRANSPORTING HAZARDS ......................................................................................................................... |
1-13 |
HAZARDS WITH MAINTENANCE OF IMPLEMENT ..................................................................................... |
1-14 |
PARTS INFORMATION .................................................................................................................................. |
1-15 |
Decal Location - Lift Type ............................................................................................................................... |
1-16 |
Decal Location - Pull Type .............................................................................................................................. |
1-18 |
Decal Description ............................................................................................................................................ |
1-20 |
Federal Laws and Regulations ....................................................................................................................... |
1-28 |
INTRODUCTION SECTION ................................................................................................ |
2-1 |
Equipment Specifications .................................................................................................................................. |
2-3 |
KEY OPERATION POINTS .............................................................................................................................. |
2-4 |
Operating Noise Level/Sound Pressure ............................................................................................................ |
2-4 |
Warranty information ......................................................................................................................................... |
2-4 |
RHINO LIMITED WARRANTY .......................................................................................................................... |
2-5 |
ASSEMBLY SECTION ....................................................................................................... |
3-1 |
DEALER SETUP INSTRUCTIONS ................................................................................................................... |
3-2 |
A-FRAME ASSEMBLY-LIFT TYPE .................................................................................................................. |
3-2 |
TAIL WHEEL ASSEMBLY - LIFT TYPE ........................................................................................................... |
3-4 |
TONGUE - PULL TYPE .................................................................................................................................... |
3-4 |
AXLE ASSEMBLY - PULL TYPE ...................................................................................................................... |
3-5 |
CONTROL RODS - PULL TYPE ...................................................................................................................... |
3-5 |
CUTTER LEVELING ......................................................................................................................................... |
3-6 |
HYDRAULIC OR MANUAL LIFT ...................................................................................................................... |
3-7 |
WHEELS - PULL TYPE .................................................................................................................................... |
3-7 |
DRIVELINE ATTACHMENT ............................................................................................................................. |
3-8 |
SHIELD ASSEMBLY ......................................................................................................................................... |
3-8 |
JACKSHAFT BEARING SUPPORT ASSEMBLY ............................................................................................. |
3-9 |
CV JACKSHAFT SUPPORT ASSEMBLY ........................................................................................................ |
3-9 |
DRIVELINE CLAMP CONE YOKE OPERATING INSTRUCTIONS ............................................................... |
3-10 |
FRONT AND REAR DEFLECTORS (Standard Equipment) ........................................................................... |
3-10 |
CHAIN GUARDS (Optional Equipment at extra cost) ..................................................................................... |
3-10 |
Rear Deflector ................................................................................................................................................. |
3-11 |
CHAIN GUARD (EXTRA EQUIPMENT) ......................................................................................................... |
3-11 |
Front Chain Guards ........................................................................................................................................ |
3-11 |
Rear Chain Guards ......................................................................................................................................... |
3-12 |
CHECK CHAINS (EXTRA EQUIPMENT) FOR LIFT-MODELS ...................................................................... |
3-12 |
OPERATION SECTION ...................................................................................................... |
4-1 |
OPERATOR REQUIREMENTS ........................................................................................................................ |
4-3 |
TRACTOR REQUIREMENTS ........................................................................................................................... |
4-4 |
ROPS and Seat Belt ......................................................................................................................................... |
4-4 |
Tractor Safety Devices ...................................................................................................................................... |
4-5 |
Tractor Horsepower .......................................................................................................................................... |
4-5 |
3-Point Hitch ..................................................................................................................................................... |
4-5 |
Drawbar-Pull Type Mower ................................................................................................................................ |
4-6 |
Front End Weight .............................................................................................................................................. |
4-6 |
Power Take Off (PTO) ...................................................................................................................................... |
4-7 |
Tire Spacing ...................................................................................................................................................... |
4-7 |
GETTING ON AND OFF THE TRACTOR ........................................................................................................ |
4-8 |
Boarding the Tractor ......................................................................................................................................... |
4-8 |
Dismounting the Tractor .................................................................................................................................... |
4-8 |
STARTING THE TRACTOR ............................................................................................................................. |
4-9 |
CONNECTING THE MOWER TO THE TRACTOR ........................................................................................ |
4-10 |
Connecting the Mower-Lift Type and Semi-Mount Type ................................................................................. |
4-10 |
3-Point Quick Hitch ......................................................................................................................................... |
4-11 |
Connecting Mower - Lift Type (Quick Hitch) ................................................................................................... |
4-11 |
Safety Tow Chain ............................................................................................................................................ |
4-12 |
Connecting the Mower-Pull Type .................................................................................................................... |
4-12 |
SETTING THE MOWER ................................................................................................................................. |
4-13 |
Setting Mower HeightLift Type ...................................................................................................................... |
4-13 |
Setting Mowing Height-Pull Type .................................................................................................................... |
4-14 |
Setting Deck Pitch ........................................................................................................................................... |
4-15 |
DRIVELINE ATTACHMENT ........................................................................................................................... |
4-15 |
Driveline Length Check ................................................................................................................................... |
4-16 |
Constant Velocity (CV) Driveline ..................................................................................................................... |
4-18 |
PRE-OPERATION INSPECTION AND SERVICE .......................................................................................... |
4-19 |
Tractor Pre-Operation Inspection/Service ....................................................................................................... |
4-20 |
Mower Pre-Operation Inspection/Service ....................................................................................................... |
4-21 |
Cutting Component Inspection ........................................................................................................................ |
4-24 |
Blade Bolt Inspection ...................................................................................................................................... |
4-26 |
DRIVING THE TRACTOR AND IMPLEMENT ................................................................................................ |
4-29 |
Starting the Tractor ......................................................................................................................................... |
4-30 |
Brake and Differential Lock Setting ................................................................................................................. |
4-30 |
Raising the Mower .......................................................................................................................................... |
4-31 |
Driving the Tractor and Mower ........................................................................................................................ |
4-31 |
Crossing Ditches and Steep Inclines .............................................................................................................. |
4-32 |
OPERATING THE TRACTOR AND IMPLEMENT .......................................................................................... |
4-33 |
Foreign Debris Hazards .................................................................................................................................. |
4-34 |
Bystanders/Passersby Precautions ................................................................................................................ |
4-34 |
Engaging the Power Take Off (PTO) .............................................................................................................. |
4-35 |
PTO RPM and Ground Speed ........................................................................................................................ |
4-36 |
Operating the Mower ...................................................................................................................................... |
4-36 |
Right of Way (Highway) Mowing ..................................................................................................................... |
4-39 |
Shutting Down the Implement ......................................................................................................................... |
4-40 |
DISCONNECTING THE MOWER FROM THE TRACTOR ............................................................................ |
4-40 |
MOWER STORAGE ....................................................................................................................................... |
4-42 |
TRANSPORTING THE TRACTOR AND IMPLEMENT .................................................................................. |
4-42 |
Transporting on Public Roadways .................................................................................................................. |
4-43 |
Hauling the Tractor and Implement ................................................................................................................. |
4-45 |
TROUBLESHOOTING GUIDE ....................................................................................................................... |
4-46 |
MAINTENANCE SECTION ................................................................................................. |
5-1 |
HAZARDS WITH MAINTENANCE OF IMPLEMENT ....................................................................................... |
5-2 |
Lubrication ........................................................................................................................................................ |
5-3 |
GEARBOX ........................................................................................................................................................ |
5-6 |
DRIVELINES ..................................................................................................................................................... |
5-6 |
MAIN & JACKSHAFT DRIVELINE SHIELDS ................................................................................................... |
5-8 |
MAIN CV DRIVELINE SAFETY SHIELD (FIGURE Mnt-R-0032) |
..................................................................... 5-9 |
DRIVELINE TAPER CONE YOKE REMOVAL INSTRUCTIONS ................................................................... |
5-10 |
BLADE SERVICING ....................................................................................................................................... |
5-10 |
BLADE SHARPENING ................................................................................................................................... |
5-11 |
BLADE CARRIER REMOVAL ........................................................................................................................ |
5-11 |
BLADE REMOVAL .......................................................................................................................................... |
5-13 |
Blade Bolt Inspection ...................................................................................................................................... |
5-14 |
BLADE TIMING AND ROTATION .................................................................................................................. |
5-15 |
BLADE TIMING PROCEDURE ....................................................................................................................... |
5-15 |
SLIP CLUTCH ................................................................................................................................................. |
5-16 |
STORAGE ...................................................................................................................................................... |
5-17 |
PROPER TORQUE FOR FASTENERS ......................................................................................................... |
5-17 |

SAFETY SECTION
Safety Section 1-1
© 2011 Alamo Group Inc.

SAFETY
SAFETY
GENERAL SAFETY INSTRUCTIONS AND PRACTICES
A careful operator is the best operator. Safety is of primary importance to the manufacturer and should be to the owner/operator. Most accidents can be avoided by being aware of your equipment, your surroundings, and observing certain precautions. The first section of this manual includes a list of Safety Messages that, if followed, will help protect the operator and bystanders from injury or death. Read and understand these Safety Messages before assembling, operating or servicing this Implement. This equipment should only be operated by those persons who have read the manual, who are responsible and trained, and who know how to do so responsibly.
The Safety Alert Symbol combined with a Signal Word, as seen below, is used throughout this manual and on decals which are attached to the equipment. The Safety Alert Symbol means: “ATTENTION! BECOME ALERT! YOUR SAFETY IS INVOLVED!” The Symbol and Signal Word are intended to warn the owner/operator of impending hazards and the degree of possible injury faced when operating this equipment.
Practice all usual and customary safe working precautions and above all---
remember safety is up to YOU. Only YOU can prevent serious injury or death from unsafe practices.
Indicates an imminently hazardous situation that, if not avoided, WILL result in DEATH OR VERY SERIOUS INJURY.
Indicates an imminently hazardous situation that, if not avoided, COULD result in DEATH OR SERIOUS INJURY.
Indicates an imminently hazardous situation that, if not avoided, MAY result in MINOR INJURY.
Identifies special instructions or procedures that, if not strictly observed, could result in damage to, or destruction of the machine, attachments or the environment.
NOTE: Identifies points of particular interest for more efficient and convenient operation or repair.
READ, UNDERSTAND, and FOLLOW the following Safety Messages. Serious injury or death may occur unless care is taken to follow the warnings and instructions stated in this Manual and in the Safety Messages on the implement. Always follow the instruction in this manual and use good common sense to avoid hazards.
NOTE: If you want a translation of this safety section in one of the following Languages, please contact: Translations at 1502 E. Walnut Street Seguin, TX 78155; Fax: (830) 372-9529; Safety Section Translations are available in Spanish, Portuguese, French, German, Russian.
TW120 01/11 |
Safety Section 1-2 |
© 2011 Alamo Group Inc.
SAFETY
OPERATOR SAFETY
TO AVOID SERIOUS INJURY OR DEATH DO THE FOLLOWING:
•READ, UNDERSTAND and FOLLOW Operator's Manual instructions, Warnings and Safety Messages.
•WEAR SAFETY GLASSES, safety shoes, hard hat, hearing protection and gloves when operating or repairing equipment
•WEAR appropriate breathing respirator when operating in dusty conditions to avoid respiratory diseases.
•DO NOT WEAR loose clothing or jewelry to avoid rotating parts entanglement injury.
•DO NOT USE DRUGS or ALCOHOL before or while operating equipment.
•DO NOT ALLOW anyone to operate equipment under the influence of drug or alcohol.
•CONSULT medical professional for medication impairment side effects.
•STAY ALERT, prolonged operation can cause fatigue, STOP and REST.
GENERAL OPERATING SAFETY
VISIBILITY CONDITIONS WHEN MOWING:
•OPERATE IN DAYLIGHT or with lights that gives at least 100 yards clear visibility.
•BE ABLE TO SEE and identify passersby, steep slopes, ditches, drop-offs, overhead obstructions, power lines, debris and foreign objects.
GROUND SPEED WHEN MOWING:
•NORMAL SPEED range is between 2 to 5mph.
•ADJUST MOWING SPEED for terrain conditions and grass type, density and cut height.
•REDUCE MOWING SPEED when near steep slopes, ditches, drop-offs, overhead obstructions, power lines and to avoid debris and foreign objects.
INSECT INFESTATION
•Do Not operate in areas where bees or insects may attack unless you WEAR PROTECTIVE CLOTHING
or use enclosed tractor cab.
PTO SPEED:
•DO NOT EXCEED IMPLEMENT RATED PTO SPEED
•AVOID exceeding rated PTO speeds that may result in broken drivelines or blade failures.
SAFETY SIGNS:
•REPLACE missing, damaged or unreadable safety signs immediately. PN OS01
TW120 01/11 |
Safety Section 1-3 |
© 2011 Alamo Group Inc.
SAFETY
SAFETY
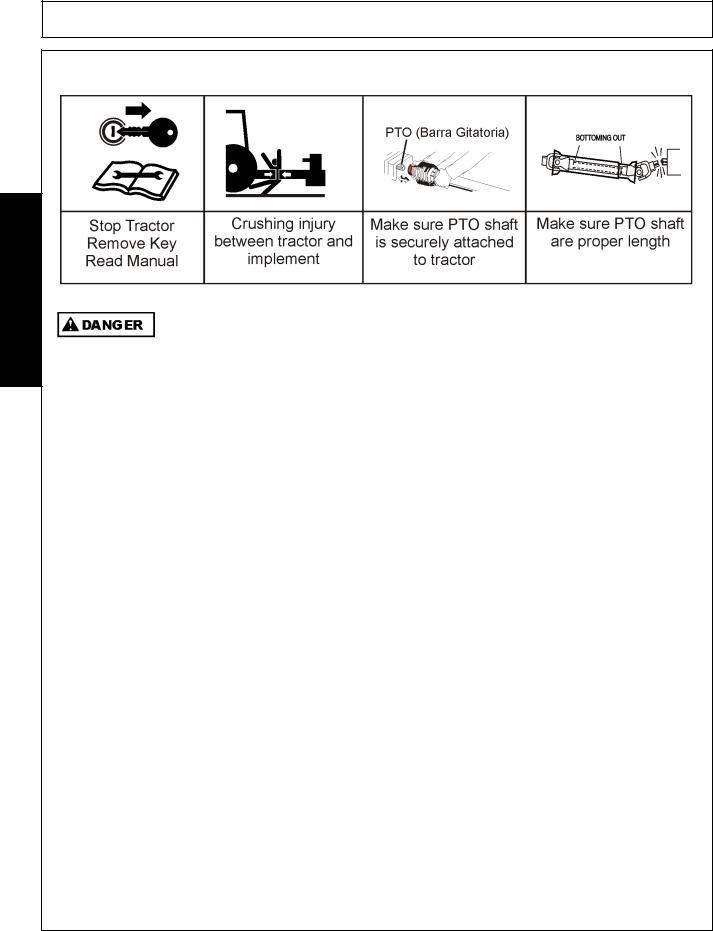
CONNECTION OR DISCONNECTING IMPLEMENT SAFETY
SAFETY
TO AVOID SERIOUS INJURY OR DEATH FROM BEING CRUSHED BY TRACTOR OR IMPLEMENT:
WHEN BACKING tractor to implement hitch:
•DO NOT ALLOW BYSTANDERS between tractor and implement
BEFORE connecting and disconnecting implement hitch:
•STOP TRACTOR ENGINE, place transmission into park, engage parking brake and remove key.
WHEN connecting and disconnecting implement hitch:
•DO NOT crawl or walk under raised mower or wing.
•USE tongue JACK to lift heavy implement tongues to control implement tongue movement.
•AVOID overloading jack to prevent jack failure and injury.
WHEN CONNECTING IMPLEMENT DRIVELINE:
TO AVOID implement driveline coming loose during operation:
•LUBRICATE yoke spring locking collar to ensure it freely slides on PTO shaft
•SECURELY seat yoke locking balls in PTO shaft groove.
•PUSH and PULL DRIVELINE on both the tractor and implement PTO SHAFTS to ensure it is SECURELY
ATTACHED
TO AVOID broken driveline during operations:
•CHECK driveline for proper length between PTO shaft and implement gearbox shaft.
•Drivelines too short can pull apart or disengage.
•Drivelines too long can bottom out.
•Bottoming driveline telescoping assembly will stop sliding and become solid.
•Driveline bottoming can push through support bearings and break off PTO shaft.
CONTACT DEALER if implement driveline does not match Tractor PTO shaft:
•DO NOT USE PTO ADAPTER.
Using a PTO adapter can cause:
•Excessive vibration, thrown objects, blade and implement failures by doubling operating speed.
•Increased working length exposing unshielded driveline areas and entanglement hazards.
DO NOT connect the Mower to a tractor with the PTO directly connected to the Tractor transmission. PN CD02
TW120 01/11 |
Safety Section 1-4 |
© 2011 Alamo Group Inc.

SAFETY
CRUSHING HAZARDS
TO AVOID SERIOUS INJURY OR DEATH FROM FALLING OFF TRACTOR, EQUIPMENT RUN OVER, ROLLOVER AND CRUSHING BY FALLING WING OR IMPLEMENT:
•USE ROPS and SEAT BELT equipped tractors for mowing operations.
•KEEP ROPS lock in up position.
•ALWAYS BUCKLE UP seat belt when operating tractor and equipment.
•ONLY OPERATE tractor and equipment while seated in tractor seat.
WHEN RAISING OR LOWERING IMPLEMENT:
•Raise or lower ONLY WHILE SEATED in tractor seat with seat belt buckled.
•Raise or lower ONLY when implement tongue is securely attached to tractor drawbar TO AVOID implement tip over.
•KEEP BYSTANDERS CLEAR of area TO AVOID crushing.
LIFTED Equipment can fall from mechanical or hydraulic failure or inadvertent Control Lever movement.
TO AVOID EQUIPMENT FALLING while working near or under lifted wings, components and implements raised by 3-Pointed tractor hitch:
•SECURELY SUPPORT or block up raised equipment and components.
•BLOCK UP and securely support equipment before putting hands, feet or body under raised equipment or lifted components.
WHEN PARKING Implement and Tractor:
•LOWER implement, LOCK or BLOCK lifted parts before leaving equipment.
•NEVER leave implement unattended in a raised position.
TO AVOID CHILDREN FALLING OFF OR BEING CRUSHED BY EQUIPMENT:
•NEVER ALLOW children to play on or around Tractor or Implement.
WHEN UNHITCHING IMPLEMENT:
•LOWER implement, LOCK or BLOCK lifted parts before leaving equipment.
•USE tongue jack to control implement tongue movement.
•USE tongue JACK to lift heavy implement tongues.
•AVOID overloading jack to prevent jack failure and injury. PN CH02
SAFETY
TW120 01/11 |
Safety Section 1-5 |
© 2011 Alamo Group Inc.

SAFETY
SAFETY
THROWN OBJECTS HAZARDS
ROTARY MOWERS CAN THROW OBJECTS 300 FEET OR MORE UNDER ADVERSE CONDITIONS.
TO AVOID SERIOUS INJURY OR DEATH TO OPERATOR OR BYSTANDERS FROM THROWN OBJECTS:
•KEEP bystanders 300 feet away
STOP MOWING IF PASSERSBY ARE WITHIN 300 FEET UNLESS:
• All THROWN OBJECT SHIELDING including, Front and Rear Deflectors, Chains Guards, Steel Guards, Bands, Side Skirts and Skid Shoes in place and in good condition when mowing.
•Mower sections or wing are adjusted to be close and parallel to ground without exposing blades.
•MOWING AREA has been inspected and foreign materials and debris have been removed.
•PASSERSBY are inside enclosed vehicle.
INSPECT AREA FOR POTENTIAL THROWN OBJECTS BEFORE MOWING:
•REMOVE debris, rocks, wire, cable, metal objects and other foreign material from area.
Wire, cable, rope, chains and metal objects can be thrown or swing outside deck with great velocity:
1.MARK objects that cannot removed.
2.AVOID these objects when mowing.
HIGH GRASS and WEED AREA INSPECTION:
•INSPECT for and REMOVE any hidden large debris.
•MOW at Intermediate height
•INSPECT and remove remaining debris
•MOW at final height.
MOWER THROWN OBJECT SHIELDING:
• KEEP all thrown object shielding including, Front and Rear Deflectors, Chains Guards, Steel Guards, Bands, Side Skirts and Skid Shoes in place and in good condition when mowing.
•DO NOT OPERATE with any thrown object shielding missing, damaged or removed.
RIGHT OF WAY (Highway) MOWING
•USE DOUBLE CHAIN GUARDS for highway, right-of-way, parks or greenbelt mowing or all other mowing where human dwellings, vehicles, or livestock could be within 300 feet of the mower.
•No shielding is 100% effective in preventing thrown objects. To Reduce Possibility of Injury:
1.MAINTAIN MOWER SHIELDING, side skirts, skid shoes, and blades in good operational condition,
2.RAISE CUTTING HEIGHT to 6 INCHES minimum,
3.INSPECT AREA thoroughly before mowing to REMOVE potential THROWN OBJECT HAZARDS,
4.NEVER ALLOW BLADES to CONTACT SOLID OBJECTS like wire, rocks, post, curbs, guardrails, or ground while mowing. PN TO02
TW120 01/11 |
Safety Section 1-6 |
© 2011 Alamo Group Inc.

SAFETY
THROWN OBJECTS HAZARDS (CONTINUED)
MOWER OPERATION:
•DO NOT exceed mower's rated Cutting Capacity or cut non-vegetative material.
•USE ENCLOSED TRACTOR CABS when two or more mowers are operating in mowing area.
•ADJUST mower sections or wing close and parallel to ground without exposing blades
•ADJUST cutting HEIGHT to AVOID BLADE CONTACT with solid objects like wire, rocks, posts, curbs, guard rails and fixed obstructions.
•DO NOT operate mower when mower is raised or in transport position
•STOP MOWING immediately if blades strike heavy objects, fixed structures, metal guard rails and concrete structures:
1.BLADES CAN FAIL from impact and objects can be thrown with great velocity.
2.INSPECT and REPLACE any damaged blades.
3.CHECK blade carrier balance and REPLACE if damaged.
•DO NOT mow in standing water TO AVOID possible BLADE FAILURE.
•AVOID MOWING in reverse:
1.STOP PTO and back up mower.
2.LOWER mower, engage PTO and mow forward.
•STOP PTO and BLADES when raising implement or the mower to transport position.
•DO NOT ENGAGE PTO with mower in transport position.
•STOP mowing when EXCESSIVE VIBRATION occurs:
1.STOP PTO and tractor ENGINE.
2.INSPECT mower for vibration source
3.REPLACE any damage parts and bent or damaged BLADES. PN TO02-X
SAFETY
TW120 01/11 |
Safety Section 1-7 |
© 2011 Alamo Group Inc.
SAFETY
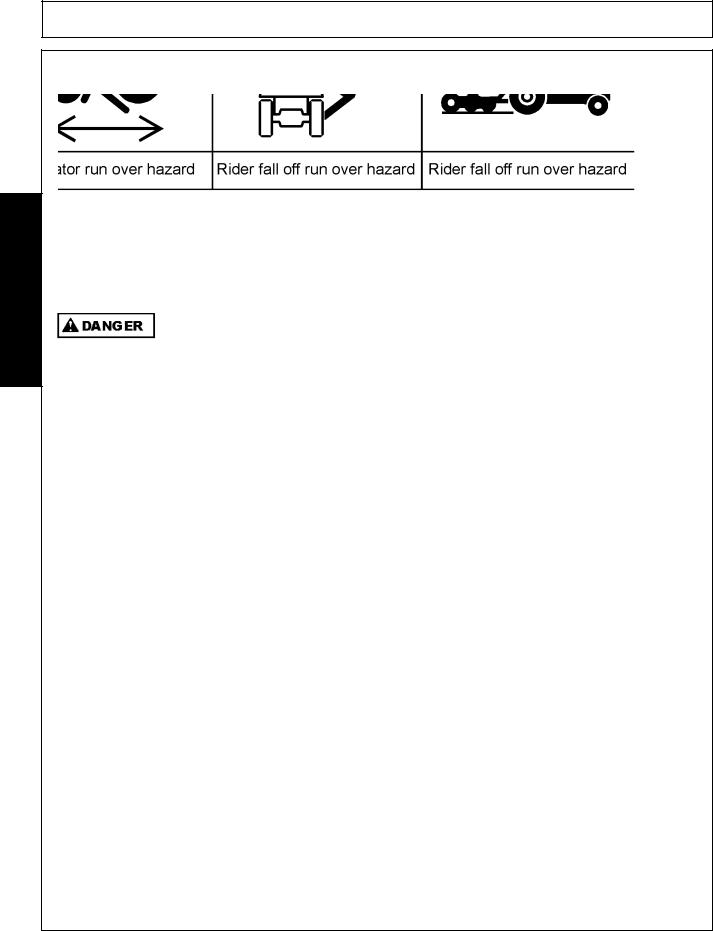
RUN OVER HAZARDS
SAFETY
TO AVOID SERIOUS INJURY OR DEATH FROM FALLING OFF TRACTOR OR EQUIPMENT RUN OVER:
•USE ROPS and SEAT BELT equipped tractors for mowing operations.
•KEEP ROPS locked in UP position.
•ONLY start tractor while seated in tractor seat.
•ALWAYS BUCKLE UP seat belt when operating tractor and equipment.
•ONLY OPERATE tractor and equipment while seated in tractor seat.
•NEVER ALLOW RIDERS on tractor or implement.
WHEN MOUNTING AND DISMOUNTING TRACTOR:
•ONLY mount or dismount when tractor and moving parts are stopped.
•STOP ENGINE AND PTO, engage parking brake, lower implement, allow all moving parts to stop and remove key before dismounting from tractor. PN RO01
TW120 01/11 |
Safety Section 1-8 |
© 2011 Alamo Group Inc.
SAFETY
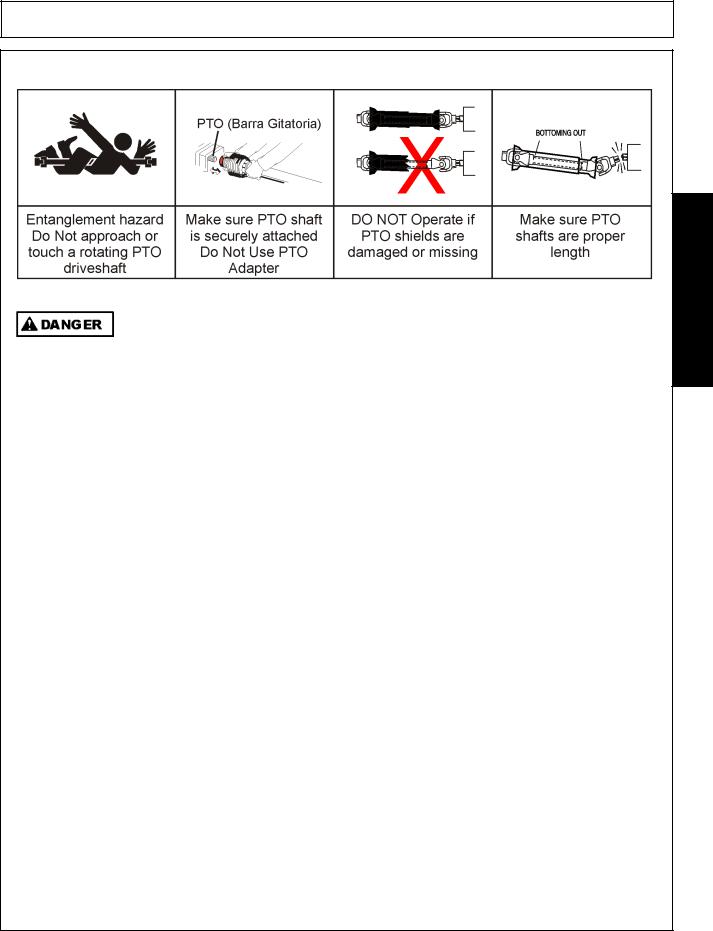
PTO ENTANGLEMENT HAZARDS
KEEP AWAY FROM ROTATING DRIVELINES AND ELEMENTS TO AVOID SERIOUS INJURY OR DEATH:
STAY AWAY and KEEP hands, feet and body AWAY from rotating blades, drivelines and parts until all moving elements have stopped.
•STOP, LOOK and LISTEN before approaching the mower to make sure all rotating motion has stopped.
•ROTATING COMPONENTS CONTINUE to ROTATE after the PTO is shut off.
PTO SHIELDING:
TO AVOID SERIOUS INJURY OR DEATH FROM ENTANGLEMENT WHEN OPERATING IMPLEMENT:
•KEEP PTO shields, integral driveline shields and input shields installed
•DO NOT OPERATE mower without shields and guards in place or missing
•REPAIR OR REPLACE if damage, broken or missing
•ALWAYS REPLACE GUARDS that have been removed for service or maintenance.
•Do Not use PTO or PTO guard as a step.
TO AVOID broken driveline during operations:
•CHECK driveline for proper length between PTO shaft and implement gearbox shaft.(Refer to Instructions in
Operation Section)
•Drivelines too short can pull apart or disengage.
•Drivelines too long can bottom out.
Bottoming driveline telescoping assembly will stop sliding and become solid.
•Driveline bottoming can push through support bearings and break off PTO shaft
•AVOID sharp turns or lift mower to heights to cause driveline "knocking".
•Lubricate driveshaft-telescoping components weekly.
CONTACT DEALER if implement driveline does not match Tractor PTO shaft:
•DO NOT USE PTO ADAPTER.
Using a PTO adapter can cause excessive vibration, thrown objects, blade and implement failures by doubling operating speed. Increased working length exposing unshielded driveline areas. PN PE01
TW120 01/11 |
Safety Section 1-9 |
© 2011 Alamo Group Inc.
SAFETY

SAFETY
SAFETY
MOWER BLADE CONTACT HAZARDS
KEEP AWAY FROM ROTATING BLADES TO AVOID SERIOUS INJURY OR DEATH FROM BLADE CONTACT:
•STAY AWAY and KEEP HANDS, FEET and BODY AWAY from rotating blades, drivelines and parts until all moving elements have stopped.
•DO NOT put hands or feet under mower decks
•STOP rotating BLADES disengage PTO and wait for blade to stop rotating before raising mower deck or wings
•STOP LOOK and LISTEN before approaching the mower to make sure all rotating motion has stopped. PN MB01
TW120 01/11 |
Safety Section 1-10 |
© 2011 Alamo Group Inc.

SAFETY
HIGH PRESSURE OIL LEAK HAZARDS
TO AVOID SERIOUS INJURY OR DEATH FROM HIGH PRESSURE HYDRAULIC OIL LEAKS PENERATING SKIN:
•DO NOT OPERATE equipment with oil or fuel leaks.
•KEEP all hydraulic hoses, lines and connections in GOOD CONDITION and TIGHT before applying system pressure.
•RELIEVE HYDRAULIC PRESSURE before disconnecting lines or working on the system.
•REMOVE and replace hose if you suspect it leaks. Have dealer test it for leaks.
HIGH PRESSURE FLUID LEAKS CAN BE INVISIBLE.
WHEN CHECKING FOR HYDRAULIC LEAKS AND WORKING AROUND HYDRAULIC SYSTEMS:
•ALWAYS WEAR safety glasses and impenetrable gloves.
•USE paper or cardboard to search for leaks.
•DO NOT USE hands or body parts to search for leak.
•KEEP hands and body AWAY from pin holes and nozzles ejecting hydraulic fluid.
•Hydraulic fluid may cause gangrene if not surgically removed immediately by a doctor familiar with this form of injury.
PN HP01
SAFETY
TW120 01/11 |
Safety Section 1-11 |
© 2011 Alamo Group Inc.
SAFETY
SAFETY
ELECTRICAL & FIRE HAZARDS
TO AVOID SERIOUS INJURY OR DEATH FROM ELECTRICAL CONTACT WHEN WORKING AROUND ELECTRICAL POWER LINES, GAS LINES AND UTILITY LINES:
•INSPECT mowing area for overhead or underground electrical power lines, obstructions, gas lines, cables and Utility, Municipal, or other type structure.
•DO NOT allow mower to contact with any Utility, Municipal, or type of structures and obstructions.
•CALL 811 and 1-800-258-0808 for identify buried utility lines.
FIRE PREVENTION GUIDELINES while Operating, Servicing, and Repairing Mower and Tractor to reduce equipment and grass fire Risk:
•EQUIP Tractor with a FIRE EXTINGUISHER
•DO NOT OPERATE mower on a tractor equipped with under frame exhaust
•DO NOT SMOKE or have open flame near Mower or Tractor
•DO NOT DRIVE into burning debris or freshly burnt area
•AVOID FIRE IGNITION by not allowing mower blade to contact solid objects like metal or rock.
•ADJUST SLIP CLUTCHES to avoid excessive slippage and clutch plate heating.
•CLEAR any grass clippings or debris buildup around mower drivelines, slip clutches, and gearboxes.
•SHUT OFF ENGINE while refueling. PN EF02
TW120 01/11 |
Safety Section 1-12 |
© 2011 Alamo Group Inc.
SAFETY
TRANSPORTING HAZARDS
TO AVOID SERIOUS INJURY AND DEATH WHEN TOWING OR TRANSPORTING EQUIPMENT:
•KEEP transport speed BELOW 20 mph to maintain control of equipment.
•REDUCE SPEED on inclines, on turns and in poor towing conditions.
•DO NOT TOW with trucks or other vehicles
•USE only properly sized and equipped tractor for towing equipment.
•FOLLOW all local traffic regulations.
TRACTOR REQUIREMENTS FOR TOWING OR TRANSPORTING IMPLEMENTS:
•ONLY TRANSPORT with tractor with ROPS in the raised position.
•USE properly sized and equipped tractor that exceeds implement weight by at least 20%
•KEEP 20% of tractor weight on front wheels to maintain safe steering.
BEFORE TRANSPORTING OR TOWING IMPLEMENT: TRACTOR INSPECTION:
•CHECK steering and braking for proper operation and in good condition.
•CHECK SMV sign, reflectors and warning lights for proper operation and visibility behind unit.
•CHECK that your driving vision is not impaired by tractor, cab, or implement while seated in tractor seat.
•ADJUST your operating position, mirrors, and implement transport for clear vision for traveling and traffic conditions.
PREPARE IMPLEMENT FOR TRANSPORTING OR TOWING:
•DISENGAGE PTO
•RAISE MOWER
•REMOVE any cut material collected on mower deck.
TOWED MOWERS - ENGAGE TRANSPORT LOCKS AND SAFETY CHAINS:
•INSTALL center axle cylinder transport stops or pins
•ATTACH implement SAFETY CHAIN to tractor
DETERMINE STOPPING CHARACTERISTICS OF TRACTOR AND IMPLEMENT FOR TRANSPORTING OR TOWING:
BRAKING TESTS:
•APPLY brakes at increasing speeds
•Observe STOPPING distances increases with increased speeds.
•DETERMINE the maximum safe transport speed that does not exceed 20 mph
DETERMINE MAXIMUM TURNING SPEED BEFORE OPERATING ON ROADS OR UNEVEN GROUND:
•TEST equipment in slowly increasing speed in turns to determine it can be operated at higher speeds.
•USE REDUCED turning speeds in sharp turns to avoid equipment turning over.
WHEN TOWING OR TRANSPORTING EQUIPMENT:
•Always WEAR SEAT BELT when operating or transporting mower.
•USE low speeds to avoid overturn with raised wings.
•USE low speeds and gradual steering on curves, hills, rough or uneven surfaces and on wet roads
•TURN ON tractor FLASHING WARNING LIGHTS.
•ALLOW clearance for implement swing while turning. PN TH02
TW120 01/11 |
Safety Section 1-13 |
© 2011 Alamo Group Inc.
SAFETY

SAFETY
SAFETY
HAZARDS WITH MAINTENANCE OF IMPLEMENT
AVOID SERIOUS INJURY OR DEATH FROM COMPONENT FAILURE BY KEEPING IMPLEMENT IN GOOD OPERATING CONDITION IN PERFORMING PROPER SERVICE, REPAIRS AND MAINTENANCE.
BEFORE PERFORMING SERVICE, REPAIRS AND MAINTENANCE ON THE IMPLEMENT:
•STOP ENGINE AND PTO, engage parking brake, lower implement, allow all moving parts to stop and remove key before dismounting from tractor.
•PLACE implement on ground or securely block up raised equipment. Use large blocks on soft or wet soil.
•PUSH and PULL Remote Hydraulic Cylinder lever to relieve hydraulic pressure.
•DISCONNECT IMPLEMENT driveline from tractor PTO SHAFT.
WEAR SAFETY GLASSES, PROTECTIVE GLOVES and follow SAFETY PROCEDURES when performing service, repairs and maintenance on the implement:
•Always WEAR protective GLOVES when handling blades, knives, cutting edges or worn component with sharp edges.
•Always WEAR GLOVES and SAFETY GLASSES when servicing hot components
•AVOID CONTACT with hot hydraulic oil tanks, pumps, motors, valves and hose connection surfaces.
•SECURELY support or BLOCK UP raised implement, framework and lifted components before working underneath equipment.
•STOP any implement movements and SHUT-OFF TRACTOR engine before doing any work procedures.
•USE ladder or raised stands to reach high equipment areas inaccessible from ground.
•ENSURE good footing by standing on solid flat surfaces when getting on implement to perform work.
•FOLLOW manufacturer's instructions in handling oils, solvents, cleansers, and other chemical agents.
•DO NOT change any factory-set hydraulic calibrations to avoid component or equipment failures.
•DO NOT modify or alter implement, functions or components.
•DO NOT WELD or repair rotating mower components. These may cause vibrations and component failures being thrown
from mower.
PERFORM SERVICE, REPAIRS, LUBRICATION AND MAINTENANCE OUTLINED IN IMPLEMENT MAINTENANCE SECTION:
•INSPECT for loose fasteners, worn or broken parts, leaky or loose fittings, missing or broken cotter keys and washers on pins, and all moving parts for wear.
•REPLACE any worn or broken parts with authorized service parts.
•LUBRICATE unit as specified by lubrication schedule
•NEVER lubricate, adjust or remove material while it is running or in motion.
•TORQUE all bolts and nuts as specified.
BLADE INSPECTION:
•REPLACE bent, damage, cracked or broken blades immediately with new blades.
•AVOID blade failures and thrown broken blades. DO NOT straighten, weld, or weld hard-facing blades.
SAFETY SHIELDS, GUARDS AND SAFETY DEVICES INSPECTION:
•KEEP all Deflectors, Chain Guards, Steel Guards, Gearbox Shields, and PTO integral shields, Bands, Side Skirts and Skid Shoes in place and in good condition.
•REPLACE any missing, broken or worn safety shields, guards and safety devices.
•Engine Exhaust, some of its constituents, and certain vehicle components contain or emit chemicals known to the state of California to cause cancer, birth defects or other reproductive harm.
•Battery posts, terminals and related accessories contain lead and lead compounds, chemicals known to the state of California to cause cancer, birth defects or other reproductive harm. PN HM01
TW120 01/11 |
Safety Section 1-14 |
© 2011 Alamo Group Inc.

SAFETY
PARTS INFORMATION
PARTS INFORMATION
Rhino mowers use balanced and matched system components for blade carriers, blades, cuttershafts, knives, knife hangers, rollers, drivetrain components, and bearings. These parts are made and tested to Rhino specifications. Non-genuine "will fit" parts do not consistently meet these specifications. The use of “will fit” parts may reduce mower performance, void warranties, and present a safety hazard. Use genuine Rhino mower parts for economy and safety.
SEE YOUR RHINO DEALER
SAFETY
TW120 01/11 |
Safety Section 1-15 |
© 2011 Alamo Group Inc.

SAFETY
Decal Location - Lift Type
NOTE: Rhino supplies safety decals on this product to promote safe operation. Damage to the decals may occur while in shipping, use, or reconditioning. Rhino cares about the safety of its customers, operators, and bystanders, and will replace the safety decals on this product in the field, free of charge (Some shipping and handling charges may apply). Contact your Rhino dealer to order replacement decals.
SAFETY
TW120 01/11 |
Safety Section 1-16 |
© 2011 Alamo Group Inc.

SAFETY
ITEM |
PART NO. |
QTY |
LEVEL |
DESCRIPTION |
1. |
D389 |
1 |
DECAL |
Multi Hazard |
2. |
D388 |
1 |
DECAL |
Driveline Hazards |
3. |
00756004 |
3 |
DANGER |
D/L Shield Missing. Do Not Operate |
4. |
00756005 |
(2) |
DANGER |
Rotating D/L Entanglement |
5. |
D137 |
1 |
INSTRUCT |
CCW Blade Rotation |
6. |
D138 |
1 |
INSTRUCT |
CW Blade Rotation |
7. |
D454 |
1 |
WARNING |
Crushing Hazard (Decal under Deck) |
8. |
00771283 |
3 |
INSTRUCT |
5 Year Gearbox Warranty |
9. |
99102 |
1 |
NAME |
Rhino (2.8” x 10”) |
10. |
00787406 |
2 |
NAME |
Rhino Type |
11. |
00785891 |
2 |
NAME |
TW120 (Large) |
12. |
00785892 |
1 |
NAME |
TW120 (Small) |
13. |
D302 |
2 |
LOGO |
Rhino Logo (4-7/8 x 6-1/2) |
14. |
03200347 |
* |
REFLECTOR |
SMV Sign |
15. |
00760657 |
1 |
IMPORTANT |
Rhino Genuine Parts, Rotary Mower |
16. |
nfs |
1 |
SER PLT |
Serial Number Plate |
17. |
D401 |
1 |
INSTRUCT |
1000 RPM Overlay |
18. |
1458392 |
2 |
REFLECTOR |
Red Reflectors |
19. |
1458393 |
2 |
REFLECTOR |
Amber Reflectors |
20. |
00776031 |
1 |
----------------- |
Canister, Operator’s Manual |
21. |
00762120C |
1 |
----------------- |
Operator’s Manual |
22. |
10058000 |
3 |
----------------- |
Bolt |
23. |
00024100 |
6 |
----------------- |
Flatwasher |
24. |
02959924 |
3 |
----------------- |
Locknut |
25. |
D614 |
3 |
DANGER |
Thrown Object Shield Missing |
26. |
D534 |
2 |
WARNING |
Blade Bolt Torque |
27. |
D629 |
1 |
INSTRUCT |
Lubrication Chart |
28. |
D608 |
2 |
WARNING |
Blade Timing |
*Provided by Tractor Manufacturer
(-) |
Provided by Driveline Manufacturer |
DECAL SHEETS
Dual Spindle Decal Sheet D442
TW 120 Decal Sheet D483
SAFETY
TW120 01/11 |
Safety Section 1-17 |
© 2011 Alamo Group Inc.

SAFETY
Decal Location - Pull Type
NOTE: Rhino supplies safety decals on this product to promote safe operation. Damage to the decals may occur while in shipping, use, or reconditioning. Rhino cares about the safety of its customers, operators, and bystanders, and will replace the safety decals on this product in the field, free of charge (Some shipping and handling charges may apply). Contact your Rhino dealer to order replacement decals.
SAFETY
TW120 01/11 |
Safety Section 1-18 |
© 2011 Alamo Group Inc.

SAFETY
ITEM |
PART NO. |
QTY |
LEVEL |
DESCRIPTION |
1. |
D389 |
1 |
DECAL |
Multi Hazard |
2. |
D390 |
1 |
DECAL |
Pull Type Unit Hazards |
3. |
D388 |
1 |
DECAL |
Driveline Hazards |
4. |
00756004 |
3 |
DANGER |
D/L Shield Missing, Do Not Operate |
5. |
00756005 |
2** |
DANGER |
Rotating D/L Entanglement |
6. |
D137 |
1 |
INSTRUCT |
CCW Blade Rotation |
7. |
D138 |
1 |
INSTRUCT |
CW Blade Rotation |
8. |
D454 |
1 |
WARNING |
Crushing Hazard (Decal under Deck) |
9. |
00771283 |
3 |
INSTRUCT |
5 Year Gearbox Warranty |
10. |
99102 |
1 |
NAME |
Rhino (2.8” x 10”) |
11. |
00787406 |
2 |
NAME |
Rhino Type |
12. |
00785891 |
2 |
NAME |
TW 120 (Large) |
13. |
00785892 |
1 |
NAME |
TW 120 (Small) |
14. |
D302 |
2 |
LOGO |
Rhino (4-7/8 x 6-1/2) |
15. |
03200347 |
1 |
REFLECTOR |
SMV Sign |
16. |
00760657 |
1 |
IMPORTANT |
Rhino Genuine Parts |
17. |
nfs |
1 |
SER PLT |
Serial Number Plate |
18. |
D401 |
1 |
INSTRUCT |
1000 RPM Overlay |
19. |
1458392 |
2 |
REFLECTOR |
Red Reflectors |
20. |
1458393 |
2 |
REFLECTOR |
Amber Reflectors |
21. |
00776031 |
1 |
----------------- |
Canister, Operator’s Manual |
22. |
00762120C |
1 |
----------------- |
Operator’s Manual |
23. |
10058000 |
3 |
----------------- |
Bolt |
24. |
00024100 |
6 |
----------------- |
Flatwasher |
25. |
02959924 |
3 |
----------------- |
Locknut |
26. |
D614 |
3 |
DANGER |
Thrown Object Shield Missing |
27. |
D534 |
2 |
WARNING |
Blade Bolt Torque |
28. |
D629 |
1 |
INSTRUCT |
Lubrication Chart |
29. |
D518 |
1 |
WARNING |
Jack Positioning |
30. |
D608 |
2 |
WARNING |
Blade Timing |
*Provided by Tractor Manufacturer
( ) |
Provided by Driveline Manufacturer |
DECAL SHEETS
Dual Spindle Decal Sheet D442
TW120 Decal Sheet D483
SAFETY
TW120 01/11 |
Safety Section 1-19 |
© 2011 Alamo Group Inc.
SAFETY
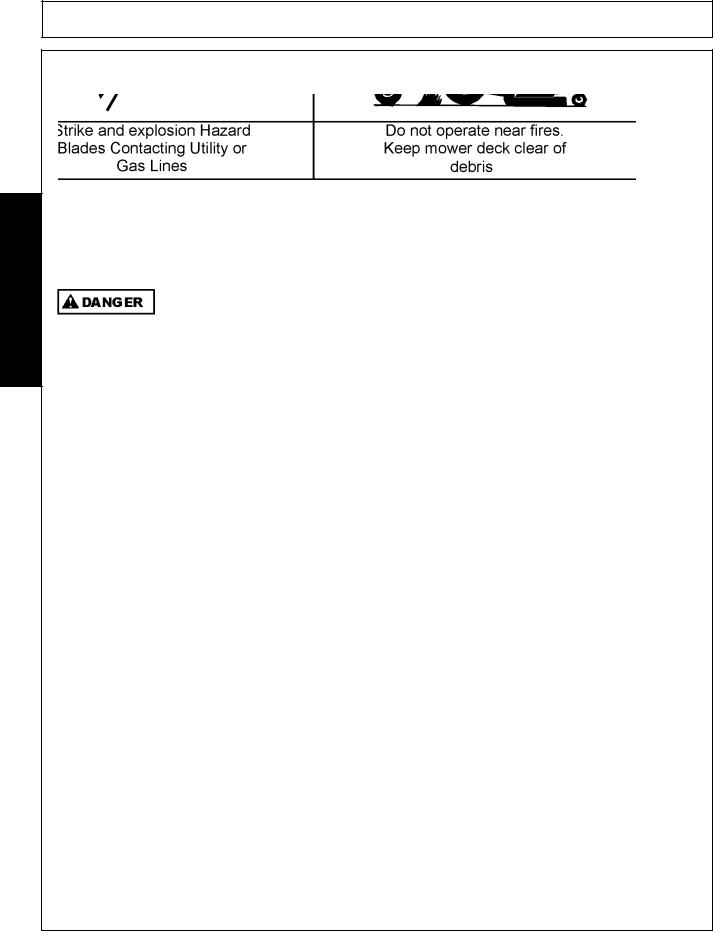
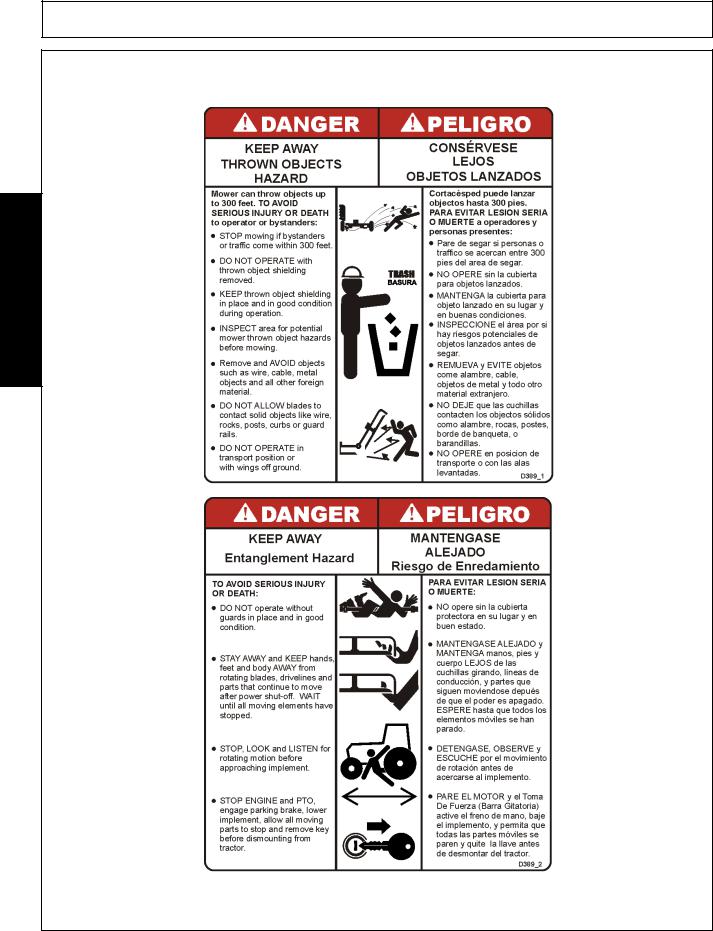
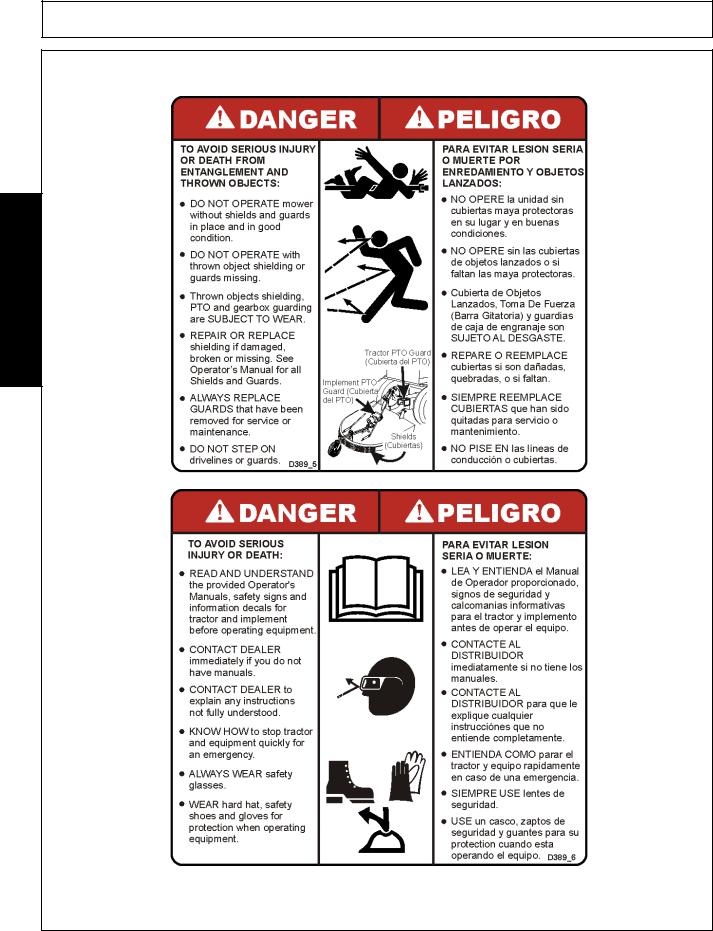
Decal Description
SAFETY
TW120 01/11 |
Safety Section 1-20 |
© 2011 Alamo Group Inc.

SAFETY
SAFETY
TW120 01/11 |
Safety Section 1-21 |
© 2011 Alamo Group Inc.
SAFETY
SAFETY
TW120 01/11 |
Safety Section 1-22 |
© 2011 Alamo Group Inc.
 Loading...