


Radio / Cassette
Stockholm
RCM 128
Operating instructions

26 |
25 |
24 |
23 |
22 |
21 |
20 |
19 |
18 |
17 |
16 |
15 |
14
1 |
13 |
2 |
3 |
4 |
5 |
6 |
7 |
8 |
9 |
10 |
11 |
12 |
DEUTSCH ENGLISH FRANÇAIS ITALIANO NEDERLANDS SVENSKA ESPAÑOL PORTUGUÊS
3

Contents |
|
Quick reference ............................ |
33 |
Important notes ............................ |
39 |
Precautions ........................................... |
39 |
Traffic safety ......................................... |
39 |
Installation ............................................. |
39 |
Telephone mute .................................... |
39 |
Accessories .......................................... |
39 |
KeyCard theft protection |
|
system ........................................... |
40 |
Putting the unit into operation .............. |
40 |
Removing the KeyCard ........................ |
40 |
“Training” a second KeyCard/ |
|
Replacing a KeyCard ............................ |
40 |
Displaying the radio pass data ............. |
40 |
Short Additional Memory (S.A.M.) ........ |
41 |
Turn On Message (T.O.M.) .................. |
41 |
Optical indication for extra security ...... |
41 |
Care of your KeyCard ........................... |
41 |
Switching the audio source ........ |
41 |
Radio operation with RDS ........... |
42 |
AF - Alternative frequency .................... |
42 |
REG - regional programme .................. |
42 |
Selecting a waveband .......................... |
42 |
Station tuning ........................................ |
42 |
Scrolling through the broadcasting |
|
networks (only FM) ............................... |
43 |
Changing the memory bank (FM)......... |
43 |
Storing stations ..................................... |
43 |
Automatically storing the strongest |
|
stations with Travelstore ....................... |
44 |
Recalling stored stations ...................... |
44 |
Scanning stored stations with |
|
Preset Scan .......................................... |
44 |
Scanning stations with Radio-Scan ...... |
44 |
Changing the scan time ........................ |
44 |
Selecting the seek tuning sensitivity .... |
44 |
Switching from stereo to mono (FM) .... |
45 |
PTY – Programme Type ....................... |
45 |
Programme type ................................... |
45 |
Receiving traffic programme |
|
stations with RDS-EON................ |
47 |
Traffic announcement priority on/off .... |
47 |
Warning beep ....................................... |
48 |
Automatic seek tuning start .................. |
48 |
Adjusting the volume for traffic an- |
|
nouncements and the warning beep .... |
48 |
Adjusting GEO for traffic |
|
messages and the warning beep ......... |
48 |
Traffic Memo (TIM) ....................... |
49 |
Warning note ................................... |
49 |
Setting the clock in the DSC menu ...... |
49 |
Recalling stored traffic messages ........ |
49 |
TIM standby mode while the radio is |
|
switched off ........................................... |
50 |
Programming the TIM standby mode / |
|
TIM times .............................................. |
50 |
Deactivating the TIM standby mode ..... |
50 |
Warning note ................................... |
51 |
Tape operation ............................. |
51 |
Inserting a tape ..................................... |
51 |
Removing a tape ................................... |
51 |
Fast Forward/Rewind ........................... |
51 |
Selecting titles with S-CPS ................... |
51 |
Switching the tape side ........................ |
52 |
Tape equalisation ................................. |
52 |
Scanning cassette titles with SCAN ..... |
52 |
Dolby B NR* .......................................... |
52 |
Skipping unrecorded tape portions |
|
with Blank Skip ..................................... |
52 |
Listening to the radio during fast tape |
|
winding with RM (Radio Monitor) ......... |
52 |
Care notes ............................................ |
53 |
CD changer operation (optional) 53 |
|
Switching to CDC operation ................. |
53 |
Selecting CDs and titles ....................... |
53 |
MIX playback ........................................ |
54 |
Selecting the display mode .................. |
54 |
Storing the display mode ...................... |
54 |
SCAN operation .................................... |
54 |
Entering CD names .............................. |
54 |
Deleting CD names with |
|
DSC-UPDATE ...................................... |
55 |
DSC programming ....................... |
55 |
Overview of the DSC factory |
|
settings .................................................. |
58 |
Appendix ....................................... |
58 |
Specifications ........................................ |
58 |
32

Quick reference
1Switching on/off with the ON button:
Press ON.
When switching the set on with the ON button, the KeyCard has to be inserted. The unit will play with the preadjusted volume.
Switching on/off with the KeyCard:
The set has to be turned on via the ON button.
Note:
Read the information in chapter “KeyCard theft protection system”.
Switching on/off via the ignition:
When connected correspondingly, the set can also be turned on and off via the vehicle ignition.
After the ignition has been switched off, a double beep tone will remind you that you should remove the KeyCard before leaving your vehicle.
Switching on with the ignition being switched off:
To keep on operating the set when the ignition is switched off (KeyCard is inserted), proceed as follows:
Press ON after the double beep tone. The unit will be turned on.
To avoid that the battery goes flat, the system will be turned off automatically after a playback time of one hour.
2VOL+ / VOL-
To alter the volume.
Each time the set is switched on, it will play with the pre-adjusted volume (VOL FIX).
You may also change the VOL FIX setting (see chapter “DSC programming”).
3
For instantly muting the volume.
By pressing the  button the volume will be muted immediately. “MUTE” will appear in the display.
The function is cancelled by pressing button  or VOL+.
When pressing VOL-, the normal volume will be by one grade lower than the mute volume.
To programme the mute volume level, proceed as follows:
•Adjust the desired volume.
•Press  for two seconds until you hear a beep.
Now this volume level is stored as your mute volume.
Extra function 
Memory button in the DSC menu.
4FMT
Press repeatedly to switch between the FM memory banks I, II and T (Travelstore).
When pressing this button, the system will automatically switch to FM.
Extra function FMT
To store the six most powerful stations automatically with Travelstore:
Press FMT until you hear a beep or “T-STORE” appears in the display.
5M•L - toggle switch
To toggle between medium and long wave reception.
DEUTSCH ENGLISH FRANÇAIS ITALIANO NEDERLANDS SVENSKA ESPAÑOL PORTUGUÊS
33
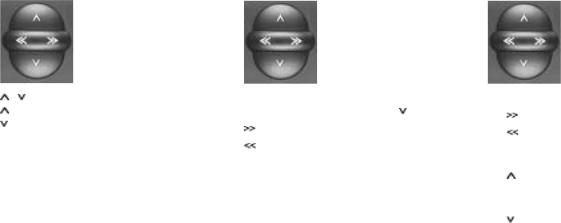
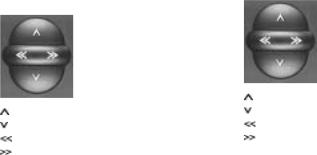
6 Rocker switch
Radio operation |
Tape operation |
Changer operation (optional) |
/ |
Station search |
|
Up |
|
Down |
<</>> |
Up/Down in short intervals when AF |
|
is off |
<</>> |
To scroll through the station net- |
|
works when AF is on, |
|
e.g. NDR 1, 2, 3, 4, N-JOY, FFN, |
|
ANTENNE ... . |
 /
/  Title selection (S-CPS)
  Up
Up
Down
Fast forward
Fast rewind
Stop function by pressing  .
.
CD selection
Up
Down
Title selection
Upwards: Press briefly.
CUE - fast advance (audible):
Keep depressed.
Downwards: Press as many times as required.
To re-start a title: Press briefly.
REVIEW - fast reverse (audible):
Keep depressed.
Extra rocker switch functions:
Further setting functions with
AUD |
J |
GEO |
I |
DSC MODE H |
|
PTY |
> |
Condition: The corresponding function has to be activated.
34
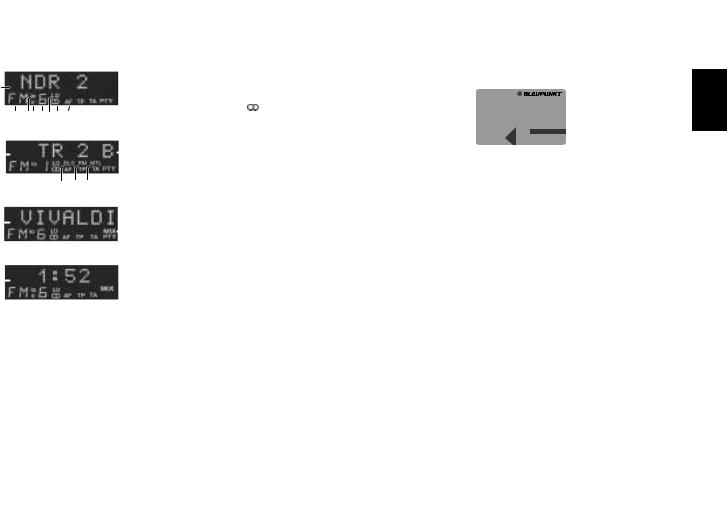
7 Display
a |
|
|
|
|
|
|
|
||||||
|
|
|
|
|
|
e f g h i |
|
|
|
|
|
|
|
|
|
|
|
|
|
|
|
|
|
|
|
|
|
|
|
|
|
|
|
j |
k l |
m n |
|||||
b |
|
|
|
|
r |
|
|
|
|
|
o |
||
|
|
|
|
|
|
|
|
|
|||||
|
|
|
|
|
|
||||||||
|
|
|
|
|
|
|
q |
p |
|||||
c |
|
|
|
|
|
|
|
|
|
s |
|||
|
|
|
|
|
|
|
|||||||
d |
|
|
|
|
|
|
|
|
|
|
|
|
|
|
|
|
|
|
|
|
|
|
|
|
|
||
|
|
|
|
|
|
|
|
|
|||||
|
|
|
|
|
|
|
|
||||||
a) NDR2 |
- |
Station name |
|||||||||||
b) TR 2 |
- |
Track (side) 2 of the casset- |
|||||||||||
|
|
|
|
|
|
|
|
te |
|
|
|
|
|
c)VIVALDI - CD name or
d)1 : 52 - CD time (playback time)
|
and number for changer |
|
operation (optional) |
e) FM |
- Waveband |
f) |
lo |
- |
Seek tuning sensitivity |
g) |
I, II, T |
- Memory bank I, II or Travel- |
|
|
|
|
store |
h) |
6 |
- |
Preset button (1-6) |
i) |
LD |
- |
Loudness |
j) |
|
- |
Stereo |
k) |
AF |
- |
Alternative frequency for |
|
|
|
RDS operation |
l) |
TP |
- A traffic station is being re- |
|
|
|
|
ceived |
m) TA |
- Priority for traffic stations |
||
n) |
PTY |
- |
Programme type function |
o) |
B |
- Dolby B noise reduction |
|
p) |
MTL |
- A metal or CrO2 type is |
|
|
|
|
being played |
q) |
RM |
- Radio-Monitor (to listen to |
|
|
|
|
the radio during fast tape |
|
|
|
winding) |
r) |
BLS |
- Blank-Skip (to skip un- |
|
|
|
|
recorded tape portions) |
s) |
MIX |
- CD playback in random |
|
|
|
|
order |
8KeyCard theft protection system
To operate the set it is necessary that the KeyCard is inserted.

 KeyCard
For this purpose, introduce the KeyCard (with the contact area showing up) into the slot above the tongue sticking out of the unit.
To remove the card, press first to unlock.
Read also the information in chapter “KeyCard theft protection system”.
Flashing KeyCard tongue
When the radio is turned off and the KeyCard removed, the KeyCard tongue can be programmed to flash for optical theft protection.
For more information see chapter “DSC programming”.
This flashlight can be switched off by pushing in the tongue and lock.
DEUTSCH ENGLISH FRANÇAIS ITALIANO NEDERLANDS SVENSKA ESPAÑOL PORTUGUÊS
35
9MIX
Changer (CDC) operation (optional)
MIX CD
The CD titles will be played at random. The individual discs are selected in numeric order.
MIX MAG
The CD titles will be played at random. The individual discs are also selected in random order.
MIX OFF
The Mix function is deactivated.
Press MIX as many times until the desired function briefly appears in the display.
:SC
Radio operation
Scan
Press SC briefly –
“FM SCAN” and the name of the scanned station will alternately appear in the display. The unit will scan all stations which can be received.
Preset Scan
Press SC for approximately two seconds until you hear a beep.
“SCAN” and the name of the scanned station will alternately appear in the display. The unit will scan all stations stored on the preset buttons.
To stop Scan / Preset Scan: Press SC once again.
Changer operation (optional)
CD-Scan
Press SC.
“CDC-SCAN” will appear in the display.
All CD titles will be scanned briefly. To stop CD-Scan:
Press SC once again.
;lo
To switch the seek tuning sensitivity level:
Press button briefly.
To switch between mono and stereo reception:
Press button for approximately two seconds (beep).
The stereo symbol  will disappear for mono playback.
<TIM (Traffic Memo)
To play back the stored traffic announcements:
Press TIM briefly.
To switch the priority for traffic announcements on and off:
Press TIM for approximately two seconds.
When “TA”t(raffic announcement) lights up in the display, the system will play traffic stations only.
=AF
Alternative frequency during RDS operation:
When “AF” lights up in the display, the system will automatically seek a frequency offering better reception of the same RDS programme.
AF on/off: Press AF briefly.
Regional function on/off:
Press the AF button for approximately two seconds until you hear a beep. “REG-ON” or “REG-OFF” will appear in the display (see chapter REG - regional programme).
36

>PTY (Programme Type)
In the PTY mode, the preset buttons become programme type buttons. With each preset you can select one programme type, such as for example NEWS, SPORT, POP MUSIC, EDUCATE, etc.
?SRC (source)
You can switch between the different audio sources radio, tape, and CDC/ AUX (if activated).
@DIS
Radio operation
When pressing the DIS button, the frequency will be displayed for approximately four seconds.
Tape operation
When pressing the DIS button, the station name/frequency will be displayed for approximately four seconds.
Changer operation (optional)
To switch the display mode and select between name, time (playback time)
and number (disc number):
•Press DIS briefly.
ARM (Radio Monitor)
Press this button to listen to the radio while fast forwarding or rewinding the tape.
To switch RM on/off: Press RM.
When this function has been activated, “RM” shows on the display panel. The radio is played back during fast tape run.
B
Press to eject the tape.
C1, 2, 3, 4, 5, 6 - preset buttons
On FM, you can store six stations for each of the memory banks I, II and T. On MW/LW, you can store six stations each.
To store a station: Press a preset button during radio operation and hold down until the set resumes play after the muting and you hear a beep.
To recall a station: Select the desired waveband. On FM, also adjust the corresponding memory bank. Then press the relevant preset button briefly.
|
Extra function preset buttons |
|
|
DEUTSCH |
|
|
|
||
|
To store and recall a PTY programme |
|
|
|
|
type. |
|
|
|
|
|
ENGLISH |
||
|
button when PTY is active (“PTY” |
|||
|
On FM, you can store and recall one |
|
||
|
programme type on/from each preset |
|
||
|
lights up in the display). |
|
||
|
|
|||
D Cassette loading slot |
FRANÇAIS |
|||
|
||||
|
Insert the tape with side A or 1 facing |
|
||
|
up, the open side showing to the right. |
|
||
|
|
|||
E |
Tape side selector |
ITALIANO |
||
|
||||
|
Press this button to switch over to the |
|
||
|
other side during tape operation. The |
|
||
|
|
|
|
|
|
display shows “TR 1” or “TR 2”. |
NEDERLANDS |
||
|
|
|||
F B |
|
|||
|
Dolby B NR* |
|
||
|
Press this button to play back a tape |
SVENSKA |
||
|
which has been recorded with Dolby-B |
|||
|
|
|||
|
noise reduction. When this button is |
|
||
|
pressed, „B“ lights up in the display. |
|
||
|
* Noise Reduction system manufactured under li- |
|
|
|
|
|
|
||
|
cense from Dolby Laboratories Licensing Cor- |
|
ESPAÑOL |
|
|
poration. „Dolby“ and the double-D symbol are |
|
||
|
|
|
||
|
trademarks of Dolby Laboratories Licensing Cor- |
|
|
|
|
poration. |
|
|
|
|
|
|
|
|
|
|
|
|
|
|
|
|
|
PORTUGUÊS |
|
|
|
|
|
37
GLD
Loudness - When listening at a low level, the Loudness function creates a more natural sound by boosting the low frequency range.
LD on/off: Press the button.
When the Loudness function is active, “LD” will light up in the display.
See chapter “DSC programming” for more information.
HDSC (Direct Software Control) Use the DSC function to customise
certain programmable, basic settings to suit your personal needs and preferences. See chapter “DSC programming” for more information.
IGEO
To adjust the balance (left/right) and fader (front/rear) with the rocker switch.
Fader front
Fader rear
Balance left
Balance right
The last setting will be stored automatically.
To switch off GEO: Press button once again.
If the setting remains unchanged within four seconds, the display will switch back to the previous condition.
Extra function GEO
Separate balance and fader settings for traffic messages. See chapter “Adjusting GEO for traffic messages and the warning beep”.
JAUD
To adjust the treble and bass frequencies with the rocker switch.
Treble +
Treble –
Bass –
Bass +
The last setting will be stored automatically.
To switch off AUD: Press button once again.
If the setting remains unchanged within four seconds, the AUD setting will be terminated automatically.
38

Important notes
Precautions
Before starting to use your new car radio, please read the following information carefully.
Traffic safety
As the driver of a motor vehicle, it is your responsibility to pay attention to the traffic situation at all times. Never use your car radio in a way that could distract you.
Please keep in mind that you travel a distance of 14 m per second at a speed of only 50 km/h.
Should the traffic situation become particularly demanding, we advise you not to use the radio.
Always make sure that you are still able to hear any warning signals coming from outside of the vehicle, such as police or fire engine sirens, so that you can react accordingly.
Therefore, you should always select a moderate volume for playing your car radio while you are driving.
Installation
If you would like to install your new car stereo yourself or add other audio components to existing ones, then please read carefully the enclosed instructions on installation and connection.
In order to ensure that the set operates properly it is necessary that the positive power supply line is connected via the ignition and the permanent +12 V lead.
Do not ground the loudspeaker outputs!
Telephone mute
If you have a mobile telephone installed in your vehicle, radio, tape or changer playback can be muted automatically when using the phone (telephone mute).
“PHONE” will then appear in the display. When TA is active, traffic messages will always have priority. The announcement will be aborted by pressing the TIM button.
Accessories
Use only the accessories and spare parts approved by Blaupunkt.
You can use the following Blaupunkt products with this car stereo:
Changer
CDC A 05 or CDC F 05
Remote control
With the infrared remote control RC 05 you can control all of the important functions of your car hi-fi system from the steering wheel.
Amplifier
All Blaupunkt amplifiers
DEUTSCH ENGLISH FRANÇAIS ITALIANO NEDERLANDS SVENSKA ESPAÑOL PORTUGUÊS
39
 Loading...