


Radio / CD / Changer
Florida RD 168 US
Nevada RDM 168 US
Alaska RDM 168 US
Operation instructions
1
2
15 |
14 |
13 |
12 |
11 |
10
3 |
4 |
5 |
6 |
7 |
8 |
9 |
Thummer™ III Steering Wheel Remote Control (sold separately)
Commande à distance Thummer™ III (optionnelle)
11Funcionamiento del control remoto Thummer™ III (opcional) Funcionamento do Controle Remoto Thummer™ III (opcional)
2 |
|
1 |
10 |
|
2

Table of contents |
|
Equipment overview ...................... |
5 |
Florida RD 168 ........................................ |
5 |
Nevada RDM 168 ................................... |
5 |
Alaska RDM 168 ..................................... |
5 |
Quick reference .............................. |
6 |
Important information .................. |
11 |
What you definitely should read ........... |
11 |
Traffic safety ......................................... |
11 |
Installation ............................................. |
11 |
Telephone mute .................................... |
11 |
Accessories .......................................... |
11 |
Anti-theft security system/ |
|
detachable face ............................ |
12 |
Detaching face ...................................... |
12 |
Attaching face ....................................... |
12 |
Care of face .......................................... |
12 |
Locking face ...................................... |
12 |
Choosing mode of operation ...... |
12 |
RDS radio operation .................... |
13 |
AF alternative frequency ...................... |
13 |
Selecting frequency band areas ........... |
13 |
Station tuning ........................................ |
13 |
Station search / ........................... |
13 |
Manual tuning with << >> .................. |
13 |
Scrolling through station chains |
|
(only FM) ............................................... |
13 |
Changing storage level (FM) ................ |
14 |
Storing stations ..................................... |
14 |
Automatic storage of strongest stations |
|
with Travelstore .................................... |
14 |
Calling stored stations .......................... |
14 |
Scanning stations with radio scan ........ |
14 |
Changing scan time .............................. |
14 |
Changing sensitivity of station search .. |
15 |
Switching stereo/mono (FM) ................ |
15 |
Activating automatic IF bandwidth |
|
switching ............................................... |
15 |
PTYProgram type (mode) .................. |
15 |
Program types ...................................... |
15 |
Turning PTY on/off ............................ |
15 |
Inquiring about station program type |
15 |
Choosing program type ..................... |
16 |
Storing program type ............................ |
16 |
Scanning stations with PTY scan ......... |
16 |
PTY priority ........................................... |
16 |
CD operation ................................. |
17 |
Turning CD operation on ...................... |
17 |
Inserting CD .......................................... |
17 |
Removing CD ....................................... |
17 |
Choosing title ........................................ |
17 |
CD mix operation .................................. |
18 |
CD pause .............................................. |
18 |
CD repeat (RPT/repeat function) ......... |
18 |
CD SCAN operation ............................. |
18 |
CD changer operation .................. |
18 |
Inserting CDs ........................................ |
18 |
Removing CDs ...................................... |
18 |
Playing CDs .......................................... |
19 |
Choosing titles ...................................... |
19 |
CD MIX operation ................................. |
19 |
CD PAUSE ............................................ |
19 |
CD Repeat (RPT/repeat function) ........ |
19 |
CD SCAN operation ............................. |
19 |
Choosing the display mode .................. |
20 |
To change the display mode ............. |
20 |
Naming CDs .................................. |
20 |
Starting CD name input ........................ |
20 |
Deleting CD name input ....................... |
21 |
Deleting one CD name ...................... |
21 |
Deleting all CD names of a CD |
|
magazine ........................................... |
21 |
Deleting entire name storage of a CD |
|
changer .............................................. |
21 |
Deleting entire name storage of a CD |
|
player ................................................. |
21 |
ESPAÑOL FRANÇAIS ENGLISH
PORTUGUÊS NEDERLANDS SVENSKA
ESPAÑOL PORTUGUÊS
3
Clock / time ................................... |
22 |
Setting time ........................................... |
22 |
Displaying time ..................................... |
22 |
Adjusting time after power outage ........ |
22 |
Turning off adjustment for daylight |
|
savings time .......................................... |
22 |
Equalizer Setting .......................... |
23 |
Setting instructions ............................... |
23 |
Assistance in setting your equalizer ..... |
24 |
DSC programming ....................... |
25 |
Overview of the basic DSC factory |
|
settings .................................................. |
27 |
Specifications ............................... |
27 |
Amplifier ................................................ |
27 |
Tuner ..................................................... |
27 |
Cassette ................................................ |
27 |
CD ......................................................... |
27 |
CD changer |
|
(optional, only for Alaska RDM168 |
|
and Nevada RDM168) .......................... |
27 |
Troubleshooting Guide................ |
28 |
General ................................................. |
28 |
Radio reception..................................... |
28 |
CD Changer operation (optional) ......... |
28 |
Error Displays ....................................... |
29 |
4

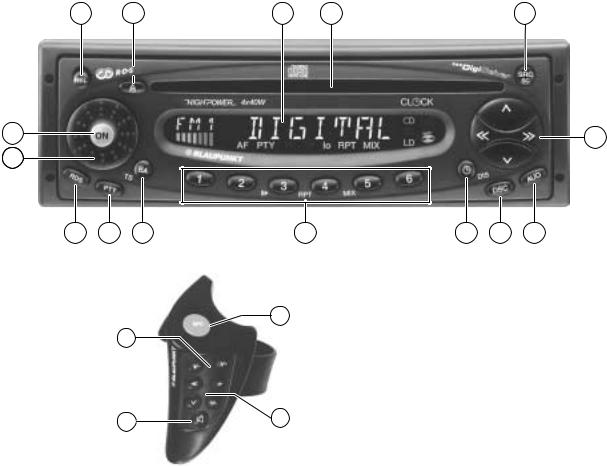
Equipment overview
Florida RD 168 |
Nevada RDM 168 |
Alaska RDM 168 |
Florida RD 168 with multi-tone green dis- |
Nevada RDM 168 with multi-tone orange |
Alaska RDM 168 with multi-tone yellow and |
play |
display |
green display |
Features:
–CD player
–4 x 40 watt maximal output performance
–4-channel preamp-output (3V)
–Release panel (detachable electronic face)
–RDS (FM/AM) EON
–PTY (station search by program type)
–Codem D reception model
–30 storage areas
–Clock (exact time controlled by RDS with automatic daylight savings setting)
–Hicut (reduced interference when reception is difficult)
Same features as Florida RD 168, but in |
Same features as Nevada RDM 168, but in |
addition: |
addition: |
–Equalizer for setting of low and middle frequencies (1 band equalizer, bass logic)
–Source tone memory (customized tone setting of each signal source (Radio, CD, CD changer) is stored automatically for the respective signal source)
–Connection of remote control possible
–Telephone mute (muting during phone call)
–Disc management system
(Control of a connected CD changer possible)
–AUX function (connection of an external signal source (e.g., a walkman) possible)
–Equalizer for setting of low, middle, and high frequencies (digital parametric equalizer / 2 band)
–Sharx (automatic IF bandwidth switching to reduce interference from adjacent stations)
–CD naming (possibility of naming the CDs in the CD changer to be able to list them on the display)
ENGLISH
FRAN AISÇ
ESPA OLÑ
PORTUGU SÊ
NEDERLANDS SVENSKA
ESPA OLÑ
PORTUGU SÊ
5
Quick reference
“Press” means a momentary press of less than 1/2 second. All presses requiring more than 1/2 second are followed by a beep. (Beep for all button presses available through Direct software Control Menu.)
1Power On/Off:
Press the On/Off button in the center of the level volume control or inserting a disc into the unit - the face must be installed and the ignition must be on. The unit operates at the preset volume level.
Power on/off when ignition is on:
When unit on, the unit can be turned off and then on again through the car ignition.
Last-used source becomes active unless unit is turned on by inserting disc, in which case CD player becomes active.
Power on when ignition is off:
The unit (with faceplate installed) can be operated again as follows when the ignition is off:
The unit is turned on by pressing the On/Off button in the center of the volume level control.
In order to protect the car battery, the unit will automatically stop playing after approximately one hour.
2Adjusting the volume:
The unit will operate at the preset volume level when it is turned on. The volume is changed by adjusting the loudness control.
Turn control to right to increase volume level. Turn control to left to decrease volume level.
Press On/Off button to temporarily reduce volume. “Mute” appears and volume level returns to the mute value set in the DSC menu.
To clear the mute function, press the On/Off button again or adjust the level control.
The mute function for reducing the volume level and the preset volume level of the unit can be changed according to the instructions under “Programming with DSC”.
3AF
To turn the AF function on/off:
Press the RDS key for approximately 2 seconds. You will hear a beep and “AF” appears.
With the assistance of RDS the unit will search for an alternative frequency that provides better reception for the station presently being listened to. The AF function is turned off by pressing the RDS key for approximately
2 seconds.
After the beep the display will no longer display the letters “AF”.
3RDS
By briefly pressing the RDS key you can switch from the display of the station frequency to the name of the station (if available).
4PTY
Program type = program mode “PTY” turns the station keys to program type keys. Each station key allows you to choose a program type such as news, sports, rock, pop, edu-
cation, etc. Once PTY is activated, the toggle switch << >> is able to call all program types. To activate press on the PTY key and “PTY” appears. Press the PTY key again to disactivate.
6

5BA
To switch between the storage levels/ frequency band areas FM 1, FM II, TS (Travelstore) AM, and AM Travelstore.
Additional Travelstore features:
To activate Travelstore press the BA key until you hear a beep and “T-STORE” appears.
TS stores the six strongest stations.
6Station keys 1 - 6
Radio operation
At each storage level (I, II, and “T”) of the FM area, you can store up to six stations.
You can also store 6 stations in the AM area and the AM Store area.
Preset Station Storage
Set the radio to the station to be stored. Press the station key where the station should be stored (program will be muted) and hold down the key until the program can be heard again and the beeping stops.
Preset Station Selection
To set the frequency band area and choose the desired storage level (FM, AM or FM/AM Travelstore) press one
of the six preset stations. You can listen to the station stored there.
Additional features of the preset station keys
To store and select the PTY program type.
After activating PTY (“PTY” appears in the display), you can store and select a program type (e.g., rock, pop, classical, news, etc.) on each station key in FM operation.
CD operation
3/II pause
Press station key number 3 and the current CD program will be switched and “pause” appears. Press station key 3 again to stop pause.
4/RPT repeat
CD titles can be played repeatedly. You are able:
To repeat the presently playing title (“REPEAT-T”) or all titles of the CD you are presently playing (“REPEAT- D”).
When the RPT function is activated the display lights up with “RPT”. After choosing the repeat function and after each title change, the display will brief-
ly show “REPEAT-T” or “REPEAT-D”.
REPEAT-T on:
• Press “4/RPT”.
REPEAT-D on:
• Depress “4/RPT” and hold.
To turn “RPT” off: Press “4/RPT”.
5/Mix operation
Press station key 5 to turn on the mix operation for the currently playing CD. This will cause the titles of this CD to be played in a random sequence. “MIX CD” appears and the word “MIX” will fade in at the bottom of the display. Pressing station key 5 again to disactivate this function.
5/Mix operation of the CD changer
CD titles can be played in random sequence.
You are able to:
Play all titles of a CD (“MIX-CD”) or all titles of all inserted CDs (“MIX-ALL”) in random sequence.
When the MIX function is activated, “MIX” appears.
After switching to this function and after each title change, the display will briefly show “MIX-CD” or “MIX-ALL”.
MIX-CD on:
• Press “5/MIX”.
ENGLISH
FRAN AISÇ
ESPA OLÑ
PORTUGU SÊ
NEDERLANDS SVENSKA
ESPA OLÑ
PORTUGU SÊ
7
MIX-ALL on:
• Hold “5/MIX” depressed.
Press “5/MIX” to disactivate MIX.
7Clock display
Press the DIS key when the unit is turned on and the current time will be shown for approximately 8 seconds. Additional features of the clock display Press and hold DIS key until it beeps which will result in a permanent time display.
When carrying out other functions, the time display will be masked for approximately 8 seconds.
8DSC (direct software control)
You can customize certain basic unit settings with DSC. Additional information can be found in the section “Programming with DSC”.
9AUD
This key activates the tone setting menu. You can set different tone settings for each operation mode. The last setting for each operation mode will be stored. (This applies only to the Nevada RDM 168 and the Alaska RDM 168.)
Setting treble (high tones) and bass (low tones):
Press the AUD key once. The display will show “BASS” and you can change the setting by pressing the toggle switch either to the left or right.
You can change the treble setting by pressing the rocker switches either up or down while the display shows “TREBLE”.
The display will show the chosen values. The last value will be stored. Press the AUD key to disactivate.
The AUD setting will end automatically if there is no change within 8 seconds.
Setting balance (left/right) and fader (front/back):
Press the AUD key two times.
By operating the rocker switches up or down you can set the volume ratio between the front and the back speakers. At the same time the display will indicate “FADER”.
Press the toggle switches to the left and right to adjust the volume. At the same time, the display will indicate “BALANCE”.
The display will show the selected values. The last value will be stored. Press the AUD key to turn off.
The AUD setting will be end automatically if there is no change within 8 seconds.
9LD - loudness
To set the low tones appropriate for the human ear at low volume levels. Press the AUD key to turn the loudness function on/off and hold the key down until you hear a beep. In units with source tone memory, the loudness function can be turned on and off for each signal source independently.
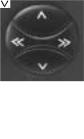
:Toggle switch
Radio operation
Automatic tuning
 /
/ Station search
up down
Manual tuning
<< >> incrementally up/down
(in FM only when AF turned off)
8

In FM only:
<<>> Scrolling through the station chains when AF is on (e.g. NDR1,2,3,4,
N-Joy ...) .
CD operation
Select title
up
down
By pressing  once, the currently playing title will start from the beginning.
>>Fast forward, audible
Hold depressed as necessary
<<Fast reverse, audible
Hold depressed as necessary
Additional functions of the toggle switch:
Possible other settings with
AUD |
9 |
DSC Mode |
8 |
PTY |
4 |
The respective function must be activated.
;SRC
“SRC” (source)
This key allows you to switch between the operation modes Radio, CD and a CD changer (if one is connected).
;SC Scan
Radio operation
Press the SC key for approximately 2 seconds.
You will hear a beep and the display will alternate between “SCAN” and the abbreviated name of the scanned station. All FM stations that can be received will be briefly scanned.
PTY scan:
The PTY scan can only be started if PTY is turned on. (The display will show “PTY”.)
Press the SC key for approximately 2 seconds.
You will hear a beep and the display will alternate between “PTY SCAN” and the abbreviated name of the scanned station.
The stations with the selected program type will be briefly scanned.
Stop Scan / PTY: Press the SC key.
CD changer
Press the SC key for approximately 2 seconds. You will hear a beep and
the display will show “SCAN”. Each title of each CD will be briefly scanned sequentially.
Stop CD Scan: Press the SC key.
CD Changer
Press the SC key for approximately 2 seconds. You will hear a beep and
the display will show “SCAN”. Each title of each CD will be briefly scanned sequentially.
Stop CD Scan: Press the SC key again.
<Inserting CD
After inserting the CD with the label facing up, it is automatically transported to the operating position. The unit automatically switches and plays the content of the inserted CD.
ENGLISH
FRAN AISÇ
ESPA OLÑ
PORTUGU SÊ
NEDERLANDS SVENSKA
ESPA OLÑ
PORTUGU SÊ
9
 Loading...