Blaupunkt LONDON MP37 User Manual
www.blaupunkt.com
Radio CD MP3 WMA
London MP37 |
7 647 553 310 |
Bedienungsanleitung
Operating instructions
Mode d’emploi
Istruzioni d’uso
Gebruiksaanwijzing
Bruksanvisning
Instrucciones de manejo
Instruções de serviço
Betjeningsvejledning
Instrukcja obsługi
Návod k obsluze
Návod na obsluhu
1 |
2 |
3 |
4 |
5 |
6 |
13 |
12 |
11 |
10 |
9 |
8 |
7 |
14
2

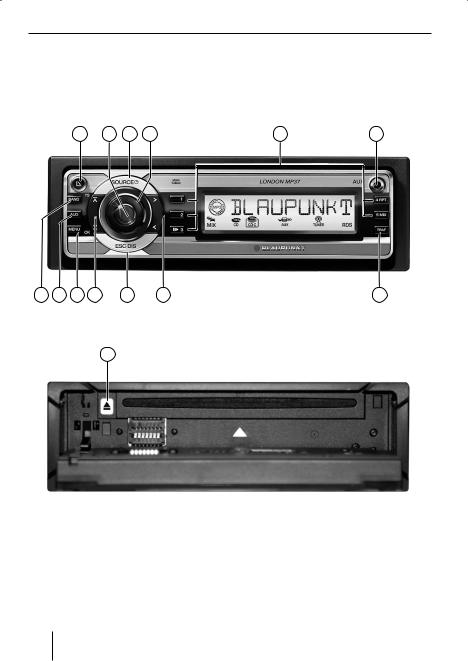
Controls
1
 button to open the flip-release control panel.
2On/Off button
Short press: Switches the device on. In operation: Mutes the device.
Long press: Switches the device off.
3 SOURCE button
Short press: Source selection between radio and CD and (if connected or switched on) CD changer, AUX and FRONT AUX.
Long press: Briefly displaying time.
4 Volume control
5 Keys 1 - 5
6 FRONT AUX input
7TRAF•RDS button
Short press: Switches traffic information standby on/off.
Long press: Switches convenient RDS function on/off.
8 Arrow keys  and
and 
9ESC•DIS button
Short press: Changes from a menu item back to the main menu (also in Audio menu).
Long press: Changes display contents.
: Arrow keys  and
and 
;MENU•OK button
Short press: Calls up the menus for basic settings and confirms settings. Ending the scan function.
Long press: Starts the Scan function.
<AUD button to call up the Audio menu: Adjusting bass, treble, middle, subout, balance and fader.
Switching X-BASS on/off and adjusting it.
Selects an equaliser presetting.
=BAND•TS button
Short press: Selects the FM memory banks and the MW and LW wavebands. Long press: Starts the Travelstore function.
> button (Eject) for removing a CD from the device.
ENGLISH
37

Contents
About these instructions .................. |
40 |
Symbols used................................ |
40 |
Use as directed.............................. |
40 |
Declaration of conformity................ |
40 |
For your safety ................................ |
41 |
If you are installing device yourself.... |
41 |
Cleaning notes............................... |
41 |
Disposal of old unit |
|
(EU countries only) ........................ |
42 |
Scope of delivery............................. |
42 |
Optional equipment |
|
(not part of the scope of delivery) .... |
42 |
Warranty......................................... |
43 |
Service ........................................ |
43 |
Detachable control panel ................. |
43 |
Theft protection............................. |
43 |
Detaching the control panel............. |
43 |
Attaching the control panel.............. |
44 |
Switch-off time (OFF TIMER) ........... |
44 |
Switching on/off.............................. |
45 |
Adjusting the volume ....................... |
45 |
Setting the power-on volume ........... |
45 |
Quickly reducing the volume (Mute).. |
46 |
Telephone Audio/Navigation Audio ... |
46 |
Switching the confirmation |
|
beep on/off................................... |
47 |
Radio mode ..................................... |
47 |
Adjusting the tuner......................... |
47 |
Switching to radio mode ................. |
48 |
Convenient RDS functions (AF, REG).... |
48 |
Selecting the waveband/ |
|
memory bank ................................ |
48 |
Tuning into a station ....................... |
49 |
Setting the sensitivity of station seek |
|
tuning .......................................... |
49 |
Storing stations ............................. |
50 |
Storing stations automatically |
|
(Travelstore) ................................. |
50 |
Listening to stored stations ............. |
50 |
Scanning receivable stations (SCAN) ... |
50 |
Setting the scanning time................ |
50 |
Programme type (PTY) .................. |
51 |
Optimising radio reception .............. |
52 |
Traffic information........................... |
53 |
Switching traffic information |
|
priority on/off ............................... |
53 |
Setting the volume for traffic |
|
announcements............................. |
53 |
CD mode ......................................... |
54 |
Switching to CD mode .................... |
54 |
Selecting tracks............................. |
54 |
Fast track selection ........................ |
54 |
Fast searching (audible).................. |
55 |
Random track play (MIX) ................. |
55 |
Scanning tracks (SCAN).................. |
55 |
Repeating tracks (Repeat)............... |
55 |
Interrupting playback (PAUSE)......... |
55 |
Configuring the display ................... |
56 |
Displaying CD text.......................... |
56 |
Traffic announcements in CD mode .. |
56 |
Ejecting a CD................................. |
56 |
MP3/WMA mode ............................. |
57 |
Preparing an MP3 CD ..................... |
57 |
Switching to MP3 mode .................. |
58 |
Configuring the display ................... |
58 |
Selecting a directory ...................... |
59 |
Selecting tracks/files ...................... |
59 |
Fast search ................................... |
59 |
Random track play – MIX................. |
59 |
Scanning tracks – SCAN ................. |
60 |
Repeated playback of individual |
|
tracks or entire directories – REPEAT ... |
60 |
Interrupting playback (PAUSE)......... |
60 |
38

Contents
CD-changer mode ............................ |
61 |
Switching to CD-changer mode ........ |
61 |
Selecting CDs................................ |
61 |
Selecting tracks............................. |
61 |
Fast searching (audible).................. |
61 |
Repeating individual tracks or whole |
|
CDs (REPEAT) ............................... |
61 |
Random track play (MIX) ................. |
61 |
Scanning all tracks on all CDs (SCAN)... |
62 |
Interrupting playback (PAUSE)......... |
62 |
Configuring the display ................... |
62 |
Clock – Time.................................... |
63 |
Displaying the time ........................ |
63 |
Setting the time ............................. |
63 |
Selecting 12/24-hour clock mode .... |
63 |
Displaying the time continuously |
|
when the device is off and the |
|
ignition is on ................................. |
63 |
Sound ............................................. |
64 |
Adjusting the bass ......................... |
64 |
Adjusting the middle ...................... |
64 |
Adjusting the treble........................ |
65 |
Setting the left/right volume |
|
distribution (Balance) .................... |
65 |
Adjusting the front/rear volume |
|
distribution (Fader)........................ |
65 |
Preamplifier output |
|
(Preamp-Out/Sub-Out) .................... |
66 |
Adjusting the sub-out level .............. |
66 |
Adjusting the sub-out cutoff |
|
frequency ..................................... |
66 |
X-BASS ........................................... |
67 |
Adjusting the X-BASS boost............. |
67 |
Equalizer presettings (Presets) ........ |
67 |
Adjusting the display settings........... |
68 |
Adjusting the display brightness....... |
68 |
Setting the display illumination |
|
colour .......................................... |
68 |
External audio sources ..................... |
69 |
Switching the rear AUX input on/off .. |
70 |
Technical data ................................. |
70 |
ENGLISH
39
About these instructions
About these instructions
These instructions contain important information to easily and safely install and operate the device.
•Read these instructions carefully and completely before using the device.
•Keep the instructions at a location so that they are always accessible to all users.
•Always pass on the device to third parties together with these instructions.
In addition, observe the instructions of the devices used in conjunction with this device.
Symbols used
These instructions employ the following symbols:
DANGER!
Warns about injuries
CAUTION!
Warns about laser beam
CAUTION!
Warns about damaging the CD drive
The CE mark confirms the compliance with EU directives.
Identifies a sequencing step
•Identifies a listing
Use as directed
This device is intended for installation and operation in a vehicle with 12 V vehicle system voltage and must be installed in a DIN slot. Observe the 'performance limits in the technical data. Repairs and installation, if necessary, should be performed by a specialist.
Declaration of conformity
The Blaupunkt GmbH declares that this car sound system complies with the basic requirements and the other relevant regulations of the directive 1999/5/EG.
40

For your safety
For your safety
The device was manufactured according to the state of the art and established safety guidelines. Even so, dangers may occur if you do not observe the safety notes in these instructions:
In operation
•Operate the device only if traffic situation permits it! Stop at a suitable location to perform more extensive operations.
•Remove or attach the control panel only while the vehicle is standing an.
If you are installing device yourself
You may only install the device yourself if you are experienced in installing car sound systems and are very familiar with the electrical system of the vehicle. For this purpose, observe the installation instructions at the end of these instructions.
Observe the following!
DANGER!
Increased risk of injury from connector
In case of an accident, the protruding connector in the FRONT-AUX-IN socket may cause injuries. The use of straight plugs or adapters can lead to an increased risk of injury.
üFor this reason, we recommend using angled jack plugs, e.g. the Blaupunkt accessories cable (7 607 001 535).
CAUTION!
The device contains a Class 1 laser that can cause injuries to your eyes.
Do not open the device and do not perform any modifications.
•Always listen at a moderate volume so that you can hear acoustic warning signals (e.g. police sirens) and protect your hearing. Do not increase the volume when selecting a different audio source or while the CD changer changes the CD. The device is briefly muted.
After operation
•The device is worthless to a thief without the control panel. Always remove the control panel whenever you leave the vehicle.
•Transport the control panel so that it is protected against impacts and the contacts cannot become dirty.
Cleaning notes
Solvents, cleaning and scouring agents as well as dashboard spray and plastics care product may contain ingredients that will damage the surface of the device.
•Use only a dry or slightly moistened cloth for cleaning the device.
•If necessary, clean the contacts of the control panel regularly using a soft cloth moistened with cleaning alcohol.
ENGLISH
41

For your safety |
Scope of delivery |
Disposal of old unit
(EU countries only)
Do not dispose of your old unit in the household trash!
Use the return and collection systems available to dispose of the old device.
Scope of delivery
The scope of delivery includes:
1Car sound system
1Case for the control panel
1Support frame
2 Disassembly bar
1Guide pin
1Operating instructions
Optional equipment
(not part of the scope of delivery)
Use only accessories approved by Blaupunkt.
Remote control
The steering wheel and/or handheld remote control allows you to access the basic functions of your car sound system safely and conveniently.
You cannot switch the device on/off using the remote control!
You can find out from your Blaupunkt dealer or on the Internet at www.blaupunkt.com which remote controls can be used with your car sound system.
Amplifier
You can use all Blaupunkt and Velocity amplifiers.
CD changers
You can connect the following Blaupunkt CD changers:
CDC A 03, CDC A 08 and IDC A 09.
42
Warranty |
Detachable control panel |
Warranty
We provide a manufacturer's warranty for products bought within the European Union. Devices purchased outside the European Union are subject to the warranty terms published by our respective regional agency.
The warranty terms can be called up under www.blaupunkt.com or requested directly from:
Blaupunkt GmbH Hotline Robert-Bosch-Str. 200
D-31139 Hildesheim
Service
In some countries, Blaupunkt offers a repair and pick-up service.
Information about the availability of this service in your country can be found at www.blaupunkt.com.
If you want to take advantage of this service, you may request a pick-up service for your device via the Internet.
Detachable control panel
Theft protection
The device is equipped with a detachable control panel (flip-release panel) as a way
of protecting your equipment against theft. |
ENGLISH |
|
|
The device is worthless to a thief without |
|
this control panel. |
|
Protect your device against theft by taking |
|
the control panel with you whenever you |
|
leave your vehicle. Do not leave the control |
|
panel inside your vehicle - not even in a hid- |
|
ing place. |
|
Notes:
•Never drop the control panel.
•Never expose the control panel to direct sunlight or other heat sources.
•Avoid direct skin contact with the control panel’s electrical contacts. If necessary, please clean the contacts with a lint-free cloth moistened with cleaning alcohol.
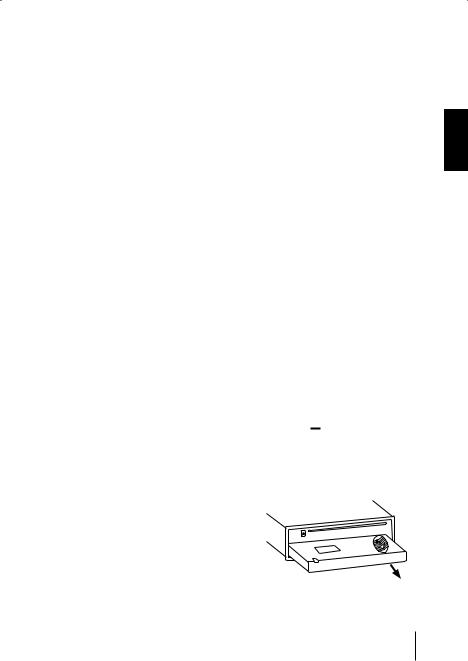
Detaching the control panel
Press the 
 button 1.
The control panel opens out towards you.
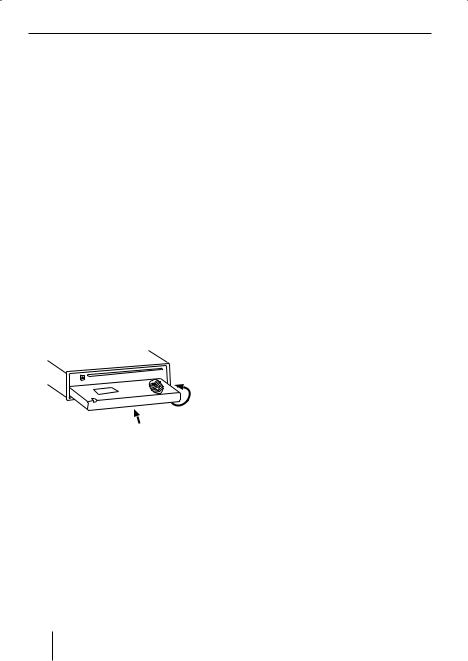
Detachable control panel
Notes:
•The device is switched off after a time preset by you. For instructions, please read the section "Switch-off time (OFF TIMER)" in this chapter.
•All the current settings are saved.
•Any CD already inserted in the device remains there.
Attaching the control panel
Hold the control panel approximately at a right angle to the device.
Slide the control panel into the device’s guides that are positioned on the left and right at the lower edge of the housing. Push the control panel carefully into the bracket until it clicks into place.
Carefully flip up the control panel until it clicks into place.
2.
1.
If the device was still switched on when you detached the control panel, it will automatically switch on with the last setting activated (radio, CD, CD changer or AUX) when the panel is replaced.
Switch-off time (OFF TIMER)
After opening the control panel, the device is switched off after an adjustable time. You can set this time from 0 to 30 seconds.
Press the MENU button ;.
Press the  or
or  button :repeatedly until the displays shows "OFF TIMER".
Press the  or
or  button 8to open the menu.
Set the time with the  or
or  button 8.
When you have finished making your changes,
press the MENU button twice ;.
Note:
If you set the switch-off time to 0 seconds, the device is switched off immediately after opening the control panel.
44

Switching on/off |
Volume |
Switching on/off
There are various ways of switching the device on/off:
Switching on/off using button 2
To switch on the device, press button
2.
The device switches on.
To switch off the device, press and hold down button 2 for longer than two seconds.
The device switches off.
Switching on/off using the vehicle ignition
The device will switch on/off simultaneously with the ignition if the device is correctly connected to the vehicle’s ignition as shown in the installation instructions and you did not switch the device off by pressing button 2.
Switching the device on/off using the detachable control panel
Detach the control panel.
The devices switches off after the time set in the "OFF TIMER" menu.
Attach the control panel again.
The device switches on. The last setting (radio, CD, CD changer or AUX) is reactivated.
Note:
To protect the vehicle battery, the device will switch off automatically after one hour if the ignition is off.
Adjusting the volume |
|
|
You can adjust the volume in increments |
|
|
from 0 (off) to 66 (maximum). |
|
|
To increase the volume, |
|
|
turn the volume control 4clockwise. |
ENGLISH |
|
To decrease the volume, |
||
|
||
turn the volume control 4 counter- |
|
|
clockwise. |
|
|
|
Setting the power-on volume
Note:
The device features a time-out function (time window).
For example, if you press the MENU button ; and select a menu item, the device switches back after approx. 8 seconds after the last button activation. The settings performed are saved.
You can set the power-on volume.Press the MENU button ;.
Press the  or
or  button : repeatedly until "ON VOLUME" appears on the display.
Press the  or
or  button 8to open the menu.
Set the power-on volume with the or  button 8.
To help you adjust the setting more easily, the device will increase or decrease the volume as you make your changes.
If you enable "LAST VOL", the volume which was set the last time you switched off the device is re-enabled.
45

Volume
Note:
To protect your hearing, the power-on volume is limited to the value "38" for the setting "LAST VOL". If the volume was higher before switch-off, the value is automatically set to "38" at switchon. This prevents an unintentionally and unexpectedly high volume when switching on the device.
When you have finished making your changes,
press the MENU button twice ;.
Quickly reducing the volume (Mute)
You can quickly reduce the volume to a preset level (Mute).
Briefly press button 2. "MUTE" appears on the display.
Cancelling mute
To return to your previously set volume level,
briefly press button 2again.
Adjusting the mute level
You can adjust the mute level.
Press the MENU button ;.
Press the  or
or  button : repeatedly until "MUTE LVL" appears on the display.
Press the  or
or  button 8to open the menu.
Set the mute level with the  or
or  button 8.
When you have finished making your changes,
press the MENU button twice ;.
Telephone Audio/Navigation Audio
If your car sound system is connected to a mobile telephone or a navigation system, the sound system’s volume will be muted as soon as you "pick up" the phone or as soon as a navigation announcement is made. You will then hear the caller or navigation announcement over the car sound system’s loudspeakers. In order for this feature to work, the mobile telephone or navigation system must be connected to the car sound system as described in the installation instructions.
You can find out from your Blaupunkt dealer which navigation systems can be used with your car sound system.
If the sound system receives a traffic announcement during a telephone call or whilst a navigation announcement is being made, you will only be able to hear the traffic announcement after the call or navigation announcement is finished (in so far as the traffic announcement is still being broadcast). The traffic announcement is not recorded!
You can adjust the volume with which you switch on the telephone calls or the voice output of the navigation.
Press the MENU button ;.
Press the  or
or  button :repeatedly until "TEL VOL" appears on the display.
Press the  or
or  button 8to open the menu.
46
 Loading...