


Radio / MD
Alaska CJ70
Dallas MD70
New Orleans MD70
Operating instructions

Bitte aufklappen Open here Ouvrir s.v.p. Aprite la pagina
Hier openslaan a.u.b. Öppna Por favor, abrir Favor abrir
2
1 |
2 |
3 |
4 |
5 |
6 |
14 |
13 |
12 |
11 |
10 |
9 |
8 |
7 |
DEUTSCH ENGLISH FRANÇAIS ITALIANO NEDERLANDS SVENSKA ESPAÑOL PORTUGUÊS
3

1 |
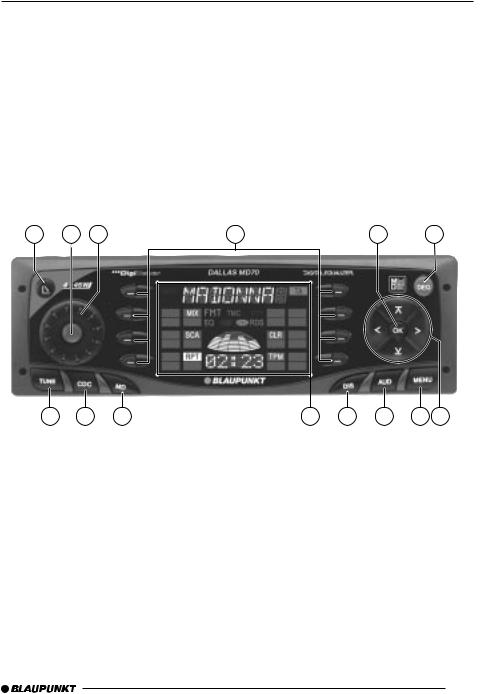
|
button for opening the control unit |
|
2Button for switching the device on and off and for muting the device
3Volume control
4Softkeys. The function of the Softkeys depends on the contents of the display at the time
5OK button for confirming menu entries and for leaving the menu
6DEQ button for calling up the equalizer menu
7Multi-function rocker
8MENU button, which calls up the basic settings menu
9AUD button for adjusting bass, treble, balance, fader and loudness
:DIS button, to change the contents of the display
;Display
< MD button to start MiniDisc playback
=CDC button, to start play from the CD changer (only if connected) or
play from an external audio source (only if connected)
>TUNE button, to begin radio operation Calling up the radio function menu (only possible when the radio is switched on)
OPERATING ELEMENTS
DEUTSCH
ENGLISH
FRANÇAIS
ITALIANO
NEDERLANDS
SVENSKA
ESPAÑOL
PORTUGUÊS
31

CONTENTS
Notes ............................................. |
33 |
Road safety ........................................... |
33 |
Fitting .................................................... |
33 |
Accessories ........................................... |
33 |
Guarantee ............................................. |
33 |
International telephone information ....... |
33 |
KeyCard theft protection ............. |
34 |
Inserting the KeyCard ........................... |
34 |
Removing the KeyCard ......................... |
34 |
“Training” a second KeyCard / |
|
Replacing the KeyCard ......................... |
34 |
KeyCard lost or damaged...................... |
35 |
Training a new KeyCard / entering the |
|
master code .......................................... |
35 |
Visual theft protection (LED) ................. |
35 |
Display Radio Passport Data ................ |
36 |
Care of the KeyCard.............................. |
36 |
Switching on and off .................... |
36 |
Adjusting the volume ................... |
37 |
Tone and volume .......................... |
38 |
Adjusting the display ................... |
39 |
Radio Operation ........................... |
40 |
Switching on radio operation ................. |
40 |
RDS convenience function (AF, REG) ... |
40 |
Select waveband/memory level ............. |
41 |
Setting the station ................................. |
41 |
Adjusting the sensitivity of the station |
|
search ................................................... |
41 |
Saving a station ..................................... |
42 |
Saving a station automatically |
|
(Travelstore) .......................................... |
42 |
Going to a preset station ....................... |
42 |
Scanning through stations .................... |
42 |
Adjusting the sample duration |
|
(Scantime) ............................................. |
43 |
Program type (PTY) .............................. |
43 |
Optimising radio reception .................... |
44 |
Switching between stereo and mono .... |
45 |
Changing the displayed information ...... |
45 |
Traffic Information ........................ |
45 |
MiniDisc operation ....................... |
46 |
Starting MiniDisc operation, |
|
Inserting MiniDisc .................................. |
46 |
Removing MiniDisc ............................... |
46 |
Selecting tracks ..................................... |
47 |
Fast search (audible) ............................. |
47 |
Random track replay (MIX) ................... |
47 |
SCAN function ....................................... |
47 |
Repeating tracks ................................... |
47 |
Changing display contents: |
|
MD text .................................................. |
47 |
Scrolling MD Text .................................. |
48 |
Traffic announcements during MD |
|
operation ............................................... |
48 |
Programming favourite MD tracks ......... |
48 |
CD changer operation (optional) 49 |
|
Starting CD changer operation ............. |
49 |
Selecting a CD ...................................... |
49 |
Selecting a track .................................... |
49 |
Fast searching (audible) ........................ |
49 |
Changing the display contents .............. |
50 |
Repeat play of individual tracks or |
|
whole CDs (REPEAT) ........................... |
50 |
Playing tracks in random sequence |
|
(MIX) ..................................................... |
50 |
Sampling all tracks on all CDs (SCAN) . 50 |
|
Naming CDs .......................................... |
51 |
Programming favourite CD tracks ......... |
51 |
CLOCK - Time ............................... |
53 |
Setting the time ..................................... |
53 |
Selecting 12/24-hour clock mode .......... |
53 |
Having the time displayed constantly |
|
when the device is switched off ............. |
53 |
Equalizer ....................................... |
54 |
Adjustment instructions ......................... |
54 |
Switching the equalizer on and off ........ |
54 |
Adjusting the equalizer .......................... |
54 |
Adjusting the sharpness of the filter ...... |
54 |
Selecting the tone preset ...................... |
54 |
Level meter / Spectrometer ................... |
55 |
Equalizer adjustment guide ................... |
55 |
External audio sources ................ |
56 |
TMC for dynamic navigation |
|
systems ......................................... |
56 |
Pre-amplifier / subout .................. |
57 |
Technical data .............................. |
57 |
Installation instructions ............ |
220 |
32

NOTES
Thank you for choosing a Blaupunkt product. We hope your new device brings you a lot of pleasure.
Note
Before you use your car radio for the first time, please read this guide carefully and make yourself familiar with the device. Keep this guide in the car for later reference.
Road safety
 Road safety has the first priority. Only make adjustments to your car radio when the traffic conditions allow. Familiarise yourself with the device before you start driving.
You must be able to hear audible alarms from police vehicles, fire engines or ambulances promptly when inside the vehicle. You must therefore listen at an appropriate volume when travelling.
Fitting
If you want to fit your car radio yourself, read the fitting and connecting notes at the end of the guide.
Accessories
Only use accessories approved by Blaupunkt.
Remote control
The optional RC 10, RC 10 H, and RC 08 remote controls allow you to control your car radio’s basic functions safely and conveniently.
Amplifier
Any Blaupunkt amplifier can be used.
CD changer
The Alaska DJ70 package includes a CD changer.
For Dallas MD70 and New Orleans MD70, the following Blaupunkt CD changers can be connected:
CDC A 06, CDC A 08, CDC A 072 and IDC A 09.
If an adapter cable is used (Blaupunkt no. 7 607 889 093) the CDC A 05 or CDC A 071 CD changers can also be connected.
Guarantee
The extent of the guarantee depends on the statutory conditions applicable in the country where the device was bought.
Regardless of statutory requirements, Blaupunkt offer a twelve month guarantee.
If you have any questions about your guarantee, please refer to your authorised Blaupunkt dealer. In every case the purchase receipt constitutes the guarantee documentation.
International telephone information
If you have any questions about the operation of the device, or if you need any other information, please call us!
The numbers for the telephone information are on the last page of this guide.
DEUTSCH ENGLISH FRANÇAIS ITALIANO NEDERLANDS SVENSKA ESPAÑOL PORTUGUÊS
33
THEFT PROTECTION
KeyCard theft protection
A KeyCard is included with your car radio.
The radio can also be operated with a second KeyCard.
If one KeyCard becomes lost or damaged you can obtain a replacement through your Blaupunkt dealer.
If you use two KeyCards, the settings of the first KeyCard are adopted by the first KeyCard. You can, however, store the following functions separately:
station button allocation, bass, treble, balance and fader settings, loudness, traffic announcement volume, beep volume and equalizer adjustment.
In addition to this, the last values selected for the waveband, station setting, traffic announcements, RDS, REG, scan time, search sensitivity, initial volume and SHARX are stored.
This means that the basic settings you have selected are made as soon as the KeyCard is inserted.
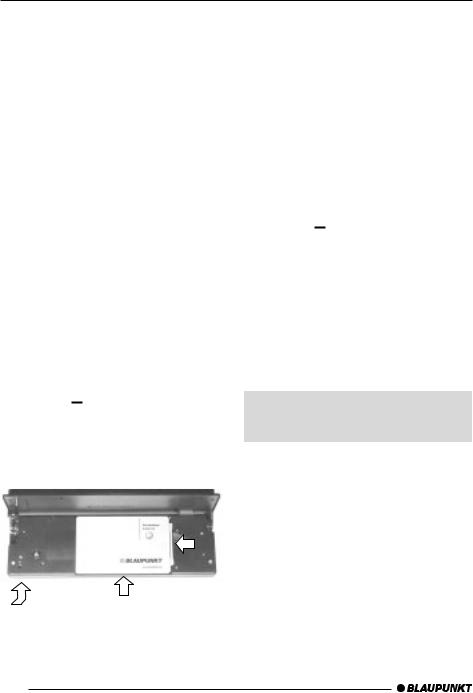
Inserting the KeyCard
Press the 
 button, 1. The control unit opens.
Insert the KeyCard, as shown in the diagram (arrow 1), with the contact surfaces downwards.
2
1
3
Push the KeyCard with the carriage in the direction of the arrow (2) carefully as far as the stop.
Close the control unit (arrow 3).
Note:
If the wrong kind of card, such as a cashpoint card, is inserted into the device, “Wrong KC” will appear on the display. Remove the incorrect card, and insert a KeyCard that is known to the device.
Removing the KeyCard
In order to unlock the control unit
press the 
 button, 1. The control unit opens.
Push the card with the “carriage” to the right as far as the stop.
Remove the card from the control unit.
Close the control unit.
Note:
In order to prevent theft, remove the KeyCard whenever you leave the vehicle, and leave the control unit opened.
 For reasons of safety the control unit must always be closed when the vehicle is moving.
“Training” a second KeyCard / Replacing the KeyCard
A second KeyCard can be “trained” as a substitute if the device is operating with the first KeyCard.
If you want to “train” a second KeyCard
insert the first KeyCard and switch the device on.
Press the MENU button, 8.
34

THEFT PROTECTION
Press the  or
or  button, 7, until “LEARN KC” appears in the display.
Press the button, 7. “CHANGE” appears in the display.
Remove the first KeyCard.
Insert the new KeyCard.
“LEARN OK” appears in the display. To leave the menu
Press the MENU button, 8.
The radio can now be operated with the new KeyCard.
Note:
Two KeyCards is the maximum that can be used with one device.
If you already have two KeyCards for the device and then “train” a third KeyCard, the device can no longer be used with the KeyCard that was not involved in the training process.
KeyCard lost or damaged
If all the KeyCards belonging to a device are damaged or lost, you can “train” a new KeyCard.
You can obtain a new KeyCard from your dealer.
In order to be able to use the new KeyCard you will require the device’s master code. You will find this in the device’s Car Radio Passport. The instructions for this are in the section on “Training a new KeyCard”.
 Keep your Car Radio Passport in a safe place, but never in the car itself.
Training a new KeyCard / entering the master code
If you no longer have a valid KeyCard for your device, and would like to train a new KeyCard
insert the new, unknown KeyCard into the device.
Close the control unit.
If necessary, switch the device off.
Hold down the TUNE and ST1 buttons, >and 4, at the same time.
Switch the device on with the main button, 2.
“0000” appears in the display.
Enter the four-figure master code from the Car Radio Passport as follows:
Enter each of the numbers for the mas-
ter code using the  and
and  buttons,
7.
Press this button as many times as is necessary to obtain the desired number in the display.
Change the location of your input with the and
and buttons, 7.
When the master code is correctly shown, press the OK button, 5.
If the device switches to play, the new KeyCard has been accepted.
Visual theft protection (LED)
When the device is switched off and the KeyCard has been removed, the power button and the CD slot illumination can flash if desired. This requires the “LED” setting in the menu to be set to “ON”.
Press the MENU button, 8.
Press the  or
or  button, 7, until either “LED ON” or “LED OFF” appears in the display.
Press the or
or button, 7, in order to switch between the settings ON and OFF.
Press the OK button, 5, or the MENU button, 8, to leave the menu. The settings are then saved.
DEUTSCH ENGLISH FRANÇAIS ITALIANO NEDERLANDS SVENSKA ESPAÑOL PORTUGUÊS
35

THEFT PROTECTION |
SWITCHING ON AND OFF |
Display Radio Passport Data
Using the supplied KeyCard you can show the Radio Passport data such as the device name, type number (7 6 ...) and the device number in the display.
Press the MENU button, 8.
Press the  or
or  button, 7, until “LEARN KC” appears in the display.
Press the button, 7.
The Radio Passport data is shown on the display as moving text.
To leave the menu
Press the OK button, 5, or the MENU button, 8, to leave the menu. The settings are then saved.
Care of the KeyCard
The KeyCard can only function properly if the contacts are free from foreign particles.Avoid touching the contacts with your skin.
If necessary, clean the KeyCard contacts using a lint-free cloth dipped in alcohol.
Switching on and off
There are a number of methods for switching the device on or off.
Switching on and off with the button 2
Press the main button, 2, to switch on. The device switches on.
To switch off, hold the main button, 2, pressed for longer than two seconds.
The device switches off.
Switching on and off with the vehicle ignition
If the device is correctly connected to the vehicle ignition, and has not been switched off with the main button, 2, it is switched on and off along with the ignition.
You can also switch the device on when the ignition is off.
Press the main button, 2.
Note:
In order to protect the vehicle battery, the device is automatically switched off after an hour if the vehicle ignition is off.
Switching on and off with the KeyCard
You can also switch the device on and off by inserting and removing the KeyCard, if the device was not previously switched off with the main button, 2. Read the chapter on “KeyCard theft protection” for information about inserting and removing the KeyCard.
36
 Loading...