


Radio / CD
Dakota CD31
Santa Fe CD31
Operating instructions
1 |
2 |
3 |
4 |
5 |
6 |
7 |
8 |
ENGLISH FRANÇAIS ESPAÑOL PORTUGUÊS
14 |
13 |
12 |
11 |
10 |
9 |
3

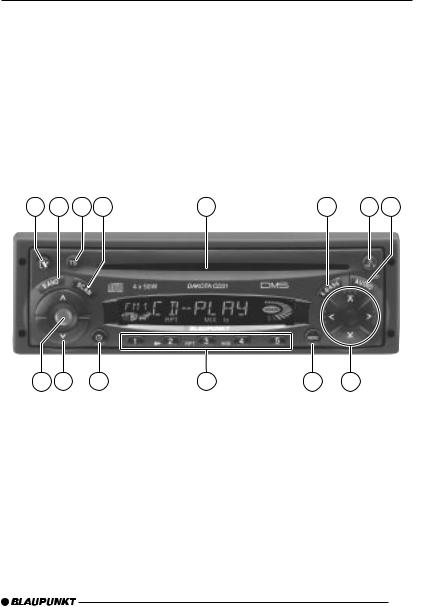
OPERATING ELEMENTS
1
 button for unlatching the removable release panel
2BAND button for selection of FM memory levels and the MW or LW wavebands,
source selection for radio operation
3TS button, starts the Travelstore function
4SCAN button, starts scan function
5CD slot
6X-BASS button, X-Bass function
7CD eject button
CD•C button, source selection between CD, radio, CD-changer and AUX (AUX not featured on Dakota CD31)
8AUDIO button, controls bass, treble, balance and fader
9Arrow keys
:MENU button, which calls up the basic settings menu
;Buttons 1 - 5
<  button to display clock time
=Volume control  volume up
  volume down
>Button for switching the device on and off
4

TABLE OF CONTENTS
Notes and accessories ............ |
6 |
Road Safety .................................... |
6 |
Fitting .............................................. |
6 |
Accessories .................................... |
6 |
Release Panel .......................... |
7 |
Theft Protection ............................... |
7 |
Removing the Release Panel ........... |
7 |
Attaching the Release Panel ............ |
7 |
Switching On and Off ............... |
8 |
Adjusting the Volume ............... |
9 |
Setting Switch-On Volume ............... |
9 |
Immediate Volume Reduction (Mute) . 9 |
|
Muting During Phone Calls .............. |
9 |
Radio Operation ..................... |
10 |
Switching on Radio Operation ....... |
10 |
Select Waveband/Memory Level ... |
10 |
Setting the Station ......................... |
10 |
Adjusting Station Search Sensitivity |
10 |
Saving a Station ............................ |
10 |
Saving a Station Automatically |
|
(Travelstore) .................................. |
11 |
Going to a Preset Station .............. |
11 |
Scanning through Available |
|
Stations (SCAN) ........................... |
11 |
Setting Scan Time ......................... |
11 |
Regional Tuner Settings ................. |
11 |
CD Operation ......................... |
12 |
Starting CD Operation .................. |
12 |
Selecting a Track ........................... |
12 |
Quick Track Selection ................... |
12 |
Fast Search (Audible) .................... |
13 |
Playing Tracks in Random |
|
Sequence (MIX) ............................ |
13 |
Sampling Tracks (SCAN) .............. |
13 |
Repeating Tracks (REPEAT) .......... |
13 |
Pausing During Play ...................... |
13 |
Changing Display Contents ........... |
13 |
Removing CD from Player ............. |
13 |
CD Changer Operation .......... |
14 |
Starting CD Changer Operation .... |
14 |
Selecting a CD .............................. |
14 |
Selecting a Track ........................... |
14 |
Quick Track Selection ................... |
14 |
Fast Search (Audible) .................... |
14 |
Changing Display Contents ........... |
14 |
Repeat Playing Tracks or Whole |
|
CDs (REPEAT) ............................. |
14 |
Playing Tracks in Random |
|
Sequence (MIX) ............................ |
15 |
Sampling All Tracks on All CDs |
|
(SCAN) ......................................... |
15 |
Pausing During Play ...................... |
15 |
CLOCK - Time ........................ |
16 |
Displaying the Time ....................... |
16 |
Setting the Time ............................ |
16 |
Choosing 12/24 Hour |
|
Clock Mode .................................. |
16 |
Display the Time When the |
|
Device is Switched Off But the |
|
Ignition On .................................... |
16 |
Displaying the time briefly when |
|
the device is switched off .............. |
16 |
Tone and Volume Controls ..... |
17 |
Adjusting the Bass ........................ |
17 |
Adjusting the Treble ....................... |
17 |
Adjusting the Balance .................... |
17 |
Adjusting the Fader ....................... |
17 |
X-BASS ........................................ |
17 |
External Audio Sources ......... |
18 |
Switching AUX input on and off ..... |
18 |
Technical data ........................ |
18 |
Guarantee .............................. |
19 |
Installation instructions .......... |
68 |
ENGLISH FRANÇAIS ESPAÑOL PORTUGUÊS
5

NOTES AND ACCESSORIES
Thank you for choosing a Blaupunkt product. We hope you will enjoy your new equipment.
Please read these instructions before using for the first time. Blaupunkt’s editors are constantly working to write clear, generally understandable instructions for use. If you still have questions about how to use your equipment, please refer to your dealer or to the telephone hotline in your country. You will find the telephone numbers on the back of this booklet.
Road Safety
 Road safety has the first priority. Only make adjustments to your car radio when the traffic conditions allow. Familiarise yourself with the device before you start driving.
You must be able to hear audible alarms from police vehicles, fire engines or ambulances promptly inside the vehicle.
You should therefore listen at an appropriate volume when travelling.
Fitting
If you want to fit your car radio yourself, read the fitting and connecting notes at the end of the guide.
Accessories
Only use accessories approved by Blaupunkt.
Remote control
The optional RC 08 and RC 10 remote control units allow you to control your car radio’s basic functions safely and conveniently from the steering wheel.
Amplifiers
Any Blaupunkt amplifier can be used (Not for Dakota CD31).
CD Changer
The following Blaupunkt CD changers can be connected:
CDC A 06, CDC A 08, CDC A 072 or IDC A 09.
The use of an adapter cable (Blaupunkt no. 7 607 889 093) also allows the CDC A 05 or CDC A 071 CD changers to be connected.
6
RELEASE PANEL
Release Panel
Theft Protection
Your device has a removable flip-release panel to protect it from theft.
The radio is of no value to a thief without this panel.
Protect your device from theft by taking the release panel with you whenever you leave the vehicle. Do not leave the panel in the car, even in a hidden place. The release panel is designed for easy handling.
Note:
●Do not drop the panel.
●Do not expose the panel to direct sunshine or any other source of heat.
●Avoid touching the contacts on the panel with your skin. If necessary, clean the contacts using a lint-free cloth dipped in alcohol.
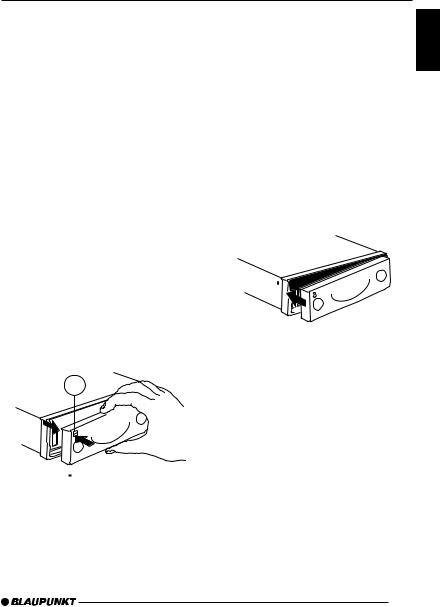
Removing the Release Panel
1
Press the 
 button 1.
The panel unlatches.
Pull the panel off the device, first straight forward and then to the left.
●When the release panel has been separated from the device, it switches itself off.
●Any current settings are saved.
●If a CD has been inserted, it remains in the device.
Attaching the Release Panel
Push the panel into the guides on the device from left to right.
Push the left hand side of the panel into the device until it engages.
Note:
●Do not press the display as you insert the panel.
If the device was switched on when the panel was removed, it will switch itself back on automatically with the last settings (radio, CD, CD-changer or AUX) as soon as the panel is replaced (no AUX on Dakota CD31).
ENGLISH FRANÇAIS ESPAÑOL PORTUGUÊS
7
 Loading...