


PLEASE READ AND SAVE THIS INSTRUCTION MANUAL
Hot Air Tool Models
HEAT PRO / HEAT PRO PLUS HEAT PRO DELUXE
WARNING
TO REDUCE THE RISK OF INJURY, USER MUST READ AND UNDERSTAND INSTRUCTION MANUAL.
FOR HOUSEHOLD USE ONLY.
KEEP CHILDREN AWAY FROM WORKING AREA.
KEY INFORMATION YOU SHOULD KNOW:
•Efficient paint removal requires a certain technique. Follow instructions in this manual.
•Aside from stripping paint, your hot air tool can be used to soften linoleum and floor tile, loosen heat sensitive adhesives, activate shrinkable plastic and thaw frozen water pipes.
For HOME RIGHT® Customer Service Call: 1-800-264-5442 or 763-780-5115, 8 a.m. to 5 p.m. CST.
HEAT PRO
HEAT PRO PLUS |
HEAT PRO DELUXE |
|
HOT AIR TOOL Heat Pro/Heat Pro Plus/Heat Pro Deluxe |
ENGLISH • ESPAÑOL • FRANÇAIS 1 |

Table of Contents |
|
CONGRATULATIONS ON YOUR PURCHASE ...................................................................................................... |
3 |
Use your Black&Decker® Hot Air Tool for the Following Tasks ...................................................................... |
3 |
Product Registration Card ............................................................................................................................. |
3 |
IMPORTANT SAFETY INSTRUCTIONS ............................................................................................................... |
3 |
WARNING: Lead-based Paints.................................................................................................................. |
3 |
WARNING: May Cause Property Damage for Severe Injury ..................................................................... |
4 |
WARNING: Explosion or Fire .................................................................................................................... |
4 |
WARNING: Electric, May Cause Property Damage, Severe Injury or Loss of Life .................................... |
4 |
WARNING: Do Not Try to Repair (or Disassemble) the Hot Air Tool Yourself .......................................... |
4 |
WARNING: Prop 65 Warning.................................................................................................................... |
4 |
HOT AIR TOOL OPERATIONAL GUIDELINES - ALL MODELS ............................................................................ |
5 |
Helpful Hints Prior to Use.............................................................................................................................. |
5 |
Guidelines for Removing Paint ...................................................................................................................... |
5 |
How to Strip Paint ......................................................................................................................................... |
6 |
Cleaning and Maintenance ............................................................................................................................. |
6 |
Storage .......................................................................................................................................................... |
6 |
MODEL HEAT PRO HOW-TO USE ...................................................................................................................... |
7 |
Model HEAT PRO Specifications.................................................................................................................... |
7 |
Operation of the Model HEAT PRO ................................................................................................................ |
7 |
Uses and Corresponding Heat Settings for the Model HEAT PRO ................................................................. |
7 |
MODEL HEAT PRO PLUS HOW-TO USE ............................................................................................................ |
8 |
Model HEAT PRO PLUS Specifications.......................................................................................................... |
8 |
Operation of the Model HEAT PRO PLUS ...................................................................................................... |
8 |
How To Attach Accessories to the Model HEAT PRO PLUS........................................................................... |
8 |
Nozzle Uses and Corresponding Heat Settings for the Model HEAT PRO PLUS............................................ |
9 |
MODEL HEAT PRO DELUXE HOW-TO USE ...................................................................................................... |
10 |
Model HEAT PRO DELUXE Specifications.................................................................................................... |
10 |
Operation of the Model HEAT PRO DELUXE ................................................................................................ |
10 |
How To Attach Accessories to the Model HEAT PRO DELUXE .................................................................... |
10 |
Uses for the Model HEAT PRO DELUXE Scrapers and Nozzles ................................................................... |
11 |
Dial in the Right Heat Setting for the Job .................................................................................................... |
11 |
Scraper or Nozzle Uses and Corresponding Heat Settings for the Model HEAT PRO DELUXE.................... |
11 |
TWO YEAR LIMITED WARRANTY.................................................................................................................... |
36 |
|
HOT AIR TOOL |
ENGLISH 2 |

Congratulations on your purchase of the Black&Decker® Hot Air Tool. Like other power tools, the Hot Air Tool is safe when properly used but can be dangerous if misused. It is the responsibility of the user to read all instructions before use and use the Hot Air Tool properly.
Read these instructions carefully and follow all safety precautions. Failure to do so may result in personal injury and/or property damage.
If after reading this manual you still have questions, call HOME RIGHT®’s Customer Service department at 1-800-264-5442 (8:00 a.m.-5:00 p.m. CST).
Use your Black&Decker® Hot Air Tool for the following tasks:
•STRIP paint and varnish for refinishing
•REMOVE bumper stickers, decals, linoleum, Formica, veneers and laminates
•SOFTEN adhesives, putty and caulk
•THAW frozen locks, frozen pipes, roof gutters and downspouts
•LOOSEN rusted bolts, nuts and fittings
•BEND plastic pipes and sheets
•DRY and cure craft projects
•DRY and cure automotive paints and fillers (the product manufacturer's recommendations must be followed.)
Product Registration Card
Please fill out and return the enclosed product registration card or go to our website, www.homeright.com, and register.
Important Safety Instructions
PLEASE READ AND UNDERSTAND THESE INSTRUCTIONS PRIOR TO USE
Do not try to repair (or disassemble) the hot air tool yourself. Repairs should be performed by a qualified shop familiar with this hot air tool or return it to HOME RIGHT (see Two-Year Warranty). Opening of the hot air tool while under warranty by anyone not authorized does void the warranty.
Hidden areas such as behind walls, ceilings, floors, soffit boards or other panels may contain flammable materials that could be ignited by the hot air tool when working in these locations. The ignition of these materials may not be readily apparent and could result in property damage and injury to persons.
When working in these locations, keep the hot air tool moving in a back-and-forth motion, lingering or pausing in one spot could ignite the panel or the materials behind it.
DO NOT LEAVE OPERATING HOT AIR TOOL ON SUPPORTING SURFACE WITH ITS NOZZLE ATTACHED.
WARNING: LEAD-BASED PAINTS
Extreme care should be taken when stripping paint. The peelings, residue and vapors of paint may contain lead, which is poisonous. Any pre1977 paint may contain lead and paint applied to homes prior to 1950 is likely to contain lead. Once deposited on surfaces, hand to mouth contact can result in the ingestion of lead. Exposure to even low levels of lead can cause irreversible brain and nervous system damage; young and unborn children are particularly vulnerable. Before beginning any paint removal process you should determine whether the paint your are removing contains lead. This can be done by your local health department or by a professional who uses a paint analyzer to check the lead content of the paint to be removed.
LEAD-BASED PAINT SHOULD ONLY BE REMOVED BY A PROFESSIONAL AND SHOULD NOT BE REMOVED USING A HOT AIR TOOL.
|
HOT AIR TOOL |
ENGLISH 3 |
Important Safety Instructions
WARNING: MAY CAUSE PROPERTY DAMAGE
OR SEVERE INJURY
1.Keep out of the reach of children.
2.Do not touch the nozzle while hot air tool is on, severe burns will result. Wear gloves to protect hands.
3.Keep moveable items secured and steady while scraping.
4.Make sure hot air tool is cooled before storing.
5.Do not leave the hot air tool unattended, turn off and unplug if you leave the work area.
WARNING
Do not touch nozzle when working.
Severe burns will result.
WARNING: EXPLOSION OR FIRE
This hot air tool produces extremely high temperatures (as high as 1100°F). It must be used with caution to prevent combustible material from igniting.
1.Keep the hot air tool in constant motion.
2.Use extreme caution if the other side of the material being scraped in inaccessible, such as house siding. Other hidden areas behind walls, ceilings, floors, soffit boards, fascia, or other panels may contain flammable materials that could be ignited by the hot air tool when working these locations. Check these areas before applying heat and do not use if flammable materials are present, or if you are not sure. The ignition of these materials may not be readily apparent and could result in property damage and injury to persons.
3.Do not use near surfaces with cracks or near metal pipes or flashing.
4.Do not use electric tools in the presence of flammable liquids or gases.
5.Do not use near combustible materials such as dry grass, leaves, and paper, which can scorch and catch fire.
6.The nozzle becomes very hot. Do not lay the hot air tool on flammable surfaces while operating or after immediately shutting off. Always set on a flat, level surface so the nozzle tip is directed upwards.
7.Do not use the hot air tool as a hair dryer.
WARNING: ELECTRIC, MAY CAUSE
PROPERTY DAMAGE, SEVERE INJURY OR LOSS OF LIFE
1.Do not disassemble.
2.Do not work in wet areas or expose the hot air tool to rain. Do not immerse.
3.To guard against electric shock do not have bodily contact with grounded surfaces such as pipes, ranges, radiators, aluminum ladders or other grounded devices.
4.Do not carry by the cord. Inspect cord for wear or damage.
5.Use only UL (CSA for Canada) listed extension cords rated for outdoor use.
6.If your hot air tool has a 3-prong plug in, do not remove grounding pin.
In Canada an outlet adapter for a 3-prong plug may not be used. Only use a grounded outlet with this unit.
WARNING: DO NOT TRY TO REPAIR (OR
DISASSEMBLE) THE HOT AIR TOOL YOURSELF
Repairs should be performed by a qualified shop familiar with this tool or return it to HOME RIGHT (see warranty). Opening of the hot air tool while under warranty by anyone not authorized does void the warranty.
WARNING: PROP 65 WARNING
Handling the coated electrical wires of this product exposes you to lead, a chemical known to the State of California to cause birth defects or other reproductive harm. Wash hands after use.
|
HOT AIR TOOL |
ENGLISH 4 |

Hot Air Tool Operational Guidelines - All Models
HELPFUL HINTS PRIOR TO USE
•Keep the scraping tool edge clean to help make the job easier.
•Do not use the hot air tool on surfaces that can be damaged by heat such as vinyl, siding, gutters, window frames.
•When removing paint from window frames, the hot air tool will soften the putty. Be careful not to gouge the putty with the scraper. The putty will firm up after it cools.
•Do not use the hot air tool on insulated laminated window glass such as Thermopane. The glass edge expansion may break the edge seal.
•When scraping fascia, do not overheat the edges of the asphalt shingles protruding over the edge of the sheathing. Too much heat will melt the asphalt.
The removal of paint by heat is safe if the below guidelines are used; however you should always keep either a container of water or an ABC fire extinguisher within reach.
GUIDELINES FOR REMOVING PAINT
1.Move the work piece outdoors. If this is not possible, keep the work area well ventilated. Open the windows and put an exhaust fan in one of them. Be sure the fan is moving the air from inside to outside.
2.Remove or cover any carpets, rugs, furniture, clothing, cooking utensils and air ducts. If they cannot be removed place in center of the room and cover.
3.Place drop cloths in the area to catch any paint chips or peelings. Wear protective clothing such as extra work shirts, overalls and hats.
4.Work in one room at a time. Furnishings should be removed or placed in the center of the room and covered. Work areas should be sealed off from the rest of the dwelling by sealing doorways with drop cloths.
5.Children, pregnant or potentially pregnant women and nursing mothers should not be present in the work area until the work is done and all cleanup is complete.
6.Wear a dust respirator mask or a dual filter (dust and fume) respirator mask, which has been approved by the Occupational Safety & Health Administration (OSHA), the National Institute of Safety and Health (NIOSH) or the United States Bureau of Mines. These masks and replaceable filters are readily available at major home center and hardware stores. Be sure the mask fits. Beards and facial hair may keep masks from sealing properly. Change filters often. DISPOSABLE PAPER
MASKS ARE NOT ADEQUATE.
7.Use caution when operating the hot air tool. Keep the hot air tool moving, as excessive heat will generate fumes, which can be inhaled by the operator.
8.Keep food and drink out of the work area. Wash hands, arms, and face and rinse mouth before eating or drinking. Do not smoke or chew gum or tobacco in the work area.
9.Cleanup all removed paint and dust by wet mopping the floors. Use a wet cloth to clean all walls, sills and any other surfaces where paint or dust is clinging. DO NOT SWEEP, DRY DUST OR VACUUM. Use a high phosphate detergent or trisodium phosphate (TSP) to wash and mop areas.
10.At the end of each work session put the paint chips and debris in a double plastic bag, close it with tape or twist ties, and dispose of properly.
11.Remove protective clothing and work shoes in the work area to avoid carrying dust into the rest of the dwelling. Wash work clothes separately. Wipe shoes off with a wet rag that is then washed with the work clothes. Wash hair and body thoroughly with soap and water.
|
HOT AIR TOOL |
ENGLISH 5 |

Hot Air Tool Operational Guidelines - All Models
HOW TO STRIP PAINT
1.Warm air preheats the surface. The hot air tool heats up the surface and causes the paint to soften so it can be scrapped off easily without damaging the surface.
2.Paint is softened by the hot air. Some paints soften without blistering and some may become rubbery and other paints may require higher heat.
3.Deep penetration of heat over total area. When working with several layers of paint, it helps to heat the surface thoroughly so all the layers can be scraped away at one time.
NOTE:
•A soft wire brush may be the best tool for very intricate surfaces.
•Mineral paints and finishes, such as cement paint and porcelain do not soften and cannot be removed with the hot air tool.
•Do not try to burn off the paint, but soften it sufficiently to be easily scraped off. Scorching can discolor the wood underneath.
4.Paint can be easily scraped off as soon as it is softened and the hot air tool is moved forward. The best method to remove paint is move the hot air tool slowly and steadily forward at an angle to the surface, pointing the nozzle in the direction of motion. This allows you to scrape safely outside the hot air stream and keeps the scraper and the scraped surface cooler.
5.Allow stripped surface to cool.
CLEANING AND MAINTENANCE
Never allow any liquid to get inside the hot air tool or immerse any part of the hot air tool into a liquid. Ensure the intake openings and the housing are clean and free of obstructions. If necessary use a soft, dry brush to clean the intake opening and housing. Only use only mild soap and a damp cloth to clean the hot air tool. Do not use household cleaners in cleaning the hot air tool since many household cleaners contain chemicals, which could seriously damage the hot air tool housing. Do not use gasoline, turpentine, lacquer or paint thinner, dry cleaning fluids or similar products to clean the hot air tool.
STORAGE
The hot air tool nozzle must cool to room temperature before placing the hot air tool in storage. Over time the nozzle will turn dark because of the high heat, and this is normal and will not affect the performance or life of the hot air tool.
|
HOT AIR TOOL |
ENGLISH 6 |
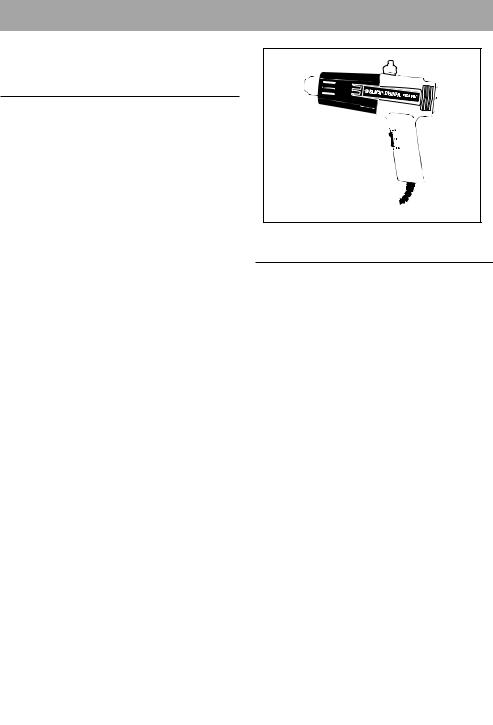
Model HEAT PRO How-to Use
The Model HEAT PRO package includes one hot air tool.
Model HEAT PRO Specifications
Wattage |
up to 1200 Watts |
Temperature |
Dual Temperature |
|
Low 500°F / High 1000°F |
Volts |
120 Volts |
AMPS |
10 AMPS |
Heat Output |
68 BTU |
Weight |
1.4 lbs. |
Cord Length |
6 feet |
Settings |
Low, Off, High |
Operation of the Model HEAT PRO
The following instructions are a general guideline for using the Model HEAT PRO hot air tool. Every project is different so use these instructions as a starting point to determine the best heat setting and distance for your project.
Before plugging the Model HEAT PRO into an electrical outlet make sure the switch is in the Off position.
1.Plug into a standard 3-hole outlet.
2.To start, slide the switch to either the Low or High position. The motor-driven fan noise will indicate the unit is running. The heating coil will light up and slowly turn red.
Note: Smoke may appear during the initial start up due to the burning of manufacturing oils. The smoke should disappear in less than a minute.
Caution: If the blower motor in the hot air tool does not turn on when the switch is set to either Low or High, turn the switch to Off immediately. The heating element will burn
out if it is not cooled by the blower.
3.For instructions on how to strip paint go to section HOT AIR TOOL OPERATIONAL GUIDELINES, How to Strip Paint.
4.To turn off when finished, slide the switch to the Off position and unplug. Set the Model HEAT PRO upright on a stable, level surface. This will speed up the cooling process because the air will flow naturally upward over the heating element. Allow the Model HEAT PRO to cool completely. Make sure the Model HEAT PRO is completely cooled before storing.
Model HEAT PRO
Uses and Corresponding Heat Settings
Removal |
Setting |
Soften paint and varnish |
High |
Urethane from furniture and woodwork |
Low |
Stickers and bumper stickers |
Low |
Vinyl flooring |
High |
Linoleum |
High |
Laminate |
High |
Caulk |
High |
Window putty |
High |
Drying |
|
Metal surfaces prior to painting |
High |
Ignition system |
Low |
Heating |
|
Shrink tube/wrap |
Low |
Window shrink coverings |
Low |
Frozen locks and water pipes |
Low |
Bearings and gears for assembly |
High |
Loosening rusted bolts |
High |
Other |
|
Soldering water pipes |
High |
Welding plastic |
High |
Bending plastic/poly carbonate |
Low |
Waxing skis |
Low |
|
MODEL HEAT PRO |
ENGLISH 7 |
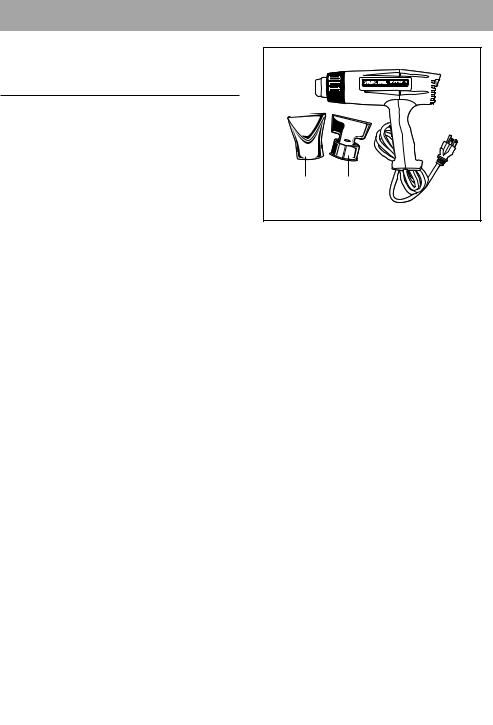
Model HEAT PRO PLUS How-to Use
The Model HEAT PRO PLUS kit includes one hot air tool, one concentrator nozzle and one scraper nozzle.
Model HEAT PRO PLUS Specifications
Wattage |
up to 1300 Watts |
Temperature |
Dual Temperatures |
|
Low 600°F / High 1100°F |
Volts |
120 Volts |
AMPS |
11 AMPS |
Output |
74 BTU |
Weight |
1.8 lbs. |
Cord Length |
6 feet |
Settings |
High, Low, Cool, Off |
Operation of the Model HEAT PRO PLUS
The following instructions are a general guideline for using the Model HEAT PRO PLUS hot air tool. Every project is different so use these instructions as a starting point to determine the best heat setting and distance for your project.
Before plugging the Model HEAT PRO PLUS into an electrical outlet make sure the switch is in the Off position.
1.Plug into a standard 3-hole outlet.
2.To start, slide the switch to either the Low or High position. The motor-driven fan noise will indicate the unit is running. The heating coil will light up and slowly turn red.
Note: Smoke may appear during the initial start up due to the burning of manufacturing oils. The smoke should disappear in less than a minute.
Caution: If the blower motor in the hot air tool does not turn on when the switch is set to either Low or High, turn the switch to Off immediately. The heating element will burn
out if it is not cooled by the blower.
3.For instructions on how to strip paint go to section HOT AIR TOOL OPERATIONAL GUIDELINES, How to Strip Paint.
4.To turn off when finished, slide the switch to the Cool position, point the nozzle up and let run until cool. Then slide the switch to the Off position and unplug. Set the Model HEAT PRO PLUS upright on a stable, level surface. This will speed up the cooling process because the
Concentrator Scraper
Nozzle
air will flow naturally upward over the heating element. Allow the Model HEAT PRO PLUS to cool completely. Make sure the Model HEAT PRO PLUS is completely cooled before storing.
How To Attach Accessories to the Model HEAT PRO PLUS
1.Set the Model HEAT PRO PLUS upright on a level surface, make sure tip is cool.
2.Set the accessory nozzle on the top of the open nozzle and push firmly into place.
3.To remove, set hot air tool with nozzle facing up; wait for it to cool.
4.Pull the accessory nozzle off the top using a twisting motion and straight pull.
5.Only use accessories designed for this hot air tool.
|
MODEL HEAT PRO PLUS |
ENGLISH 8 |

Model HEAT PRO PLUS How-to Use
Model HEAT PRO PLUS
Nozzle Uses and Corresponding Heat Settings
Removal |
Setting |
Concentrator Nozzle or Scraper |
Soften paint and varnish |
High |
Scraper |
Urethane from furniture and woodwork |
Low |
Concentrator nozzle |
Stickers and bumper stickers |
Low |
No concentrator nozzle or scraper |
Vinyl flooring |
High |
No concentrator nozzle or scraper |
Linoleum |
High |
No concentrator nozzle or scraper |
Laminate |
High |
No concentrator nozzle or scraper |
Caulk |
High |
Concentrator nozzle |
Window putty |
High |
Concentrator nozzle |
Drying |
|
|
Metal surfaces prior to painting |
High |
Concentrator nozzle |
Ignition system |
Low |
No concentrator nozzle or scraper |
Heating |
|
|
Shrink tube/wrap |
Low |
No concentrator nozzle or scraper |
Window shrink coverings |
Low |
No concentrator nozzle or scraper |
Frozen locks and water pipes |
Low |
Concentrator nozzle |
Bearings and gears for assembly |
High |
Concentrator nozzle |
Loosening rusted bolts |
High |
Concentrator nozzle |
Other |
|
|
Soldering water pipes |
High |
Concentrator nozzle |
Welding plastic |
High |
Concentrator nozzle |
Bending plastic/poly carbonate |
Low |
Concentrator nozzle |
Waxing skis |
Low |
No concentrator nozzle or scraper |
|
MODEL HEAT PRO PLUS |
ENGLISH 9 |
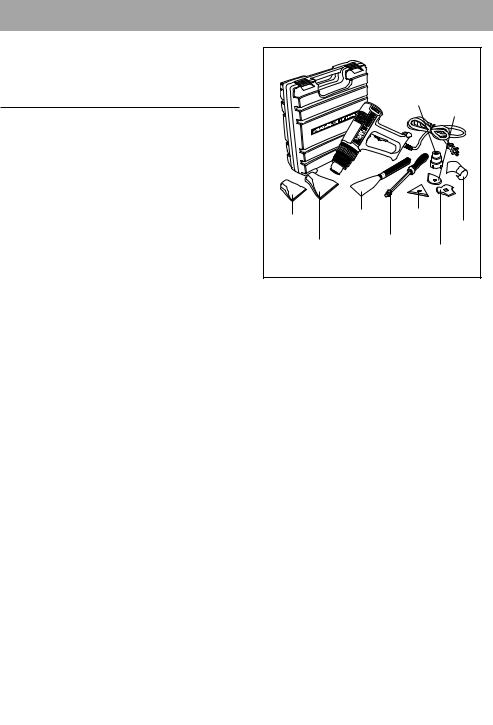
Model HEAT PRO DELUXE How-to Use
The Model HEAT PRO DELUXE kit includes one hot air tool with LED display, specialized scrapers, nozzles and carrying case.
Model HEAT PRO DELUXE Specifications
Wattage |
44 to 1250 Watts |
Temperature |
Low 100°F / High 1100°F |
Volts |
120 Volts |
AMPS |
0.5 to 10.5 AMPS |
Output |
68 BTU |
Weight |
1.8 lbs. |
Cord Length |
6 feet |
Settings |
Hi, Lo, Off |
Operation of the Model HEAT PRO DELUXE
The following instructions are a general guideline for using the Model HEAT PRO DELUXE hot air tool. Every project is different so use these instructions as a starting point to determine the best heat setting and distance for your project. Before plugging the Model HEAT PRO DELUXE into an electrical outlet make sure the switch is in the Off position.
1.Plug into a standard outlet.
2.To start slide the switch to either the Lo or Hi position. The motor-driven fan noise will indicate the unit is running. The heating coil will light up and slowly turn red.
Note: Smoke may appear during the initial start up due to the burning of manufacturing oils. The smoke should disappear in less than a minute.
Caution: If the blower motor in the hot air tool does not turn on when the switch is set to either Lo or Hi, turn the switch to Off immediately. The heating element will burn out if
it is not cooled by the blower.
3.For instructions on how to strip paint go to section HEAT GUN OPERATIONAL GUIDELINES, How to Strip Paint.
4.Use the dial to increase (+) or decrease (-) heat as needed. The LED lights will indicate the temperature level from low to high.
5.To turn off, slide the switch to the Off position and unplug. Make sure the Model HEAT PRO DELUXE is completely cooled before storing.
|
|
Concentrator |
|||
|
|
|
Nozzle |
Heart |
|
|
|
|
|
Scraper |
|
Deflector |
All Purpose |
Triangle |
|
||
Scraper |
|
Scraper |
Hook |
||
Nozzle |
|
||||
|
Scraper |
Nozzle |
|||
Window Protector |
|||||
|
|||||
Handle |
Combination |
||||
Nozzle |
|
||||
|
|
Scraper |
|||
|
|
|
|||
How To Attach Accessories to the Model HEAT PRO DELUXE
1.Set the Model HEAT PRO DELUXE upright on a level surface, make sure tip is cool.
2.Set the accessory nozzle on the top of the open nozzle and push firmly into place.
3.To remove, set hot air tool with nozzle facing up; wait for it to cool.
4.Pull the accessory nozzle off the top using a twisting motion and straight pull.
5.Only use accessories designed for this hot air tool.
|
MODEL HEAT PRO DELUXE |
ENGLISH 10 |
Model HEAT PRO DELUXE How-to Use
Uses for the Model HEAT PRO DELUXE Scrapers and Nozzles
Scraper |
Project Type |
All purpose scraper |
For large, flat surfaces |
Triangular scraper |
For flat, wooden surfaces and edges |
Combination scraper |
Perfect for molding |
Heart scraper |
For sharp corners and edges |
Nozzles |
Project Type |
Concentrator nozzle |
Focuses heat for awkward corners, crevices and moldings |
Deflector nozzle |
For doors, stairs, or any flat surface |
Window protector nozzle |
Protects glass while you work |
Hook nozzle |
Perfect for defrosting pipes, bending plastic and heat shrinking |
Dial in the Right Heat Setting for the Job
Low Heat Setting |
Medium Heat Setting |
High Heat Setting |
Dry paint and varnish |
Bend plastic |
Strip paint and varnish |
Thaw frozen pipes |
Loosen rusted nuts and screws |
Weld plastic |
Remove putty from windows |
Shrink-heat plastic |
Sweat pipe joints |
Remove tiles from floors |
Dry wall joints and repairs |
Soldiering |
Take off bumper stickers or decals |
|
|
Dry electrical components |
|
|
Model HEAT PRO DELUXE
Scraper or Nozzle Uses and Corresponding Heat Settings
Removal |
Setting (+ or – on Dial) |
Scraper or Nozzle |
Soften paint and varnish |
High |
All purpose scraper |
Urethane from furniture and woodwork |
Low |
Concentrator nozzle |
Stickers and bumper stickers |
Low |
Deflector nozzle |
Vinyl flooring |
High |
No nozzle or scraper |
Linoleum |
High |
Deflector nozzle |
Laminate |
High |
No nozzle or scraper |
Caulk |
High |
Concentrator nozzle |
Window putty |
High |
Window protector nozzle |
Drying |
|
|
Metal surfaces prior to painting |
High |
Concentrator nozzle |
Ignition system |
Low |
No nozzle or scraper |
Heating |
|
|
Shrink tube/wrap |
Low |
Hook nozzle |
Window shrink coverings |
Low |
No nozzle or scraper |
Frozen locks and water pipes |
Low |
Hook nozzle or Concentrator nozzle |
Bearings and gears for assembly |
High |
Concentrator nozzle |
Loosening rusted bolts |
Medium |
Concentrator nozzle |
Other |
|
|
Soldering water pipes |
High |
Concentrator nozzle |
Welding plastic |
High |
Concentrator nozzle |
Bending plastic/poly carbonate |
Medium |
Hook nozzle |
Waxing skis |
Low |
No nozzle |
|
MODEL HEAT PRO DELUXE |
ENGLISH 11 |
 Loading...