


User Guide
BBD100-1 BBD100-6
Contents |
|
Setup and basics............................................................................................................... |
4 |
Your device at a glance.................................................................................................................................. |
4 |
Insert the SIM card........................................................................................................................................ |
5 |
Insert a media card........................................................................................................................................ |
6 |
Turn your device on or off.............................................................................................................................. |
8 |
Move between home screens......................................................................................................................... |
8 |
Get around with navigation buttons................................................................................................................ |
9 |
Touch screen gestures................................................................................................................................... |
9 |
Apps, widgets and shortcuts........................................................................................................................ |
12 |
Personalising your device............................................................................................................................ |
14 |
Phone and voice.............................................................................................................. |
15 |
Phone icons................................................................................................................................................ |
15 |
Find your own phone number...................................................................................................................... |
15 |
Change your ringtone.................................................................................................................................. |
16 |
Making calls................................................................................................................................................ |
16 |
Receiving calls............................................................................................................................................ |
17 |
Blocking calls.............................................................................................................................................. |
19 |
Add a contact or number to your speed dial list............................................................................................ |
20 |
Call waiting and call forwarding.................................................................................................................... |
20 |
Start a conference call................................................................................................................................. |
21 |
LTE calling................................................................................................................................................... |
22 |
Wi-Fi calling................................................................................................................................................. |
23 |
Voicemail.................................................................................................................................................... |
24 |
Applications and features................................................................................................ |
25 |
Download an app on Google Play™.............................................................................................................. |
25 |
Organising your home screen...................................................................................................................... |
25 |
Messages.................................................................................................................................................... |
27 |
About the Google™ app and Now on Tap...................................................................................................... |
28 |
Clock........................................................................................................................................................... |
29 |
BlackBerry Device Search........................................................................................................................... |
32 |
Location services and Google Maps............................................................................................................. |
34 |
Google Chrome™ and Downloads................................................................................................................. |
35 |
Printing....................................................................................................................................................... |
36 |
Settings........................................................................................................................... |
38 |
Change your device settings........................................................................................................................ |
38 |
Customise the quick settings menu............................................................................................................. |
38 |
Notifications................................................................................................................................................ |
38 |
Storage space and media cards................................................................................................................... |
43 |
Connections................................................................................................................................................ |
47 |
Battery and power....................................................................................................................................... |
64 |
Display........................................................................................................................................................ |
68 |
Convenience key......................................................................................................................................... |
70 |
Accounts..................................................................................................................................................... |
71 |
Accessibility................................................................................................................................................ |
72 |
Users.......................................................................................................................................................... |
74 |
Backup and reset........................................................................................................................................ |
76 |
Update your device software........................................................................................................................ |
79 |
Security........................................................................................................................... |
80 |
Locks, passwords, and protecting your data................................................................................................. |
80 |
Finding and protecting a lost device............................................................................................................. |
86 |
Security settings.......................................................................................................................................... |
88 |
Legal notice..................................................................................................................... |
92 |
User guide |
Setup and basics |
Setup and basics
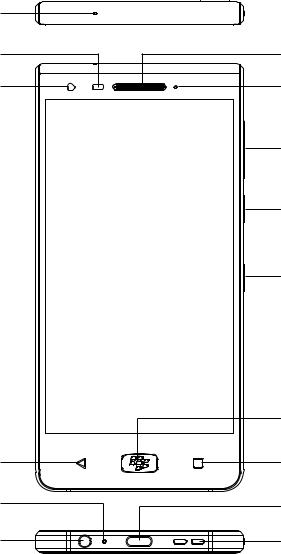
Your device at a glance
Microphone
Sensors
Front camera
Back key
Microphone
Headset connector
Receiver
Notification LED
Volume up/down key
Power key
Convenience key
Home key (Fingerprint sensor)
Recents key
USB Type-C
Speaker
4
User guide |
Setup and basics |
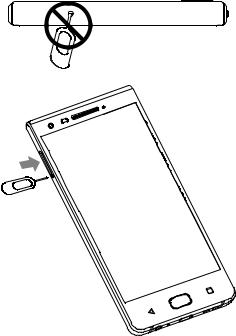
Insert the SIM card
Your device uses a nano SIM card. If you don't have a SIM card or don't have the right type of SIM card, contact your service provider.
CAUTION: Do not use a larger SIM card that was cut to a smaller size. Your device might not recognise the SIM card, or the SIM card might get stuck because it is thicker than a nano SIM card.
1.Release the SIM/microSD tray by pushing the SIM pin tool tip (provided in the box) into the hole on the right side of your device. If you don't have the SIM pin tool that came with your device, you can also use a paper clip.
WARNING! Do not insert the SIM tool into the hole located at the top of the device as this is a microphone. If inserted, this may cause damage to your device.
2.Pull out the SIM/microSD tray completely and set it on a flat surface.
3.Hold the SIM card so that the metal contacts are facing away from you. Align the notch on the SIM card with the notch in the smaller section of the tray.
5
User guide |
Setup and basics |
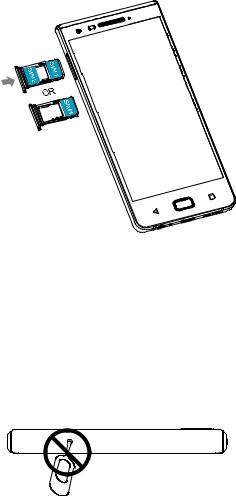
4. Put the SIM card in the tray.
5. Push the SIM/microSD tray back into the slot.
Insert a media card
If you want more storage for pictures, videos, music, and documents, you can insert a media card (microSD card).
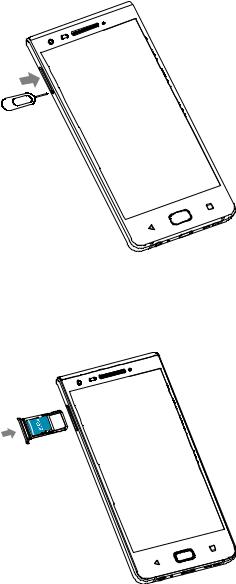
1.Release the SIM/microSD tray by pushing the SIM pin tool tip (provided in the box) into the hole on the right side of your device. If you don't have the SIM pin tool that came with your device, you can also use a paper clip.
WARNING! Do not insert the SIM tool into the hole located at the top of the device as this is a microphone. If inserted, this may cause damage to your device.
6
User guide |
Setup and basics |
2.Pull out the SIM/microSD tray completely and set it on a flat surface.
3.Hold the media card so that the metal contacts are facing away from you. Align the notch on the media card with the notch in the larger section of the tray.
4.Put the media card in the tray.
5. Push the SIM/microSD tray back into the slot.
7
User guide |
Setup and basics |
Troubleshooting: How to properly care for my phone for water resistance
The device may be damaged if water or dust enters the device. Follow these tips carefully to prevent damage to the device:
•Make sure the SIM/microSD tray is tightly closed.
•Do not immerse the device in water deeper than 1 meter and keep it submerged for more than 30 minutes.
•Do not immerse the device to water moving with force, such as ocean waves, or waterfalls.
•Do not open the SIM/microSD tray when the device is in water or in very humid places, such as swimming pools or bathrooms.
•The touch screen, and other functions may not work properly if the device is used in water.
•If the device is immersed in corrosive liquid, rinse it with clean water as soon as possible.
Turn your device on or off
Press and hold the Power on/off key (on the right side of your device).
•To turn off your device, tap Power off.
•To turn your device off and then on again, tap Restart.
Turn off the screen
Press the Power on/off key (on the right side of your device).
To turn the screen back on, press the  key, press the Power on/off key, or tap the screen twice.
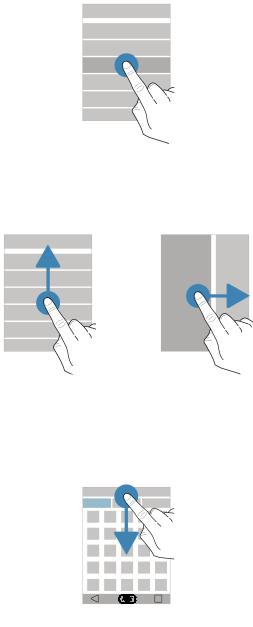
Move between home screens
You can move between your home screens with a gesture on the screen.
On the screen, swipe left or right.
8
User guide |
Setup and basics |
Get around with navigation buttons
No matter what you're doing on your device, navigation buttons appear at the bottom of your screen. Do any of the following:
•To go back to the previous screen, tap  .
.
•To go to your home screen, press the  key.
key.
•To see your recently opened apps and screens, tap  .
.
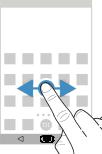
Touch screen gestures
Take a moment to learn the common gestures that you can use on the touch screen.
Wake up your device
Tap the screen twice.
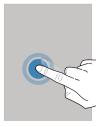
Select items
Do any of the following:
•To select an item, tap it. If the item can be opened, it opens.
•To select multiple items, such as photos that you want to share or email messages that you want to delete, touch and hold one item. Tap more items. To clear an item, tap it again.
9
User guide |
Setup and basics |
Scroll or move between items
Slide your finger to scroll through a list or move between items, such as photos.
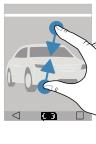
Check your notifications
You can check your latest notifications (for example, email messages and text messages) at any time. Swipe down from the top of the screen. Tap a notification to open it or pull down to see more notifications.
10
User guide |
Setup and basics |
Open Quick Settings
You can open Quick Settings to turn on or turn off common settings such as Wi-Fi and aeroplane mode. Swipe down from the top of the screen once using two fingers, or twice using one finger.
Use a slider
If a slider appears on your screen, you can progress through a file, such as a song or video, or adjust a setting, such as the screen brightness.
Drag the slider handle to the right or left.
Zoom in to or zoom out from the screen
If you want to see something in more detail, such as a photo or part of a map, you can magnify the image. To zoom in, slide two fingers apart.
11
User guide |
Setup and basics |
To zoom out, slide two fingers together.
Tip: In some cases, you can tap twice to zoom in or zoom out.
Apps, widgets and shortcuts
About apps, widgets and shortcuts
When you tap  on your home screen, a tray opens where you can access installed apps and widgets and set up shortcuts.
•The Apps tab includes a complete list of the apps installed on your device, including apps that you download on Google Play™.
•Widgets are like miniature apps that you can often interact with on the home screen. For example, the BBM widget shows a small view of your current chats. The Bookmarks widget shows all of the websites that you have bookmarked so that you can open them right from the home screen.
•Shortcuts help you perform the tasks that you do the most. For example, if you frequently write email, you can set up an email shortcut. Tapping the shortcut opens an email composer.
Search for installed apps, widgets and shortcuts
1.On the home screen, tap  .
.
2.Enter a search term in the Search apps, widgets and shortcuts field.
Add an app, a widget or a shortcut to your home screen
1.On the home screen, tap  .
.
2.Tap Apps, Widgets or Shortcuts.
3.Touch and hold an app, a widget, or a shortcut, and then release your finger when the home screen appears.
After you add a shortcut to your home screen, you might be prompted to set up the shortcut. For example, if you add the Contact shortcut, you must tap the contact that you want to send an email to.
12
User guide |
Setup and basics |
Sort your apps
You can sort your apps in the Apps list in several different ways:
•Default: The ten apps that you use the most appear at the top, followed by an alphabetical list of your apps. If you're using Android™ for Work on your device, your work apps appear at the bottom of the list.
•Alphabetical/Classic: Your apps are sorted alphabetically.
•Newest: The apps that you most recently installed appear at the top.
•Most Used: The apps that you use the most appear at the top.
To change how your apps are sorted, do the following:
1.On the home screen, tap  .
.
2.Tap the drop-down list that appears in the top-right corner. If you haven't changed how your apps are sorted, the word Default appears beside the drop-down list.
3.Tap a sorting option.
About popup widgets
Popup widgets are associated with the apps that you add to the home screen. When you add an app that includes a popup widget, an indicator appears beneath the app icon ( ). Popup widgets are useful because they allow you to have widgets that don't take up space on the home screen.
Turn on popup widgets
1.On the home screen, touch and hold an empty area of the screen, and then tap  > Popup widgets.
2.Turn on the switch.
Open a popup widget for an app
With popup widgets, you can access a widget for an app without having that widget on the home screen. If a popup widget is available for an app, an indicator (  ) appears beneath the app icon.
On the home screen, swipe up or down on an app that has a popup widget.
Change the popup widget for an app
If an app has more than one widget available, when you first swipe up or down on the app icon, you choose a widget to set as the popup widget. You can change the popup widget at any time.
1.Swipe up or down on an app icon.
2.In the upper-right corner of the widget, tap  > Change widget.
3.In the list of available widgets, tap another widget.
13

User guide |
Setup and basics |
Turn off popup widgets
On the home screen, do one of the following:
• To turn off a popup widget, on the app icon, swipe up or down. In the upper-right corner of the widget, tap > Turn off popup widget.
•To turn off all popup widgets, touch and hold an empty area of the screen, and then tap  > Popup widgets, turn off the switch.
Personalising your device
Learn how to personalise your device and make it uniquely yours. For example, you can change your ringtone or set a picture as your wallpaper.
•Change your device settings
•Change your ringtone
•Change your wallpaper
•Add a contact or number to your speed dial list
•Add an app,a widget,or a shortcut to your home screen
•Change your font size
•Change how you view your recent apps and screens
•Set up or change a screen lock
14

User guide |
Phone and voice |
Phone and voice
Phone icons
During a call
Icon |
Description |
|
|
|
Show the dial pad |
|
|
|
Mute your microphone |
|
Tip: You can also press the Convenience key to mute your microphone. |
|
|
|
Put a call on hold |
|
|
|
Make another call |
|
|
|
Turn on the speakerphone |
|
|
|
Merge calls to start a conference call |
|
|
|
Split a conference call into multiple calls |
|
|
Troubleshooting: The sound quality of the calls is poor
Make sure that the microphone, receiver or speaker is clean and dry, if the device has been immersed in water.
Find your own phone number
1.Swipe down from the top of the screen.
2.Tap  > About phone > Status > SIM Status > My phone number.
If it doesn't appear, your service provider might not have added your phone number to your SIM card. For more info, contact your service provider.
15
User guide |
Phone and voice |
Change your ringtone
1.Swipe down from the top of the screen.
2.Tap  > Sound > Phone ringtone.
3.Tap a ringtone, and then tap OK.
Tip: To use a song or a custom sound as your ringtone, move the .mp3 file you want to use to the Ringtones folder on your device. You might need to install a file manager app from the Google Play™ store first.
Making calls
Make a call
1.In the Phone app, tap  .
.
2.Enter the number.
3.Tap  .
.
Call a recent number
1.In the Phone app, tap  .
.
2.Beside a name or number, tap  .
.
Call a contact
1.In the Phone app, tap  .
.
2.Tap a contact.
3.Tap the number that you want to call.
Tip: To send a text message to a contact, beside the number, tap  .
.
Speed dial a contact
For more info about speed dial, see Add a contact or number to your speed dial list.
1.In the Phone app, tap  .
.
2.Tap a speed dial contact.
16
User guide |
Phone and voice |
Show or hide your number on outgoing calls
Depending on your service provider, this feature might not be supported.
1.In the Phone app, in the upper-right corner of the screen, tap  .
.
2.Tap Settings > Calls > Additional settings > Caller ID.
3.Tap Show number or Hide number.
View your call history
You can view past outgoing, incoming, and missed calls on the History screen.
1.In the Phone app, in the upper-right corner of the screen, tap  > Call History.
2.Do any of the following:
•To see the details of a specific call, tap a name or phone number, and then tap  .
.
•To view missed calls, tap Missed.
•To clear your call history, tap  > Clear call history > Clear.
Receiving calls
Answer or dismiss a call
1.If your device is locked, touch and hold  .
.
•To answer a call, slide your finger until it covers  . Release your finger.
•To dismiss a call, slide your finger until it covers  . Release your finger.
2.If your device is unlocked, in the call notification, tap Answer or Dismiss.
Send a quick response to a caller
You can send a caller a brief text message instead of answering an incoming call. Depending on the recipient of the quick response, additional text messaging charges might apply.
Note: If a call is from an unknown caller, the option to send a quick response does not appear.
1.When you receive an incoming call, touch and hold  . Slide your finger until it covers
  and then release your finger.
2.Do any of the following:
•To send a default message, tap a message.
•To compose a new message, type a new message at Input your own ... line, then tap Send.
When you dismiss a call to send a quick response, the caller is sent to voicemail. If you do not have voicemail, the caller receives a busy signal instead.
17
User guide |
Phone and voice |
Change your default quick response messages
You can create your own quick response messages to replace the available defaults.
1.In the Phone app, in the upper-right corner of the screen, tap  > Settings > Quick responses.
2.Tap the quick response you want to change.
3.Type a new message.
4.Tap OK.
To reset to the default quick responses, on the Edit quick responses screen, tap  > Reset default app.
Silence the ringtone when you receive a call
If you receive a call while your sound or vibration notifications are turned on, you can quickly silence your ringtone and stop your device from vibrating by pressing Volume key. After you silence the ringtone, you can still answer or decline the call.
Move a call from your headset to your device
When you have a Bluetooth headset connected to your device, incoming calls are automatically received on your headset. You can manually move the call back to the device.
1.While on a call, tap  .
.
2.Do one of the following:
•To move the call to your device, tap Handset earpiece.
•To move the call to your device speakerphone, tap Speaker.
Prevent calls from going to your Bluetooth headset
You can disconnect your Bluetooth headset from the Phone app so that calls are sent to your device instead.
1.Swipe down from the top of the screen.
2.Tap Bluetooth.
3.Beside the paired headset you want to disconnect, tap  .
.
4.Clear the Phone audio checkbox.
Put a call on hold
While on a call, tap  .
.
To resume a call, tap  again.
18

User guide |
Phone and voice |
Blocking calls
Block incoming calls
When you block calls, you won't receive calls or texts from the blocked specific phone number. Contact your service provider for more information.
1.In the Phone app, in the upper-right corner of the screen, tap  > Settings > Call blocking.
2.tap Add a number, enter a blocking phone number, tap Block.
3.tap  > Unblock to remove the blocked number.
Block a caller
Verify that the number you want to block is listed as a number for a contact in your Contacts app.
1.In the Contacts app, tap a contact.
2.Tap  >
>  .
.
3.Select the All calls to voicemail checkbox.
Block callers who aren't contacts
You can use the priority only mode to ignore calls from callers who aren't contacts. Your phone doesn't ring when you receive a call from someone who's not in your contact list, but your device still lets you know that you missed a call.
1.Swipe down from the top of the screen once using two fingers, or twice using one finger.
2.Tap  > Priority only.
3.Tap More Settings > Priority only allows > Calls > From contacts only.
Note: By default, priority only mode lasts for one hour. To change how long it lasts, swipe down from the top of the screen once using two fingers, or twice using one finger. Tap > Priority only. To increase how long the mode stays on, tap , or tap Until you turn this off.
Limit the phone numbers that you can call
When you set up and use fixed dialling numbers, you can make calls and send text messages (SMS or MMS) only to the phone numbers that you add to the fixed dialling numbers list. For example, if you give your device to your child to use, you can limit the phone numbers that your child can call. To use fixed dialling numbers, your service provider must set up your SIM card for this feature. Depending on your service provider, this feature might not be supported.
1.In the Phone app, in the upper-right corner of the screen, tap  .
.
2.Tap Settings > Calls > Fixed Dialling Numbers.
19
User guide |
Phone and voice |
3.Tap Enable FDN.
4.Enter the SIM security code provided to you by your service provider.
5.Tap OK.
6.Tap FDN list >  > Add contact.
7.Type a name and phone number.
8.Tap Save.
Add a contact or number to your speed dial list
Contacts that you add to your speed dial list appear in the  tab in the Phone app.
1.In the Phone app, tap  .
.
2.Tap the picture or letter beside a contact's name.
3.Tap  .
.
Remove a contact or number from your speed dial list
1.In the Phone app, tap  .
.
2.Touch and hold the contact you want to remove.
3.Drag the contact over  Remove. Release your finger.
Call waiting and call forwarding
Turn call waiting on or off
Depending on your service provider, this feature might not be supported.
1.In the Phone app, in the upper-right corner of the screen, tap  .
.
2.Tap Settings > Calls > Additional settings.
3.Tap the Call waiting checkbox.
20
User guide |
Phone and voice |
Set up call forwarding
Depending on your service provider, this feature might not be available.
1.In the Phone app, in the upper-right corner of the screen, tap  .
.
2.Tap Settings > Calls > Call forwarding.
3.To change the number that your calls are forwarded to, tap a call forwarding option and type a number.
Start a conference call
1.While on a call, make or answer another call.
2.To merge the calls, tap  .
.
Answer a second call while already on a call
Verify that call waiting is turned on.
1.While you are on a call and receive a second call, do one of the following:
•To put the first call on hold and answer the second call, tap Hold current call.
•To end the first call and answer the second call, tap End current call.
2.Touch and hold  , slide your finger until it covers
  and then release your finger.
3.Tap On hold to switch the first call and the second call.
4. To merge both calls and start a conference call, tap  .
.
To add more people to the conference call, repeat steps 1 and 2.
Make another call while already on a call
When you make another call while you're already on a call, your first call is automatically put on hold.
1.While on a call, tap  .
.
2.Do any of the following:
•Use the dial pad to enter a number.
•Tap above the dial pad to go to the Phone screen. Tap a contact.
3.To merge both calls and start a conference call, tap  .
.
To add more people to the conference call, repeat steps 1 to 3.
21

User guide |
Phone and voice |
Remove people from a conference call
1.While in a conference call, to view the conference call participants, tap Manage conference call.
2.Do one of the following:
•To remove a person from the conference call and hang up, tap  .
.
•To remove a person from the conference call and keep them in a separate call, tap  .
.
LTE calling
Turn on Voice over LTE and LTE video calling
Voice over LTE and LTE video calling provide high-definition voice and video calling using 4G LTE connections. To use LTE video calling, you must turn on Voice over LTE.
Depending on your service provider, this feature might not be supported. For more information, contact your service provider.
1.Swipe down from the top of the screen.
2.Tap  .
.
3.Depending on the available options, tap More > Mobile networks > IMS Settings.
4.Turn on the Voice over LTE or LTE video calling switch.
Make an LTE video call
If your service provider supports LTE video calling, you can make a video call to contacts who have this feature.
1.In the Phone app, do one of the following:
•To dial a number, tap  , and then enter the number.
•To call a contact, tap  , and then tap a contact.
•To call a speed dial contact, tap  , and then tap a contact.
2.Tap  .
.
Note: Depending on your service provider, you might not be able to make an LTE video call to a contact directly from |
or |
|
. Instead, call the contact, and then after the call connects, tap |
> Video call. |
|
Switch to a voice-only call
During a video call, tap  .
.
To switch back to a video call, tap  again.
22
User guide |
Phone and voice |
Switch between the front-facing and rear-facing camera
During a video call, do one of the following:
•Tap  .
.
•Tap Switch camera.
Put a video call on hold
During a video call, do one of the following:
•Tap  .
.
•Tap Hold call.
Share video one way
During a voice call, you can share video with the contact you're talking to, if they also have the LTE video calling feature, but the contact doesn't have to share video with you.
1.During a voice call, tap  .
.
2.Tap One Way Video.
Answer an LTE video call
1.When you receive a call, touch and hold  .
.
2.Do one of the following:
•To answer the call as a video call, slide your finger until it covers  .
.
•To answer the call as a voice call, slide your finger until it covers  .
.
Wi-Fi calling
Turn on Wi-Fi calling
Your device might be able to make and receive calls over Wi-Fi networks, even if you have limited or no mobile network coverage.
Depending on your service provider, this feature might not be supported. Contact your service provider for more information.
1.Swipe down from the top of the screen.
2.Tap  > More > Wi-Fi calling menu.
3.Turn on the Wi-Fi Calling switch.
4.To see when your device will make Wi-Fi calls, turn on Wi-Fi Calling Status.
23
User guide |
Phone and voice |
5.Tap Wi-Fi calling preferences > Connection preferences.
•To use a Wi-Fi network, even when you have a mobile signal, tap Wi-Fi preferred.
•To never use a mobile network and only use a Wi-Fi network, tap Wi-Fi only.
•To only use a Wi-Fi network for calls when you don't have a mobile signal, tap Mobile network preferred.
Make a Wi-Fi call
Make sure that  appears at the top of your screen.
1.In the Phone app, tap  .
.
2.Enter the number.
3.Tap  .
.
Voicemail
Set up your voicemail
Depending on your service provider, this feature might not be supported. Contact your service provider for more info.
1.In the Phone app, in the upper-right corner of the screen, tap  .
.
2.Tap Settings > Calls > Voicemail.
3.To set up voicemail, tap Setup. If the Voicemail number field is blank, tap Voicemail number, and then enter your voicemail access number. If you don't have a voicemail access number, contact your service provider.
To call your voicemail from the Phone app, touch and hold 1 key.
Visual Voicemail
Visual Voicemail is another way to access and manage your voicemail. In an app, you can see and scroll through your messages on your device. Some Visual Voicemail services can also transcribe your voicemail messages into text and send messages over email and SMS.
Your service provider might have a Visual Voicemail app preloaded on your device or available for you to download.
24
User guide |
Applications and features |
Applications and features
Download an app on Google Play™
1.Open the Google Play™ store app.
2.If necessary, sign in with your Google™ account.
3.Browse or search for an app that you want to download.
4.Tap the app, and then tap Install.
Organising your home screen
Move an app, a widget, or a shortcut around
1.Touch and hold an an app, a widget, or a shortcut, and then drag it to a new spot.
2.Release your finger.
Move an app or a shortcut to the favourites tray
The favourites tray appears at the bottom of each home screen, giving you easy access to your favourite apps or shortcuts. You can add up to four apps or shortcuts to the favourites tray.
1.If the favourites tray is full, touch and hold one of the apps or shortcuts in the tray. Drag it to a spot on the home screen.
2.Touch and hold the app or shortcut that you want to add, and then drag it to the favourites tray.
Add a home screen
You can add as many home screens as you want to organise your apps, widgets, and shortcuts.
1.On the home screen, touch and hold the item that you want to move, and then drag it to the right edge of the screen.
2.Hold the item at the right edge of the screen until the next home screen appears. If necessary, continue to hold the item until a blank home screen appears.
3.Release your finger.
Tip: To view different home screens quickly, tap the circles that appear above the favourites tray, and then slide your finger left or right.
25

User guide |
Applications and features |
Change the default home screen
Change the home screen that is displayed when you turn on your device or when you press the  key. Note: You might have to press the
  key twice to open your default home screen.
1.On the home screen, touch and hold an empty area on the screen.
2.Above the home screen that you want to set as your default, tap  .
.
Delete a home screen
If you're not using one of your home screens, you can delete it. If you delete the default home screen, the home screen to the right becomes the default home screen.
Note: After you delete a home screen, you can't restore it.
1.On the home screen, touch and hold an empty area of the screen.
2.Touch and hold the home screen that you want to remove, and then drag it to the Remove bar at the top of the screen.
Organise apps and shortcuts into folders
1.On the home screen, touch and hold an app or a shortcut.
2.Drag the app or shortcut on top of another app or shortcut that you want to include in the same folder.
3.To name the folder, tap the folder. Tap New folder, and then enter a name.
Change how you view your recent apps and screens
When you tap , you see a tiled view, a masonry view, or a rolodex view of your recent apps and screens. You can change the view to suit your preferences.
1.Swipe down from the top of the screen.
2.Tap  > Display > Recents.
3.Select a view.
Uninstall an app or remove an app, a widget, or a shortcut from a home screen
If you uninstall an app, the app is no longer available on your device. You must reinstall the app if you want to use it. Some built-in apps can't be uninstalled; instead, you can turn off these apps so that they no longer appear in 
 and so that you no longer receive notifications for them.
If you remove an app from the home screen, the app is still installed on your device, and you can open the app from  .
.
26
User guide |
Applications and features |
1.Touch and hold an app, a widget, or a shortcut.
2.Drag the app, widget, or shortcut toward the top of the screen.
•To uninstall an app, drag the app toward Uninstall.
•To turn off an app, drag the app toward Disable.
•To remove an app, a widget, or a shortcut from the home screen, drag the app toward Remove.
You can use the Google Play™ store to reinstall apps that you uninstall. In the Google Play™ store, tap  > My apps > All.
You can turn on apps that you turned off in  > Apps. At the top of the screen, swipe left on the categories until you see the Disabled category. Tap an app, and then tap Enable.
Messages
Using Message
You can use the default Messages app on your device to send, receive, and manage text messages, including SMS and MMS messages.
Send a text message
1.In the Messages app, tap  .
.
2.In the To field, enter a mobile phone number or start typing a contact's name. Tip: tap  or
or  to switch the keyboard.
3.After enter a mobile phone number, then tap  .
.
4.In the Type an SMS message field, type your message, and then tap  . Tip: You can add an emoticon by tapping
  in the message field.
Send a multimedia message
1.In the Messages app, tap  .
.
2.In the To field, enter a mobile phone number or start typing a contact's name. Tip: tap  or
or  to switch the keyboard.
3.After enter a mobile phone number, then tap  .
.
4.Tap  and attach a media file:
•To attach a sticker, tap  . You can also download other stickers and attach them.
•To attach a picture you take, tap  . To expand the camera view to full screen, tap
  .
.
•To attach a picture from your library, tap  .
.
•To attach an audio message you record, tap  , and then touch and hold
  to record the audio.
•To attach your location, tap  .
.
27

User guide |
Applications and features |
5. Tap  .
.
Note: If you close the screen while composing a message, it is saved as a draft. You can tap on the conversation to resume typing the message.
Delete a message
1.In the Messages app, touch and hold the message.
2.Tap  > Delete.
Manage conversations
1.In the Messages app, touch and hold a conversation until a toolbar appears along the top of the screen.
2.Do any of the following:
• To archive a conversation, tap |
. To return the archived conversation to your message list, touch and hold the |
conversation, and then tap |
. |
•To delete a conversation, tap  .
.
•To turn notifications on or off, tap  or
or  .
.
•To add a contact, tap  .
.
•To block a number, tap  .
.
Search for messages in the Messages app
You can easily search the Messages app for items, such as a contact, phone number, or message.
1.In the Messages app, tap  .
.
2.In the Search field, type your search term or terms.
About the Google™ app and Now on Tap
The Google™ app provides useful information when you need it through Google Now™ cards. Google Now™ cards contain personalised info, such as weather updates for your location, or directions to the next event on your agenda.
Now on Tap extends the features of the Google™ app to show you relevant information based on the app that you're using. For example, if you and a friend are using BBM to discuss meeting at a restaurant, Now on Tap can provide a card with ratings for the restaurant or directions to the restaurant. After you set up Now cards in the Google™ app, you can touch and hold the  key to access Now on Tap.
For more information about the Google app and Now on Tap, see the Help for the Google app.
28
 Loading...