


T1000

P
A
S
T
R
Y
L
I
G
H
T
M
E
D
.
D
A
R
K
Horizontal Toaster
Optima
®
Spacemaker
STOP
START
Spacemaker
*
Optima
™
Horizontal Toaster
SAVE THIS USE AND CARE BOOK
1-800-231-9786
QUESTIONS? Please call us TOLL FREE
?
MODEL T1000
*Trademark of General Electric Company, U.S.A.

When using electrical appliances, basic safety precautions should
always be followed, including the following:
READ ALL INSTRUCTIONS.
■ Do not touch hot surfaces. Use handles or knobs.
■ Do not operate any electric or gas heating appliance beneath this
unit. Do not place on or near a hot gas or electric burner or in a
heated oven.
■ Do not install the horizontal toaster over a sink or basin or any
electrical or gas heating appliance.
■ To protect against electrical shock, do not immerse cord, plug, or
any part of horizontal toaster in water or other liquid.
■ Close supervision is necessary when any appliance is used by or
near children.
■ Unplug from outlet when not in use and before cleaning. Allow to
cool before putting on or taking off parts, and before cleaning the
horizontal toaster.
■ Do not open crumb tray while horizontal toaster is in operation.
■ Do not operate any horizontal toaster with a damaged cord or plug
or after it has been damaged in any manner. Return horizontal
toaster to the nearest authorized service facility for examination,
repair, or adjustment.
■ The use of accessory attachments not recommended by the
appliance manufacturer may cause injuries.
■ Do not use outdoors.
■ Do not let the cord hang over the edge of table or counter, or
touch hot surfaces.
■ Plug the cord into the wall outlet. To disconnect, turn all controls
“OFF”, then remove the plug from the wall outlet. Do not yank on
the cord.
■ Do not use the horizontal toaster for other than intended use.
■ Oversized foods or utensils must not be inserted in the toaster, as
they may create a fire or risk of electric shock.
IMPORTANT SAFEGUARDS
2
P
A
S
T
R
Y
L
I
G
H
T
M
E
D
.
D
A
R
K
Horizontal Toaster
Optima
®
Spacemaker
STOP
START
■ A fire may occur if the horizontal toaster is covered or touching
flammable material, including curtains, draperies, walls, and the
like, when in operation. Do not store any item on top of the
horizontal toaster when in operation.
■ Do not clean with metal scouring pads. Pieces can break off the
pad and touch electrical parts, creating a risk of electric shock.
■ Do not leave unattended while toasting.
■ Do not operate in the presence of explosive and/or flammable
fumes.
■ This product is intended for household use only and not for
commercial or industrial use.
3
SAVE THESE INSTRUCTIONS
1
2
3
5
1
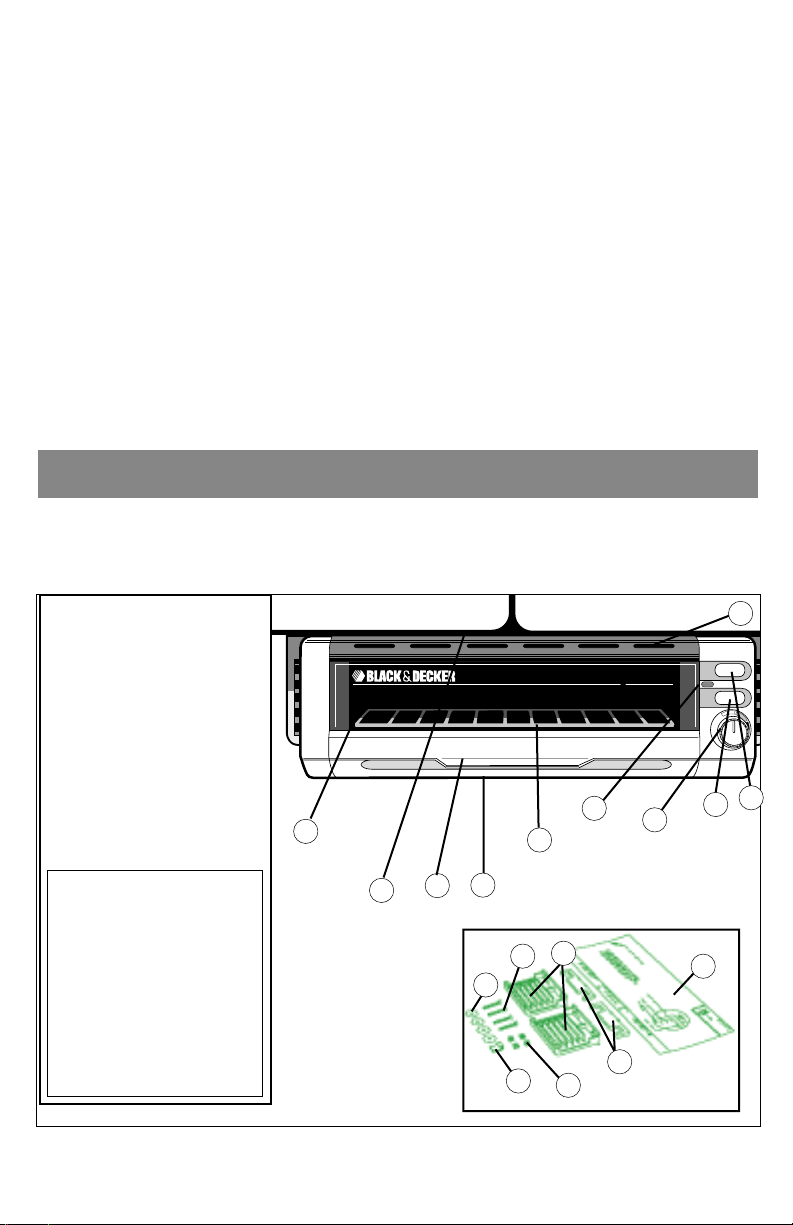
11. Glass Door
12. Metal Lip (partially hidden)
13. Door Handle
14. Pull-Down Crumb Tray
(Under Unit)
15. Toasting Rack
16. Power On Light
17. Electronic Toast Control
Knob with Pastry Setting
18. Start Button
19. Stop Button
(Cancels Toasting)
10. Vents
11. 4 Plastic Washers
12. 4 Screws
13. 2 Mounting Brackets
14. Mounting Template
15. 2 Spacer Bars
16. 4 Nuts
17. 1 Cord Hook
These items are located
in the packing materials.
Check thoroughly before
discarding.
4
6
7
8
9
10
14
13
12
11
17
16
15

SAFETY NOTE: Overtoasting of thinly sliced
breads, reduced fat diet breads, and packaged
greasy toaster foods could cause them to catch on
fire. Toast thin, diet light, or greasy slices only in
lower settings of the Toast Color Control; for
packaged toaster foods, follow toasting instructions
provided by their manufacturers.
POLARIZED PLUG This horizontal toaster has a polarized plug — one
blade is wider than the other. To reduce the risk of
electric shock, this plug will fit into a polarized
outlet only one way. If the plug does not fit fully into
the outlet, reverse it. If it still does not fit, contact a
qualified electrician. Do not attempt to defeat this
safety feature by modifying the plug in any way.
CHOOSING A Your Spacemaker* Optima
TM
Horizontal Toaster is
MOUNTING designed to be mounted under a cabinet. DO NOT
LOCATION ATTEMPT TO OPERATE UNLESS THE UNIT IS
PROPERLY INSTALLED. It can be mounted to
wood or metal cabinets. When choosing a
mounting location:
■ Keep in mind that it fits your normal work
pattern - especially the use of counter top
appliances and the possible addition of other
under-the cabinet appliances.
■ Hold the Toaster in various locations while you
consider the most convenient location for
mounting in your kitchen.
■ Do not install the Toaster over another cooking
or heating appliance or behind, under, or in front
of under-cabinet lighting appliances.
How to Use
4
*Trademark of General Electric Company, U.S.A.

■ Do not install the Toaster directly in front of an
electrical outlet, but be sure it is mounted within
reach of an electrical outlet.
■ The Toaster is designed to be mounted directly
next to any other Spacemaker* Optima
TM
product,
with a clearance of at least 1” between the two
products. If it is not mounted next to any other
Spacemaker* Optima
TM
product, maintain at least
a 5” clearance on all sides including the back.
NOTE: If you have Flush Bottom cabinets—a flat
level surface where the cabinet doors come to the
bottom of the cabinet front—(See Illustration 1A
page 6) please take note that the Metal Lip of the
Toaster should not be placed anywhere under the
hinge area of two cabinet doors.
If you are mounting the Horizontal Toaster directly
next to another Spacemaker* Optima
TM
product
that is already mounted:
1. Place the Mounting Template along the side of
the already-mounted Spacemaker* Optima
TM
pro-
duct that your Horizontal Toaster will hang next to.
2. Using the Mounting Template edge as a guide,
draw a line on the underside of the cabinet.
(Figure A) This will be the line to use to mark the
edge of the Horizontal Toaster’s location.
NOTE: To help determine
mounting location, see page 24
for the lengths of all the
Spacemaker* Optima
TM
products.
Figure A
*Trademark of General Electric Company, U.S.A.
5

INSTALLING YOUR HORIZONTAL
TOASTER
Tools you will need for
installation:
• Drill and 1/4” drill bit
• Phillips screwdriver
• Hammer/Nail to start a drill hole
• Adhesive tape
• Eye Protection Goggles
• Newspaper to cover
counter tops (optional)
First, determine if your cabinet has
a flush bottom or overhang bottom.
(See Illustration 1A & 1B). If your
cabinet has a flush bottom — flat,
level surface — follow the
mounting instructions below. If
your cabinet has an overhang — a
lip extending below the bottom of
the cabinet shelf — turn to page 9
for mounting instructions.
MOUNTING INSTRUCTIONS
FOR CABINET WITH FLUSH
BOTTOM
1. Empty your cabinet of its
contents before starting to drill.
Clean the underside of the
cabinet to remove any grease or
other residue.
2. With the doors of the cabinet
open, place the front of the
Mounting Template even with the
front of the cabinet. (Figure B)
Tape securely in place.
3. Mark the four drill holes
through the Template onto the
cabinet bottom with a pencil and
Overhang Bottom-1B
Flush bottom-1A
Figure B
6

remove the Mounting Template.
(Figure C)
4. Cover the counter top to catch
drilled wood chips.
CAUTION: Suitable eye
protection is recommended to
prevent injury from shavings
while using a drill.
5. Make a small starter hole by
hammering a nail or using a
smaller drill bit. Holding the drill
straight and vertical at the hole
marks, center and drill up
through the bottom of the
cabinet. (Figure D)
6. Insert a plastic washer on
each screw with the flat side of
the washer resting on the
cabinet bottom. Drop each screw
with the washer in place through
a drilled hole from inside the
cabinet. Repeat the procedure
with remaining screws and
washers. Thread a nut onto each
screw so that approximately 1/4”
of the screw is exposed beyond
the nut. (Figure E)
7. Slide the Mounting Bracket
above the nuts through the
U-shaped openings on the
Bracket. The Bracket will then be
resting on the nuts. (Figure F)
(See page 8).
7
Figure D
Figure E
Figure C

8. Press the Bracket inward
and forward toward the front
of the cabinet until it stops.
Tighten the screw/nut assem-
bly with a screwdriver until
the Bracket just touches the
bottom of the cabinet. (Figure
G) The Bracket should move
freely front to rear in the slot
to fine tune the fit of the
Toaster to the cabinet front.
Repeat Steps 7 and 8 for the
other Bracket.
9. Hold the Toaster in front of
you and push it forward into
the slots on the Mounting
Brackets until it locks into
place. The Metal Lip on the
top of the Toaster must rest
against the cabinet front. (See
Figure H) The front of the
Toaster will extend 1
1
⁄2" beyond
the front of the cabinet.
10. Drape the Cord toward an
electrical outlet and use the
Cord Hook to hold it out of the
way. Peel the paper off the
adhesive back of the Cord
Hook. Place the Cord Hook at
the back edge of the cabinet
(on or next to the wall) over
the outlet to be used.
NOTE:
For safety, NEVER USE
TACKS THROUGH OR AGAINST
THE CORD TO HOLD IT.
8
Figure H
Figure G
Figure F
 Loading...