


INSTRUCTION MANUAL
Catalog Numbers: SNC100, SNC100B
Key Information You Should Know
•Dirt cup can only be removed and emptied when in sweep mode.
•Do not push dirt cup emptying button when removing from unit.
•For best pick-up performance while in collect mode, the broom head bristles should be facing towards you.
•Use only with AA alkaline batteries.
SAVE THIS MANUAL FOR FUTURE REFERENCE.
CONSERVER LE PRÉSENT GUIDE À TITRE DE RÉFÉRENCE.
VEA EL ESPAÑOL EN LA CONTRAPORTADA.
INSTRUCTIVO DE OPERACIÓN, CENTROS DE SERVICIO Y PÓLIZA DE GARANTÍA. ADVERTENCIA: LÉASE ESTE INSTRUCTIVO ANTES DE USAR EL PRODUCTO.
Catalog Number: SNC100, SNC100B |
FORM NO. 5146821-00, Rev. 1 |
PRINTED IN CHINA |
Copyright © 2006 Black & Decker |
|
(JAN. ‘06) |
 WARNING: Important Safety Warnings and Instructions
When using electrical appliances, basic safety precautions should always be followed, including the following:
PLEASE READ AND UNDERSTAND ALL INSTRUCTIONS CAREFULLY BEFORE USING THE UNIT.
 WARNING: To reduce the risk of fire, electrical shock or injury:
•Close supervision is necessary when any appliance is used near children. Do not allow to be used as a toy.
•Do not operate in the presence of explosives and/or flammable fumes or liquids.
•Always store and use the Sweep and Collect indoors.
•Keep hair, loose clothing, and all parts of body away from moving parts.
•Store out of reach of children.
•This appliance is intended for household use only and not for commercial or industrial use.
•Use only as described in this manual.
•Do not put any object into unit openings. Keep end of rotating brush and other openings away from your face and body.
•Use extra caution when cleaning on stairs.
•Keep work areas well lit.
•Do not pick up sharp large objects that may damage Sweep and Collect.
•Do not use on wet surfaces or to pick up any liquids, toxic substances, flammable or combustible liquids such as gasoline or use in areas where they may be present.
•Do not use without dirt cup in place.
•Do not pick up anything that is burning or smoking, such as cigarettes, matches, or hot ashes.
•Any electronic or electrical appliance should not be stored in or exposed to areas of high heat or humidity. Do not store your Sweep and Collect close to stoves, radiators, furnaces or in a bathroom or bathing area.
SAVE THESE INSTRUCTIONS
SPECIFIC SAFETY RULE
 WARNING: Some dust created by this product contains chemicals known to the State of California to cause cancer, birth defects or other reproductive harm. Some examples of these chemicals are:
•compounds in fertilizers
•compounds in insecticides, herbicides and pesticides
•arsenic and chromium from chemically treated lumber
To reduce your exposure to these chemicals, wear approved safety equipment such as dust masks that are specially designed to filter out microscopic particles.
6 |
1 |
Handle Release |
5 Broom Head |
|
|
|
Button |
6 |
Dirt Cup |
|
2 |
Beater Bar |
||
|
7 |
Wall Hook |
||
|
3 |
Battery |
||
|
8 |
Hardware Bag |
||
|
|
Compartment Cover |
||
3 |
4 |
Motorized Dust Pan |
9 |
Batteries |
5  4
4
1
2
7 |
8 |
9 |
|
|
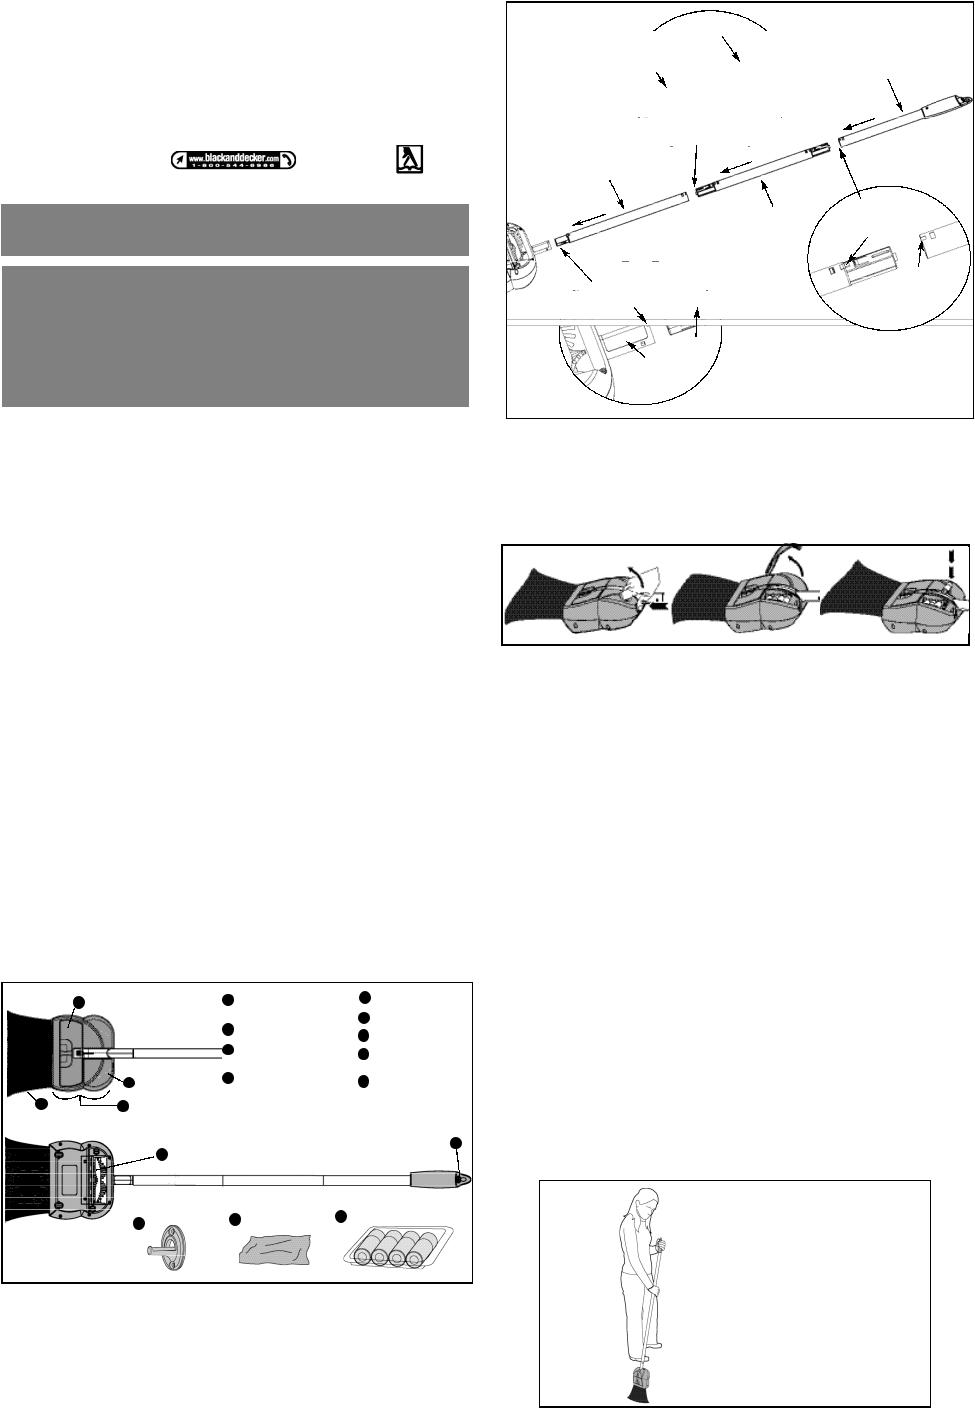
F e a t u re s
*Depending on model purchased, your unit may not appear exactly as shown.
*BEFORE FIRST USE remove all components from the packaging and familiarize yourself with them to help you in the assembly and operation of your Sweep & Collect. The batteries, hardware bag and hanging hook are located in the dirt cup and need to be removed before the first use. To remove and open the dirt cup, please follow the “Emptying The Dirt Cup” instructions.
Handle Assembly (SNC100B only)
1.Insert the plastic end of the bottom handle segment into the motorized dust pan. Be sure to align the key (A) in the plastic connector with the notch (B) in the receptacle (C). Push in until the connector “clicks” in place.
2.The middle handle segment can be assembled to the bottom segment in only one way. Ensure the shape of the key (D) in the connector matches the shape of the notch (E) in the tube of the bottom segment before inserting and snapping in place.
3.Assemble the top handle segment to the middle segment in a similar fashion. (F &G)
|
|
KEY D |
|
|
|
|
|
|
|
|
|
TOP HANDLE |
||
NOTCH E |
|
|
||
|
|
|
|
SEGMENT |
|
|
|
|
|
|
|
|
|
|
Step 2
BOTTOM HANDLE
SEGMENT
|
|
Step 3 |
|
MIDDLE HANDLE |
|||
SEGMENT |
|
|
|
|
KEY F |
|
|
|
|
|
|
|
|
|
|
NOTCH G
Step 1
NOTCH B
KEY A
RECEPTACLE C
Battery Installation
Note: Before installing batteries, ensure handle is locked in place. (Fig. 1c, Fig. 2)
 WARNING: Use caution when removing batteries as they may become hot if the unit is used in collect mode for extended periods of time.
Remove the battery compartment cover by pushing the tab (Fig. 1a) and rotating up as shown in Fig. 1b. Insert four fresh alkaline AA batteries (Fig. 1c) making sure to match (+) and (-) terminals correctly and reinstall the battery compartment cover. Use alkaline batteries only.
Fig. 1a |
Fig. 1b |
Fig. 1c |
|
|
|
 WARNING: Batteries can explode, or leak, and can cause injury or fire. To reduce this risk:
•Carefully follow all instructions and warnings on the battery label and package.
•Always insert batteries correctly with regard to polarity (+ and -), marked on the battery and the equipment.
•Do not short battery terminals.
•Do not charge batteries.
•Do not mix old and new batteries. Replace all of them at the same time with new batteries of the same brand and type.
•Remove dead batteries immediately and dispose of per local codes.
•Do not dispose of batteries in fire.
•Keep batteries out of reach of children.
•Remove batteries if the device will not be used for several months.
•Transporting batteries can possibly cause fires if the battery terminals inadvertently come in contact with conductive materials such as keys, coins, hand tools and the like. The US Department of Transportation Hazardous Material Regulations (HMR) actually prohibit transporting batteries in commerce or on airplanes (i.e. packed in suitcases and carryon luggage) UNLESS they are properly protected from short circuits. So when transporting individual batteries, make sure that the battery terminals are protected and well insulated from materials that could contact them and cause a short circuit.
Installing The Wall Hook
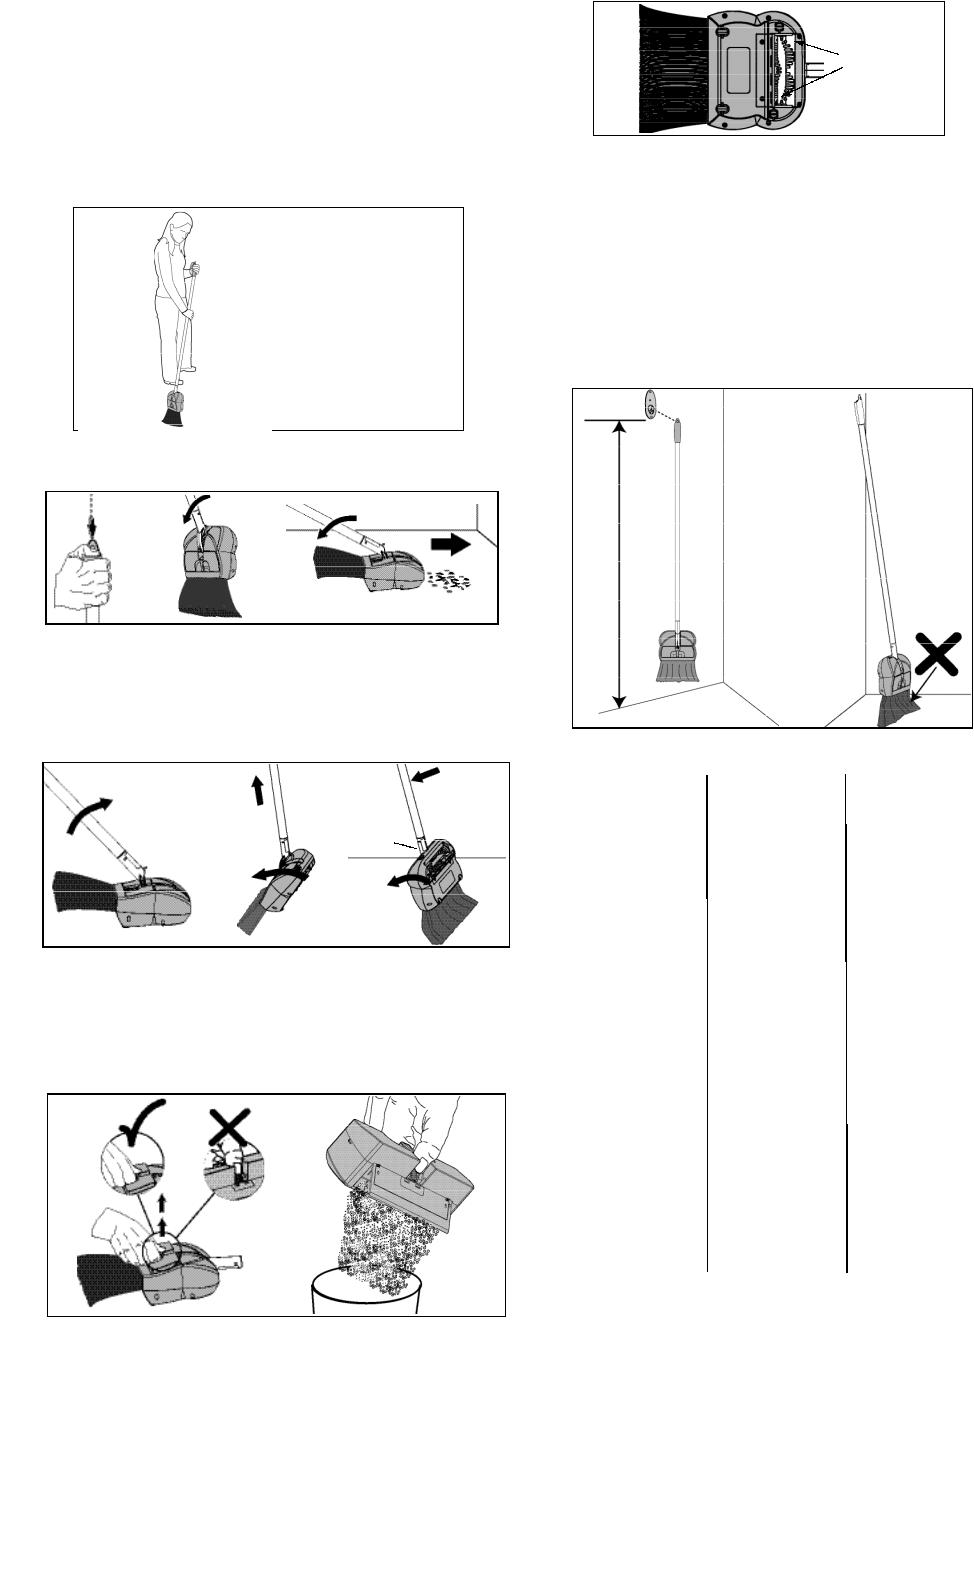
Note: It is highly recommend to hang the Sweep and Collect on the provided hook or similar device to prevent damage to the broom head.
Firmly attach the provided wall hook to the wall so it will not pull out. It should be mounted at a minimum’ height of 54”(137 cm) to its bottom to ensure the broom head does not touch the floor. (Fig. 8a) Use the hardware provided only if hanging on conventional hollow wall construction such as sheetrock over studs. If not, use the appropriate fasteners for the particular wall material.
Operation
 WARNING: Do not use the Sweep and Collect without the dirt cup in place.
Note: The Sweep and Collect is to be used for pick up of dry debris on hard floors only. Avoid picking up pieces of string and similar material to prevent binding of the beater bar.
How to Operate
Fig. 2 Fig. 3
Sweep |
Collect |
Mode |
Mode |
•To change from sweep (Fig. 2) to collect mode (Fig. 3), push the button in the end of the handle (Fig. 4a) and rotate the handle towards the broom bristles as shown in Fig. 4b. At this point, the beater bar should start turning.
Fig. 4a |
Fig. 4b |
Fig. 4c |
|
|
|
Note: During collection mode, the beater bar can be momentarily stopped by pushing the button in the end of the handle.
•Roll the unit back and forth over the pile of debris to collect it into the dirt cup. For best pick up performance, the broom head bristles should be facing away from the dirt pile as shown above (Fig. 4c).
•To change back to sweep mode, rotate handle back into slot in housing (Fig. 5a) until it latches (Fig.5b) and you hear a “click” sound (Fig. 5c).Tomakeit easier toreturnthehandle tothesweep position, thebuttoninthe endof thehandlecanbepressed. Atthispoint,the beater bar shouldstop turning.
Fig. 5a |
Fig. 5b |
Fig. 5c |
“CLICK”
Emptying The Dirt Cup
Note: The unit needs to be in sweep mode (Fig. 2) before the dirt cup can be removed. It is important not to use excessive force to remove the dirt cup. If the dirt cup seems stuck in the housing, follow the “Unclogging the Unit” procedure.
1.Remove the dirt cup from unit by pulling straight up as shown. Do not push on emptying button when pulling out. (Fig. 6a)
2.Hold the dirt cup over a garbage container and empty by completely depressing emptying button and shaking moderately. (Fig. 6b)
3.Release the button and push the dirt cup back into the motorized dust pan until flush with top surface.
Fig. 6a |
Fig. 6b |
Unclogging the Unit
Note: Dirt cup door mechanism must be free of debris to fully close and allow removal of the dirt cup.
1.Remove batteries from the unit.
2.Rotate handle to change to collect mode. (Fig. 3)
3.Flip over to access the opening (Fig. 7) extending from the beater bar to the dirt cup.
4.Clean out any debris in this opening and at the entrance to the dirt cup that may impede the operation of the beater bar or the dirt cup door mechanism.
5.Return to sweep mode.
6.Replace the batteries.
Maintaining the Beater Bar
Note: Periodic maintenance to the beater bar is required to ensure optimum pick up performance.
1.Remove the batteries from the unit.
2.Flip over to access the beater bar.
3.Remove any hair or other debris that is wrapped around or is trapped near the beater bar to ensure it can rotate freely.
4.Replace the batteries.
Cleaning and Storage
•It is suggested that the dirt cup is emptied before storage.
•Hang unit on hook or other device when not in use to keep broom head in best condition
(Fig. 8a).
•Do not store the Sweep and Collect resting on the broom head (Fig. 8b) as this will result in permanent damage to the bristles.
•Periodically clean the unit with a damp cloth, including the chamber which the dirt cup fits into. Remove any hair, fiber or other materials that may have built up in the unit or on the rotating brush.
•Don’t use abrasive materials to clean the sweeper. Do not immerse the unit in water.
54” min 137 cm
TROUBLESHOOTING GUIDE
|
PROBLEM |
POSSIBLE REASON |
|
|
POSSIBLE SOLUTION |
|||||
|
Motorized dust pan will not |
|
1. |
Batteries depleted. |
|
|
|
|
|
|
|
|
1. |
Install new alkaline batteries. |
|||||||
|
operate |
|
2. |
Button is depressed. |
|
2. |
Release button. |
|||
|
|
|
3. |
Handle is in sweep |
|
3. |
Change to collect mode. |
|||
|
|
|
|
position. |
|
|
|
|
|
|
|
|
|
4. |
Unit needs servicing. |
|
4. |
Call Customer Service. |
|||
|
|
|
5. |
Beater bar jammed. |
|
5. |
Clean hair or debris from |
|||
|
|
|
|
|
|
|
beater bar. |
|
||
|
Motorized dust pan will not |
|
1. |
Dirt cup is full. |
|
1. |
Empty dirt cup. |
|||
|
pick-up |
|
2. |
Batteries depleted. |
|
2. |
Install new alkaline batteries. |
|||
|
|
|
3. |
Beater bar jammed or |
|
3. |
Clean hair or debris from |
|||
|
|
|
4. |
clogged. |
|
4. |
beater bar. |
|||
|
|
|
Unit clogged |
|
Check for excessive material |
|||||
|
|
|
|
|
|
|
on beater bar or in bottom of |
|||
|
|
|
|
|
|
|
sweeper. Follow “Unclogging |
|||
|
|
|
|
|
|
|
the Unit” and “Maintaining the |
|||
|
|
|
|
|
|
|
Beater Bar” instructions. |
|||
|
|
|
|
|
|
|
|
|
||
|
Motorized dust pan does not |
|
1. |
Rollers are clogged with |
|
1. |
Position handle in sweep |
|||
|
roll smoothly on floor. |
|
|
debris. |
|
|
mode to turn brush roll off. |
|||
|
|
|
|
|
|
|
Clean any hair/debris from |
|||
|
|
|
|
|
|
|
rollers (4), shafts and wheel |
|||
|
|
|
|
|
|
|
wells. |
|
||
|
Dirt cup is difficult to remove / |
|
1. |
Dirt build up in unit. |
|
1. |
Remove dirt cup and |
|||
|
replace |
|
|
|
|
|
clean it and inside of unit with |
|||
|
|
|
2. |
Obstruction in dirt path |
|
2. |
damp cloth. |
|||
|
|
|
|
Check for excessive material |
||||||
|
|
|
|
has jammed dirt cup |
|
|
in bottom of sweeper. Follow |
|||
|
|
|
|
door open. |
|
|
“Unclogging the Unit” |
|||
|
|
|
3. |
Handle is in incorrect |
|
3. |
instructions. |
|||
|
|
|
|
Change to sweep mode. |
||||||
|
|
|
|
position |
|
|
|
|
|
|
|
|
|
|
|
|
|
|
|
||
|
Brush roll will not turn off |
|
1. |
Handle is not locked in |
|
1. |
Press handle into unit until |
|||
|
|
|
|
sweep position. |
|
|
securely fitted. |
|||
|
|
|
|
|
|
|
|
|
|
|
|
|
|
|
|
|
|
|
|
|
|
Service Information
Black & Decker offers a full network of company-owned and authorized service locations throughout North America. All Black & Decker Service Centers are staffed with trained personnel to provide customers with efficient and reliable service.
Whether you need technical advice, repair, or genuine factory replacement parts, contact the Black & Decker location nearest you.
To find your local service location, refer to the yellow page directory under “Tools—Electric”
or call: 1-800-54-HOW-TO.
Full Two-Year Home Use Warranty
Black & Decker (U.S.) Inc. warrants this product for two years against any defects in material or workmanship. The defective product will be replaced or repaired at no charge in either of two ways:
The first, which will result in exchanges only, is to return the product to the retailer from whom it was purchased (provided that the store is a participating retailer). Returns should be made within the time period of the retailer’s policy for exchanges (usually 30 to 90 days after the sale). Proof of purchase may be required. Please check with the retailer for their specific return policy regarding returns that are beyond the time set for exchanges. The
second option is to take or send the product (prepaid) to a Black & Decker owned or authorized Service Center for repair or replacement at our option. Proof of purchase may be required.
Black & Decker owned and authorized service centers are listed under “Tools-Electric” in the yellow pages of the phone directory.
This warranty does not apply to accessories. This warranty gives you specific legal rights and you may have other rights which vary from state to state. Should you have any questions, contact the manager of your nearest Black & Decker Service Center.
This product is not intended for commercial use.
Free warning label replacement: If your warning labels become illegible or are missing, call 1-800-544-6986 for a free replacement.
Black & Decker (U.S.) Inc., |
See ‘Tools-Electric’ |
|
701 |
E. Joppa Rd. |
– Yellow Pages – |
Towson, |
MD 21286 U.S.A. |
for Service & Sales |
AVANT DE RETOURNER CE PRODUIT POUR QUELQUE RAISON QUI SOIT, VEUILLEZ APPELER AU 1-800-54-HOW-TO (544-6986)
Voici des renseignements importants qu’i l vous faut savoir :
•Le vide-poussière ne peut être enlevé et vidé qu'en mode de balayage.
•Ne pas enfoncer le bouton de vidage du vide-poussière au moment de le retirer de l’appareil.
•Pour un ramassage optimal, en mode de ramassage, les soies du balai-brosse doivent vous faire face.
•Utiliser’ l appareil uniquement avec des piles alcalines AA.
 AVERTISSEMENT : Avertissements de sécurité et directives importantes :
Lorsqu’on utilise un appareil électrique, il faut toujours respecter certaines règles de sécurité fondamentales, notamment les suivantes :
LIRE ATTENTIVEMENT TOUTES LES DIRECTIVES AVANT D’UTILISER L’APPAREIL.
 AVERTISSEMENT : Afin de minimiser les risques d'incendie, de chocs électriques ou de blessures :
•Exercer une étroite surveillance pour l’utilisation de tout appareil à proximité d’enfants. Interdire l’utilisation de l’app areil comme jouet.
•Ne pas utiliser l'appareil en présence de vapeurs ou de liquides explosifs ou inflammables.
•Toujours ranger et utiliser l’ap pareil Sweep and Collect à l’ intérieur.
•Maintenir les cheveux, vêtements et toutes les parties du corps à distance de tous les composants mobiles.
•Ranger l’app areil hors de la portée des enfants.
•Cet appareil est conçu pour une utilisation domestique seulement et non industrielle ou commerciale.
•Utiliser l’app areil uniquement selon les indications données dans le présent manuel.
•Ne pas insérer d’ob jet dans les ouvertures de’apl pareil. Tenir l’extrémité de la brosse tournante et toute autre ouverture loin du visage et du corps.
•Être très prudent pour nettoyer les escaliers.
•Tenir la zone de travail bien éclairée.
•Ne pas ramasser de gros objets tranchants pouvant endommager l’app areil Sweep and Collect.
•Ne pas utiliser l’ap pareil sur une surface mouillée ou pour ramasser des liquides, des substances toxiques, inflammables ou combustibles comme de’esl sence et ne pas l’utili ser dans les endroits où ces substances sont présentes.
•Ne pas utiliser l’ap pareil si le vide-poussière n'est pas en place.
•Ne pas ramasser des matières brûlantes ou fumantes comme des cigarettes, des allumettes ou des cendres chaudes.
•Éviter de ranger tout appareil électronique ou électrique dans un endroit de grande chaleur ou humidité ou de l’ex poser à de telles conditions. Ne pas ranger votre appareil Sweep and Collect près d’une cuisinière, d’un radiateur, d’un e fournaise ou dans la salle de bain.
CONSERVER CES DIRECTIVES
RÈGLE DE SÉCURITÉ SPÉCIFIQUE
 AVERTISSEMENT : Certaines poussières produites par cet outil contiennent des produits chimiques reconnus par l’État de la Californie comme pouvant causer le cancer, les anomalies congénitales et d’autres dangers pour la reproduction. Voici quelques exemples de ces produits chimiques :
•composés présents dans les engrais
•composés présents dans les insecticides, herbicides et pesticides
• arsenic et chrome présents dans le bois d’oeuvre traité chimiquement. Pour réduire toute exposition à ces produits chimiques, porter un équipement de sécurité approuvé comme un masque antipoussière conçu spécialement pour filtrer les particules microscopiques.
6 |
|
1 |
Bouton de dégagement |
5 Balai-brosse |
|
|
|
|
de poignée |
6 |
Vide-poussière |
|
|
2 |
Èlément vibro-batteur |
||
|
|
7 |
Crochet mural |
||
|
|
3 |
Couvercle de logement |
||
|
|
8 |
Sac de |
||
|
|
|
à piles |
||
|
|
4 |
Pelle à poussière |
9 |
quincaillerie |
|
3 |
Piles |
|||
|
|
motorisée |
|||
5 |
|
|
|
|
|
4 |
|
|
|
|
|
1
2
7 |
8 |
9 |
|
|
Caractéristiques
*Selon le modèle acheté, il est possible que votre appareil diffère de celui illustré.
*AVANT LA PREMIÈRE UTILISATION, déballer tous les composants et se familiariser avec ceux-ci pour faciliter l’assemblage et l’utilisation du Sweep & Collect. Les piles, le
sac de quincaillerie et le crochet de suspension se trouvent dans le vide-poussière et doivent être enlevés avant la première utilisation. Pour retirer et ouvrir le vide-poussière, veuillez suivre les directives « Vider le vide-poussière » du manuel.
Module de la poignée (modèle SNC100B uniquement)
1. Insérer l’extrémité de plastique du segment inférieur de la poignée, dans la pelle à poussière motorisée. S’assurer d’aligner la clé (A) du connecteur de plastique avec
l’encoche (B) dans le réceptacle (C). Enfoncer jusqu’à |
ce que le connecteur s’enclenche. |
|
2. Le segment du milieu de la poignée assemble’ |
dans le segment inférieur dans un seul |
|
sens. S’assurer que le format de la clé (D) du connecteur correspond au format de l’encoche (E) dans le tube du segment inférieur avant de l’insérer et de l’enclencher .
3.Insérer le segment supérieur de la poignée dans le segment du milieu de façon similaire.
(F et G)
CLÉ D
SEGMENT
ENCOCHE E SUPÉRIEUR DE
POIGNÉE
Étape 2
SEGMENT INFÉRIEUR
DE POIGNÉE
|
|
Étape 3 |
|
SEGMENT DE |
|||
POIGNÉE DU MILIEU |
|
|
|
|
CLÉ F |
|
|
|
|
|
|
|
|
|
|
ENCOCHE G
Étape 1
ENCOCHE B
CLÉ A
RÉCEPTACLE C
Installation des piles
Remarque : Avant de poser les piles, s'assurer que la poignée est verrouillée en place.
(fig. 1c, fig. 2)
 AVERTISSEMENT : Être prudent pour retirer les piles, car elles peuvent être chaudes si le balai a été utilisé en mode de ramassage pour une longue période.
Retirer le couvercle du logement des piles en enfonçant la languette (figure 1a) et en la tournant vers le haut comme il est indiqué à la figure 1b. Insérer quatre piles alcalines AA neuves (figure 1c) et s'assurer de bien correspondre les bornes (+) et (-), puis remettre le couvercle du logement des piles. Utiliser uniquement des piles alcal i n e s .
Fig. 1a |
Fig. 1b |
Fig. 1c |
|
|
|
 AVERTISSEMENT : Les piles peuvent exploser ou couler et causer blessures ou incendie. Pour réduire ce risque :
•Suivre attentivement’étiquetttoutedesles instructions et avertissements figurant sur l pil’embaset’apparllageilde. l
•Toujours insérer les piles de manière à correspondre à la bonne polarité ( et -), telle indiquée’ sur les piles et le matériel.
•Ne pas créer de court-circuit dans les bornes des piles.
•Ne par charger les piles.
•Ne pas mélanger piles neuves et usagées. Les remplacer toutes en même temps par des piles neuves de la même marque et du même type.
•Retirer immédiatement les piles mortes et les éliminer en fonction des codes régionaux en vigueur.
•Ne pas jeter de piles au feu.
•Garder les piles hors de la portée des enfants.
•Retirer’appareilles pilesne sieral pas utilisé pendant plusieurs mois.
•Le transport des piles peut causer un incendie si les bornes des piles entrent en contact involontairement avec des matières conductrices comme des clés, de la monnaie, des outils’autresmanuelsélémentset d semblables. La Hazardous Material Regulation du
département américain des transports interdit en fait le transport des piles pour le commerce et dans les avions (ex. : piles emballées dans des valises et des bagages à main)’ellesÀ MOINSne soientqu bien protégées contre les courts-circuits. Pour le transport’assurerdes pilesqueindividuelles,bornes sont protégées et bien isolées
contre toute matière pouvant entrer en contact avec elles et causer un court-circuit.
Installation du crochet mural
Remarque :’accrochappareilnous’ vouslSweeprecommandons vivement d |
|
|
Collect au’unmoyendispositif’éviterdu crochetsemblablefourniafinoudd |
|
|
endommager’ |
le balai-brosse. |
. Le |
Fixer fermement’il nelesortecrochetpasmduralmurfourni de manière à ce qu |
||
crochet doit être fixé à une hauteur minimale de 137 cm (54 po) de manière à ce que le |
||
balai-brosse ne touche pas au plancher. (fig. 8a) Utiliser la quincaillerie fournie |
|
|
uniquement’appareil estsil accroché sur un mur creux conventionnel comme le Gyproc |
|
|
posé sur’estdespasmontle cantss,employer.Si ce n les fixations appropriées prévues |
|
|
pour le matériau constituant le mur utilisé. |
|
|
Fonctionnement
AVERTISSEMENT : Ne pas utiliser l’appareil |
Sweep and Collect si son vide-poussière |
n’est pas en place. |
|
Remarque : L’appareil Sweep and Collect est utilisé uniquement pour ramasser les |
|
débris secs sur des planchers en dur. |
|
Éviter de ramasser des sections de fils ou tout matériau semblable afin d’éviter tout |
|
coincement de l’élément vibro-batteur. |
|
Fonctionnement |
|
Fig. 2 |
Fig. 3 |
Mode de |
Mode de |
balayage |
ramassage |
•Pour passer du mode de balayage (figure 2) au mode de ramassage (figure 3), enfoncer le bouton situé à l'extrémité de la poignée (figure 4a), puis tourner la poignée vers les soies du balai comme le montre la figure 4b. À ce’élémentomentvibro-là,-batteurl
devrait commencer à tourner.
 Loading...