


DW160-161/384292 5/2/02 1:57 PM Page 2
DEWALT Industrial Tool Co., 701 East Joppa Road, Baltimore, MD 21286 |
Printed in U.S.A. (APR02-CD-1) |
Form No. 384292-00 |
|
DW160,DW161 |
Copyright © 1997,2002 |
|
|
The following are trademarks for one or more DeWALT power tools: the yellow and black color scheme; the “D” shaped air intake rill;g the array of pyramids on the handgrip; the kit box configuration; and the array of lozenge-shaped humps on the surface of the tool.

DW160-161/384292 5/2/02 1:57 PM Page 3
INSTRUCTION MANUAL GUIDE D'UTILISATION MANUAL DE INSTRUCCIONES
INSTRUCTIVO DE OPERACIÓN, CENTROS DE SERVICIO Y PÓLIZA DE GARANTÍA.ADVERTENCIA: LÉASE ESTE INSTRUCTIVO ANTES DE USAR EL PRODUCTO.
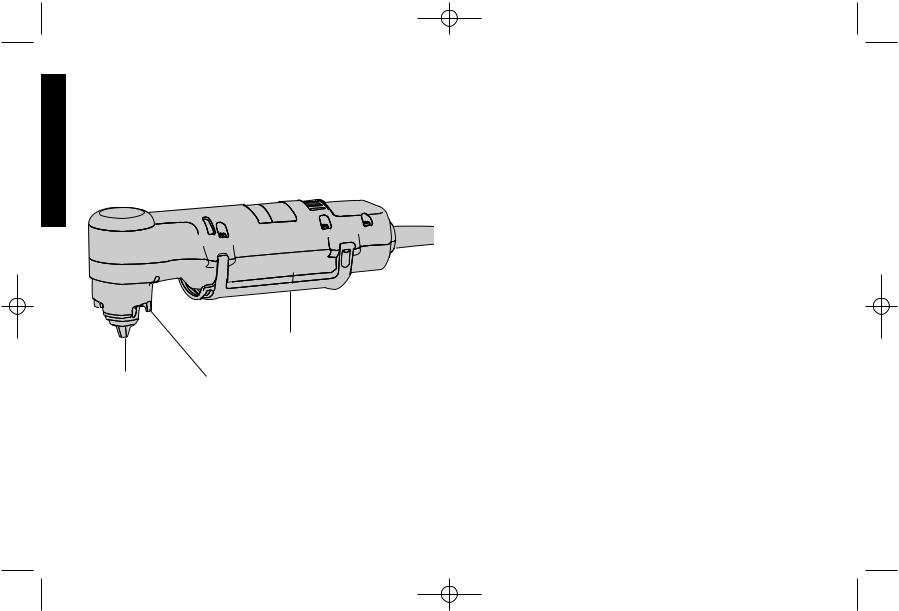
DW160/DW161 Right Angle Drill
Perceuse d’angle Taladro de ángulo recto
DW160-161/384292 5/2/02 1:57 PM Page 4
IF YOU HAVE ANY QUESTIONS OR COMMENTS ABOUT THIS OR ANY DEWALT TOOL, CALL US TOLL FREE AT:
1-800-4-DEWALT (1-800-433-9258)
English
PADDLE SWITCH
CHUCK
CHUCK GUARD
Important Safety Instructions
 WARNING: When using electric tools, basic safety precautions should always be followed to reduce risk of fire, electric shock, and personal injury, including the following:
READ ALL INSTRUCTIONS
Double Insulation
Double insulated tools are constructed throughout with two separate layers of electrical insulation or one double thickness of insulation between you and the tool’s electrical system. Tools built with this insulation system are not intended to be grounded. As a result, your tool is equipped with a two prong plug which permits you to use extension cords without concern for maintaining a ground connection.
NOTE: Double insulation does not take the place of normal safety precautions when operating this tool. The insulation system is for added protection against injury resulting from a possible electrical insulation failure within the tool.
 CAUTION: WHEN SERVICING USE ONLY IDENTICAL REPLACEMENT PARTS. Repair or replace damaged cords.
Polarized Plugs
Polarized plugs (one blade is wider than the other) are used on equipment to reduce the risk of electric shock. When provided, this plug will fit in the polarized outlet only one way. If the plug does not fit fully into the outlet, reverse the plug. If it still does not fit, contact a qualified electrician to install the proper outlet. Do not change the plug in any way.

DW160-161/384292 5/2/02 1:57 PM Page 1
Safety Instructions For All Tools
•KEEP WORK AREA CLEAN. Cluttered areas and benches invite injuries.
•CONSIDER WORK AREA ENVIRONMENT. Don’t expose power tools to rain. Don’t use power tools in damp or wet locations. Keep work area well lit. Do not use tool in presence of flammable liquids or gases.
•GUARD AGAINST ELECTRIC SHOCK. Prevent body contact with grounded surfaces. For example; pipes, radiators, ranges, and refrigerator enclosures.
•KEEP CHILDREN AWAY. Do not let visitors contact tool or extension cord. All visitors should be kept away from work area.
•STORE IDLE TOOLS. When not in use, tools should be stored in dry, and high or locked-up place — out of reach of children.
•DON’T FORCE TOOL. It will do the job better and safer at the rate for which it was intended.
•USE RIGHT TOOL. Don’t force small tool or attachment to do the job of a heavy-duty tool. Don’t use tool for purpose not intended.
•DRESS PROPERLY. Do not wear loose clothing or jewelry. They can be caught in moving parts. Rubber gloves and non-skid footwear are recommended when working outdoors. Wear protective hair covering to contain long hair. Air vents often cover moving parts and should also be avoided.
•USE SAFETY GLASSES. Also use face or dust mask if operation is dusty.
•DON’T ABUSE CORD. Never carry tool by cord or yank it to disconnect from receptacle. Keep cord from heat, oil, and sharp edges.
•SECURE WORK. Use clamps or a vise to hold work. It’s safer than using your hand and it frees both hands to operate tool.
•DON’T OVERREACH. Keep proper footing and balance at all times.
•MAINTAIN TOOLS WITH CARE. Keep tools sharp and clean for
1
better and safer performance. Follow instructions for lubricating and changing accessories. Inspect tool cords periodically and if damaged, have repaired by authorized service facility. Inspect extension cords periodically and replace if damaged. Keep handles dry, clean, and free from oil and grease.
•DISCONNECT OR LOCK OFF TOOLS when not in use, before servicing, and when changing accessories, such as blades, bits, cutters.
•REMOVE ADJUSTING KEYS AND WRENCHES. Form habit of checking to see that keys and adjusting wrenches are removed from tool before turning it on.
•AVOID UNINTENTIONAL STARTING. Don’t carry tool with finger on switch. Be sure switch is off when plugging in.
•EXTENSION CORDS. Make sure your extension cord is in good condition. When using an extension cord, be sure to use one heavy enough to carry the current your product will draw. An undersized cord will cause a drop in line voltage resulting in loss of power and overheating. The following table shows the correct size to use depending on cord length and nameplate ampere rating. If in doubt, use the next heavier gage. The smaller the gage
number, the heavier the cord.
|
|
|
Minimum Gage for Cord Sets |
|
|
|||
|
Volts |
|
Total Length of Cord in Feet |
|
|
|||
|
120V |
|
0-25 |
26-50 |
51-100 |
101-150 |
|
|
|
240V |
|
0-50 |
51-100 |
101-200 |
201-300 |
|
|
|
Ampere Rating |
|
AWG |
|
|
|
||
|
More |
Not more |
|
|
|
|
||
|
Than |
Than |
|
|
|
|
|
|
0 |
- |
6 |
18 |
16 |
16 |
14 |
|
|
6 |
- |
10 |
18 |
16 |
14 |
12 |
|
|
10 |
- |
12 |
16 |
16 |
14 |
12 |
|
|
12 |
- |
16 |
14 |
12 |
Not Recommended |
|||
|
|
|
|
|
|
|
|
|
•OUTDOOR USE EXTENSION CORDS. When tool is used outdoors, use only extension cords intended for use outdoors and so marked.
•STAY ALERT. Watch what you are doing. Use common sense. Do not operate tool when you are tired.
English

DW160-161/384292 5/2/02 1:57 PM Page 2
English
•CHECK DAMAGED PARTS. Before further use of the tool, a guard or other part that is damaged should be carefully checked to determine that it will operate properly and perform its intended function. Check for alignment of moving parts, binding of moving parts, breakage of parts, mounting, and any other conditions that may affect its operation. A guard or other part that is damaged should be properly repaired or replaced by an authorized service center unless otherwise indicated elsewhere in this instruction manual. Have defective switches replaced by authorized service center. Do not use tool if switch does not turn it on and off.
•  CAUTION: When drilling or driving into walls, floors or wherever live electrical wires may be encountered, DO NOT TOUCH ANY METAL PARTS OF THE TOOL! Hold the tool only by insulated grasping surfaces to prevent electric shock if you drill or drive into a live wire.
 WARNING: Some dust created by power sanding, sawing, grinding, drilling, and other construction activities contains chemicals known to cause cancer, birth defects or other reproductive harm. Some examples of these chemicals are:
•lead from lead-based paints,
•crystalline silica from bricks and cement and other masonry products, and
•arsenic and chromium from chemically-treated lumber (CCA).
Your risk from these exposures varies, depending on how often you do this type of work. To reduce your exposure to these chemicals: work in a well ventilated area, and work with approved safety equipment, such as those dust masks that are specially designed to filter out microscopic particles.
•Avoid prolonged contact with dust from power sanding, sawing, grinding, drilling, and other construction activities. Wear protective clothing and wash exposed areas with soap and water. Allowing dust to get into your mouth, eyes, or lay on the skin may promote absorption of harmful chemicals.
2
FIG. 1
HOLES IN CHUCK
OPENINGS IN
CHUCK GUARD
FIG. 2
FIG. 3

DW160-161/384292 5/2/02 1:57 PM Page 3
 CAUTION: Wear appropriate hearing protection during use.
Under some conditions and duration of use, noise from this product may contribute to hearing loss.
SAVE THESE INSTRUCTIONS
Motor
Be sure your power supply agrees with nameplate marking. 120 volts AC means your tool may be operated only with alternating current and never with direct current. Voltage decrease of more than 10% will cause loss of power and overheating. All tools are factory tested; if this tool does not operate, check the power supply.
Switch
To turn the tool on, depress the paddle switch that runs the length of the tool, as shown in Figure 4. To turn the tool off, release the paddle.
Chuck
Open chuck jaws by aligning hole in chuck with an opening in the chuck guard, and insert the chuck key through the opening and into the chuck (Figure 1). Insert shank of bit about 3/4" (19mm) into chuck. It’s important to tighten chuck with all three holes. To release bit, turn key counterclockwise in just one hole.
Chuck Key Holder (Figure 2)
1.Push double-hole end of holder through slot in other end of holder.
2.Slip loop over electric plug and draw loop tight around cord.
3.Push ends of chuck key handle through two holes in end of holder.
Chuck Removal
Insert straight end of chuck key handle into chuck as shown in Figure 3. Using a wooden mallet or similar object, strike key sharply in a counterclockwise direction. This will loosen the chuck so that it can be unscrewed by hand.
3
Drilling
1.Always turn off tool and disconnect from power supply when attaching or changing bits or accessories.
2.Use sharp drill bits only. For WOOD, use twist drill bits, spade bits, power auger bits, or hole saws. For METAL, use high speed steel twist drill bits or hole saws. For MASONRY, such as brick, cement, cinder block, etc., use carbide-tipped bits
3.Be sure the material to be drilled is anchored or clamped firmly. If drilling thin material, use a “back-up” block to prevent damage to the material.
4.Always apply pressure in a straight line with the bit. Use enough pressure to keep the drill bit biting, but do not push hard enough to stall the motor or deflect the bit.
5.Hold tool firmly to control the twisting action of the drill.
6.IF DRILL STALLS, it is usually because it is being overloaded.
RELEASE TRIGGER IMMEDIATELY, remove drill bit from work, and determine cause of stalling. DO NOT CLICK TRIGGER OFF
AND ON IN AN ATTEMPT TO START A STALLED DRILL – THIS CAN DAMAGE THE DRILL.
7.To minimize stalling on breaking through the material, reduce pressure on drill and ease the bit through the last fractional part of the hole.
8.Keep the motor running when pulling the bit back out of a drilled hole. This will help prevent jamming.
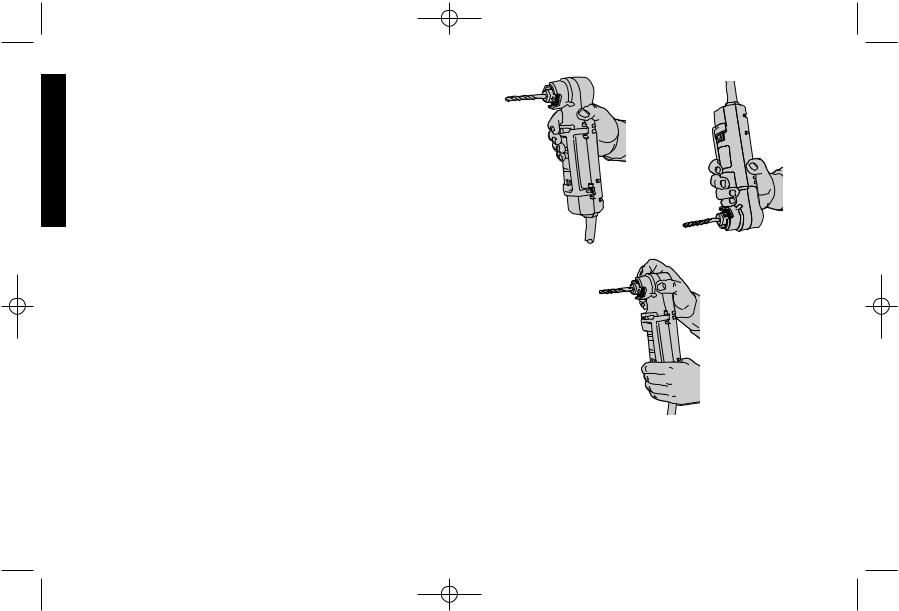
9.For optimum control and comfort, the drill may be grasped in one of the following illustrated manners: Around the neck of the drill using one or two fingers to operate the paddle switch as in Figure 4, in an inverted position with the heel of the hand pushing on the head of the drill and one or two fingers on the paddle switch
English
DW160-161/384292 5/2/02 1:57 PM Page 4
English
as in Figure 5, or holding the head of the drill with one hand and operating the paddle switch with the other hand, holding the back end of the drill as in Figure 6.
Drilling in Wood
Holes in wood can be made with the same twist drills used for metal. These bits may overheat unless pulled out frequently to clear chips from the flutes. For larger holes, use spade bits, power auger bits, or hole saws. Work that is likely to splinter should be backed up with a block of wood.
Drilling in Metal
Use a cutting lubricant when drilling metals. The exceptions are cast iron and brass which should be drilled dry. The cutting lubricants that work best are sulphurized cutting oil or lard oil; bacon grease will also serve the purpose.
Drilling in Masonry
Use carbide tipped masonry bits at low speeds. Keep even force on the drill but not so much that you crack the brittle materials. A smooth, even flow of dust indicates the proper drilling rate.
Motor Brushes
Your tool will stop when the brushes wear out (down to about 3/16" (5mm) long). This prevents damage to the motor.
Accessories
Recommended accessories for use with your tool are available at extra cost from your local dealer or authorized service center.
If you need assistance in locating any accessory, please contact DEWALT Industrial Tool Co., 701 East Joppa Road, Baltimore, MD 21286 or call 1-800-433-9258.
 CAUTION: The use of any other accessory not recommended
for use with this tool could be hazardous. |
|
For safety in use, the following accessories should be used only in |
|
sizes up to the maximums shown in the table below. |
4 |
|
FIG. 5
PADDLE
SWITCH
FIG. 4
FIG. 6
MAXIMUM RECOMMENDED CAPACITIES |
|
|
|
Chuck Size |
3/8" |
1/4" |
3/8" |
Drill Speed (RPM) |
1200 |
1200 |
2000 |
Twist Bits in Metal |
3/8" |
1/4" |
3/8" |
Flat Boring Bits in Wood |
1-1/4" |
3/4" |
3/4" |
Carbide Tipped Bits in Masonry |
9/16" |
1/2" |
1/2" |
Hole Saws in Wood or Metal |
1-1/4" |
1" |
1" |

DW160-161/384292 5/2/02 1:57 PM Page 5
ACCESSORY MUST BE RATED FOR USE AT SPEED EQUAL TO OR HIGHER THAN NAMEPLATE RPM OF TOOL WITH WHICH IT IS BEING USED.
Wire Wheel Brushes |
4" Diameter Maximum |
Wire Cup Brushes |
3" Diameter Maximum |
Buffing Wheels |
3" Diameter Maximum |
Rubber Backing Pads |
4-5/8" Diameter Maximum |
ROUND-SHANK MASONRY BITS
These bits are carbide-tipped for top performance and extra long life in most masonry drilling applications.
BIT DIAMETER |
USABLE DRILLING DEPTH |
SHANK DIAMETER |
3/16" |
1-1/2" |
3/16" |
1/4" |
2" |
1/4" |
5/16" |
2-1/4" |
1/4" |
3/8" |
2-1/2" |
1/4" |
1/2" |
2-1/2" |
1/4" |
9/16" |
4-1/4" |
1/4" |
HIGH-SPEED HOLE SAWS (use with mandrels)
SAW OUTSIDE |
FOR CONDUIT SIZES |
FOR PIPE TAP SIZES |
DIAMETERS |
|
|
5/8" |
Built in mandrel; no separate mandrel |
|
3/4" |
3/8" |
|
7/8" |
1/2" |
|
1-5/16" |
|
3/4" |
1" |
|
|
1-1/16" |
|
|
1-1/8" |
3/4" |
|
1-3/16" |
|
1" |
5
Important
To assure product SAFETY and RELIABILITY, repairs, maintenance and adjustment (including brush inspection and replacement) should be performed by authorized service centers or other qualified service organizations, always using identical replacement parts.
Full Warranty
DEWALT heavy duty industrial tools are warranted for one year from date of purchase. We will repair, without charge, any defects due to faulty materials or workmanship. For warranty repair information, call 1-800-4-DEWALT. This warranty does not apply to accessories or damage caused where repairs have been made or attempted by others. This warranty gives you specific legal rights and you may have other rights which vary in certain states or provinces.
In addition to the warranty, DEWALT tools are covered by our:
30 DAY NO RISK SATISFACTION GUARANTEE
If you are not completely satisfied with the performance of your DEWALT heavy duty industrial tool, simply return it to the participating seller within 30 days for a full refund. Please return the complete unit, transportation prepaid. Proof of purchase may be required.
FREE WARNING LABEL REPLACEMENT: If your warning labels become illegible or are missing, call 1-800-4-DEWALT for a free replacement.
English
 Loading...