


B&K AV7.1
Preprogrammed & Learning
Remote Control
Table Of Contents
Introduction |
Page |
2 |
|
Battery Installation |
|
A. How To Open and Close Battery Compartment Cover |
3 |
B. Low Battery Message |
3 |
Using Your Remote Control |
4 |
A. Function Table Reference |
4 |
Function Tables |
5 |
B. Preprogrammed Set-Up |
8 |
Three Digit Code Method |
8 |
Auto Search Method |
10 |
Recalling the Set-Up Code |
11 |
C. Learning Set-Up |
12 |
Learning New Functions on the Main Keyboard |
12 |
Learning New Functions on the Device Buttons |
14 |
Erasing Learned Functions |
15 |
Erasing Individual Buttons |
15 |
Erasing All Buttons in One Device Mode |
16 |
Erasing All Buttons in All Device Modes |
16 |
D. Operation |
17 |
Device Buttons |
17 |
Main Device Mode |
18 |
Automatic Audio Mode |
18 |
Backlighting |
19 |
Advanced Features |
20 |
A. Punch Through Controls |
20 |
Volume “Punch Through” |
20 |
Channel “Punch Through” |
21 |
Transport “Punch Through” |
22 |
B. Macro Buttons |
23 |
Programming Macro Buttons |
24 |
Erasing Macro Buttons |
25 |
C. Changing the LCD Display |
26 |
D. Programming a Second TV, VCR, etc. to other Device Buttons |
27 |
Warranty and Specifications |
28 |
Glossary |
29 |
Appendix |
31 |
Assignment of Audio / Video Equipment |
31 |
Set Up Code Tables |
32 |
Audio |
32 |
Satellite |
34 |
TV |
36 |
V1 |
39 |
V2 |
42 |
CD |
44 |
DVD |
47 |
Tape |
48 |
1
Introduction
The B&K AV7.1 remote control is preprogrammed to operate over 1,000 Audio and Video components so that you can set it up by simply punching in a threedigit code number that matches your equipment.
The AV7.1 also has the ability to learn new functions from your original remote controls, allowing you to customize the remote to your own needs and update it as you add new equipment. Please refer to pages 8 – 16 for instructions on setting up the remote control.
AV7.1 System Controller operates up to eight different audio and video devices in your home entertainment system. They are listed below:
1TVs, Monitors, Video/LCD Projectors
2VCRs, TV/VCR combination units
3Cable boxes, Internet set-tops
4Satellite receivers – DSS, Primestar, Dish, DBS, C-Band
5Audio Receivers, Preamplifiers, Surround Processors
6Compact disc players, Multi-Disc changers
7DVD, Laser disc players, Cassette decks
8Cassette Tape Players, DAT, MiniDisc, Switchers, Lighting, Home Control Devices, and Line Doublers
Setting up the remote control to work with your equipment is simple. The remote control also has many advanced features that can add ease and enjoyment to the operation of your home entertainment system. Please follow the instructions in the manual, and retain the manual for future reference.
For any questions or comments about this remote control, please contact B&K Components, Ltd. 2100 Old Union Road Buffalo, New York 14227, or call 1-800- 543-5252. Service hours are 9:00 AM to 5:00 PM, EST, Monday – Friday.
2

Using Your Remote
This remote control uses four (4) AAA 1.5V batteries. Please be sure to match the batteries with the (+) and (-) markings inside the battery compartment during the installation.
A.Open and Close the Battery Compartment Cover
1.To open the battery cover, push the latch forward toward the top of the remote control, and lift the latch up.
2.To close the battery cover, slide the battery cover straight in (towards the top of the remote) and push down until it “clicks” into place.
B. Low Battery Message
When the Liquid Crystal Display (LCD) flashes L_BAT, the batteries should be replaced.
Note: Batteries should be last about 6 months under normal conditions. The AV7.1 remote control will retain its programmed memory for up to one year after the batteries are removed and up to ten years after the batteries go “dead”.
3

Using Your Remote
A. Function Table Reference
4
Using Your Remote
No. |
Button Name |
B&K Functions |
SAT Functions |
TV Functions |
1-8 |
Device Name |
B&K (ON) |
Sat (ON) |
TV (ON) |
9 |
Power / On |
On / Off |
On / Off (Off) |
On / Off (Off) |
10 |
Mute |
Mute |
Mute |
Mute |
11 |
Off |
Power Off |
TV / Sat |
TV / Video |
12 |
VOLUME + |
Master Volume + |
Vol. Up |
Vol. Up |
13 |
VOLUME – |
Master Volume – |
Vol. Down |
Vol. Down |
14 |
CHANNEL + |
Preset + |
Ch. + |
Ch. Up |
15 |
CHANNEL – |
Preset – |
Ch. – |
Ch. Down |
16 |
Up / Pause |
Up / Tune + |
Up |
Up |
17 |
Down / Stop |
Down / Tune - |
Down |
Down |
18 |
Right / F.F. |
Right / Bal. Right |
Right |
Right / Picture |
19 |
Left / Rew. |
Left / Bal. Left |
Left |
Left / Audio |
20 |
Sel / Play |
Enter |
Select |
Select / Enter |
21 |
Save / I<< / Mode |
Save |
Guide |
Display / Recall |
22 |
Menu / >>I |
Menu |
Menu |
Menu |
23 |
Exit / Rec. |
Return (Exit) |
Exit / Cancel |
Exit / Clear |
24 |
DVD-Audio/ Eject |
DVD Audio Mode |
Prev. Ch. |
Q. View / Last Ch. |
25-29 |
1–5 |
1–5 |
1–5 |
1–5 |
30 |
6 / EX |
6 |
6 |
6 |
31 |
7 |
7 |
7 |
7 |
32 |
8 / Direct |
8 |
8 |
8 |
33 |
9 / LtRt |
9 |
9 |
9 |
34 |
0 / HP |
0 |
0 |
0 |
35 |
+10 |
+ 10 |
|
100/Ch. Scan |
36 |
Enter |
Enter |
Enter |
Ch. Scan |
37 |
THX / Cinema |
THX Mode |
Fav |
Sleep |
38 |
Surr / Surround |
Surround Mode |
Info / Fetch |
Caption |
39 |
ST / Stereo |
Stereo Mode |
Next Prog. |
Antenna |
40 |
Mono |
Mono Mode |
Alt. Audio |
Reset |
41 |
AM |
AM Tuner Band |
|
PIP On / Auto Ch. |
42 |
EQ |
EQ selection |
|
PIP Swap, Add |
43 |
C+ |
Center Level + |
|
PIP Freeze / Delete |
44 |
R+ |
Rear Level + |
|
PIP Off / Position |
45 |
S+ |
Sub Level + |
|
TV / CATV |
46 |
FM |
FM Tuner Band |
Rec. |
Auto |
47 |
Z |
Zone |
|
Add |
48 |
C– |
Center Level – |
|
Delete |
49 |
R– |
Rear Level – |
|
|
50 |
S– |
Sub Level – |
|
|
51 |
M1 |
Pound # |
|
|
52 |
M2 |
B |
|
|
53 |
M3 |
C |
|
|
54 |
M4 |
Freq. |
|
|
55 |
Light |
Light |
Light |
Light |
5
Using Your Remote
No. |
Button Name |
VCR Functions |
Cable Functions |
1-8 |
Device Name |
V1 (ON) |
V2 (ON) |
9 |
Power / On |
On / Off (OFF) |
On / Off (Off) |
10 |
Mute |
Mute |
Mute |
11 |
Off |
VCR / TV |
Switch / A/B |
12 |
VOLUME + |
Vol. Up |
Vol. Up |
13 |
VOLUME – |
Vol. Down |
Vol. Down |
14 |
CHANNEL + |
Ch. Up |
Ch. + |
15 |
CHANNEL – |
Ch. Down |
Ch. – |
16 |
Up / Pause |
Pause |
Up / Fine + |
17 |
Down / Stop |
Stop |
Down / Fine – |
18 |
Right / F.F. |
Fast Forward |
Right / Fine R |
19 |
Left / Rew. |
Rewind |
Left / Fine L |
20 |
Sel / Play |
Play |
Select |
21 |
Save / I<< / Mode |
F. Adv. / Slow I<< |
Guide / Recall |
22 |
Menu / >>I |
X2 / Intro / Slow >>I |
Menu |
23 |
Exit / Rec. |
Record |
Exit |
24 |
DVD-Audio / Eject |
Eject |
Prev. Ch. |
25-29 |
1–5 |
1–5 |
1–5 |
30 |
6 / EX |
6 |
6 |
31 |
7 |
7 |
7 |
32 |
8 / Direct |
8 |
8 |
33 |
9 / LtRt |
9 |
9 |
34 |
0 / HP |
0 |
0 |
35 |
+10 |
1-100 |
* / Help |
36 |
Enter |
Enter |
Enter / Memory |
37 |
THX / Cinema |
Program |
Fav |
38 |
Surr / Surround |
Display |
Info |
39 |
ST / Stereo |
Counter |
PPV / Buy |
40 |
Mono |
Reset |
P / Delete |
41 |
AM |
Auto Ch. |
Page – |
42 |
EQ |
Add + |
Page + |
43 |
C+ |
Delete – |
Day – |
44 |
R+ |
Tape Speed |
Day + |
45 |
S+ |
VCR Plus |
Record |
46 |
FM |
Tracking + |
|
47 |
Z |
Tracking – |
|
48 |
C– |
Auto Tracking |
|
49 |
R– |
Slow – |
|
50 |
S– |
Slow + |
|
51 |
M1 |
Index |
|
52 |
M2 |
QTR On |
|
53 |
M3 |
QTR Off |
|
54 |
M4 |
Edit |
|
55 |
Light |
Light |
Light |
6
Using Your Remote
No. |
Button Name |
CD Functions |
DVD Functions |
AUX Functions |
1-8 |
Device Name |
CD (ON) |
DVD (ON) |
TAPE (ON) |
9 |
Power / On |
On / Off (OFF) |
On / Off (Off) |
On / Off (Off) |
10 |
Mute |
Mute / Fader |
|
Mute / Rec. Mute |
11 |
Off |
Random |
|
|
12 |
VOLUME + |
Vol. Up |
|
|
13 |
VOLUME – |
Vol. Down |
|
|
14 |
CHANNEL + |
Track + / Skip + |
Skip >>I |
|
15 |
CHANNEL – |
Track – / Skip – |
Skip I<< |
|
16 |
Up / Pause |
Pause |
Pause |
Pause |
17 |
Down / Stop |
Stop |
Stop |
Stop |
18 |
Right / F.F. |
F.F. / Search + |
Fast Forward |
Fast Forward |
19 |
Left / Rew. |
Rew. / Search – |
Rewind |
Rewind |
20 |
Sel / Play |
Play |
Play |
Play |
21 |
Save / I<< / Mode |
Search – |
Set Up |
Deck A |
22 |
Menu / >>I |
Search + |
Menu |
Deck B |
23 |
Exit / Rec. |
|
Clear |
Record |
24 |
DVD-Audio/ Eject |
Eject / Intro |
Open / Close |
Rev. Play |
25-29 |
1–5 |
1–5 |
1–5 |
1–5 |
30 |
6 / EX |
6 |
6 |
6 |
31 |
7 |
7 |
7 |
7 |
32 |
8 / Direct |
8 |
8 |
8 |
33 |
9 / LtRt |
9 |
9 |
9 |
34 |
0 / HP |
0 |
0 |
0 |
35 |
+10 |
Plus 10 |
10+ |
Deck A |
36 |
Enter |
Disc |
Enter |
Deck B |
37 |
THX / Cinema |
Program |
Return |
|
38 |
Surr / Surround |
Display |
Display |
|
39 |
ST / Stereo |
Repeat |
Sub. On / Off |
|
40 |
Mono |
Clear |
Audio |
|
41 |
AM |
Disc 1 |
Up |
Rewind |
42 |
EQ |
Disc 2 |
Down |
Forward Play |
43 |
C+ |
Disc 3 |
Select |
Fast Forward |
44 |
R+ |
Disc 4 |
Angle |
Stop |
45 |
S+ |
Disc 5 |
Slow |
Reverse Play |
46 |
FM |
A – B |
Left |
Pause |
47 |
Z |
Time |
Right |
Record |
48 |
C– |
Intro |
Subtitle |
|
49 |
R– |
Edit |
Repeat |
|
50 |
S– |
|
Random |
|
51 |
M1 |
|
A / B Repeat |
|
52 |
M2 |
|
T |
|
53 |
M3 |
|
Title |
|
54 |
M4 |
|
Memory |
|
55 |
Light |
Light |
Light |
Light |
7

Using Your Remote
B. Preprogrammed Set-Up
The AV7.1 universal remote control can operate up to eight separate audio and video devices or equipment. To program the remote control for your devices, please use the following steps.
Three Digit Code Method
1.Turn on the device you would like the remote control to operate, either manually or with your original remote control.
2.Find the three digit Set-Up Code Number for your device from the tables on pages 32 – 49.
Example: To set-up the remote to operate a SONY TV, go to the TV Set-Up Code table found on pages 36 – 38 and look for SONY under the Manufacturer / Brand column. You will find that the Set-Up Code numbers for SONY TVs are 070, 085, 126, 139, 147, and 185.
3.Press the corresponding Device Button (B&K, CD, DVD, TAPE, SAT, TV, V1, or V2) and the MUTE button on the remote control, simultaneously. SET will appear in the LCD.
Example: To set-up the remote to operate a TV, press the TV Device Button and MUTE button, simultaneously.
8
Using Your Remote
Note: SET appears in the LCD for 20 seconds to indicate that the remote control is ready to be programmed. The following steps must be entered while SET appears in the LCD.
4.Point the remote control toward the device that was turned on in Step 1 and enter in the first three-digit Set-Up Code number for that device using the number buttons (0-9) on the remote control. SET followed by the three-digit number will appear in the LCD.
Note: If you have tried all of the three digit Set-Up Code numbers listed for your device and it still did not turn off, please proceed to the Auto Search Method on page 10 to program your remote control.
5.Once your device turns off, press the Device Button selected in Step 3 once again to store the Set-Up Code number. PASS will flash in the LCD.
6.Test the remote control for your device. Try the POWER, CHANNEL UP AND DOWN, VOLUME UP AND DOWN buttons, etc. If any of the buttons do not perform as they should, please repeat the set-up from Step 1 using the next Set-Up Code number for your device.
Note: Some audio and video devices have separate buttons for POWER ON and POWER OFF. To operate these devices on the remote, press the corresponding Device Button to turn the equipment ON and press the POWER button to turn the equipment OFF.
7.Please repeat the above steps to program the remote control for each of your other devices.
9

Using Your Remote
Auto Search Method
Please use this method if none of the Set-Up Code numbers worked for your device during the standard set-up procedure or if the manufacturer or brand for your device was no listed in the Set-Up Code Tables.
1.Turn on the device you would like the remote control to operate, either manually or with your original remote control.
2.Press the corresponding Device Button (B&K, CD, DVD, TAPE, SAT, TV, V1, or V2) and the MUTE button, simultaneously. SET will appear in the LCD.
3.Point the remote control toward the device and press the CHANNEL UP button on the remote control. Each button press sends the signal for one Set-Up Code number. Keeping the CHANNEL UP button pressed produces a quick scanning of the Set-Up Code numbers.
Release the CHANNEL UP button as soon as the device turns off. Please confirm that you have the correct code by pressing the MUTE button on the remote control. You should be able to turn your device on and off with this button.
If you pass the correct Set-Up Code number, you can return to it by pressing the CHANNEL DOWN button, one Set-Up Code number at a time, until your device turns back on.
Note: During programming, the signal for POWER ON and POWER OFF is located on the MUTE button. For devices that use separate POWER ON and POWER OFF buttons, pressing the MUTE button on the remote during the programming will only turn the device off.
10
Using Your Remote
4.Once the correct code is confirmed, press the Device Button to store the Set-Up Code number. PASS will appear in the LCD.
5.Test the remote control for your device. Try the POWER, CHANNEL UP AND DOWN, VOLUME UP AND DOWN buttons, etc. If any of the buttons do not perform as they should, please repeat the set-up from Step 1 using the next Set-Up Code number for your device.
Note: Some audio and video devices have separate buttons for POWER ON and POWER OFF. To operate these devices on the remote, press the corresponding
Device Button to turn the equipment ON and press the POWER button to turn the equipment OFF.
6.Please repeat the above steps to program the remote control for each of your other devices.
Recalling the Set-Up Code Number
To display the three-digit Set-Up Code number that was stored for a device.
1.Press the Device Button and MUTE button, simultaneously. SET will appear in the LCD.
2.Press the OFF button. The LCD will quickly flash the three-digit Set-Up Code number that was stored for your device in that mode.
3.Please write your Set-Up Code numbers in the chart below, for future reference.
Set-Up Code Numbers |
|
|
|
|
|
|||
|
|
|
|
|
|
|
|
|
B&K |
|
|
|
|
SAT |
|
|
|
CD |
|
|
|
|
TV |
|
|
|
DVD |
|
|
|
|
V1 |
|
|
|
Tape |
|
|
|
|
V2 |
|
|
|
11
Using Your Remote
C. Learning Set-Up
The AV7.1 has the ability to learn new functions from your original remote controls:
∙There are 8 pages of learning with each page corresponding to the 8 Device modes on the remote control: B&K, CD, DVD, TAPE, SAT, TV, V1, or V2.
∙All Buttons in all Device modes can learn, except the LIGHT button.
∙The 8 Device buttons at the top of the remote control labeled B&K, CD, DVD, TAPE, SAT, TV, V1, or V2, can learn only in the Audio Mode (B&K).
∙Learned functions override any existing preprogrammed functions on the remote control.
∙Learned functions are automatically erased when a new function is learned on the same button.
∙Learned functions are retained even after a different three-digit code number is programmed into the remote control.
∙To erase a learned function and return to an original preprogrammed function, please refer to the section Erasing Learned Functions on page 15.
Learning New Functions on the Main Keypad
1.Select the mode in which you wish to learn the new function by pressing the corresponding Device Button.
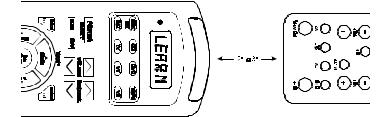
2.Place the AV7.1 and the original remote to be learned from, on a flat level surface. Line up the remote controls head to head, approximately 2 to 3 inches apart.
12
Using Your Remote
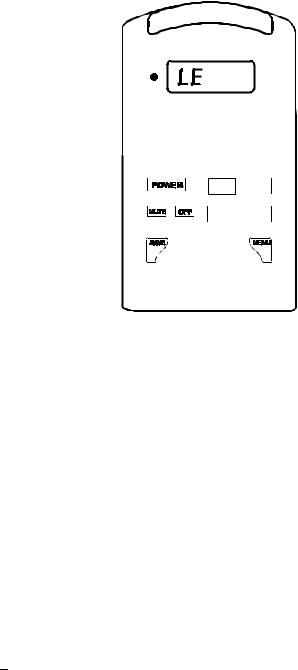
3.Press and hold both the Device Button selected in Step 1 and the SEL / PLAY button for approximately three seconds, until the LCD on the AV7.1 shows LEARN. The AV7.1 is now in the learning mode.
13
Using Your Remote
Once you have stored the learned functions, test the buttons that have been taught. If any of the buttons do not operate as they should, please repeat from Step 1 for those buttons.
Note: If the LCD shows FAIL at any time during the learning process, the AV7.1 was unable to learn the new functions. Please repeat from Step 4. If the AV7.1 continues to show FAIL during the learning process, please try the following suggestions:
∙Increase or decrease the head to head distance between the two remote controls, with a one to six inch range.
∙Increase or decrease the time you press and hold the button on the original remote control in Step 5, for one to two seconds.
∙Avoid fluorescent lights or strong sunlight during the set-up. These lighting conditions can cause interference with the learning process.
∙Verify that the original remote control contains fresh batteries.
Some remote controls operate at non-standard IR, UHF, or ultrasonic frequencies, and are unable to be learned. If you continue to experience difficulty during setup, please contact the dealer you purchased your unit from or our customer service department for assistance.
Learning New Functions on Device Buttons
The eight Device buttons at the top of the remote control can also learn new functions. These buttons can only be set up in the B&K mode. If a new functions is learned on a Device button, the new function will override and existing preprogrammed information on the Device button.
1.Place the AV7.1 and the original remote control to be learned from, on a flat surface. Line up the remote controls head to head, approximately 2 to 3 inches apart.
2.Press and hold both the B&K and SEL / PLAY buttons simultaneously, for approximately three seconds, until the LCD on the AV7.1 shows LEARN. The AV7.1 is now in the learning mode.
3.Press and release one of the eight Device buttons on the AV7.1. The LCD will show READY.
Note: Each of the following steps must be completed within 20 seconds. If the remote does not receive any commands within the allotted time, it will return to its normal operating mode.
14
 Loading...