


USER'S GUIDE
23B6-J SERIES 220V-240V
2Thank You
3Safety Instructions
4Product View
5Assembly
6-8 Operations
9 Maintenance and Care
10 Troubleshooting
10 Replacement Parts
10Accessories
11Warranty
12Product Registration
12 Consumer Services

Thanks for buying a BISSELL Lift-Off™ Steam Mop
We’re glad you purchased a BISSELL Lift-Off Steam Mop. Everything we know about floor care went into the design and construction of this complete, high-tech home cleaning system.
Your BISSELL Lift-Off Steam Mop is well made, and we back it with a limited two year warranty. We also stand behind it with a
knowledgeable, dedicated Consumer Services department, so, should you ever have a problem, you’ll receive fast, considerate assistance.
My great-grandfather invented the floor sweeper in 1876. Today, BISSELL is a global leader in the design, manufacture, and service of high quality homecare products like your BISSELL Lift-Off Steam Mop.
Thanks again, from all of us at BISSELL.
Mark J. Bissell
Chairman & CEO
2 w w w. b i s s e l l . c o m

IMPORTANT SAFETY INSTRUCTIONS
When using an electrical appliance, basic precautions should be observed, including the following:
READ ALL INSTRUCTIONS BEFORE USING STEAM MOP.
Always connect to a properly Earthed outlet. Unplug from outlet when not in use and before conducting maintenance or troubleshooting.
 WARNING:
To reduce the risk of fire, electric shock, or injury:
■Use indoors only
■Do not immerse
■Use only on surfaces moistened by cleaning process
■Do not leave machine when it is plugged in
■Do not service machine when it is plugged in
■If the supply cord is damaged, it must be replaced by the manufacturer or its service agent in order to avoid a hazard
■Do not use machine if it has been dropped, damaged, left outdoors or dropped into water
■Do not expose to rain, store indoors
■Do not pull or carry by cord, use cord as a handle, close door on cord, pull cord around sharp corners or edges, run appliance over cord, or expose cord to heated surfaces
■Do not carry the appliance while in use
■Do not unplug by pulling on cord; unplug by grasping plug not the cord
■Do not handle plug or appliance with wet hands
■Do not put any object into appliance openings, use with blocked opening or restrict air flow
■Do not expose hair, loose clothing, fingers or body parts to openings or moving parts
■Do not pick up hot or burning objects
■Do not pick up flammable or combustible materials (lighter fluid, petrol, kerosene, etc.) or use in the presence of explosive liquids or vapours
■Do not use appliance in an enclosed space filled with vapours given off by oil base paint, paint thinner, some moth proofing substances, flammable dust, or other explosive or toxic vapours
■Remove plug from electrical outlet before cleaning or maintaining the appliance
■Not intended for use by persons (including children) with reduced physical, sensory or mental capabilities, or lack of experience and knowledge, unless they have been given supervision or instruction concerning use of the appliance by a person responsible for their safety
■Young children should be supervised to ensure that they do not play with the appliance
■Do not pick up toxic material (chlorine bleach, ammonia, drain cleaner, petrol, etc.)
■Do not modify the Earthed plug
■Do not allow to be used as a toy
■Do not use for any purpose other than described in this User’s Guide
■Use only manufacturer’s recommended attachments
■Use only cleaning products formulated by BISSELL for use in this appliance to prevent internal component damage
■Keep openings free of dust, lint, hair, etc.
■Keep appliance on a level surface
■Turn off all controls before unplugging
■Be extra careful when cleaning stairs
■Liquid or steam must not be directed towards equipment containing electrical components
■Pay close attention when working around children.
SAVE THESE INSTRUCTIONS
THIS MODEL IS FOR HOUSEHOLD USE ONLY.
 WARNING:
This appliance must be Earthed.
 The symbol means WARNING: Danger of scalding.
 Surface may be hot. Avoid contact.
IMPORTANT FOR
OPERATION ON A 220-240 VOLT A.C. 50/60 Hz POWER SUPPLY ONLY.
If your appliance is fitted with a nonrewireable BS 1363 plug it must not be used unless a 13 amp (ASTA approved to BS 1362) fuse is fitted in the carrier contained in the plug. Spares may be obtained from your BISSELL supplier.
If for any reason the plug is cut off, it must be disposed of, as it is an electric shock hazard should it be inserted into a 13 amp socket.
3
w w w. b i s s e l l . c o m

Product view
Steam Trigger
Detachable Pod
Release
Quick Release™
Cord Wrap
Power Cord
Steam Control
Knob
Lower Cord
Wrap
Deluxe
Mop Pad
Steam on |
Strain Relief |
Demand Trigger |
Handle |
Easy Carrying
Handle
Removable
Water Tank
Detachable Steam
Pod
Water Purification |
Lower |
System |
Body Base |
Ready Light |
|
Maneuverable |
|
Swivel Head |
|
4
w w w. b i s s e l l . c o m
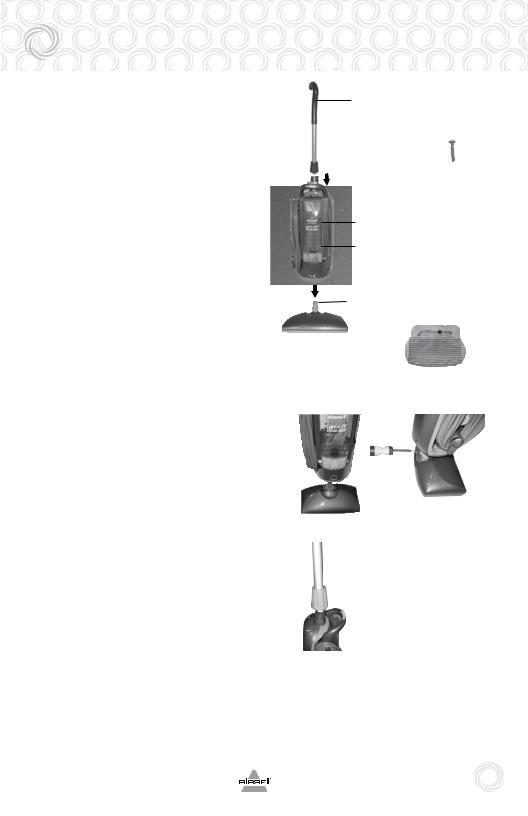
Assembly
Your Lift-Off Steam Mop assembles quickly and easily. The only thing you will need for assembly is a Phillips head screwdriver.
Your Lift-Off Steam Mop is packaged with the following items:
Handle Assembly
Lower Body base
Detachable Steam Pod with water purification
Maneuverable Swivel Head Removable Water Tank
1 small Phillips Head Screw taped to the handle
2 Deluxe Mop Pads
1.Attach lower body base to maneuverable swivel head.
2. Secure maneuverable swivel head with small Phillips head screw. Tighten until secure.
3.Slide handle assembly down into lower body base until it will go no
further. Secure the handle by turning |
1 |
the knob until tight.
Lift-Off Steam Mop assembly is now complete.
3
Handle Assembly
Small Screw
Lower Body Base
Removable Water Tank
Maneuverable
Swivel Head
2 Deluxe Mop Pads
2
5
w w w. b i s s e l l . c o m

Operations
Features and accessories
Removable water tank
The water tank is located on the front of the Lift-Off Steam Mop. It can be refilled with water any time during use. Distilled or demineralized water may be used in place of tap water.
Do not use chemicals with your Lift-Off Steam Mop (not including BISSELL Eucalyptus Mint Natural water product).
Water purification system
This filter removes minerals and other impurities from tap water, preventing water deposits from damaging your LiftOff Steam Mop. It should be replaced when the bright green grains turn blue. To maximize performance of the filter, distilled water may be used.
Ready light
The ready light will glow when the Lift-Off Steam Mop is ready to use.
Steam on demand trigger
Press to release steam.
Maneuverable swivel head
Use to clean around furniture and hard to reach areas on the floor.
Mop pads
Reuseable microfiber mop pad is machine washable and safe for all hard floor surfaces.
Circular scrubbing brush tool
Attach to end of the hose for scrubbing stubborn soil and hard to reach areas. Color coded for specific use. Red for bathrooms and black for the kitchen.
Grout brush tool
Attach to end of the hose for scrubbing small cracks and crevices.
Flat surface Microfiber pad cleaning tool
Attach flat surface with pad to the end of the adapter. Attach to the end of the hose for cleaning large flat surfaces.
Window squeegee
Attach the Window Squeegee to the end of the adaptor. Attach to the end of the hose.
Tip:
Do not attempt to use your Lift-Off Steam Mop without water in the tank.
 CAUTION:
Thermal shock can shatter glass. Before cleaning cold glass surfaces, carefully warm the surface by directing the steam jet on the glass from a distance at no less than four to six inches.
6 w w w. b i s s e l l . c o m

Operations
Getting ready
1. Attach mop pad |
2A |
2B |
A. Set the mop pad flat on the floor. |
|
|
B.Line up the mop head and place it inside the mop pad with cord located at rear of mop head. Tighten cord to ensure tight fit.
2.Fill water tank
A.Remove tank by lifting straight up and
B. |
away from the unit. |
2D |
2E |
Unscrew cap and remove from tank. |
|
|
|
C. |
Fill water tank with water. For best results, |
|
|
|
water should be at room temperature. |
|
|
D.Replace the assembly cap and tighten until snug.
E.Replace water tank by lining up vertical guides and gently sliding tank into place.
3.Select a steam control setting. Light is for delicate floors such as hardwood and laminates. Normal is for everyday cleaning, and Tough is for hard to clean messes.
4.Twist the Quick Release™ cord wrap clockwise to unwrap the power cord completely and plug into a 220V-240V grounded outlet as described on the Important Safety Instructions, page 3.
5.The ready light will illuminate in 30 seconds when the Lift-Off Steam Mop is ready for use.
Before you clean
Thoroughly sweep or vacuum floor prior to cleaning with the Lift-Off Steam Mop.
Cleaning hard floors
Your Lift-Off Steam Mop is designed to clean hard flooring such as ceramic tile, vinyl, laminate, marble, stone and sealed hard wood floors. Use of your Lift-Off Steam Mop on waxed or some unwaxed floors may result in a dimin-
ished glossiness. The Lift-Off Steam Mop is not for use on unsealed wood floors. For best results test in an inconspicuous area and check the care instructions from your flooring manufacturer.
7
w w w. b i s s e l l . c o m

Operations
Cleaning hard floors continued
1. When the ready light illuminates, begin cleaning by slowly passing over surface while pressing the steam on demand trigger to emit steam as needed.
2. To sanitize an area of your floor, (attack invisible germs and bacteria) place the center of the Lift-Off Steam Mop over the spot for a minimum 15 seconds, but no longer than 20 seconds. For larger areas, overlap swivel head placement.
3. When the Lift-Off Steam Mop stops emitting steam, simply remove the water tank, refill, and continue cleaning.
NOTE: upon first use of this steam product or first use of a new filter, the pump may make a "knocking" sound while the filter fills with water. This sound is normal and may last up to one minute. Continue to depress the trigger until the knocking sound subsides and the unit emits steam.
Steam cleaning all living areas
Stubborn messes that resist traditional water and cleaning solutions can be removed with steam. Toothpaste or hair spray on the bathroom sink, soap scum on sliding shower walls—steam makes all these far easier to clean.
1.Fill the water tank with cool tap water or distilled/demineralized water and replace back on Detachable Steam Pod.
2.Remove Steam Pod by pressing the pod release button on the top of the carry handle and pulling the pod out and away from the lower base.
3.Remove cord from pod and connect the plug to an appropriate outlet.
4.Remove hose from pod by pressing the clip at the end of the hose where it connects to the detachable pod.
5.Connect desired tool to the end of the hose.
6.When blue ready light turns on, the steamer is ready to use.
7.To activate steam, press the pod release button on the top of the carry handle. To stop steaming, release the pod release button.
 Warning:
Never put descaling, aromatic
(not including the BISSELL Eucalyptus Mint and water products), alcoholic or detergent product into the steam cleaner, as this may damage it or make it unsafe for use.
Tip:
During first use, it may take several seconds for the Lift-Off Steam Mop to begin steaming. The water needs to flow through the filter to the heater. This delay will only occur during initial use or when using a new filter.
8 w w w. b i s s e l l . c o m
 Loading...