


SPOTCLEAN®, LITTLE GREEN®
_______________
USER GUIDE
2513, 2694 SERIES
More of a video person? Look for this icon and go online for an instructional
how-to video at
www.BISSELL.com/ videos

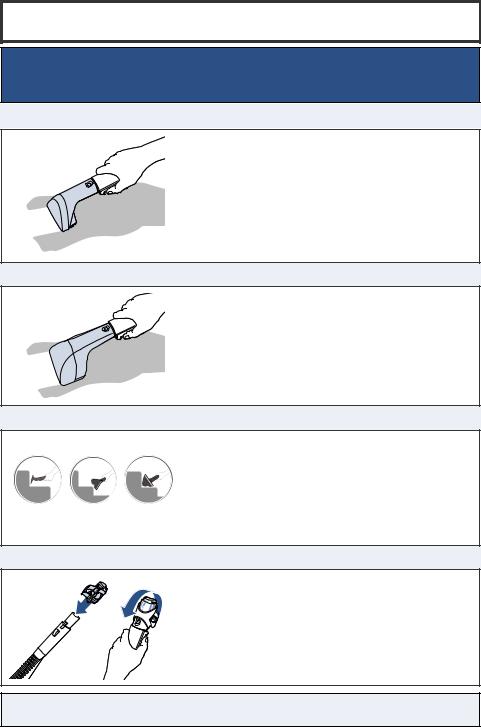
IMPORTANT SAFETY INSTRUCTIONS
READ ALL INSTRUCTIONS BEFORE USING YOUR PORTABLE CARPET CLEANER.
When using an electrical appliance, basic precautions should be observed, including the following:
WARNING |
use in areas where they may be present. |
»»Unplug the appliance and disconnect the accessory. |
|
|
»»Do not use to pick up flammable or combustible |
Liquid ejected from the battery may cause irritation |
|
|
materials (lighter fluid, gasoline, kerosine, etc.) or |
or burns. |
|
TO REDUCE THE RISK OF FIRE, |
»»Do not use appliance in an enclosed space |
Remove battery cover to replace the batteries. |
|
ELECTRIC SHOCK OR INJURY: |
|||
filled with vapors given off by oil-based paint, |
Observe battery polarity when replacing batteries. |
||
»»Connect to a properly grounded outlet only. See |
|||
paint thinner, some moth-proofing substances, |
»»If attachment is to be stored for a long period, the |
||
grounding instructions. Do not modify the three- |
flammable dust, or other explosive or toxic vapors. |
batteries should be removed. Different types of |
|
prong grounded plug. |
|||
»»Do not use to pick up toxic material (chlorine bleach, |
batteries or new and used batteries are not to be |
||
»»Do not leave appliance when it is plugged in. |
ammonia, drain cleaner, etc.). |
mixed. The battery must be removed from the |
|
Unplug from outlet when not in use and before |
»»Do not pick up anything that is burning or smoking, |
accessory before it is scrapped. |
|
servicing. |
such as cigarettes, matches, or hot ashes. |
»»Never put batteries in mouth. If swallowed, contact |
|
»»Do not expose to rain. Store indoors. |
»»Use only BISSELL® cleaning products intended |
your physician or local poison control. |
|
»»Do not allow to be used as a toy. Close attention is |
for use with this appliance to prevent internal |
»»Replace battery with CR1632 only. Use of another |
|
necessary when used by or near children. |
component damage. See the Cleaning Fluid section |
battery may present a risk of fire or explosion. |
|
»»Do not use for any purpose other than described |
|||
of this guide. |
CR1632 cells may be purchased any where batteries |
||
in this user guide. Use only manufacturer’s |
»»Keep appliance on a level surface. |
are sold. |
|
recommended attachments. |
»»Risk of fire and chemical burn hazard. Keep |
»»Plastic film can be dangerous. To avoid danger of |
|
»»Do not use with damaged cord or plug. If appliance |
batteries out of reach of children and in original |
suffocation, keep away from children. |
|
is not working as it should, has been dropped, |
package until ready to use. Do not recharge, |
»»Do not pick up toxic material (chlorine bleach, |
|
damaged, left outdoors, or dropped into water, |
disassemble, heat above 60°C (140°F) or incinerate |
ammonia, drain cleaner, etc.). |
|
have it repaired at an authorized service center. |
|||
batteries. The batteries can explode in a fire. The |
»»Do not use appliance in an enclosed space |
||
»»Always install float before any wet pick-up |
battery terminals are not to be short circuited. |
filled with vapours given off by oil base paint, |
|
operation. |
Dispose of used batteries safely and promptly. Even |
paint thinner, some moth-proofing substances, |
|
»»Do not pull or carry by cord, use cord as a handle, |
|||
used cells may cause injury. |
flammable dust, or other explosive or toxic vapours. |
||
close a door on cord, or pull cord around sharp |
»»This attachment contains a lithium button/coin |
»»Do not pick up hard or sharp objects such as glass, |
|
edges or corners. Do not run appliance over cord. |
cell battery. If a new or used lithium button/coin |
nails, screws, coins, etc. |
|
Keep cord away from heated surfaces. |
|||
cell battery is swallowed or enters the body, it can |
»»Liquid must not be directed towards equipment |
||
»»Do not unplug by pulling on cord. To unplug, grasp |
cause severe internal burns and can lead to death in |
containing electrical component s. |
|
the plug, not the cord. |
as little as two hours. Always completely secure the |
»»Do not immerse. Use only on surfaces moistened by |
|
»»Do not handle plug or appliance with wet hands. |
battery compartment. If the battery compartment |
cleaning process. |
|
»»Do not put any object into openings. Do not use |
does not close securely, stop using the product, |
»»Use only the type and amount of liquids specified |
|
with any opening blocked; keep openings free |
remove the batteries, and keep them away from |
under the operations section of this guide. |
|
of dust, lint, hair, and anything that may reduce |
|||
children. If you think batteries might have been |
»»Use only on carpet moistened by cleaning process. |
||
air flow. |
swallowed or placed inside any part of the body, |
»»Recycle batteries, do not mix with household waste. |
|
»»Keep hair, loose clothing, fingers, and all parts of |
seek immediate medical attention. |
»»The battery is to be disposed of safely. |
|
body away from openings and moving parts. |
»»Under abusive conditions, liquid may be ejected |
»»Do not incinerate the accessory even if it severely |
|
»»Turn OFF all controls before plugging or unplugging |
from the battery; avoid contact. If contact |
damage. The batteries can explode in a fire. |
|
appliance. |
accidentally occurs, flush with water. If liquid |
|
|
»»Use extra care when cleaning on stairs. |
|
||
contacts eyes, additionally seek medical help. |
|
SAVE THESE INSTRUCTIONS FOR FUTURE USE
This model is for household use only. Commercial use of this unit voids the manufacturer’s warranty.
 WARNING
Improper connection of the equipment-grounding conductor can result in a risk of electrical shock. Check with a qualified electrician or service person if you aren’t sure if the outlet is properly grounded. DO NOT MODIFY THE PLUG. If it will not fit the outlet, have a proper outlet installed by a qualified electrician. This appliance is designed for use on a nominal 120-volt circuit, and has a grounding attachment plug that looks like the plug in the illustration. Make certain that the appliance is connected to an outlet having the same configuration as the plug. No plug adapter should be used with this appliance.
GROUNDING INSTRUCTIONS
This appliance must be connected to a grounded wiring system. If it should malfunction or break down, grounding provides a safe path of least resistance for electrical current, reducing the risk of electrical shock. The cord for this appliance has
an equipment-grounding conductor and a grounding plug. It must only be plugged into an outlet that is properly installed and grounded in accordance with all local codes and ordinances.
2 www.BISSELL.com

Thanks for buying a BISSELL® portable carpet cleaner!
We love to clean and we’re excited to share one of our innovative products with you. We want to make sure your portable carpet cleaner works as well in two years as it does today, so this guide has tips on using, maintaining, and if there is a problem, troubleshooting.
In just a few simple assembly steps, you’ll be ready to spot clean. Flip to page 6 and let’s get started!


 What’s In The Box?
1 |
|
3 |
4 |
1. |
Base Unit |
|
|
2. |
BISSELL Formula |
|
|||
|
|
|
|
|
||
|
|
|
|
3. |
Flex Hose Clip |
|
|
|
|
|
4. |
Additional Tool Storage* |
|
|
|
5 |
6 |
5. |
Hose Grip Bracket |
|
|
|
|
6. |
Quick Release™ Cord Wrap |
||
|
|
|
|
7. |
HydroRinse™ Self |
|
|
|
|
|
|
Cleaning Hose Tool* |
|
|
|
|
|
8. |
3" Tough Stain Tool* |
|
|
|
|
|
9. |
Deep Reach Tool* |
|
|
|
|
7 |
10. |
3-N-1 Stair Tool* |
|
|
|
|
11. |
4" Tough Stain Tool* |
||
|
|
2 |
|
|||
|
|
|
12. |
Deep Reach Tool* |
|
|
|
|
|
|
13. |
Stain Trapper Tool* |
|
|
|
|
|
14. |
LED Spraying Crevice Tool |
|
|
|
|
|
*select Models only |
|
|
8 |
9 |
10 |
11 |
12 |
13 |
14 |
NOTE: Standard accessories may vary by model. To identify what should be included with your purchase, please refer to the “Carton Contents” list located on the carton top flap.
Safety Instructions . . . . |
|
. 2 |
Troubleshooting . . . . . . 14 |
|||||||
Product View . . . . . . . |
.4 |
Warranty . |
. |
. |
. . |
. |
. . |
. 15 |
||
Cleaning Formula . . . . |
. |
. 5 |
Service . . |
. |
. |
. . |
. |
. . |
. 15 |
|
Operations . . . . . . . . 6-10 |
Product Registration . . . |
|
. 16 |
|||||||
Maintenance & Care . . . |
11-13 |
Consumer Care . . . . . . |
16 |
|||||||
www.BISSELL.com 3
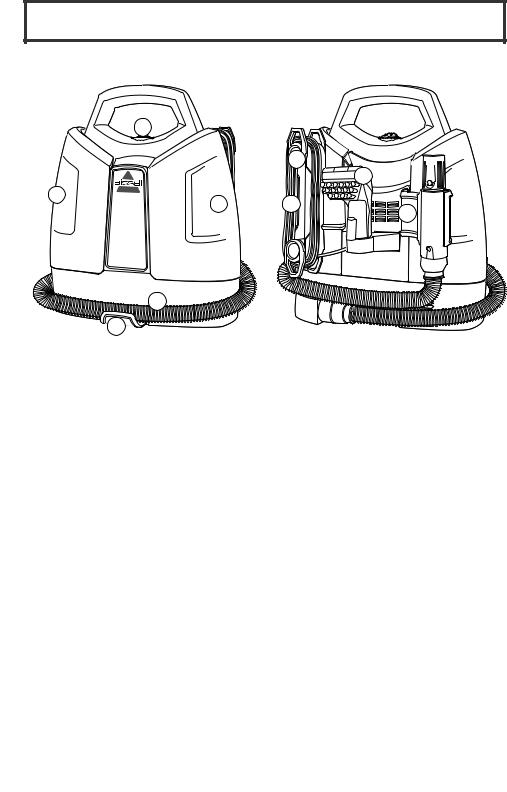
Product View
|
2 |
|
|
|
|
|
|
7 |
|
|
|
|
|
9 |
1 |
3 |
6 |
|
|
|
8 |
|||
|
|
|
|
|
|
4 |
|
|
|
|
5 |
|
|
|
1. |
Clean Water/Solution Tank |
5. |
|
Flex Hose Clip |
2. |
Power Button |
6. |
|
Power Cord |
3. |
Dirty Water Tank |
7. |
|
Quick Release™ Cord Wrap |
4. |
Flex Hose |
8. |
|
Hose Grip Bracket |
4 www.BISSELL.com
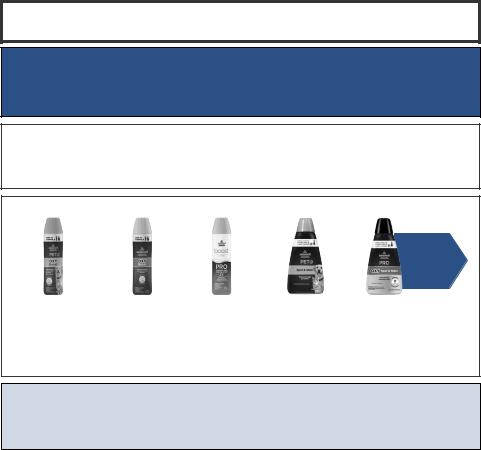
Cleaning Formula
 WARNING
To reduce the risk of fire and electric shock due to internal component damage, use only BISSELL® cleaning formula intended for use with this machine.
Keep plenty of genuine BISSELL Spot & Stain Cleaner formula for portable carpet cleaning machines on hand so you can clean whenever it fits your schedule. Always use genuine BISSELL cleaning formulas.
|
|
|
|
Use Professional |
|
|
|
|
formula for |
|
|
|
|
optimal cleaning |
|
|
|
|
results! |
BISSELL Pet Oxy |
BISSELL Oxy |
BISSELL Boost |
BISSELL 2X® Pet |
BISSELL |
Boost Formula |
Boost formula |
Pro formula |
Stain & Odor |
Professional Spot |
for carpet & |
for carpet & |
for carpet & |
|
& Stain + Oxy |
upholstery |
upholstery |
upholstery |
|
|
NOTICE: Use of cleaning formulas which contain lemon or pine oil may damage this appliance and void the warranty. Chemical spot cleaners or solvent-based soil removers also should not be used. These products may react with the plastic materials used in your cleaner, causing cracking or pitting.
www.BISSELL.com 5

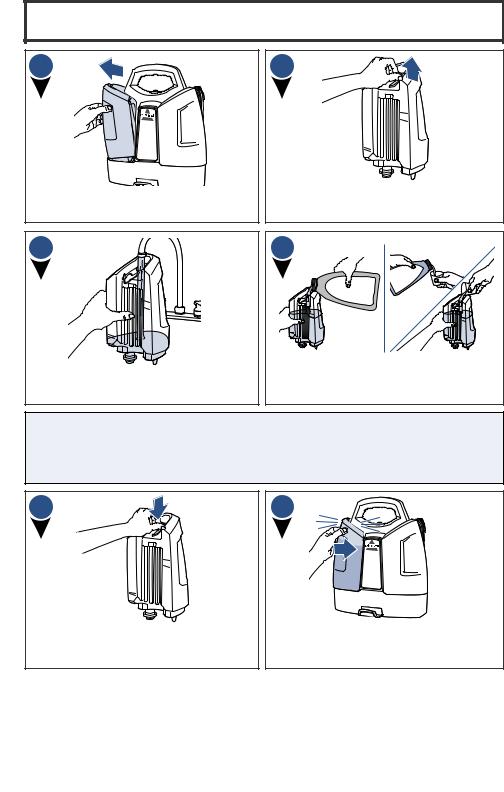
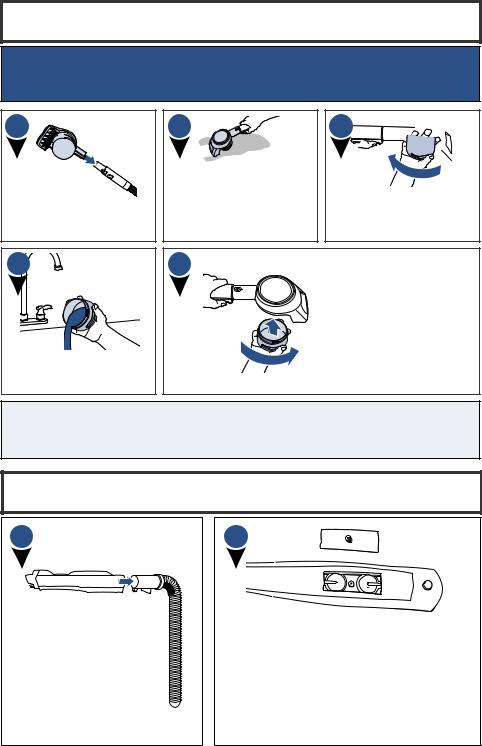
Assembly
 WARNING
Do not plug in your cleaner until you are familiar with all instructions and operating procedures.
1 |
2 |
Slide the flex hose clip into opening on the front of the machine. You will hear a “snap” when it is locked into place.
Attach Cord Wrap by snapping it into place on the Dirty Water Tank side of the machine.
3 |
4 |
Snap the hose grip bracket into the back of the machine on the Clean Water/Solution Tank side.
Snap the second tool storage (select models) into the back between the Cord Wrap and hose grip bracket.
5 |
6 |
Then wrap the flex hose around the unit and snap hose grip into bracket.
Wrap the power cord around the Cord Wrap.
6 www.BISSELL.com
Filling the Clean Water/Solution Tank
1
Remove the tank by pulling the top of the tank away from the unit.
3
Add water to the indicated fill line on the solution tank.
2
Pull black tab to reveal tank opening. The plug rotates out of the way for easy filling.
4 FORMULA |
BOOST |
Add formula to the indicated fill line on the solution tank. Add 1 ounce of any BISSELL® Boost, if desired.
NOTE: Follow the fill lines on your Clean Water/Solution Tank to add the correct amount of hot tap water (140 degrees F / 60 degrees C MAX) and portable machine formula. Note: There are different directions on the tank for small and large messes. DO NOT BOIL OR MICROWAVE WATER.
5 |
6 |
Replace the plug by rotating into place and pressing gently onto tank.
Replace tank by lining the bottom with indentations on machine. Push the top of the tank into place until you hear a “click”.
www.BISSELL.com 7
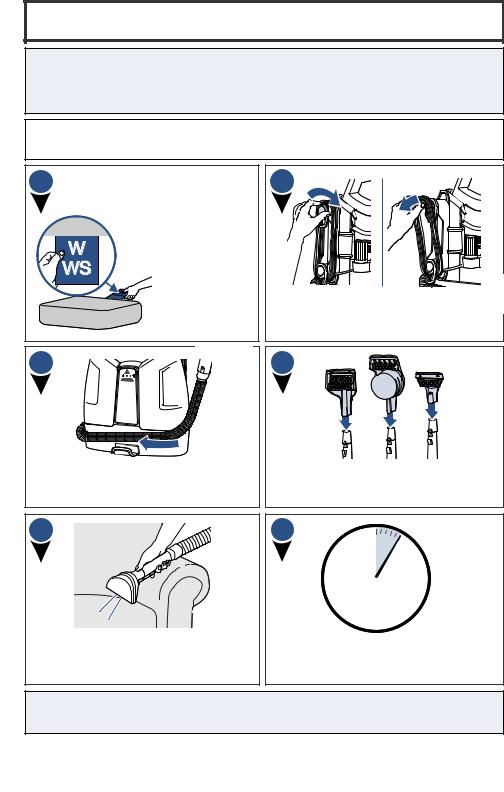
Pre-Treating
IMPORTANT: Check the manufacturer’s tag before cleaning upholstery. “W” or “WS” on the tag means you can use your cleaner. If tag is coded with an “S” (with diagonal strike-through), or says “Dry Clean Only,” do not proceed. If manufacturer’s tag is missing or not coded, check with your furniture dealer.
WHY PRETREAT? Cleaning effectiveness will be enhanced if you pre-treat heavily stained or highly soiled areas.
1 |
Check the |
|
manufacturer’s tag |
|
before cleaning |
|
upholstery. “W” or |
|
“WS” on the tag |
|
means you can use |
|
your machine. |
3 |
|
2
Twist the Quick Release™ Cord Wrap clockwise to quickly unwrap power cord. Plug in unit and press power button beneath the handle to turn it ON.
4
Release the flex hose from the hose grip bracket. Unwrap flex hose completely from around the unit.
Select desired tool for spot cleaning, Insert tool on end of hose until it clicks into place.
5
Hold the 3” Tough Stain Tool just above the carpet or upholstery to be cleaned. Press the trigger to mist solution over the soiled area.
6
5
Let cleaning solution set for 5 minutes before cleaning.
NOTE: When pre-treating with the Deep Reach Tool or Deep Stain Tool, it should be kept in contact with the carpet as noted on the next page.
8 www.BISSELL.com
Cleaning with Tools
 WARNING
Keep spray away from face. Failure to do so may result in personal injury.
CLEANING WITH THE 3"/4” Tough Stain Tool
Attach the 3”/4” Tough Stain Tool to the handheld cleaning hose. Press the spray trigger to mist solution over and onto the soiled area. Release spray trigger and gently scrub the stain.
To lift the stain away, apply downward pressure on the tool and slowly pull it toward you. Then use “drying strokes” (by not pressing down trigger) to remove remaining moisture. Repeat as needed.
CLEANING WITH THE DEEP STAIN/REACH TOOL (select models)
Attach the Deep Stain/Reach Tool to the cleaning hose.
Set the tool directly on top of the carpet before pulling the spray trigger to inject formula deep into the carpet fibers.
Always keep the tool in direct contact with carpeting to avoid over-spraying.
CLEANING WITH THE 3-N-1 STAIR TOOL (select models)
|
A |
B |
|
C |
||||
|
1 |
|
|
2 |
|
|
3 |
|
|
|
|
|
|
|
|
|
|
FLAT |
|
|
|
CREVICE |
||||
NOSE |
||||||||
Attach the 3-n-1 Stair Tool to the cleaning hose. This versatile 3-way tool sprays, scrubs and suctions up dirt and stains from the outer curves, corner and tread of a carpeted stairs. Twist the tool head to desired setting to clean. The downward facing edge is the active cleaning mode: (a) use the flat area to clean top of stairs, (b) use pointed edge to clean inside crevice, (c) use indented area to clean outer corner.
CLEANING WITH THE HYDRORINSE™ TOOL (select models)
Attach the HyrdoRinse™ tool to the cleaning hose.
Hold the hose and attachment in an upright position. Then hold down the trigger to rinse the hose for 30
seconds.
The HydroRinse tool can be stored on the right handle or on the hose in between use.
NOTE: Ensure that the cleaning solution and water are in the tank before use.
www.BISSELL.com 9
Cleaning with Stain Trapper Tool
 WARNING
Keep spray away from face. Failure to do so may result in personal injury.
1
Attach the Stain Trapper Tool to the end of the hose.
4
Dump dirty water into a sink or toilet and rinse the tank out with clean water.
2
Slowly move the tool back and forth over the stain. Be careful not to move the tool back and forth too quickly or soiled water will flow back into the hose.
3 


To empty the Stain Trapper Tool, rotate the small tank on the bottom of the tool to unlock it.
5
Replace the tank by lining up the locking teeth with their mating slots (make sure the two teeth that are closest together are pointed toward the brush). Turn the tank to lock it into place.
CLEANING THE STAIN TRAPPER TOOL: Clean the front of the tool by removing the plate over the suction plate. Pull down to remove and rinse with water. Then replace the plate by sliding back into place.
Cleaning with LED Spraying Crevice Tool
1
Pull tabs out of battery door area before use to activate. Connect to the end of the hose and the LED Light will automatically turn on.
Pull the trigger to spray solution. Scrub and suction the area to lift and remove the stain.
2
To replace LED battery, unscrew the small screw with a Phillips-head screwdriver. Pull cover off to reveal two batteries (CR1632 3V). Slide and pull out each battery and replace with new. Be sure the “+” sign on battery is facing out.
Dispose of used battery promptly. Keep away from children. Do not disassemble and do not dispose of in fire.
10 www.BISSELL.com
 Loading...