


SMARTCLEAN® CONNECTED
Robotic Vacuum
___________
USER GUIDE
2147 SERIES
More of a video person? Look for this icon and go online for an instructional how-to video at
www.BISSELL.com/ videos

IMPORTANT SAFETY INSTRUCTIONS
 WARNING
Read all safety warnings and instructions. Failure to follow the warnings and instructions may result in electric shock, fire and/or serious injury.
 WARNING
TO REDUCE THE RISK OF FIRE, ELECTRIC SHOCK OR INJURY:
»» Do not use outdoors or on wet surfaces.
»» Do not allow to be used as a toy. Close attention is necessary when used by or near children.
»» Do not use for any purpose other than described in this user guide. Use only manufacturer’s recommended attachments.
»» Do not charge with damaged Docking Station or plug. If appliance is not working as it should, has been dropped, damaged, left outdoors, or dropped into water, have it repaired at a qualified technician.
»» Do not close a door on cord or plug, or pull cord or plug around sharp edges or corners. Do not run appliance over cord or plug. Keep cord or plug away from heated surfaces.
»» Do not unplug by pulling on cord. To unplug, grasp the charger, not the cord.
»» Do not handle charger, contact points, Docking Station or robot vacuum cleaner with wet hands.
»» Do not put any object into openings. Do not use with any opening blocked; keep openings free of dust, lint, hair, and anything that may reduce air flow.
»» Keep hair, loose clothing, fingers, and all parts of body away from openings and moving parts.
»» Do not use to pick up flammable or combustible materials (lighter fluid, gasoline, kerosene, etc.) or use in areas where they may be present.
»» Do not use in an enclosed space filled with vapors given off by oil-based paint, paint thinner, some moth-proofing substances, flammable dust, or other explosive or toxic vapors.
»» Do not use to pick up toxic material (chlorine bleach, ammonia, drain cleaner, etc.).
»» Do not pick up anything that is burning or smoking, such as cigarettes, matches or hot ashes.
»» Do not use without Filter in place.
»» Use only on dry, indoor surfaces.
»» Keep appliance on a level surface.
»» Do not carry the robot vacuum cleaner while it is running.
»» Remove the cords from other corded products out of the area to be cleaned.
»» Do not operate the vacuum in a room where an infant or child is sleeping.
»» Do not operate the vacuum in an area where there are lit candles or fragile objects on the floor.
»» Do not operate the vacuum in a room that has lit candles and/or fragile objects on furniture that the vacuum may accidentally hit or bump.
»» Do not allow children to sit on the vacuum.
»» Prevent unintentional starting. Ensure the ON/OFF switch is in the OFF position before connecting to battery pack, picking up or carrying the appliance. Do not carry the appliance with your finger on the switch.
»» Disconnect the battery pack from the appliance before making any adjustments, changing accessories, or storing appliance. Such preventive safety measures reduce the risk of starting the appliance accidentally.
»» Recharge only with the charger specified by the manufacturer. A charger that is suitable for one type of battery pack may create a risk of fire when used with another battery pack.
»» Use appliances only with specifically designated battery packs. Use of any other battery packs may create a risk of injury and fire.
»» When battery pack is not in use, keep it away from other metal objects, like paper clips, coins, keys, nails, screws or other small metal objects, that can make a connection from one terminal to another. Shorting the battery terminals together may cause burns or a fire.
»» Under abusive conditions, liquid may be ejected from the battery; avoid contact. If contact accidentally occurs, flush with water. If liquid contacts eyes, additionally seek medical help. Liquid ejected from the battery may cause irritation
or burns.
»» Do not use a battery pack or appliance that is damaged or modified. Damaged or modified batteries may exhibit unpredictable behavior resulting in fire, explosion or risk of injury.
»» Do not expose a battery pack or appliance to fire or excessive temperature. Exposure to fire or
temperature above 266 degrees F or 130 degrees C may cause explosion.
»» Have servicing performed by a qualified repair person using only identical replacement parts. This will ensure that the safety of the product is maintained.
»» For use only with battery pack model 4ICR19/66. »» For use only with charger model DS_M650I.
»» Do not modify or attempt to repair the appliance or the battery pack.
»» Do not charge the unit outdoors.
»» Do not position Docking Station near stairs or cliff edges.
»» Follow all charging instructions and do not charge the battery pack or appliance outside of the temperature range specified in the instructions. Charging improperly or at temperatures outside of the specified range may damage the battery and increase the risk of fire.
»» Do not incinerate the appliance even if it is severely damaged. The batteries can explode in a fire.
 WARNING
This product contains a lithium-ion rechargeable battery. According to Federal and State regulations, removal and proper disposal of lithium-
ion batteries is required. For disposal instructions see
the instructions on page 13.
SAVE THESE INSTRUCTIONS
This model is for household use only.
 WARNING
»» Plastic film can be dangerous. To avoid danger of suffocation, keep away from children.
»» Do not plug in your robotic vacuum UNTIL you are familiar with all instructions and operating procedures.
»» To reduce the risk of electrical shock, turn Power Switch OFF and disconnect polarized plug from electrical outlet BEFORE performing maintenance or troubleshooting checks.
2 www.BISSELL.com
FCC CAUTION
Contains FCC ID:VPYLBYD.
NOTE: This equipment has been tested and found to comply with the limits for a Class B digital device, pursuant to part 15 of the FCC Rules. These limits are designed to provide reasonable protection against harmful interference in a residential installation. This equipment generates, uses and can radiate
radiofrequency energy and, if not installed and used in accordance with the instructions, may cause harmful interference to radio communications. However, there is no guarantee that interference will not occur in a particular installation. If this equipment does cause harmful interference to radio or television reception, which can be determined by turning the equipment off and on, the user is encouraged to try to correct the interference by one or more of the following measures: —Reorient or relocate the receiving antenna. —Increase the separation between the equipment and receiver. —Connect the equipment into an outlet on a circuit different from that to which the receiver is connected. —Consult the dealer or an experienced radio/TV technician for help. Changes or modifications not expressly approved by the party responsible for compliance could void the user’s authority to operate the equipment. This equipment complies with FCC radiation exposure limits set forth for an uncontrolled environment and meets the FCC radio frequency (RF) Exposure Guidelines. This equipment should be installed and operated keeping the radiator at least 20cm or more from a person’s body.
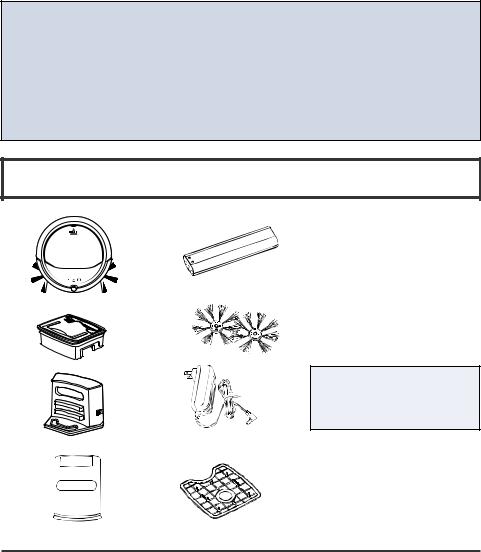
Package Contents |
|
|
||
1. |
2. |
1. |
BISSELL® SmartClean® |
|
|
|
Connected Robotic Vacuum |
||
|
|
2. |
Rechargeable Li-Ion Battery |
|
|
|
3. |
Dust Bin with Cleaning Tool |
|
|
|
4. |
Edge Cleaning Brushes |
|
|
4. |
5. |
Docking Station |
|
3. |
6. |
Power Adapter |
||
|
||||
|
|
7. |
Invisible Wall |
|
|
|
8. |
Filter (located inside Dust Bin) |
|
|
6. |
5. |
NOTE: Standard accessories |
|
may vary by model. Please |
|
refer to the “carton contents” |
|
list on the carton top flap. |
7. |
8. |
(4 AA batteries not included)
Safety Instructions . . . |
. . . . . . . . 2 |
Troubleshooting . . . . . . . . . |
13-14 |
Product View . . . . . . . . |
. . . . . . . .4 |
Warranty . . . . . . . . . . . . . . . . |
. . . 15 |
Assembly . . . . . . . . . |
. . . . .5.-6. . |
Consumer Care . . . . . . . . . . . |
. . 15 |
Operations . . . . . . . . . . |
. . . . . .7-9 |
Product Registration . . . . . . |
. . 16 |
Maintenance & Care |
. . . . .9.-12 |
Parts & Supplies . . . . . . . . . . |
. . 16 |
www.BISSELL.com 3
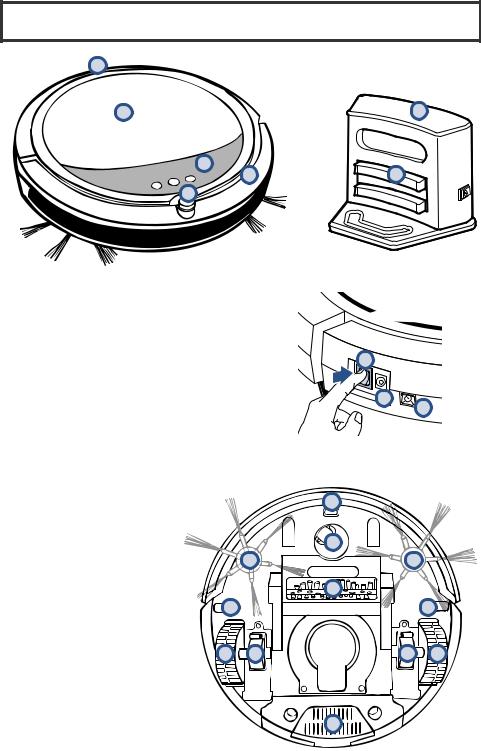
Getting to Know Your Robot
1
2 |
9 |
6 |
1 |
7 |
|
8 |
|
1 |
Contact Points (for automatic charging) |
|
|
|
2 |
Top Cover (Dust Bin inside) |
|
|
|
3 |
Power Switch |
3 |
|
|
4 |
Charging Port |
|
||
5 |
Navigation Sensor |
|
|
|
6 |
LED Control Panel & Wi-Fi Indicator |
4 |
|
|
7 |
Bumper |
5 |
||
|
||||
8 |
IR Receiver (for Docking Station) |
|
||
|
|
|||
9 |
Docking Station |
|
|
10LED Cliff Sensors
11Front Wheel
12Edge-Cleaning Brushes
13Brush Roll
14 |
Rear Wheels |
|
10 |
|
15 |
Wheel Cover Plates |
|
|
|
16 |
Battery Cover Plate |
|
|
|
|
|
|
11 |
|
|
|
12 |
12 |
|
|
|
|
13 |
|
|
10 |
|
|
10 |
|
14 |
15 |
15 |
14 |
|
|
|
16 |
|
4 |
www.BISSELL.com |
|
|
|

Assembly
Getting Started
There are 4 steps to set up your robot:
Step 1: Install the Battery
Step 2: Install the Edge-Cleaning Brushes
Step 3: Turn ON the Power Switch on the side of the robot Step 4: Charge your SmartClean® Connected
 WARNING
Do not plug in your robot vacuum until you are familiar with all instructions and operating procedures.
Step 1: Install the Battery
DO NOT REMOVE THE PLASTIC SHRINK SLEEVE FROM THE BATTERY PACK.
1
Before installing the battery, check that the Power Switch is OFF. Press down on Battery Cover Plate and slide forward to insert the battery.
2
Install the battery in the compartment ensuring that the +/- terminal of the battery match the +/- indicators in the battery compartment.
3
Replace the cover.
Step 2: Install the Edge-Cleaning Brushes 
To install the EdgeCleaning Brushes, push the brush into the holder. You may hear a “click” that indicates that the brush is in place.
www.BISSELL.com 5
 Loading...