


1
33"
TRIPLE BLADE |
MOWER |
|
|
COMMERCIAL |
|
T h a n k Y o u f o r S e l e c t i n g
The Powerful Self-Propelled Billy Goat Mower
Operator Owner's Manual
FM3300 & FM3300E
2 Accessories
Mulching Kit
P/N 520144
Reduces lawn clippings to fine nutrient-rich particles that filter down to the soil.
Grass Catcher Kit P/N 520142
Easily convert your mower to bag grass and leaves.
Transaxle Guard Kit P/N 520155
To protect the transaxle from accidental contact from concrete curbs or other hazards.
3 |
Specifications |
||
|
|
|
|
|
|
FM3300 |
FM3300E |
|
|
|
|
Engine: HP |
13.0 HP (9.7 kW) |
13.0 HP (9.7 kW) |
|
Engine:Type |
B&S INTEK OHV |
B&S INTEK OHV ELECTRIC START |
|
Engine: Fuel cap. |
3.0 qt. (2.8 L) |
3.0 qt. (2.8 L) |
|
Engine: Oil Cap. |
1.5 qt. (1.4 L) |
1.5 qt. (1.4 L) |
|
Weight: Unit |
267 # (121 Kg) |
277 # (126 Kg) |
|
Weight: Shipping |
410 # (186 Kq) |
420 # (191 Kq) |
|
UNIT SIZE: OVERALL LENGTH - 57"(1.44 m)
OVERALL WIDTH - 43" (1.09 m)
OVERALL HEIGHT - 47" (1.19 m)
Part No. 520141 |
Page 1 of 20 |
Form No. F061604A |

5 |
IN THE INTEREST OF SAFETY |
|
|
|
BEFORE STARTING ENGINE, READ AND UNDERSTAND THE “ENTIRE OPERATOR'S MANUAL & |
|
ENGINE MANUAL.” |
|
THIS SYMBOL MEANS WARNING OR CAUTION. DEATH, PERSONAL INJURY AND/OR PROPERTY |
|
DAMAGE MAY OCCUR UNLESS INSTRUCTIONS ARE FOLLOWED CAREFULLY. |
|
WARNING: The Engine Exhaust from this product contains chemicals known |
|
to the State of California to cause cancer, birth defects or other reproductive harm. |
WARNING: DO NOT 
1.DO NOT run engine in an enclosed area. Exhaust gases contain carbon monoxide, an odorless and deadly poison.
2.DO NOT place hands or feet near moving or rotating parts.
3.DO NOT store, spill or use gasoline near an open flame, or devices such as a stove, furnace, or water heater which use a pilot light or devices which can create a spark.
4.DO NOT refuel indoors where area is not well ventilated. Outdoor refueling is recommended.
5.DO NOT fill fuel tank while engine is running. Allow engine to cool for 2 minutes before refueling. Store fuel in approved safety containers.
6.DO NOT remove fuel tank cap while engine is running.
7.DO NOT operate engine when smell of gasoline is present or other explosive conditions exist.
8.DO NOT operate engine if gasoline is spilled. Move machine away from the spill and avoid creating any ignition until the gasoline has evaporated.
9.DO NOT transport unit with fuel in tank.
10.DO NOT smoke when filling fuel tank.
11.DO NOT choke carburetor to stop engine. Whenever possible, gradually reduce engine speed before stopping.
12.DO NOT run engine at excessive speeds. This may result in injury & /or damage to unit.
13.DO NOT tamper with governor springs, governor links or other parts which may change the governed engine speed.
14.DO NOT tamper with the engine speed selected by the engine manufacturer.
15.DO NOT check for spark with spark plug or spark plug wire removed. Use an approved tester.
16.DO NOT crank engine with spark plug removed. If engine is flooded, place throttle in “FAST” position and crank until engine starts.
17.DO NOT strike flywheel with a hard object or metal tool as this may cause flywheel to shatter in operation. Use proper tools to service engine.
18.DO NOT operate engine without a muffler. Inspect periodically and replace, if necessary. If engine is equipped with muffler deflector, inspect periodically and replace, if necessary, with correct deflector.
19.DO NOT operate engine with an accumulation of grass, leaves, dirt or other combustible material in the muffler area.
20.DO NOT use this engine on any forest covered, brush covered, or grass covered unimproved land unless a spark arrester is installed on the muffler. The arrester must be maintained in effective working order by the operator. In the State of California the above is required by law (Section 4442 of the California Public Resources Code). Other states may have similar laws. Federal laws apply on federal lands.
21.DO NOT touch hot muffler, cylinder, or fins
because contact may cause burns.
22.DO NOT run engine without air cleaner or air cleaner cover.
23.DO NOT operate during excessive vibration!
24.DO NOT leave machine unattended while in operation.
25.DO NOT park machine on a steep grade or slope.
WARNING: DO 
1.ALWAYS DO remove the wire from the spark plug when servicing the engine or equipment TO PREVENT ACCIDENTAL STARTING.
2.DO keep cylinder fins and governor parts
free of grass and other debris |
which can |
affect engine speed. |
|
3.DO pull starter cord slowly until resistance is felt. Then pull cord rapidly to avoid kickback and prevent hand or arm injury.
4.DO examine muffler periodically to be sure it is functioning effectively. A worn or leaking muffler should be repaired or replaced as necessary.
5.DO use fresh gasoline. Stale fuel can gum carburetor and cause leakage.
6.DO check fuel lines and fittings frequently for cracks or leaks. Replace if necessary
7.Follow engine manufacturer operating and maintenance instructions.
8.Inspect machine and work area before starting unit.
6 TABLE OF CONTENTS
SAFETY INSTRUCTIONS |
|
|
|
|
|
|
|
|
|
|
|
2 |
||||||||
|
|
|
|
|
|
|
|
|
|
|
||||||||||
GENERAL SAFETY |
|
|
|
|
|
|
|
|
|
|
|
|
|
3 |
||||||
|
|
|
|
|
|
|
|
|
|
|
|
|
||||||||
ASSEMBLY |
|
|
|
|
|
|
|
|
|
|
|
|
|
|
|
|
4 |
|||
|
|
|
|
|
|
|
|
|
|
|
|
|
|
|
|
|||||
LIT. BAG & CONTROLS |
|
|
|
|
|
|
|
5 |
||||||||||||
|
|
|
|
|
|
|
||||||||||||||
LABELS |
|
|
|
|
|
|
5 - 6 |
|||||||||||||
|
|
|
|
|
||||||||||||||||
OPERATION |
|
|
|
|
|
|
|
|
|
|
6 |
- 9 |
||||||||
|
|
|
|
|
|
|
|
|
|
|||||||||||
MAINTENANCE |
|
|
|
|
|
|
|
|
10 |
- 14 |
||||||||||
|
|
|
|
|
|
|||||||||||||||
PARTS DRAWING & LIST |
|
|
|
|
15 |
- 18 |
||||||||||||||
|
|
|||||||||||||||||||
ACCESSORIES |
|
|
19 |
|||||||||||||||||
|
|
|||||||||||||||||||
TROUBLESHOOTING |
|
|
|
|
20 |
|||||||||||||||
|
|
|
|
|||||||||||||||||
WARRANTY PROCEDURE |
|
|
20 |
|||||||||||||||||
|
|
|||||||||||||||||||
7 |
SOUND |
SOUND LEVEL 94.8 dBA at operator position
Sound tests were performed on 8/15/2003 under the conditions listed:
NOTE: Sound power level listed is the highest value for any model in this manual.
Please refer to serial plate on the unit for the sound level for your model.
GENERAL CONDITION: |
Sunny |
|
TEMPERATURE: |
86 °F (30.0 °C) |
|
WIND SPEED: |
2.4 MPH (3.9 KPH) |
|
WIND DIRECTION: |
|
South |
HUMIDITY: |
57% |
|
BAROMETRIC PRESSURE: |
30.2" Hg (767mm Hg) |
|
8 |
VIBRATION |
VIBRATION LEVEL 2.65 g
Vibration levels at the operators handles were measured in the vertical, lateral, and longitudinal directions using calibrated vibration test equipment. Tests were performed on 08/19/03 under the conditions listed:
GENERAL CONDITION: |
Sunny |
|
TEMPERATURE: |
99 °F (37.2 °C) |
|
WIND SPEED: |
5.5 MPH (8.9 kmh) |
|
WIND DIRECTION: |
|
South East |
HUMIDITY: |
37% |
|
BAROMETRIC PRESSURE: |
29.9" Hg (759mm Hg) |
|
Part No. 520141 |
Page 2 of 20 |
Form No. F061604A |

9 GENERAL SAFETY
For your safety and the safety of others, these directions should be followed:
Do not operate this machine without first reading owner's manual and engine manufacturer's manual.
Use of Ear Protection is recommended while operating this machine.
Use of Eye and Breathing protection is recommended when using this machine.
This cutting machine is capable of amputating hands and feet and throwing objects. Failure to observe the following safety instructions could result in serious injury or death.
I. General Operation
1.Read, understand, and follow all instructions on the machine and in the manual(s). Be thoroughly familiar with the controls and the proper use of the mower before starting.
2.Do not put hands or feet near or under rotating parts. Keep clear of the discharge opening at all times.
3.Only allow responsible individuals, who are familiar with the instructions, to operate the mower.
4.Clear the area of objects such as rocks, toys, wire, bones, sticks etc., which could be picked up and thrown by the blade(s).
5.Be sure the area is clear of other people before mowing. Stop mower if anyone enters the area.
6.Do not operate the mower when barefoot or wearing open sandals. Always wear substantial foot wear.
7.Do not pull mower backwards unless absolutely necessary. Look down and behind before and while moving backwards.
8.Do not operate the mower without proper guards, plates, grass catcher or other safety protective devices in place.
9.See manufacturer’s instructions for proper operation and installation of accessories. Only use accessories approved by the manufacturer.
10.Stop the blade(s) when crossing gravel drives, walks, or roads.
11.Stop the engine (motor) whenever you leave the equipment, before cleaning the mower or unclogging the chute.
12.Shut the engine (motor) off and wait until the blade comes to complete stop before removing grass catcher.
13.Mow only in daylight or good artificial light.
14.Do not operate the mower while under the influence of alcohol or drugs.
15.Never operate mower in wet grass. Always be sure of your footing; keep a firm hold on the handle and walk; never run.
16.Disengage the self-propelled mechanism or drive clutch on mowers so equipped before starting the engine (motor).
17.If the equipment should start to vibrate abnormally, stop the engine (motor) and check immediately for the cause. Vibration is generally a warning of trouble.
18.Always wear safety goggles or safety glasses with side shields when operating mower.
II. Slope Operation
Slopes are a major factor related to slip and fall accidents which can result in severe injury. All slopes require extra caution. If you feel uneasy on a slope, do not mow it.
DO:
Mow across the face of slopes; never up and down. Exercise extreme caution when changing direction on slopes.
Remove objects such as rocks, tree limbs, etc. Watch for holes, ruts, or bumps. Tall grass can hide obstacles.
DO NOT:
Do not mow near drop-offs, ditches, or embankments. The operator could lose footing or balance.
Do not mow excessively steep slopes.
Do not mow on wet grass. Reduced footing could cause slipping.
III. Children
Tragic accidents can occur if the operator is not alert to the presence of children. Children are often attracted to the mower and the mowing activity. Never assume that children will remain where you last saw them.
1.Keep children out of the mowing area and under the watchful care of a responsible adult.
2.Be alert and turn mower off if children enter the area.
3.Before and while moving backwards, look behind and down for small children.
4.Never allow children to operate the mower.
5.Use extra care when approaching blind comers, shrubs, trees, or other objects that may obscure vision.
IV. Service
1.Use extra care in handling gasoline and other fuels. They are flammable and vapors are explosive.
a)Use only an approved container.
b)Never remove gas cap or add fuel with the engine running. Allow engine to cool before refueling. Do not smoke.
c)Never refuel the machine indoors.
d)Never store the machine or fuel container inside where there is an open flame, such as a water heater.
2.Never run an engine inside a closed area.
3.Never make adjustments or repairs with the engine (motor) running. Disconnect the spark plug wire, and keep the wire away from the plug to prevent accidental starting.
4.Keep all nuts and bolts, especially blade attachment bolts, tight and keep equipment in good condition.
5.Never tamper with safety devices. Check their proper operation regularly.
6.Keep mower free of grass, leaves, or other debris build-up. Clean up oil or fuel spillage. Allow mower to cool before storing.
7.Stop and inspect the equipment if you strike an Object. Repair, if necessary, before restarting.
8.Never attempt to make wheel height adjustments while the engine (motor) is running.
9.Always disconnect electric mowers (live operated) before cleaning, repairing, or adjusting.
10.Grass catcher components are subject to wear, damage, and deterioration, which could expose moving parts or allow objects to be thrown. Frequently check components and replace with manufacturer’s recommended parts, when necessary.”
11.Mower blades are sharp and can cut. Wrap the blade(s) or wear gloves, and use extra caution when servicing them.
12.Do not change the engine governor setting or overspeed the engine.
Part No. 520141 |
Page 3 of 20 |
Form No. F061604A |
11 ASSEMBLY
Read all safety and operating instructions before assembling or starting this unit.

 PUT OIL IN ENGINE BEFORE STARTING.
DISCONNECT SPARK PLUG WIRE
BEFORE ASSEMBLING UNIT.
Your Billy Goat Mower is shipped from the factory in one crate, completely assembled except for the handles and console assembly.
NOTE: All item numbers called out in the assembly, operation, and maintenance sections of this manual can be found on Parts List (pages 15-18).
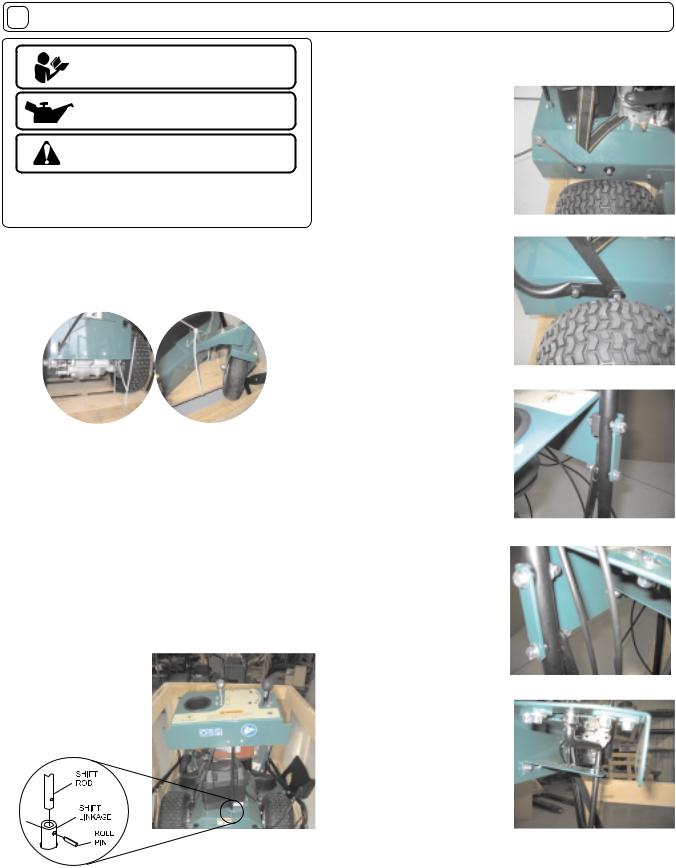
Figure 11-1
1.Cut and remove the nylon retaining straps (see figure 11-1). 2.Pry up and remove the shipping crate’s top panel. 3.Remove the shipping crate’s end panel at rear of mower
4.With the console positioned as shown in Figure 11-3, insert the shift linkage rod (Item 31) into the shift linkage connector (Item 54).
5. To assemble the shift rod (item 31) to the shift linkage (item 54), use the roll pin in the parts/literature bag. If you’ll notice on the shift linkage, the hole is larger on one side than the other.
It will be easier to start the roll pin from the larger side, forcing it through the shift rod and the hole on the other side of the shift linkage, using a hammer or large adjustable pliers.
6.Remove and retain for reuse console mounting bolts, washers and nuts (Items 135, 150 & 151) from left and right handles.
7.Remove and retain for reuse handle mounting bolts and hex lock washers (Items 102 & 6) located just above the rear wheels on each side of mower (see figure 11-4).
NOTE: Fasteners should only be tightened snug tight until handle and console assembly is complete.
Figure 11-3
Part No. 520141 |
Page 4 of 20 |

12 LITERATURE ASSY P/N 520137
Literature Checklist
|
Check |
Warranty |
Check |
|
Owner's |
Owner's |
Warranty |
||
Manual |
Card |
|||
Manual |
Card |
|||
520141 |
400972 |
|||
|
|
|
||
900407 |
|
|
|
|
Ty Wrap |
|
|
|
|
Qty 4 |
|
|
|
520156
Roll Pin 1/4" x 1" long Qty 1
13 CONTROLS
Throttle Control
33" TRIPLE BLADE MOWER
TRANSPORT ONLY 5
LIFT THEN PULL
TO REVERSE
4
CHOKE |
3 |
|
|
START |
2 |
|
1 N
5200048 No: Part
STOP
LIFT THEN PULL R
TO REVERSE
 WARNING
AVOID SERIOUS INJURY OR DEATH. |
OBJECT THROWN BY BLADE |
|
Follow all instructions in Owner's Manual. |
CAN CAUSE SERIOUS INJURY. |
|
Go across slopes, not up and down. |
Inspect area and remove debris before |
|
Do not mow when children or others are around. |
mowing. |
|
Look down and behind before and while moving |
||
Keep children and others away. |
||
backwards. |
||
Wear eye protection. |
||
Keep safety guards, shields, switches, and etc. |
Do not operate unless guard is in place. |
|
in place and working. |
|
|
|
|
START (PULL UP)
RUN
OFF
14 ENGINE LABELS
Speed Control
5th gear (Transporting Speed): LIft up on the lever then push to engage in the 5th gear.
Rev: LIft up on the lever then pull back for reverse.
Electric Start Only
Pull up on the switch then push forward to start the engine.
Briggs & Stratton
Read and follow Operating
Instructions before running engine.
Gasoline is flammable. Allow engine
to cool at least 2 minutes before fueling.
Engines emit carbon monoxide,
DO NOT run in enclosed area.
Part No. 520141 |
Page 5 of 20 |
Form No. F061604A |

15 INSTRUCTION LABELS
These labels should be included on your Billy Goat Finish Mower. If any of these labels are damaged, replace them before putting this equipment into operation. Item and part numbers are given to help in ordering replacement labels..
 WARNING
EXPLOSIVE FUEL |
400268 |
STOP ENGINE AND ALLOW T O
COOL BEFORE REFUELING.
Label Do Not Fill While Engine Is Hot Item 4 Part No.400268
|
WARNING |
890254 |
900327 |
Label Ear Eye Breathing |
Label Warning Guards |
Item No. 114 Part No. 890254 |
Item 119 Part No.900327 |
PATENT PENDING
PART NO. 500183
Label Patent Pending
Item 178 Part No.500183
|
DANGER |
|
810736 |
Label Danger Keep Hands |
Label Danger Flying Material |
and Feet Away |
Item No. 2 Part No. 810736 |
Item 5 Part No.400424 |
|
|
500176 |
Label Read Owner's Manual |
Label Clutch Drive |
Item 52 Part No.890301 |
Item No. 10 Part No. |
|
500176 |
|
PART: 520048 |
33" TRIPLE BLADE MOWER |
LabelDESCRIPTION:FM ElectricLABEL CONSOLEConsoleELECTRIC START FM |
ELECTRIC START MODEL |
ItemPAGE472 PartOF 2 No. 520048
520048 No: Part
|
|
5 |
|
|
TRANSPORT ONLY |
4 |
|
|
LIFT THEN PUSH |
||
|
TO FOWARD 5TH |
||
CHOKE |
|
3 |
|
|
|
||
START |
|
2 |
|
|
|
||
|
|
1 |
|
|
LIFT THEN PULL |
N |
|
|
TO REVERSE |
||
STOP |
R |
||
|
|||
WARNING |
|
||
AVOID SERIOUS INJURY OR DEATH. |
OBJECT THROWN BY BLADE |
START (PULL UP) |
|
|
|||
Follow all instructions in Owner's Manual. |
CAN CAUSE SERIOUS INJURY. |
RUN |
|
Go across slopes, not up and down. |
Inspect area and remove debris before |
|
|
Do not mow when children or others are around. |
mowing. |
OFF |
|
Look down and behind before and while moving |
|||
Keep children and others away. |
|
||
backwards. |
Wear eye protection. |
|
|
Keep safety guards, shields, switches, and etc. |
Do not operate unless guard is in place. |
|
|
in place and working. |
|
||
|
No: Part |
|
Label FM Console |
||
520079 |
||
Item 47 Part No. 520079 |
||
|
||
|
|
 WARNING
TO PREVENT INJURY
Do not operate unless deflector is in place
Label Warning Mower
Item No. 17 Part No. 510206
500177
PUSH TO
RELEASE
BRAKE
Label Blade Drive |
Label Push to Release Brake |
Item No. 11 Part No. |
Item 95 Part No. 520117 |
500177 |
|
CUTTING HEIGHT MAY BE ADJUSTED BY PLACING
SPACERS ABOVE OR BELOW CASTER SPINDLES.
HIGHEST |
LOWEST |
|
CUTTING |
CUTTING |
|
|
HEIGHT |
HEIGHT |
|
OF 4.0" |
OF 1.5" |
|
|
PART NO. 520043 |
Label Hgt. Guideline |
|
|
Item No. 7 Part No. 520043 |
||
33" TRIPLE BLADE MOWER |
|
|
|
|
5 |
|
TRANSPORT ONLY |
4 |
|
LIFT THEN PUSH |
|
|
TO FOWARD 5TH |
|
CHOKE |
|
3 |
|
|
|
START |
|
2 |
|
|
|
|
|
1 |
|
LIFT THEN PULL |
N |
|
TO REVERSE |
|
STOP |
R |
|
|
||
WARNING |
|
|
AVOID SERIOUS INJURY OR DEATH. |
OBJECT THROWN BY BLADE |
|
Follow all instructions in Owner's Manual. |
CAN CAUSE SERIOUS INJURY. |
|
Go across slopes, not up and down. |
Inspect area and remove debris before |
|
Do not mow when children or others are around. |
mowing. |
|
Look down and behind before and while moving |
|
|
Keep children and others away. |
|
|
backwards. |
Wear eye protection. |
|
Keep safety guards, shields, switches, and etc. |
Do not operate unless guard is in place. |
|
in place and working. |
|
|
Part No. 520141 |
Page 6 of 20 |
Form No. F061604A |
16 OPERATION
INTENDED USE: This unit is mainly designed for cutting grass. Some overgrown weeds, and taller grass may also be cut. Be sure to inspect work area and machine before operating. Make sure that all operators of this equipment are trained in general machine use and safety.
Like all mechanical tools, reasonable care must be used when operating machine. Do not operate unit
in areas where bystanders may be present.
Do not operate if excessive vibration occurs.  If excessive vibration occurs, shut engine off immediately and check for damaged or worn blade, loose blade jam nut, loose engine or lodged foreign objects. Note: See maintenance section for proper blade jam nut
torque specifications.
16.1STARTING
PUT OIL IN ENGINE THEN CHECK
THE LEVEL BEFORE STARTING.
ENGINE: See engine manufacturer’s instructions for type and amount of oil and gasoline used.
Engine must be level when checking and filling oil and gasoline.
ENGINE SPEED: Controlled by throttle lever on the control console plate.
FUEL VALVE: Move fuel valve to "ON" position (when provided on engine).
CHOKE: Operated with the throttle control by moving the throttle control to the full start position.
THROTTLE: Move remote throttle control to fast position. Pull starting rope to start engine.
ELECTRIC START: Choke the engine if necessary. Pull up then push forward on the toggle switch until engine starts, then release switch to run.
1.Select desired cutting height before starting engine.
2.Place mower on a sidewalk or driveway where the mower blade is in an unloaded condition. If it must be started on the lawn, move mower over previously cut grass.
3.Be sure drive lever or blade lever are not engaged.
4.Choke if necessary.
5.Pull back on starter rope slowly until resistance is felt. Then pull cord rapidly to start. Repeat if necessary.
16.2CUTTING OPERATION
CAUTION: Stop Blade when crossing gravel drives, walks or roads and under all conditions where thrown objects might be a hazard.
CLEARING A CLOGGED CUTTING DECK: Turn engine off and wait for blade to stop completely. Disconnect spark plug wire.
Wearing durable gloves, remove clog. Danger, the clog may contain sharp materials. Reconnect spark plug wire.
CAUTION: Use extreme care when operating the blade. Inspect the work area for foreign objects that could cause damage to the unit or injure the operator if struck by the blade. Never operate the blade with bystanders in the work area.
GENERAL OPERATION: To engage the blade, depress the operator’s left hand control lever against operator’s handle. The blade is disengaged by releasing this lever.(See Fig. 1.1) To engage the wheel drive, lift the operator’s right hand control lever against operator’s handle. The drive is disengaged by releasing this lever.(See Fig. 1.2) Ground speed can be varied by shifting gears as described on page 8. To begin cutting, engage the blade lever, allow the blade to spin up to speed, and engage the wheel drive to begin moving forward into the material to be cut.
NOTE: Do not engage blade during transport between work sites. The blade should remain disengaged at all times when work is not being performed.
The best performance is achieved when cutting in dry conditions. If the deck becomes choked with grass
or debris during operation, back unit off of debris allowing machine to clear itself and continue cutting, or shut the unit off and clear the clog by hand (See above). A drop in engine RPM or a noticeable change in engine sound is usually a good indicator of a clogged discharge or other interference.
Under most conditions cutting should be done in second or third gear. Fourth gear should be reserved for conditions where grass is thinned out or not as tall. The quality of the cut produced is directly related to the unit's ground speed during cutting. If the quality of the cut
is not satisfactory (i.e. material left standing) you should shift into a lower gear during cutting. For improved control in confined areas, this machine can be pushed forward or backward by releasing the drive lever located at the bottom of the operator's right-hand handle while depressing the brake release lever.
Part No. 520141 |
Page 7 of 20 |
Form No. F061604A |
 Loading...