Beurer PM26 Operating Instructions
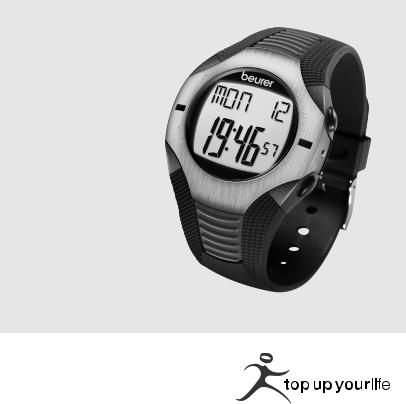


 heart rate monitor herzfrequenz pulsuhr
german|engineering
PM 26
Operating Instructions
Gebrauchsanleitung

TABLE OF CONTENTS
Scope of delivery............................................................................. |
2 |
Important Notes ............................................................................... |
3 |
General Information for Training.................................................... |
5 |
Functions of the HR monitor .......................................................... |
6 |
Transmission of signal and methods of Devices Measurement.7
Getting started ................................................................................. |
7 |
Putting on the heart rate monitor................................................ |
7 |
Activating the HR watch from transport mode............................ |
7 |
Putting on the chest strap........................................................... |
8 |
General operation of the heart rate monitor |
.................................9 |
Buttons on the heart rate monitor............................................... |
9 |
Display...................................................................................... |
10 |
Menus....................................................................................... |
10 |
Basic settings ................................................................................ |
12 |
Setting basic functions and personal data................................ |
12 |
Setting the training data ........................................................... |
13 |
Training........................................................................................... |
15 |
Stopping running times............................................................. |
15 |
Recording laps ......................................................................... |
16 |
Deleting all records................................................................... |
16 |
Displaying training data ............................................................ |
16 |
Displaying the lap overview...................................................... |
17 |
Alarm clock .................................................................................... |
18 |
Timer............................................................................................... |
19 |
Technical details and batteries .................................................... |
20 |
Abbreviation list ............................................................................ |
23 |
1 |
|
G B
SCOPE OF DELIVERY
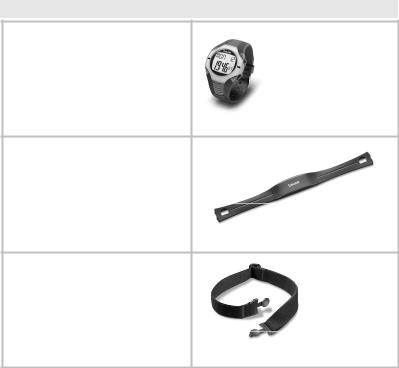
Heart rate monitor with wrist band
Chest strap
Elastic tension strap (adjustable)
In addition:
These operating instructions
2
IMPORTANT NOTES
Please read these operating instructions carefully, keep them for future reference and also make them available to others. Pay attention to all information in these operating instructions!
Training
This HR monitor is not a therapeutic device. It is a training instrument which was developed for the measurement and representation of the human heart rate.
With high-risk sports, please note that the use of the HR monitor can represent an additional source of injury.
If in doubt or in the case of illnesses, please consult your doctor about your ideal upper and lower training heart rate, as well as the recommended duration and frequency of the training. In such a way, you can achieve optimal results when training.
WARNING: People suffering from cardiovascular diseases or those with pacemakers should only use this heart rate monitor after having consulted their doctor.
Application
The heart rate monitor is only intended for private use.
The heart rate monitor may only be used in the manner outlined in the operating instructions. The manufacturer is not liable for damages that are caused by improper or incorrect use.
This heart rate monitor is waterproof (50 m) and therefore suitable for swimming. No signal transmission is possible underwater, however, which means you cannot carry out a reading.
Electromagnetic disturbances may occur. (see chapter "Technical Specifications", page 20)
3
G B

Cleaning and care
From time to time, carefully clean your chest strap, elastic chest strap and heart rate monitor with a soap and water solution. Then rinse off all components with clean water. Carefully dry them with a soft towel. You can wash the elastic chest strap in the washing machine at 30° without fabric softener. The chest strap is not made for the dryer!
Store the chest strap in a clean and dry place. Dirt impairs the elasticity and functioning of the transmitter. Sweat and moisture can keep the electrodes wet and consequently activate the transmitter, which shortens battery life.
Only change the batteries at a specialist dealer.
Repair, Accessories and Disposal
Prior to use, you have to ensure that the HR monitor is free of damage. If in doubt, do not use the HR monitor and consult your sales representative or the customer service address provided.
Repairs may only be conducted by customer service or authorized dealers. Please do not in any case attempt to repair the HR monitor!
Use the HR monitor only in combination with Beurer original accessories.
Avoid contact with suntan lotions or the like, since these can cause damage to the imprint or plastic components.
Do not expose the device to direct sunlight.
Please dispose of the HR monitor and used batteries only in accordance with the Waste Electric and Electronic Equipment Directive 2002/96/EC – WEEE. For inquiries, please contact the municipal authority responsible for disposal in your area.
4
GENERAL INFORMATION FOR TRAINING
This heart rate monitor serves to measure the human pulse. By means of various settings, you can support your individual training program and monitor your pulse. You should monitor your pulse during exercise because you should prevent your heart from excessive strain on the one hand and on the other in order to achieve the optimal training results. The table provides you with some information on the selection of your training zone. The maximum heart rate reduces with advancing age. Information on the training heart rate must therefore always be in relation to the maximum heart rate. The following rule of thumb helps to identify the maximum heart rate:
220 - age = maximum heart rate
The following example applies to a 40-year-old person: 220-40 = 180
|
Heart/health |
Fat burning |
Fitness pro- |
Endurance |
Anaerobic |
|
programme |
zone |
gramme |
training pro- |
training |
|
|
|
|
gramme |
|
Max. heart rate |
50-65% |
55-75% |
65-80% |
80-90% |
90-100% |
range |
|
|
|
|
|
Display on |
HEALTH |
FAT-B |
AROBIC |
– |
– |
monitor |
|
|
|
|
|
Effect |
Strengthens the |
The body burns |
Improves the |
Improves speed |
Overloads |
|
heart and the |
the highest |
respiratory and |
maintenance and |
specific muscles. |
|
circulatory system |
percentage of |
circulatory |
increases basic |
High injury risk for |
|
|
calories from fat. |
system. Ideal to |
speed. |
athletes at |
|
|
Strengthens the |
promote the basic |
|
amateur level, |
|
|
heart and the |
endurance |
|
risk to the heart in |
|
|
circulatory |
|
|
case of disease. |
|
|
system, |
|
|
|
|
|
enhances fitness |
|
|
|
Suitable for |
Ideal for |
Weight control |
Athletes at |
Ambitious |
Only professional |
|
beginners |
and loss |
amateur level |
athletes at |
athletes |
|
|
|
|
amateur level, |
|
|
|
|
|
professional |
|
|
|
|
|
athletes |
|
Training |
Regenerative |
|
Fitness training |
Endurance |
Fitness training |
|
training |
|
|
training |
addressing |
|
|
|
|
|
specific zones |
Three preset pulse ranges are saved in the heart rate monitor as training zone suggestions (HEALTH/FAT-B/AROBIC). For selecting pulse limits, see chapter "Setting the training data", page 13.
5
G B

FUNCTIONS OF THE HR MONITOR
Pulse functions
Exact ECG heart rate measurement
Transmission: analogue
3 training zone suggestions
Individual training zone adjustable
Acoustic alarm upon leaving training zone
Average heart rate (average)
Maximum training heart rate
Calorie consumption in kcal
Fat burn in grams
Time functions
Time of day
Calendar (up to 2099) and weekday
Date
Alarm/alarm clock
Stop watch
25 laps for each training, recall of all of them or each one. Display of lap time and average heart rate
Countdown timer
Settings
Gender
Weight
Unit of weight kg/lb
Height
Unit of height in cm or ft/in
Year of birth
Hourly chime
Key tones
12 and 24-hour format
Activity level (3 levels)
6

TRANSMISSION OF SIGNAL AND METHODS OF DEVICES MEAS-
UREMENT
Receiving range of the heart rate monitor
Your heart rate monitor picks up the heart rate signals sent by the chest strap transmitter within a range of 70 centimeters.
Sensors on the chest strap
The entire chest strap consists of two components: the actual chest strap and an elastic tension belt. There are two ribbed sensors in the middle on the inside of the chest strap that fits close to the body. Both sensors determine your heart rate ECG exactly and transmit this to the heart rate monitor.
The chest strap is compatible with other analogue devices, such as e.g. ergometers.
GETTING STARTED
Putting on the heart rate monitor
You can wear your heart rate monitor like a wrist watch.
Activating the HR watch from transport mode
During transport, nothing is shown on the display. You can activate your heart rate monitor from the transport mode by pressing any button for 5 seconds.
7
G B

Putting on the chest strap
Tighten the chest strap with the elastic tension belt. Adjust the length of the belt such that the belt is snug, but neither too loose nor too tight. Position the belt around the chest such that the logo is facing outwards and in the correct position directly over the breast bone. For men, the chest belt should be located directly below the pectoral muscles, for women, directly below the breast.
Since optimal contact between the skin and the heart rate sensors can not be created immediately, it may take some time until the heart rate is measured and displayed. If necessary, alter the position of the transmitter in order to achieve optimal contact. Most of the time, sufficient contact is achieved through the accumulation of sweat beneath the chest strap. You can, however, also wet the contact points on the inside of the chest strap. For this, lift the chest strap up from the skin slightly and wet the two sensors with saliva, water or ECG gel (available at the chemistry). The contact between the skin and chest strap may not be interrupted also with greater movements of the thorax such as during deep breathing. Significant chest hair can interfere with and even prevent contact.
Put on the chest strap a few minutes before starting in order to warm it up to body temperature and establish optimal contact.
8
GENERAL OPERATION OF THE HEART RATE MONITOR |
G |
|
|
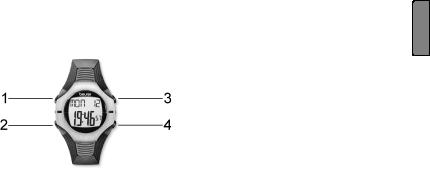
Buttons on the heart rate monitor |
B |
1 |
LAP |
Stops individual training laps. |
2 |
MODE |
Switches between the main menus. If you |
|
|
keep the MODE button pressed for at least |
|
|
3 seconds, you get into the setting mode for |
|
|
a menu. Exit the setting mode also by keep- |
|
|
ing the MODE button pressed for 3 sec- |
|
|
onds. |
3 |
ST/STP/RESET |
Start/stops functions, sets values. Keep |
|
|
pressed to accelerate input. |
|
|
Counts values forwards. |
|
|
Starts and stops the stop watch. |
|
|
When held down, resets the stopwatch |
|
|
function and the results data (kcal etc.). |
4 |
LIGHT |
When held down for 3 seconds, the dis- |
|
|
play will light up for 3 seconds. Note: does |
not apply in the setup menu for basic settings and personal data.
Counts down set values. 9
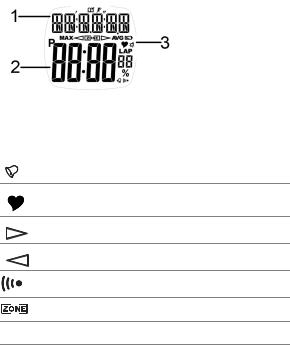
Display
1Top line
2Bottom line
3Symbols
Hour signal is activated
Heart rate is being received
Training zone has been exceeded
Training zone has been underrun
Alarm clock is activated
Heart rate is inside the preset pulse limits
MAX Maximum heart rate
AVG Average heart rate
An explanation of the display abbreviations can be found in the list of abbreviations at the end of the operating instructions.
Menus
Operation of the heart rate monitor is based on main menus. From the main menus (except lap overview), you can switch to the rele-
10
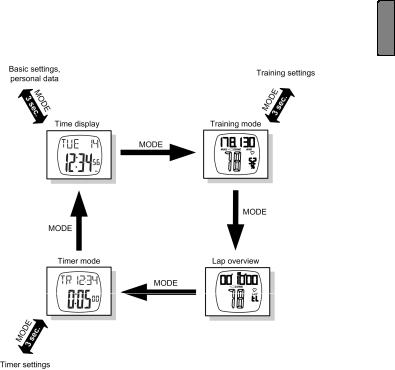
vant settings menu. You can switch between the main menus with |
G |
the MODE button. You can reach the settings menus by holding the |
|
MODE button down for around 3 sec. You can leave the settings |
B |
menus in the same way and return to the relevant main menu. |
|
Power-saving mode
In the time display main menu, press the LAP button for approx. 5 sec to turn on power-saving mode. The display is turned off in this mode, so that the battery can last longer. Please note that the functions (e.g. Time) are still working and the display is just turned off. Press any button to reactivate the display again.
11
BASIC SETTINGS
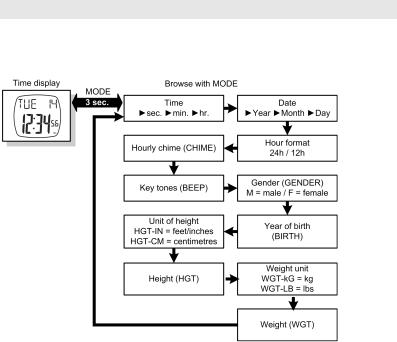
Setting basic functions and personal data
In the time display main menu, you can set the time, set basic functions of the heart rate monitor and specify personal settings.
In the time display main menu, hold down the MODE button for approx. 3 sec. You get into the setting menu with a number of settings; move on to the next setting by pressing the MODE button. The default settings flash if you can change them. Change these settings with the START/STOP/RESET and LIGHT buttons.
Exit the setting menu by keeping the MODE button pressed for approx. 3 seconds.
TIP: If you hold down the buttons ST/STP/RESET or LIGHT for more than 2 sec, the relevant setting automatically counts up or down until you release the button.
12

Setting the training data
In the training mode main menu, you can set the individual upper and lower limits of your heart rate by selecting your optimal training workload. To do this, you can choose from three default values:
optimal health [HEALTH] (50-65 % of the max. heart rate)
fat burner [FAT-B] (55-75 % of the max. heart rate)
fitness [AROBIC] (65-80 % of the max. heart rate)
Or you can specify your own limits for the heart rate [USR].
In addition, you can also set the acoustic alarm, if your heart rate is outside your pulse limits during training.
You can also specify your activity level at one of 3 levels. Calorie consumption and fat burn will be recalculated according to your selected activity level:
High activity level [HIGH]: You regularly play sport and train very intensely at least three times a week.
Medium activity level [MEDIUM]: You regularly play sport recreationally.
Low activity level [LOW]: You only play sport occasionally and without high sporting demands.
G B
13
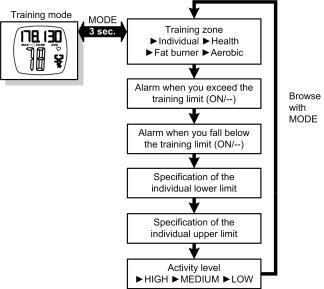
Press the MODE button in the training mode main menu for approx. 3 sec to reach the settings menu. Browse through the respective settings with the MODE button. Settings that you can change will flash. Change the settings with the ST/STP/RESET and LIGHT buttons. Confirm with the MODE button.
Leave the settings menu once again by holding down the MODE button for approx. 3 sec.
TIP: If you hold down the buttons ST/STP/RESET or LIGHT for more than 2 sec, the relevant setting automatically counts up or down.
14
 Loading...