


 Loading...
Joybook 5000/5200 Series User’s Manual
Welcome

 Copyright
Copyright 2005 by BenQ Corporation. All rights reserved. No part of this publication may be reproduced, transmitted, transcribed, stored in a retrieval system or translated into any language or computer language, in any form or by any means, electronic, mechanical, magnetic, optical, chemical, manual or otherwise, without the prior written permission of this company.
 Disclaimer
BenQ Corporation makes no representations or warranties, either expressed or implied, with respect to the contents hereof and specifically disclaims any warranties, merchantability or fitness for any particular purpose. Further, BenQ Corporation reserves the right to revise this publication and to make changes from time to time in the contents hereof without obligation of this company to notify any person of such revision or changes.
*Windows, Internet Explorer and Outlook Express are trademarks of Microsoft Corporation. Others are copyrights of their respective companies or organizations.
 Joybook Models Covered by This Manual
This manual contains the information about the following Joybook models:
•Joybook 5000 series
•Joybook 5200 series
Please note that the actual hardware or software capabilities will vary according to the model you purchased. To determine your Joybook model, please refer to the label on the packing box, or the printing on your Joybook.

Table of Contents |
|
BenQ Joybook 5000/5200 Series Quick Start Guide ....................................... |
1 |
Package Contents ....................................................................................... |
1 |
Getting Your Joybook Ready for Use........................................................ |
1 |
Expanding the Capabilities of Your Joybook ........................................... |
2 |
Touring Your Joybook...................................................................................... |
5 |
Left Side View............................................................................................. |
7 |
Right Side View .......................................................................................... |
8 |
Rear View.................................................................................................... |
9 |
Front Panel ................................................................................................. |
10 |
Function Hotkeys....................................................................................... |
11 |
Getting Started with Windows XP ................................................................... |
13 |
Using the Q-Media Bar..................................................................................... |
14 |
Setting Up QMedia Bar.............................................................................. |
15 |
Customizing the Hotkeys (P1, P2)..................................................... |
15 |
Sending and Receiving E-mail................................................................... |
16 |
Getting Online............................................................................................ |
16 |
Wireless Magic - Using the Built-In Wireless LAN Function.................. |
17 |
Listening to Music and Creating Custom Music Collections.................. |
18 |
QMusic Workspace............................................................................. |
18 |
Playing a Music CD............................................................................. |
18 |
Creating a Playlist................................................................................ |
18 |
Converting CD Music into MP3 Format........................................... |
19 |
Creating an MP3 Music CD ............................................................... |
19 |
Watching DVD/VCD Movies.................................................................... |
20 |
PowerDVD Control Panel .................................................................. |
20 |
Region Code Settings .......................................................................... |
21 |
Basic Operations.................................................................................. |
21 |
Making Your Own Movies ........................................................................ |
23 |
PowerDirector Workspace ................................................................. |
23 |
The Movie-Making Process ................................................................ |
24 |
Step 1: Loading Clips into the Library ............................................... |
24 |
Step 2: Managing Clips in the Workspace ......................................... |
24 |
Step 3: Working with Effects .............................................................. |
24 |
Step 4: Producing a Movie Disc.......................................................... |
25 |
Viewing Digital Photographs, Creating Slide Shows and Calendars....... |
26 |
Photo Explorer Workspace ................................................................. |
26 |
|
Viewing Images.................................................................................... |
26 |
|
Creating a Slide Show or Screensaver................................................. |
26 |
|
Making a Calendar .............................................................................. |
27 |
|
Burning CDs/DVDs Using Nero Express.................................................. |
28 |
|
Using QCamera .......................................................................................... |
31 |
|
QCamera Workspace .......................................................................... |
31 |
|
Capturing Videos................................................................................. |
32 |
|
Capturing Photos................................................................................. |
32 |
|
Applying Special Effects to Photos and Videos.................................. |
32 |
|
Creating a New Album........................................................................ |
32 |
|
Adding Photos to an Album ............................................................... |
32 |
|
Burning Albums onto a CD ................................................................ |
32 |
|
Using QPower............................................................................................. |
34 |
|
Launching QPower.............................................................................. |
34 |
|
Checking Battery Level........................................................................ |
34 |
|
Selecting a Power Profile..................................................................... |
34 |
|
Setting up a Power Profile................................................................... |
34 |
|
Associating Application Programs with Power Profiles.................... |
35 |
|
Removing the Association Between Programs and Power Profiles .. |
36 |
|
Protecting Your Joybook from Viruses and Other Security Threats....... |
36 |
|
Attaching External Display Devices ................................................................. |
37 |
|
Attaching an External Display Device ....................................................... |
37 |
|
S-Video Out ................................................................................................ |
38 |
|
Installing Additional Memory .......................................................................... |
39 |
|
Recovering Your System ................................................................................... |
42 |
|
Using the Windows System Restore Tool ................................................. |
42 |
|
Using the Quick Recovery Function.......................................................... |
42 |
|
Using the Recovery CDs............................................................................. |
42 |
|
Reinstalling Software or Driver........................................................... |
42 |
|
FAQ and Troubleshooting................................................................................ |
43 |
|
General ........................................................................................................ |
43 |
|
Battery and Power ...................................................................................... |
43 |
|
Connection ................................................................................................. |
44 |
|
System ......................................................................................................... |
44 |
|
Display......................................................................................................... |
47 |
|
Table of Contents |
iii |
|

Information on Safety, Cleaning, and Battery Maintenance.......................... |
48 |
Safety ........................................................................................................... |
48 |
Battery Maintenance .................................................................................. |
48 |
Cleaning Your Joybook .............................................................................. |
48 |
Service and Support.......................................................................................... |
49 |
BenQ Joybook Global Online Service ....................................................... |
49 |
Joybook Online Registration...................................................................... |
49 |
iv Table of Contents

BenQ Joybook 5000/5200 Series Quick Start Guide
Package Contents
Before using your Joybook for the first time, please check if you have all the items with you. For details about what should be included in the package, refer to the package contents label on the accessory box. If any of the items are missing or appear to be damaged, contact your dealer. Save the packaging in case you need to ship your Joybook for service.
Getting Your Joybook Ready for Use
1. Connecting the power
• Connect the power cord to a wall outlet and start charging the battery.
 • The power systems and plug types might vary depending on your country/region.
• When the battery is charging, the battery indicator appears in amber. When the battery is fully charged, the light goes off.
• For details about the colors and meanings of the indicators, refer to the figures in "Touring Your Joybook" on page 5.
2. Turning the power on
Press the power button to start up your Joybook, and then follow the onscreen instructions to complete the initial Windows XP setup.
• Connect the power cord to the power adapter.
• Connect the power adapter to the power socket on your Joybook.
BenQ Joybook 5000/5200 Series Quick Start Guide |
1 |

Expanding the Capabilities of Your Joybook
•Connect an analog telephone line to the modem port of the Joybook to dial-up to the Internet.
•Connect USB mice or digital cameras to the USB port of the Joybook to enjoy the convenience of high-speed USB connectivity.
•Access your home or office local area network (LAN) by connecting the Ethernet cable to the Ethernet port of your Joybook.
• Listen to music or record sounds via the earphone or microphone jack.
2 BenQ Joybook 5000/5200 Series Quick Start Guide
•Use the PC card slot and various PC cards available on the market to further expand the capabilities of your Joybook.
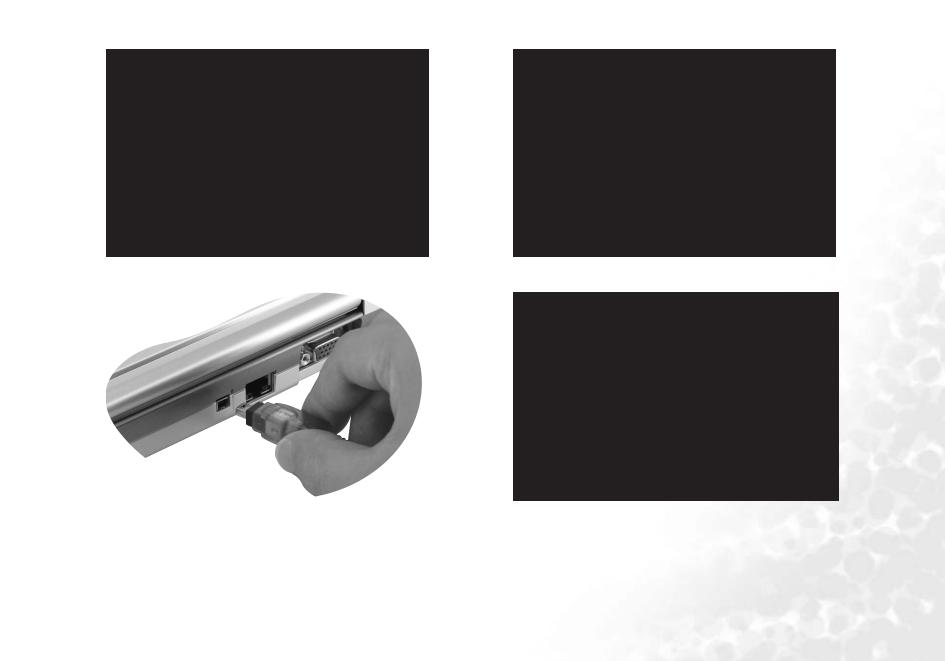
•Connect digital camcorders and high-speed storage equipment to the IEEE 1394 (FireWire) port of the Joybook.
• View DVD movies or create your own CDs.
• Connect an external monitor or projector to the VGA port of the Joybook.
|
BenQ Joybook 5000/5200 Series Quick Start Guide |
3 |
|

• Connect various video devices to the S-Video port of the Joybook using an S- |
• Connect to your personal digital devices (such as mobile phones or PDA) wire- |
||||
|
Video cable. |
|
lessly. (available on Joybook 5000 series only) |
||
|
|
|
|
|
|
|
|
|
|
|
|
|
|
|
|
|
|
•Exchange files using the Three-in-One memory card slot and Memory Stick, SD or MMC type memory cards.
4 BenQ Joybook 5000/5200 Series Quick Start Guide
 Touring Your Joybook
Joybook 5000
Series
Joybook 5200
Series
|
|
|
|
|
|
|
|
|
|
|
|
|
|
|
|
|
|
|
|
|
|
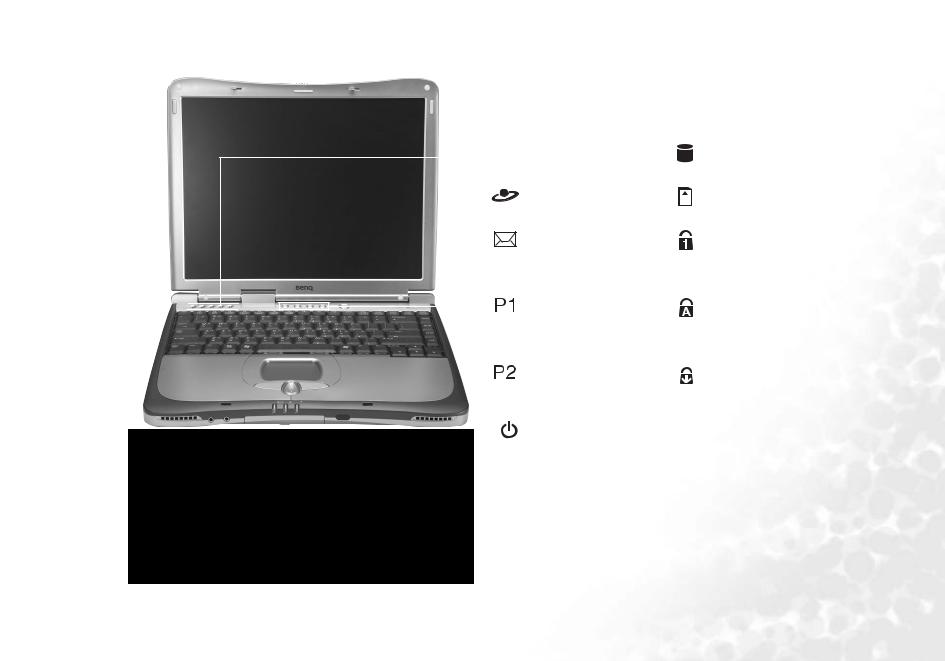
Hard Disk Drive Activity Indicator |
|
|
|
|
|
|
|
|
|
|
|
|
|
|
|
|
|
|
|
|
|
|
|
|
|
|
|
|
|
|
|
|
|
|
|
|
|
|
|
|
|
|
|
|
|
Lights up in blue when Joybook is |
|
|
|
|
|
|
|
|
|
|
|
|
|
|
|
|
|
|
|
|
|
|
reading the data on the hard disk. |
|
|
|
|
|
|
|
|
|
|
|
|
|
Internet Hotkey |
|
|
|
|
|
|
Three-in-One Card Indicator |
||
|
|
|
|
|
|
|
|
|
|
|
|
|
|
|
|
|
|
|
||||
|
|
|
|
|
|
|
|
|
|
|
|
|
Starts |
up |
the |
Internet |
|
|
|
|
Lights up in blue when Joybook is |
|
|
|
|
|
|
|
|
|
|
|
|
|
|
|
|
|
|
||||||
|
|
|
|
|
|
|
|
|
|
|
|
|
Explorer Web browser. |
|
|
|
|
|
reading data on the memory card. |
|||
|
|
|
|
|
|
|
|
|
|
|
|
|
E-Mail Hotkey |
|
|
|
|
|
|
Num Lock Indicator |
||
|
|
|
|
|
|
|
|
|
|
|
|
|
|
|
|
|
|
|
||||
|
|
|
|
|
|
|
|
|
|
|
|
|
|
|
|
|
|
|
||||
|
|
|
|
|
|
|
|
|
|
|
|
|
Starts |
up |
the |
Outlook |
|
|
|
|
Lights up in blue when the Num |
|
|
|
|
|
|
|
|
|
|
|
|
|
|
|
|
|
|
||||||
|
|
|
|
|
|
|
|
|
|
|
|
|
Express e-mail program. |
|
|
|
|
|
Lock function is activated. (refer to |
|||
|
|
|
|
|
|
|
|
|
|
|
|
|
|
|
|
|
|
|
|
|
|
"Function Hotkeys" on page 11 for |
|
|
|
|
|
|
|
|
|
|
|
|
|
|
|
|
|
|
|
|
|
|
details). |
|
|
|
|
|
|
|
|
|
|
|
|
|
Customizable Hotkey 1 |
|
|
|
|
|
Caps Lock Indicator |
|||
|
|
|
|
|
|
|
|
|
|
|
|
|
|
|
|
|
|
|||||
|
|
|
|
|
|
|
|
|
|
|
|
|
Can |
be |
customized |
to |
|
|
|
|
Lights up in blue when the Caps |
|
|
|
|
|
|
|
|
|
|
|
|
|
|
|
|
|
|
||||||
|
|
|
|
|
|
|
|
|
|
|
|
|
open an application. |
|
|
|
|
|
Lock function is activated. (refer to |
|||
|
|
|
|
|
|
|
|
|
|
|
|
|
|
|
|
|
|
|
|
|
|
"Function Hotkeys" on page 11 for |
|
|
|
|
|
|
|
|
|
|
|
|
|
|
|
|
|
|
|
|
|
|
details) |
|
|
|
|
|
|
|
|
|
|
|
|
|
Customizable Hotkey 2 |
|
|
|
|
|
Scroll Lock Indicator |
|||
|
|
|
|
|
|
|
|
|
|
|
|
|
|
|
|
|
|
|||||
|
|
|
|
|
|
|
|
|
|
|
|
|
Can |
be |
customized |
to |
|
|
|
|
Lights up in blue when Scroll Lock |
|
|
|
|
|
|
|
|
|
|
|
|
|
|
|
|
|
|
||||||
|
|
|
|
|
|
|
|
|
|
|
|
|
open an application. |
|
|
|
|
|
function is activated. (refer to "Func- |
|||
|
|
|
|
|
|
|
|
|
|
|
|
|
|
|
|
|
|
|
|
|
|
tion Hotkeys" on page 11 for details) |
Power Button
Turns Joybook on or off.
 For more information about how to configure the customizable hot keys, please refer to "Customizing the Hotkeys (P1, P2)" on page 15.
Touring Your Joybook |
5 |
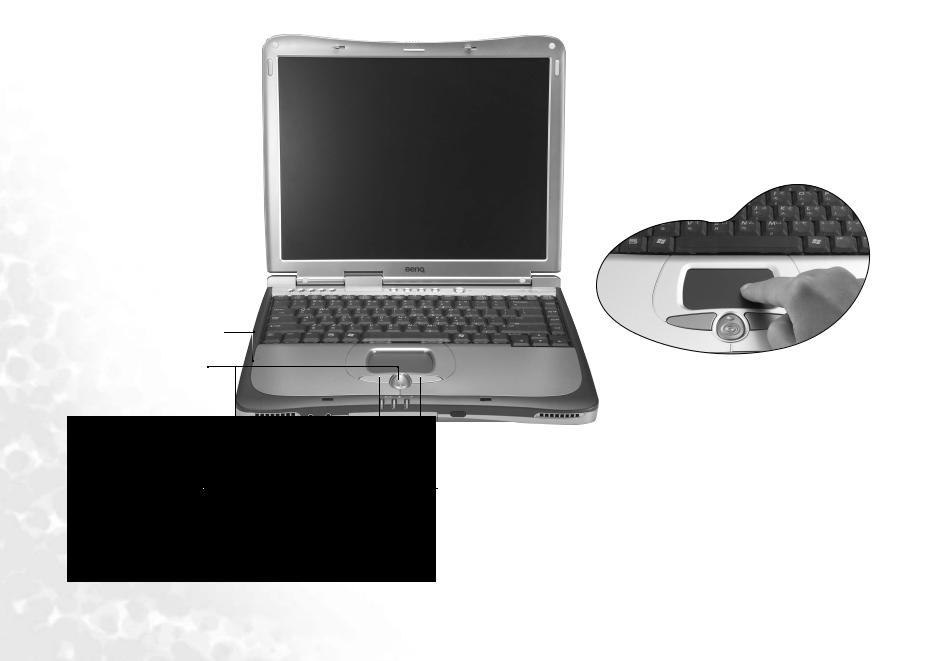
Microphone
For recording sounds.
Up and Down Scroll Button
Use this button to scroll windows up or down, or toggle among items in a menu.
Joybook 5000 Series
Touch Pad
You can use the touch pad to conveniently control the cursor on the screen.
•To move the cursor, gently move your finger on the touch pad. The cursor will move accordingly.
•Tap on the touch pad once to execute the same action as clicking on the left button of a mouse.
•Tap twice to execute the same action as double-clicking.
Left and Right Selection Buttons
Equivalent to the left and right buttons on a mouse.
Joybook 5200 Series
6 Touring Your Joybook
Left Side View
Joybook 5000 Series
Modem Port
Accepts an analog telephone line for use with the internal modem.
USB 2.0 Ports
For connecting peripherals such as mice, digital cameras and MP3 players that use the USB interface.

 Volume Up/Down Button
Increases and decreases the speaker volume.
 Three-in-One Memory Card Slot
Reads Memory Stick, SD Card and MMC Card.
Joybook 5200 Series
 PC Card Slot
This PC Card slot accepts two (one on Joybook 5200 series) Type-II or one Type-III (not supported on Joybook 5200 series) PC Card. You can use it and various PC Cards on the market to further expand the capabilities of your Joybook.
Insert the PC Card into the slots following the direction indicated on the card and complete related driver settings.
PC Card Ejection Button
You can use this button to eject an inserted PC Card. To eject a PC Card:
1.Quit all PC Card applications and shut down all PC Card functions.
2.Press and then release the PC Card ejection button, causing it to pop out.
3.When the button has popped out, push it in again to eject the PC Card.
Touring Your Joybook |
7 |
Right Side View
|
|
|
|
|
|
|
|
Joybook 5200 Series |
Joybook 5000 Series |
|
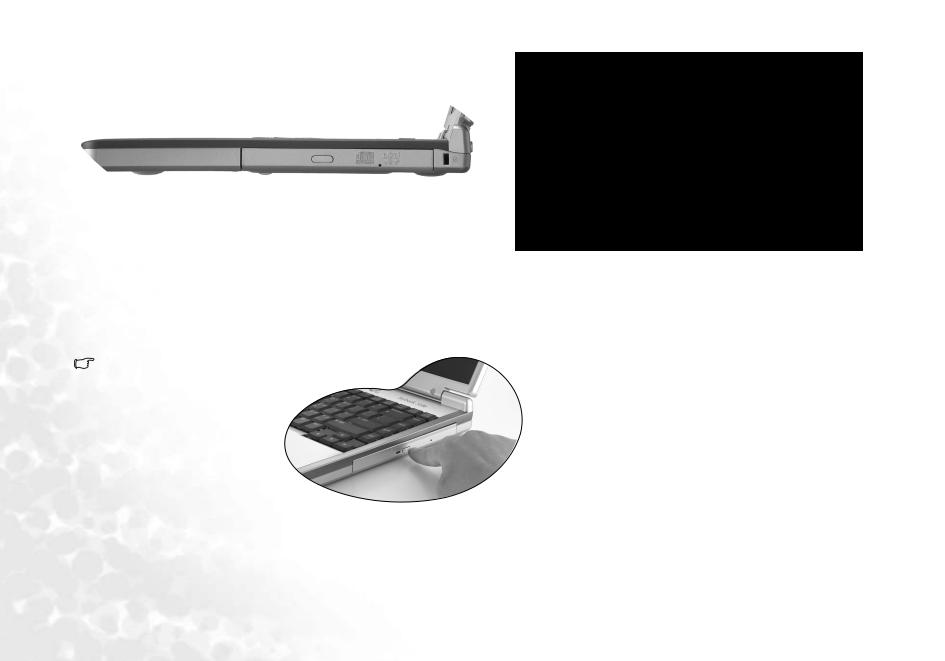
DVD Super-Multi/DVD+RW/DVD & CD-RW Combo Drive (Optional)
Supports multi-functional optical module for reading music CDs, VCDs and DVDs or burning CD-R/CD-RW or DVD+R/DVD+RW (optional) discs. Discs can be inserted/ejected by pressing the small ejection button on the drive.
If you wish to open the disc tray of the
drive when your Joybook power is off, or it can't be opened using the ejection button, insert a pointed object into the tray ejection hole next to the ejection button to force open the disc tray.
 Kensington Lock Hole (only on Joybook 5000 Series)
You can attach a Kensington-type lock and cable to this hole to prevent theft.
8 Touring Your Joybook

Rear View
Joybook 5000 Series
Kensington Lock Hole (only on Joybook 5200 Series)
You can attach a Kensington-type lock and cable to this hole to prevent theft.
Power Jack
For connecting AC power supply.
IEEE 1394 (FireWire)
Can be used to connect to a digital video camera and use it to create your own movies. You can also use it to connect to a Firewire hard disk, printer and more.
LAN (Ethernet) Port
Allows Joybook to connect to a 10/100Mbps Ethernet network.
Joybook 5200 Series
VGA Port
For connecting external display devices, such as monitors and projectors.
S-Video Out Port
Allows you to output display signals to a television set or VCR for viewing or recording.
Ventilation Holes
For dissipating heat and keeping the computer at an optimal temperature.
Touring Your Joybook |
9 |

Front Panel
Joybook 5000 Series
Joybook 5200 Series
Speaker
Plays audio generated by Joybook.
 Earphone Jack
Can be used to connect to an earphone/headset or external speaker for playing Joybook audio.

 MIC IN
Can be used to connect to a microphone for recording sounds.


 Power Indicator
•Lights up in blue when Joybook is turned on.
•When the system enters sleep mode, turns into amber.
Battery Indicator
•When Joybook is in use, lights up in blue.
•When the battery is charging, turns into amber.
•Flashing blue indicates that the battery is running low.
•Flashing amber indicates that the battery is malfunctioning, in which case you should contact service personnel.
Wireless Connection Indicator
When the wireless LAN function is enabled, lights up in blue.
Infrared port (only on Joybook 5000 Series)
You can connect Joybook to your PDA, mobile phone or other Infrared compatible devices using this port.
10 Touring Your Joybook
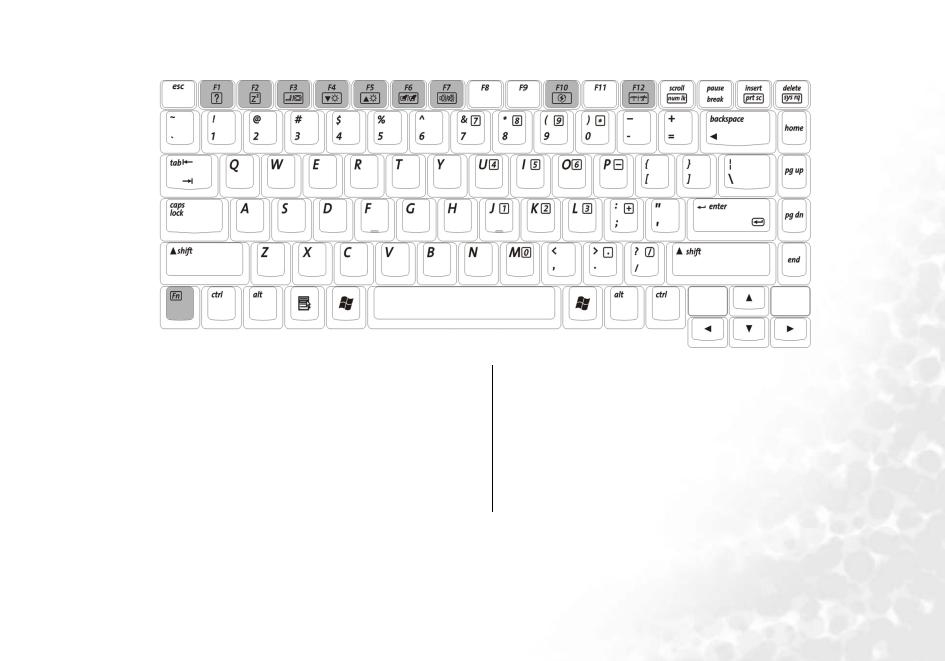
Function Hotkeys
You can use the function hotkeys to access commonly used functions or make quick settings. To use the hotkeys, press and hold the Fn (Function) key at the lower left corner of the keyboard, and then press the desired hotkey.
Fn + F1 Opens function keys online help.
Fn + F2 Puts Joybook into sleep mode.
Fn + F3 Switches display between the screen and an external monitor/projector, or allows simultaneous display.
Fn + F4 Decreases screen brightness.
Fn + F5 Increases screen brightness.
Fn + F6 Activates or deactivates the touch pad.
Fn + F7 Activates or deactivates the speakers.
Fn + F10 Switches among the 3 basic power profiles of QPower.
Fn + F12 Activates or deactivates wireless LAN function.
Press this key combination several times to switch between wireless LAN ON -> wireless LAN OFF.
The status is indicated by the Wireless Connection Indicator. Please refer to the previous page for details.
Touring Your Joybook |
11 |


 Windows Key

 + Tab
+ Tab

 + E
+ E

 + M
+ M
Functionally equivalent to clicking the Start button on the Windows desktop.
Makes the next item on the Windows task bar active.
Opens the My Computer window for browsing disks and files.
Minimizes all windows.
Shift (  ) +
) + 
 + M
+ M

 + R
+ R
Fn + num lk
Caps lock
 Application Key
Cancels minimization of all windows.
Activates the Run dialogue box.
Activates or deactivates the numeric keypad integrated in the keyboard (indicated by the light gray shade in the illustration above).
Capitalizes all text entered.
Provides the same function as the right touch pad button, bringing up a contextual pop-up menu.
12 Touring Your Joybook
 Getting Started with Windows XP
Your Joybook comes installed with Windows XP, Microsoft's latest operating system for consumer PCs. The first time you start up your Joybook, Windows XP will ask you a few questions. Answer the questions to ensure that your full rights are protected. If you are asked to select the type of keyboard and you are not sure, please check the specification label on the packing carton to determine the correct keyboard type.
After you are done answering the questions, Joybook will restart and then you will enter Windows XP for the first time. Click Start  and select Help and
Support  in the menu that appears. The Help and Support Cen-
ter will appear and you can find more information on how to use Windows XP here.
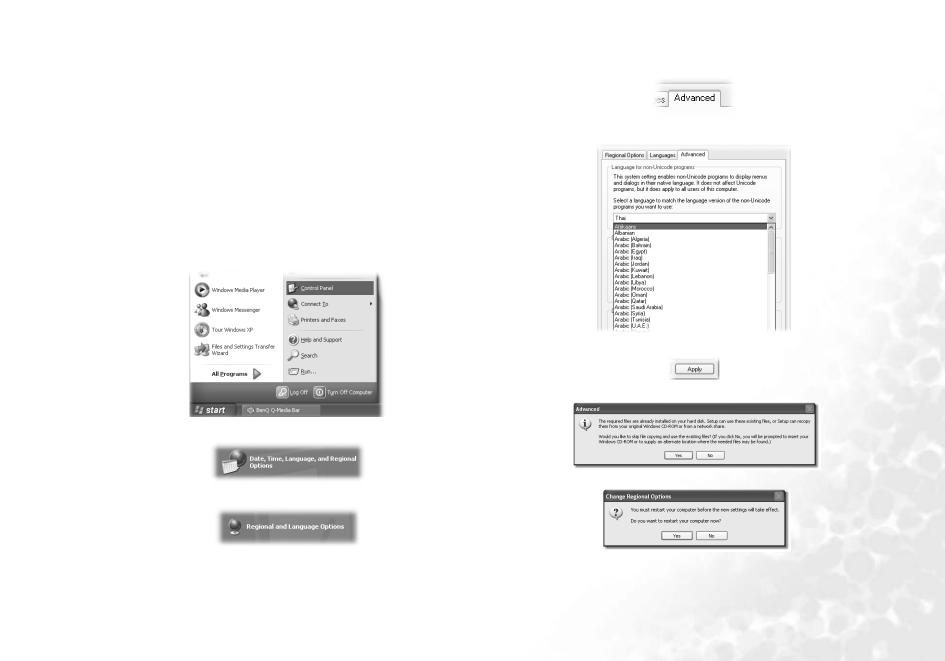
Next, please follow the steps below to setup the language for non-unicode programs settings in Windows XP.
1. Click Start and then Control Panel.
2.Click Date, Time, Language, and Regional Options.
3.Click Regional and Language Options in the window that appears.
4.Click the Advanced tab.
5.In the drop-down listbox, click to select your language and country.
6.Click Apply.
7.Click Yes.
8.Click Yes.
|
Getting Started with Windows XP |
13 |
|
Loading...