


 Loading...
 Joybee 110 (DA-110)
Digital Audio Player
User Manual
Welcome

 Copyright
Copyright 2003 by BENQ Corporation. All rights reserved. No part of this publication may be reproduced, transmitted, transcribed, stored in a retrieval system or translated into any language or computer language, in any form or by any means, electronic, mechanical, magnetic, optical, chemical, manual or otherwise, without the prior written permission of this company.
 Disclaimer
BENQ Corporation makes no representations or warranties, either expressed or implied, with respect to the contents hereof and specifically disclaims any warranties, merchantability or fitness for any particular purpose. Further, BENQ Corporation reserves the right to revise this publication and to make changes from time to time in the contents hereof without obligation of this company to notify any person of such revision or changes.
*Windows, Internet Explorer and Outlook Express are trademarks of Microsoft Corporation. Others are copyrights of their respective companies or organizations.
 Handling Instructions
1.This player is a highly precise electronic product. Please do not disassemble it.
2.Do not format the memory of the player in FAT32/NTFS file format.
3.Do not attempt to alter any part of the player.
4.Do not subject the player to severe impact.
5.Keep the player away from water or direct sunlight.
6.Use damp cloth to clean the player. Do not use any chemical solution.
7.Use only chargers and accessories for use with this particular player model. The use of any other types will invalidate any approval or warranty applying to the player, and may be dangerous.
8.Keep proper volume while listening or it may cause eternal harm to listening capacity.
9.Dispose of unused player and its accessories according to local environmental regulations.

 Table of Contents
1
Copyright 2
Disclaimer 2
Table of Contents i
Your Joybee 110 Digital Audio Player 1
Introduction 1
Package Contents 1
System Requirements 1
Touring the Joybee 110 Digital Audio Player 2
Buttons/Ports/Parts 2
The LCD Display 4
Getting the Joybee 110 Digital Audio Player Ready 5
Connecting Earphone 5
Charging the Battery 5
Installing Joybee 110 Digital Audio Player Software 6 Installing the USB Driver 7
Installing in Windows ME/Windows 2000/Windows XP 7 Installing in Windows 98 7
Using the Joybee 110 Digital Audio Player 8
Turning the Player On and Off 8
Playing Music 8
Section Repeat 8
Play Repeat, EQ (Equalizer), Play Speed 8
Repeat 8
Equalizer 9
Speed 9
Recording 9
Using the Record Function 9
System Setups 9
Recording setups 10
Setting date and time 10
Table of Contents |
i |

Format flash memory 10
Setting Joybee 110 Auto-Off time 10 Setting display backlight duration 10 Setting display contrast 10
Setting language 10 SW Upgrade 10
Buttons Lock 10
Using the Joybee 110 Digital Audio Player as a USB Flash Drive 11
Using QMusic 12
The Main Screen 12
Adding songs to the Joybee 110 Digital Audio Player using QMusic 14
Notes, FAQ and Troubleshooting Tips 21
Notes 21
FAQ and Troubleshooting Tips 22
ii Table of Contents

 Your Joybee 110 Digital Audio Player
Introduction
Congratulations on your purchase of the Joybee 110 Digital Audio Player!
The Joybee 110 Digital Audio Player not only provides multiple functions for high quality music playback and voice recording but consumes lower power to extend your good time. It supports MP3 and WMA music formats, multi-language display and 7 pre-set EQ modes.
Joybee 110 also features audio files segment repeating and options for play speed, making it an ideal tool for language learning. Besides, you can use the Joybee 110 Digital Audio Player as a flash drive, so you can not only make your music mobile, but also move your important data with you.
In addition to the Joybee 110 Digital Audio Player itself, its bundle software tools also provide you with added convenience for converting and transferring music data, making it the easiest to use and highly personalized digital audio player ever available.
Package Contents
The Joybee 110 Digital Audio Player sales package should include the following items. Please contact your dealer if any of them is missing or damaged.
Joybee 110 Digital Audio Player Earphone
USB cable
CD-ROM (eManual / QMusic / Driver..., etc.) Quick start guide
Warranty card Necklet
System Requirements
Microsoft Windows 98SE/ME/2000/XP Pentium 200MHz or higher
USB port CD-ROM drive
60MB hard disk space 32MB system memory
Your Joybee 110 Digital Audio Player |
1 |

Touring the Joybee 110 Digital Audio Player
Buttons/Ports/Parts
(1) LCD Dipslay
(2) Earphone Jack
(3) Necklet Hole |
(8) Volume Up |
(4) Scroll Up/ Next/ Fast
Forward
(9)Volume Down 
(5)Play/ Pause/ Stop/ Power
(6)Scroll Down/ Previous/
Fasr Rewind |
(12)USB port |
(7) Menu/ Function
(11) In-Built Microphone
(10) A-B/ Hold
(1) LCD display
Displays the status of the player. (e.g. song title, play time..., etc.)
(2) Earphone jack
For connecting your earphone to Joybee 110.
(3) Necklet hole
For strapping the necklet.
(3) Scroll up/Next track/Fast forward (

 ) Button
Skip to the next track while playing music, or to the next file while playing recorded files.
If current song or file is already the last one, pressing this button brings you to the first song or file.
Hold down the button while playing to fast forward through tracks. Scroll up in menus.
(4) On/Off/Play/Pause/Stop Button (


 )
)
When player power is off, long press this button to turn on the player and the startup screen will appear.
2 Your Joybee 110 Digital Audio Player

When the player is in standby mode, press this  button to start playing. In a menu, press this button to enter or confirm your selection.
When player power is on or in standby mode, hold down this button for 2 seconds to turn it off.
When playing or recording, press this button to pause. The icon  will appear on the dis-
play. When paused, press this button to resume playing or recording. The icon  will disappear.
While playing or recording, long press this button to stop and put the player into standby mode.
(5) Scroll down/Previous track/Fast rewind ( ) Button
Skip to the previous track while playing music, or to the previous file while playing recorded files. If current song or file is already the first one, pressing this button brings you to the last song or file.
Hold down the button while playing to fast rewind through tracks. Scroll up in menus.
(6) Menu/Function (MENU) Button
Press to select among main menu in idle mode.
Long press to have pop-up options while playing audio files.
(7)/(8) Volume up (+VOL)/Volume down (-VOL) Button
Use the 2 volume control buttons to adjust playback volume: "+" to increase (up to level
17) it and "-" to decrease (down to level 0) it. The volume status is displayed on the display.
(9) Functions button lock/Audio files segment repeat ( /A-B) Button
While playing, press this button to set the starting point for section repeat. The icon "A " will appear on the display. Press this button again to set the ending point. The icon "
 AB" will appear on the display and meanwhile the player will start playing the
section repeatedly. Press this button to cancel section repeat. The icon " AB" disappears and resumes to normal playback mode.
Long press  /A-B button to disable all button functions. Long press again to cancel lock mode.
(10)In-built microphone For voice recording.
(15) USB port
As a USB port, you can connect the USB cable to this port and the USB port on your computer to establish connection between both.
For connecting Joybee 110 to computer when charging.
Your Joybee 110 Digital Audio Player |
3 |
The LCD Display |
(2) |
|
|
|
|
|
|
|||
|
|
|
|
|
|
|
|
|
||
(1) |
|
|
|
|
|
|
|
|
(3) |
|
|
|
|
|
|
|
|
|
|||
|
|
|
|
|
|
|
|
|||
|
|
|
|
|
|
|
|
|
|
|
|
|
|
|
|
|
|
|
|
|
|
|
|
|
|
|
|
|
|
|
|
|
(4)
(5) |
(8) |
|
(6)(7)
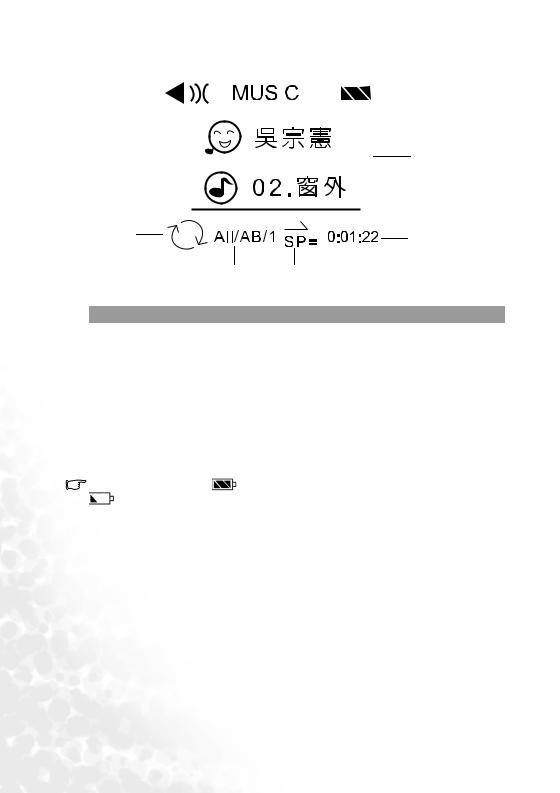
No. |
Description |
|
|
|
|
(1) |
Indicates that the player is in playback mode. |
|
|
|
|
(2) |
Indicates that the player is in MUSIC/VOICE/RECORD/ SETTING mode. |
|
|
|
|
(3) |
Shows the status of battery power. |
|
|
|
|
(4) |
Shows the artist and the audio file being played. |
|
|
|
|
(5) |
Appearance of this icon indicates that the player is in repeat mode. |
|
|
|
|
(6) |
Appearance of this icon indicates type of repeat mode. (ALL repeat/ AB section |
|
|
repeat/single audio tract repeat) |
|
(7) |
Shows current playspeed. |
|
|
|
|
(8) |
Shows current track elapsed time when playing or recording time when recording. |
|
|
|
|
3 bars in the battery status icon |
indicate that the battery power is sufficient. Only one bar in the icon |
|
indicates that the power is weak. If there are no bars in the icon  , the battery is near empty and
you need to charge it immediately. The player will turn off automatically, and any recording in progress will be saved.
4 Your Joybee 110 Digital Audio Player
 Getting the Joybee 110 Digital Audio Player
Ready
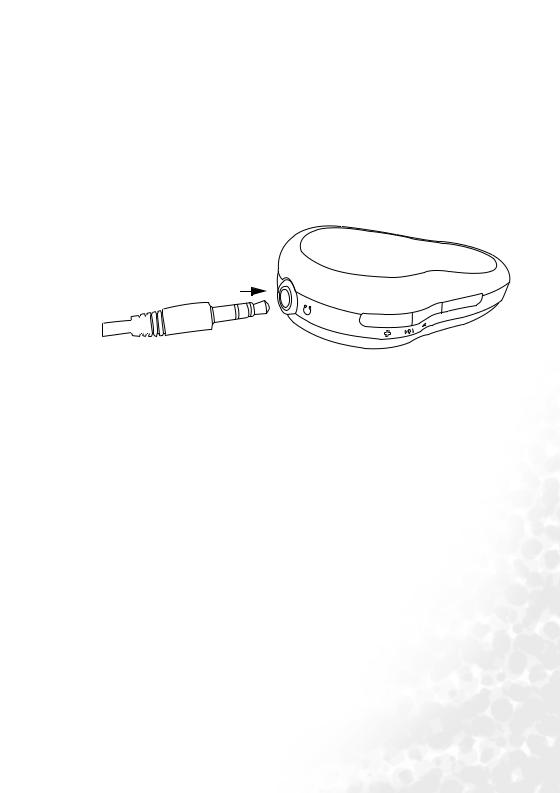
Connecting Earphone
As illustrated, plug the earphone into the earphone jack on the Joybee 110 Digital Audio Player.
Charging the Battery
Connect Joybee 110 Digital Audio Player to PC USB port with the USB cable. When charging completes, “Charging Completes” will show on display. It’ll take about three hours the first time you charge your Joybee 110.
A fully charged battery is capable of providing up to 10 hours of playback time. The maximum playback time will vary depending on the playback volume and file format.
Getting the Joybee 110 Digital Audio Player Ready |
5 |
Loading...