


List of contents |
|
|
Special features |
2 |
|
Safety instructions |
3 |
|
Getting started |
4 |
|
Aerial connection |
4 |
|
Switching on |
4 |
|
Battery fitting |
4 |
|
|
1 |
|
Control unit |
5 |
|
Front and rear panel |
5 |
|
External connections table |
6 |
|
Remote control |
6 |
|
Using the TV |
7 |
|
TV controls |
7 |
|
Manual tuning |
8 |
|
Automatic tuning |
9 |
|
Child lock |
9 |
|
Program table |
10 |
|
TV setup |
11 |
|
Sound menu |
11-12 |
|
Picture menu |
13 |
|
Features menu |
14 |
|
Picture format |
15 |
|
Using teletext |
16-17 |
|
Connecting external equipment |
18-22 |
|
Help and service tips |
23 |
|
Technical specifications table |
24 |
|

Television
Thank you for buying this television which is designed to give you many years of satisfactory service.
You may already be familiar with using a television but do please take time to read these instructions. They are designed to familiarise you with the unit s many new features and to ensure you get the very best out of your purchase.
Special features
¥Your TV can receive stereo channels directly (NICAM optional).
¥100 Programme Memory
¥Available for Cable Channels (A decoder maybe required)
¥Manual Fine Tuning
¥Child Lock
¥Return to the last channel viewed (SWAP)
2¥ Spatial Sound effect
¥16:9 picture format
¥S-Video connection (optional)
¥Audio/Video RCA sockets (optional).
¥Back Audio Out (optional)
¥Normalisation system to recall the setting in memory after the colour,contrast, brightness setting have been changed.
¥Picture adjustment using one button (Smart control).
¥Sound adjustment using one button (Smart control).
¥Equalizer Sound Setup
¥Automatic Volume Limiting
¥Your TV set is equipped with an On-Screen Display system. This system enables the user to see the function on-screen and to control them efficiently.
¥Infrared Remote Control
¥Virtual Dolby Surround (optional)
¥Multi language menu system
¥On Timer
¥Off Timer
¥Stereo headphone socket (optional)
¥2 Scart Socket: Video cassette recorder, satellite receiver, video disc player,DVD, TV games or a home computer can be connected to this AV socket with an appropriate connecting cable.
¥Third scart socket (optional).
¥Subwoofer (optional)
¥Zoom, Letterbox, Subtitle picture formats ( for Widescreen TV sets)
¥Naming the channels
¥Teletext reception
¥Auto recognition of the broadcasting format (4:3, 16-9 or Letterbox) via WSS feature.
Safety is Important
Your safety and the safety of others is important. Please, therefore, ensure you read the Safetyinstructions before you operate this television.
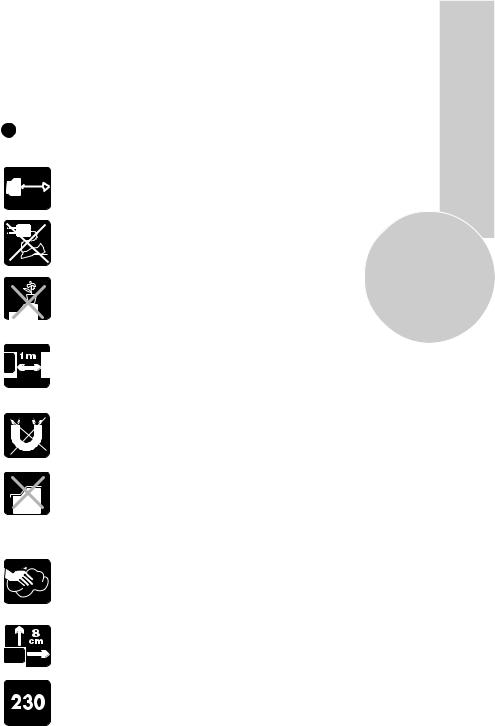
Safety instructions |
|
||||
! Read all the safety instructions before first use of your TV. |
|
||||
|
|
|
|
¥ Position the television so that direct light does not fall on |
|
|
|
|
|
the screen. Excessive light will cause a washed out effect. |
|
|
|
|
|
¥ Position the power supply lead and other leads so that |
|
|
|
|
|
they are not likely to be walked on or pinched by things |
|
|
|||||
|
|
|
|
placed on or against them. |
3 |
|
|
|
|
|
|
|
|
|
|
¥ Do not use the appliance in humid or damp conditions. |
|
|
|
|
|
Do not allow the appliance to get wet, i.e. dripping or |
|
|
|
|
|
splashing, as this may be dangerous. Do not place water |
|
|
|
|
|
filled objects, such as vases and flower top on top of the |
|
|
|
|
|
appliance. |
|
|
|
|
|
¥ Make sure that no naked flame sources, such as lighted |
|
|
|
|
|
candles, are placed on top of the appliance. |
|
|
|
|
|
¥ Do not place the television near heat sources such as |
|
|
|
|
|
radiators, ovens, stoves, etc. |
|
|
|
|
|
¥ Do not use the television near any apparatus that produces |
|
|
|
|
|
a magnetic field such as HI-FI speakers or electric motors |
|
|
|
|
|
|
|
|
|
|
|
|
|
|
|
|
|
otherwise colourpurity may be affected. |
|
|
|
|
|
¥ The heat built up in the set escapes through ventilation |
|
|
|
|
|
holes, so do not cover the set by drapes, clothes etc. that may |
|
|
|
|
|
block air circulation. Do not place the television on carpet |
|
|
|
|
|
or soft furnishings. |
|
|
|
|
|
¥ NEVER let children push anything into the holes or slots |
|
|
|
|
|
on the case. |
|
|
|
|
|
¥ Clean the TV Screen using a slightly damp cloth or chamois |
|
|
|
|
|
leather. Never use abrasive cleaning agents like liquid or |
|
|
|
|
|
aerosol cleaners. |
|
|
|
|
|
¥ Remove the mains plug from the socket outlet while cleaning. |
|
|
|
|
|
¥ If you wish to place the television on a shelf or in a wall |
|
|
|
|
|
unit always ensure there is a minimum air gap of 8 cm |
|
|
|
|
|
around the top, sides and rear of the television, to assist |
|
|
|
|
|
ventilation. |
|
|
|
|
|
¥ Your TV set is designed to operate with mains voltages |
|
|
|
|
|
230VAC; 50Hz. Do not connect your TV set to power sources |
|
|
|
|
|
other than the mains supply. |
|
Getting started
Remove your Television carefully from the box. You may wish to store the packaging for future use.
In the box
Inside your this package you should have:
¥Television
¥Remote control
¥User guide
¥AAA batteries x 2
4 |
Read these instructions before use. |
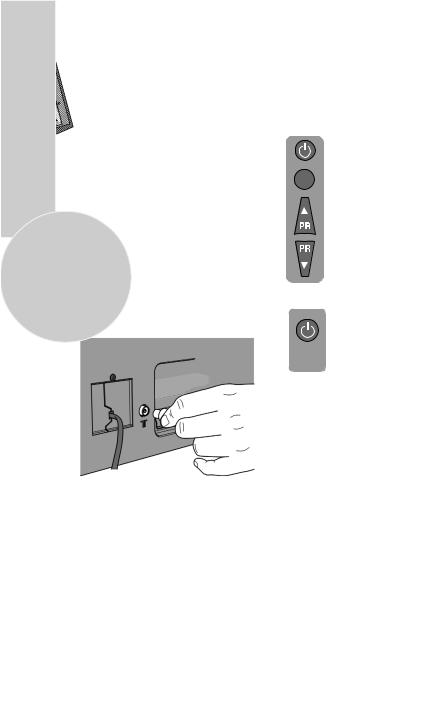
Aerial connection
To connect an aerial, plug the aerial lead into the aerial socket on the rear of the TV.
Please Note
When not in use disconnect the plug from the mains power supply.
Press the Power button on the front of the TV. The standby indicator will
7 illuminate.
Press a Numeric button or the
Program up or Program down
button on the remote handset or
Program up or Program down button on the front panel to switch the TV on.
The standby indicator remains on. The picture will appear after a few seconds.
Press the Standby button to switch the TV to standby. The standby indicator will brighter.
Please Note
Do not leave the television on standby unattended or overnight.
Switching the TV on for the first time
You can use an outdoor or indoor aerial.
However, if you use an indoor aerial the quality of the reception may be reduced and adjustment of the aerial may be required when changing programs.
Please note
If you live in a poor reception area or use an indoor aerial you may experience loss or corruption of teletext transmissions.
To install your TV, please read the sectionsTV controls and Tuning the television .
Battery fitting
Insert the 2 AAA Batteries supplied into the compartment on the rear of the remote control, ensure you follow the polarity diagram inside the compartment.
Switching on
Mains power
Connect the mains plug into the mains socket and switch on.
Connect the TV mains plug into your domestic mains socket outlet (230 V 50 Hz AC).
Control Unit
Front Panel
Program Down/Up button
P- P+
Volume Down/Up button.
V- V+ |
5 |
|
|
General |
|
Program ON/OFF switch |
Stand by (Depends on model) |
Stand by indicator |
|
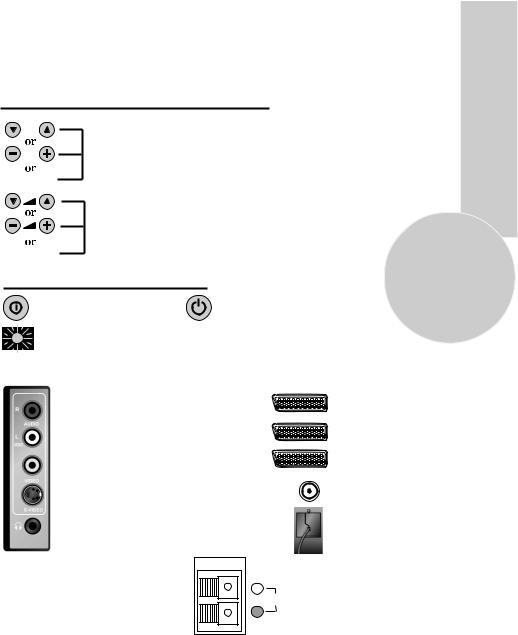
External Connections: (Front or side) (External connections: (Rear)
Right audio RCA (Red)
Left audio RCA/Mono RCA (White)
Video RCA (Yellow)
S-Video connection
Headphone socket
Optional
SUBWOOFER
R 
AUDIO
OUT
L 
It is used for external subwoofer in 33 televisions
AV1 scart
AV2 scart
AV3 scart (optional)
Aerial socket
Power cable
You may wish to connect audio amplifier or any similar devices to audio out. The output is always the current channel you are watching.
Please note
¥See the external connections table on next page for available connections depending the size and model of your TV set.
¥Do not use Video RCA and S-Video connections at the same time, otherwise they will effect the picture each other.

|
External connections table |
|
|
|
|
|||||
|
|
|
|
|
|
|
|
|
|
|
|
|
Picture tube |
24 |
25 |
26 |
28 |
28 |
29 |
32 |
33 |
|
|
size/typee |
16:9 |
4:3 |
16:9 |
4:3 |
16:9 |
4:3 |
16:9 |
4:3 |
|
|
|
|
|
|
|
|
|
|
|
|
|
AV1 Scart |
STD. |
STD. |
STD. |
STD. |
STD. |
STD. |
STD. |
STD. |
|
|
|
|
|
|
|
|
|
|
|
|
|
AV2 Scart |
STD. |
STD. |
STD. |
STD. |
STD. |
STD. |
STD. |
STD. |
|
|
|
|
|
|
|
|
|
|
|
|
|
AV3 Scart |
OPT. |
OPT. |
OPT. |
OPT. |
OPT. |
OPT. |
OPT. |
OPT. |
|
|
|
|
|
|
|
|
|
|
|
|
|
Headphone |
OPT. |
OPT. |
OPT. |
OPT. |
OPT. |
OPT. |
OPT. |
OPT. |
|
|
socket |
||||||||
|
|
|
|
|
|
|
|
|
|
|
|
|
Audio/Video |
OPT. |
OPT. |
OPT. |
OPT. |
OPT. |
OPT. |
OPT. |
OPT. |
|
|
RCA |
||||||||
|
|
|
|
|
|
|
|
|
|
|
6 |
|
S-Video |
OPT. |
OPT. |
OPT. |
OPT. |
OPT. |
OPT. |
OPT. |
OPT. |
|
socket |
|||||||||
|
|
|
|
|
|
|
|
|
|
|
|
|
Back Audio |
OPT. |
OPT. |
OPT. |
OPT. |
OPT. |
OPT. |
OPT. |
OPT. |
|
|
Out |
||||||||
|
|
|
|
|
|
|
|
|
|
|
STD : Standart
OPT : Optional
Please note:
The Audio/Video RCA, S-Video and Headphone socket can be placed on the front panel or on the right-hand side of the cabinet depending to the model of your TV.
Remote control
Mute |
|
|
|
P 100 |
|
|
|
REVEAL |
|
|
|
DOUBLE |
1 |
2 |
3 |
|
|
||
HOLD |
4 |
5 |
6 |
|
|
|
|
SUB |
7 |
8 |
9 |
|
|||
UPDATE |
|
|
|
AV |
0 |
-/-- |
|
MIX |
|
|
|
TV/TX |
|
|
MENU |
|
|
|
|
|
OK |
|
|
SWAP |
|
|
16:9 |
|
TIMER |
|
PP |
|
|
|
Using the TV
TV controls
Programme selection
Press the Program up or Program down buttons on the TV or remote control or press a Numeric button to select a programme.
To select a programme whose
1number is greater than 9 using the numeric buttons, press the -/--
-/-- button first and then press the two Numeric buttons. For example, to
1select programme 12, press the-/--
2button followed by1 and then 2. You can also select a program by pressing in the OK button.
OK Press the OKbutton and a grey box will appear on the screen with programme numbers on it.
P00
P01
P02
P03 TRT1
P04 TRT2
 P05 STAR
P06 CY 470
P07
P08
P09
P10
P11
P12
P13
P14
P15
|
Use the Program up and Program |
|
|
down buttons to scroll through the |
|
|
programme numbers. When you |
|
OK |
find the program number you want |
|
press theOK button again. |
||
|
TV/TX |
Press theTV/TX button to close |
the grey box. |
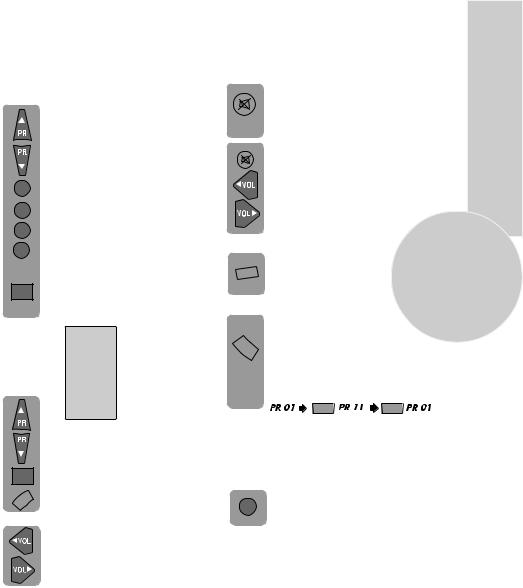
Volume
Press the Volume + or Volume -
button on the TV or the Vol▲ or Vol ▲ button on the remote control.
A sound level bar will appear on the screen.
Mute
To mute the sound press the Mute button on the remote control. A loudspeaker symbol will appear on the screen.
Press the Mute button again to restore the sound. The symbol will disappear.
Pressing Volume down buttons to decrease headphone volume. Pressing the Volume up buttons to increase the headphone volume.
PP |
|
|
7 |
|
Personal preference. Press the |
||
PP |
PP button to revert to the |
|
|
|
default settings for the TV. |
|
|
Swap |
(See TV setup). |
|
|
Allows you to swap between the |
|
||
|
|
||
SWAP |
program you are watching and the |
|
|
last selected program. i.e. If you were |
|
||
|
|
||
|
watching Program 1 and change to |
|
|
|
Program 11, press theSwap button |
|
|
|
to go back to Program 1. Press it |
|
|
|
again to return to Program 11. |
|
|
|
SWAP |
SWAP |
|
AV
For use when you are connecting an external source to your TV (Video recorder, DVD player etc.) via the SCART sockets or RCA sockets.
See Connecting external equipment .
AV |
Press theAV button to select your |
|
input as follows: |
||
|
2 Scart models:
1AV1 when using SCART socket 1.
2AV2 when using SCART socket 2.
3AV2S for S-Video equipment.
4AV3 when using the RCA sockets of the TV. (Optional)
5AV3S when using the S-video socket and
RCA audio sockets of the TV. (Optional)
3 Scart models:
1AV1 when using SCART socket 1.
2AV2 when using SCART socket 2.
3AV2S for S-Video equipment.
4AV3 when using SCART socket 3.
5AV4 when using the RCA sockets of the TV. (Optional)
6AV4S when using the S-video socket and
RCA audio sockets of the TV. (Optional)

AV |
Press the AV button again to return |
|
to TV. |
||
|
Tuning the television
There are two ways of tuning your television: Manual, where you control the tuning process or
Autoprogram where the television does it all automatically.
Please Note
If the TV is set to a channel with no signal the TV will return to standby after 5 minutes. The time remaining is displayed on the screen last 60 second.
8
Manual tuning
Tuning the TV is accessed through the
SETUP menu.
There are two ways to access the SETUP
menu: |
Press the blue Setup button. |
||
|
|
|
|
|
MENU |
or |
|
|
Press the Menu button and use the |
||
|
|
|
Program down button to select |
|
|
|
SETUP. Press the OK button to |
|
OK |
|
enter the SETUP menu. |
|
|
|
|
In the Setup menu select PROG NO and change to P1 using
the Program down button to select it and the Volume up button to change it.
Starting with Program 1, tune in the first channel as follows:
Use the Program down button to select SEARCH.
Press the Volume up or Volume down button to start the tuning search.
When the search finds a strong channel signal it will stop searching. The picture will appear.
Identify which channel you are watching (BBC 1, ITV 1 etc.) and decide which program number you want it to be.
Use the Program down button to select PROGRAM NO.
|
|
|
|
|
select again SEARCH and |
|
|
|
|
|
|
||
|
|
|
|
|
||
country. In some countries the broadcasting |
||||||
continue the tuning procedure |
||||||
system can be both in BG/DK or BG/LL«. |
||||||
until you have tuned in all the |
||||||
Only the TV sets produced with Pal Secam |
||||||
programmes you want or the |
||||||
BG/DK or Pal Secam BG/LL« systems can |
||||||
television can receive. |
||||||
receive both BG/DK or BG/LL« broadcasts. |
||||||
|
||||||
In this case the user can select the required |
|
|||||
SYSTEM using Volume up/down buttons. |
|
|||||
|
SETUP |
Use theVolume up/down buttons |
||||
|
CHANNEL |
S 07 |
||||
|
SYSTEM |
BG |
to select the program number. |
|||
|
FINE TUNE |
0 |
|
|
||
|
SEARCH |
< > |
|
|
|
|
|
AUTOPROGRAM |
OFF |
|
|||
|
CHILD LOCK |
|
||||
|
PROGRAM NO |
P1 |
Use the Program down button to |
|||
|
STORE |
|
|
|
||
|
C/S |
|
|
|
select Store. Press theOKbutton |
|
|
|
|
|
and STORED will appear on the |
||
|
BACK |
|
|
OK |
STORE line. |
|
Please note |
|
|
|
You have now stored the first |
||
The system will displayed automatically on |
channel. |
|||||
SYSTEM row i.e.BG, L, I, DK depending |
Use the Program up button to |
|||||
the receiving broadcasting system of the |
|
|||||
Please note
If you do not press any buttons for 15 seconds the TV will exit the menu system.
 Loading...