


Beko RASGL142B, RASGL142PX, RASFLE72B, RASFLE72PX, ASGP342B User Manual
...ASGP342X |
ASGN542S |
RASFLE72B |
ASGP342B |
ASGL142X |
RASFLE72PX |
ASGN542B |
RASGL142B |
RASGD242PX |
ASGN542X |
RASGL142PX |
|
EN |
|
|
Please read these instructions first before using your appliance
Thank you for choosing a Beko appliance.
Please take some time to read this user manual before using your appliance, to ensure you know how to safely operate the controls and functions.
Carefully follow all unpacking and installation instructions to ensure the appliance is correctly connected and fitted prior to use.
Please write your product model and serial number on the last page of this user manual, and store in a safe location close to the appliance for easy future reference.
This user manual may also be applicable for several other models. Differences between models will be listed.
If you have any questions or concerns, please call our contact centre or find help and information online at www.beko.co.uk
Symbols and their descriptions
This instruction manual contains the following symbols:
C A B
Important information or useful usage tips.
Warning against dangerous conditions for life and property.
Warning against electric voltage.
Table of Contents
1. Safety and environment instructions3
1.1. General safety . . . . . . . . . . . . . . . . . . . . . . 3 1.1.1 HC warning . . . . . . . . . . . . . . . . . . . . . . . 4 1.1.2 For models with water dispenser. . . . . . . . 4 1.2. Intended use . . . . . . . . . . . . . . . . . . . . . . . 5 1.3. Child safety . . . . . . . . . . . . . . . . . . . . . . . . 5
1.4. Compliance with WEEE Directive and Disposing of the Waste Product . . . . . . . . . 5
1.5. Compliance with RoHS Directive . . . . . . . . . 5 1.6. Package information . . . . . . . . . . . . . . . . . 5
2 |
Refrigerator |
6 |
|
|
|
3 |
Installation |
7 |
3.1. Right place for installation. . . . . . . . . . . . . . 7 3.2. Attaching the plastic wedges . . . . . . . . . . . 7 3.3. Adjusting the stands. . . . . . . . . . . . . . . . . . 8 3.4. Power connection . . . . . . . . . . . . . . . . . . . 8 3.5. Water connection . . . . . . . . . . . . . . . . . . . 9 3.6. Connecting water hose to the product. . . . 10 3.7. Connecting to water mains . . . . . . . . . . . . 10 3.8. For products using water carboy . . . . . . . . 11 3.9 Water filter . . . . . . . . . . . . . . . . . . . . . . . . 11 3.9.1.Fixing external filter on the wall (Optional) 12 3.9.2.Internal filter. . . . . . . . . . . . . . . . . . . . . . 13
4 Preparation |
15 |
4.1. What to do for energy saving . . . . . . . . . . 15 4.2. First Use . . . . . . . . . . . . . . . . . . . . . . . . . 15
5 |
Using the product |
16 |
5.1. Indicator panel . . . . . . . . . . . . . . . . . . . . . |
16 |
|
5.2. Humidity controlled crisper . . . . . . . . . . . . |
26 |
|
5.3. Activating water filter change warning . . . |
27 |
|
5.4. Using the water fountain . . . . . . . . . . . . . |
29 |
|
5.5. Filling the fountain water tank . . . . . . . . . . |
29 |
|
5.6. Cleaning the water tank . . . . . . . . . . . . . . |
30 |
|
5.7. Taking ice / water . . . . . . . . . . . . . . . . . . |
31 |
|
5.8. Drip tray . . . . . . . . . . . . . . . . . . . . . . . . . |
31 |
|
5.9. Zero degree compartment . . . . . . . . . . . . |
32 |
|
5.10. Vegetable bin . . . . . . . . . . . . . . . . . . . . . |
32 |
|
5.11. Blue light . . . . . . . . . . . . . . . . . . . . . . . . |
32 |
|
5.12. Ionizer . . . . . . . . . . . . . . . . . . . . . . . . . . |
32 |
|
5.13. Minibar. . . . . . . . . . . . . . . . . . . . . . . . . . |
32 |
|
5.14. Odour filter . . . . . . . . . . . . . . . . . . . . . . |
32 |
|
5.15. Icematic and ice storage box . . . . . . . . . . |
33 |
|
5.16. Ice-maker . . . . . . . . . . . . . . . . . . . . . . . |
33 |
|
5.17. Freezing fresh food . . . . . . . . . . . . . . . . . |
35 |
|
5.18. Recommendations for storing frozen foods 35 |
||
5.19. Deep freezer details . . . . . . . . . . . . . . . . |
35 |
|
5.20. Placing the food . . . . . . . . . . . . . . . . . . . |
36 |
|
5.21. Door open alert . . . . . . . . . . . . . . . . . . . |
36 |
|
5.22. Interior light . . . . . . . . . . . . . . . . . . . . . . |
36 |
|
6 |
Maintenance and cleaning |
37 |
6.1 Avoiding bad odours. . . . . . . . . . . . . . . . . 37 6.2 Protecting the plastic surfaces . . . . . . . . . 37 6.3 Cleaning of Glass Water Tank . . . . . . . . . . 38
7. Troubleshooting |
39 |
|
|
|
2 / 47 EN |
Refrigerator / User Guide |
|
|
|

1.Safety and environment instructions
This section provides the safety instructions necessary to prevent the risk of injury and material damage. Failure to observe these instructions will invalidate all types of product warranty.
Intended use
|
WARNING: |
A |
Keep ventilation openings, in |
the appliance enclosure or in |
|
|
the built-instructure, clear of |
|
obstruction. |
|
WARNING: |
|
Do not use mechanical |
A |
devices or other means to |
accelerate the defrosting |
|
|
process, other than those |
|
recommended by the |
|
manufacturer. |
A |
WARNING: |
Do not damage the refrigerant |
|
|
circuit. |
|
WARNING: |
|
Do not use electrical |
A |
appliances inside the food |
storage compartments of the |
|
|
appliance, unless they are of |
|
the type recommended by the |
|
manufacturer. |
This appliance is intended to be used in household and similar applications such as
–staff kitchen areas in shops, offices and other working environments;
–farm houses and by clients in hotels, motels and other residential type environments;
–bed and breakfast type environments;
–catering and similar non-retail applications.
1.1. General safety
•This product should not be used by persons with physical, sensory and mental disabilities, without sufficient knowledge and experience or by children. The device can only be used by such persons under supervision and instruction of a person responsible for their safety. Children should not be allowed to play with this device.
•In case of malfunction, unplug the device.
•After unplugging, wait at least 5 minutes before plugging in again.
•Unplug the product when not in use.
•Do not touch the plug with wet hands! Do not pull the cable to plug off, always hold the plug.
•Do not plug in the refrigerator if the socket is loose.
•Unplug the product during installation, maintenance, cleaning and repair.
•If the product will not be used for a while, unplug the product and remove any food inside.
•Do not use the product when the compartment with circuit cards located on the upper back part of the product (electrical card box cover) (1) is open.
1
1 |
•Do not use steam or steamed cleaning materials for cleaning the refrigerator and melting the ice inside. Steam may contact the electrified areas and cause
Refrigerator / User Guide |
3 / 47 EN |
|
|
|
|
Safety and environment instructions
short circuit or electric shock!
•Do not wash the product by spraying or pouring water on it! Danger of electric shock!
•In case of malfunction, do not use the product, as it may cause electric shock. Contact the authorised service before doing anything.
•Plug the product into an earthed socket. Earthing must be done by a qualified electrician.
•If the product has LED type lighting, contact the authorised service for replacing or in case of any problem.
•Do not touch frozen food with wet hands! It may adhere to your hands!
•Do not place liquids in bottles and cans into the freezer compartment. They may explode.
•Place liquids in upright position after tightly closing the lid.
•Do not spray flammable substances near the product, as it may burn or explode.
•Do not keep flammable materials and products with flammable gas (sprays, etc.) in the refrigerator.
•Do not place containers holding liquids on top of the product. Splashing water on an electrified part may cause electric shock and risk of fire.
•Exposing the product to rain, snow, sunlight and wind will cause electrical danger. When relocating the product, do not pull by holding the door handle. The handle may come off.
•Take care to avoid trapping any part of your hands or body in any of the moving parts inside the product.
•Do not step or lean on the door, drawers and similar parts of the refrigerator. This will cause the product to fall down and cause damage to the parts.
• Take care not to trap the power cable.
1.1.1 HC warning
If the product comprises a cooling system using R600a gas, take care to avoid damaging the cooling system and its pipe while using and moving the product. This gas is flammable. If the cooling system
is damaged, keep the product away from sources of fire and ventilate the room immediately.
C The label on the inner left side indicates the type of gas used in the product.
1.1.2 For models with water dispenser
•Pressure for cold water inlet shall be maximum 90 psi (620 kPa). If your water pressure exceeds 80 psi (550 kPa), use a pressure limiting valve in your mains system. If you do not know how to check your water pressure, ask for the help of a professional plumber.
•If there is risk of water hammer effect in your installation, always use a water hammer prevention equipment in your installation. Consult Professional plumbers if you are not sure that there is no water hammer effect in your installation.
•Do not install on the hot water inlet. Take precautions against of the risk of freezing of the hoses. Water temperature operating interval shall
be 33°F (0.6°C) minimum and 100°F (38°C) maximum.
|
4 / 47 EN |
Refrigerator / User Guide |
|
|
|

Safety and environment instructions
• Use drinking water only.
1.2. Intended use
•This product is designed for home use. It is not intended for commercial use.
•The product should be used to store food and beverages only.
•Do not keep sensitive products requiring controlled temperatures (vaccines, heat sensitive medication, medical supplies, etc.) in the refrigerator.
•The manufacturer assumes no responsibility for any damage due to misuse or mishandling.
•Original spare parts will be provided for 10 years, following the product purchasing date.
1.3. Child safety
•Keep packaging materials out of children’s reach.
•Do not allow the children to play with the product.
•If the product’s door comprises a lock, keep the key out of children’s reach.
1.4. Compliance with WEEE Directive
and Disposing of the Waste Product
This product complies with EU WEEE Directive (2012/19/EU). This product bears a classification symbol for waste electrical and electronic equipment (WEEE).
This product has been manufactured
with high quality parts and materials which can be reused and are suitable for recycling. Do not dispose of the
waste product with normal domestic and other wastes at the end of its service life. Take it to the collection
center for the recycling of electrical and electronic equipment. Please consult your local authorities to learn about these collection centers.
1.5. Compliance with RoHS Directive
•This product complies with EU WEEE Directive (2011/65/EU). It does not contain harmful and prohibited materials specified in the Directive.
1.6. Package information
Packaging materials of the product are manufactured from recyclable materials in accordance with our National Environment Regulations. Do not dispose of the packaging materials together with the domestic or other wastes. Take them to the packaging material collection points designated by the local authorities.
Refrigerator / User Guide |
5 / 47 EN |
|
|
|
|
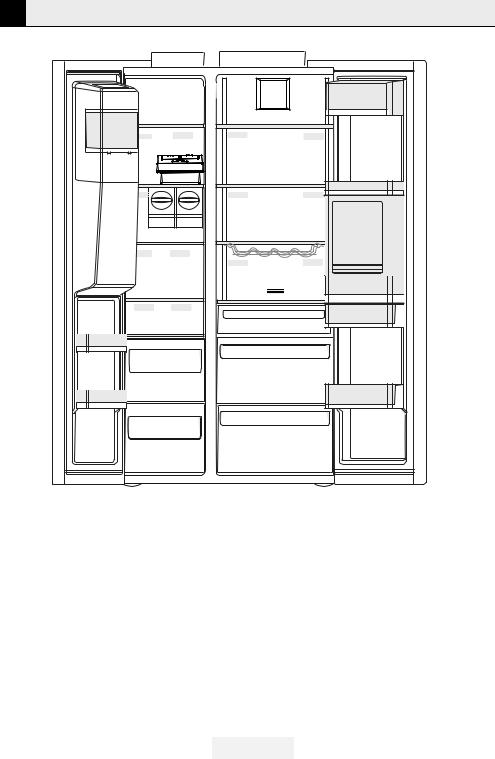
2 Refrigerator
1
*18
*17

*16
*16
15 |
14
13
2 |
|
3 |
*4 |
5 |
*6 |
|
|
|
*7 |
*9 |
|
10 |
|
*11 |
*8 |
|
|
12 |
|
|
13 |
1- |
Freezer compartment |
10Odour filter |
|||
2- |
Cooler compartment |
11Zero degree compartment |
|||
3- |
Fan |
12Vegetable bins |
|||
4- |
Butter-cheese compartment |
13Adjustable stands |
|||
5- |
Glass shelves |
14Frozen food storing compartments |
|||
6- |
Cooler compartment door shelves |
15Freezer compartment door shelves |
|||
7- |
Minibar accessory |
16Icematics |
|||
8- |
Water tank |
17Ice storage box |
|||
9- |
Wine rack |
18- Ice-maker decorative lid |
|||
|
|
|
|
*Optional |
|
|
|
|
|
|
|
|
|
C |
*Optional: Figures in this user guide are schematic and may not be exactly match your product. If your |
||
|
|
product does not comprise the relevant parts, the information pertains to other models. |
|||
|
|
|
|
|
|
|
|
|
|
|
|
6 / 47 EN |
Refrigerator / User Guide |
3 Installation
3.1. Right place for installation
To ready the product for installation, see the information in the user guide and make sure the electric and water utilities are as required. If not, call an electrician and plumber to arrange the utilities as necessary.
WARNING: The manufacturer assumes B no responsibility for any damage caused by the work carried out by unauthorized
persons.
WARNING: The product’s power cable B must be unplugged during installation.
Failure to do so may result in death or serious injuries!
WARNING: : If the door span is too A narrow for the product to pass, remove the
door and turn the product sideways.
•Place the product on a flat surface to avoid vibration.
•Place the product at least 30 cm away from the heater, stove and similar sources of heat and at least 5 cm away from electric ovens.
•Do not expose the product to direct sunlight or keep in damp environments.
•The product requires adequate air circulation to function efficiently. If the product will be placed in an alcove, remember to leave at least 5 cm distance between the product and the ceiling and the walls.
•Do not install the product in environments with temperatures below -5°C.
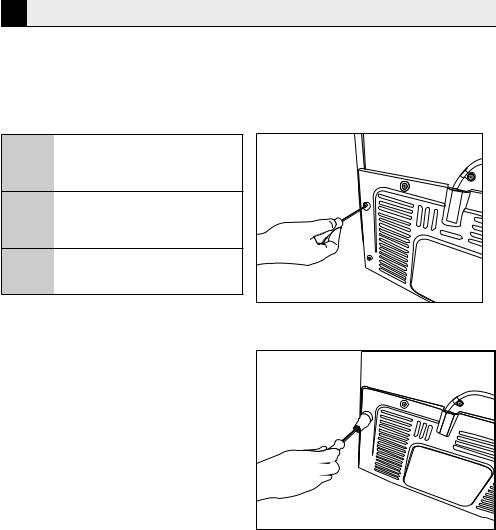
3.2. Attaching the plastic wedges
Use the plastic wedges in the provided with the product to provide sufficient space for air circulation between the product and the wall.
1. To attach the wedges, remove the screws on the product and use the screws provided with the wedges.
2. Attach 2 plastic wedges on the ventilation cover shown as j in the figure.
Refrigerator / User Guide |
7 / 47 EN |
|
|
|
|

Installation
3.3. Adjusting the stands
If the product is not in balanced position, adjust the front adjustable stands by rotating right or left.
In order to adjust the doors vertically,
•Loosen the fixing nut at the bottom
•Screw adjusting nut (CW/CCW) according to the position of the door
•Tighten the fixing nut for the final position
In order to adjust the doors horizontally,
•Loosen the fixing bolt on the top
•Screw the adjusting bolt (CW/CCW) on the side according to the position of the door
•Tighten the fixing bolt on the top for the final position
adjusting nut |
fixing nut |
fixing nut |
3.4. Power connection
A |
WARNING: Do not use extension or multi |
sockets in power connection. |
|
B |
WARNING: Damaged power cable must |
be replaced by Authorized Service. |
When placing two coolers in adjacent C position, leave at least 4 cm distance
between the two units.
•Our firm will not assume responsibility for any damages due to usage without earthing and power connection in compliance with national regulations.
•The power cable plug must be easily accessible after installation.
•Do not use multi-group plug with or without extension cable between the wall socket and the refrigerator.
|
8 / 47 EN |
Refrigerator / User Guide |
|
|
|
Installation
3.5. Water connection
(Optional)
WARNING: Unplug the product and A the water pump (if available) during
connection.
The product can be connected to a carboy or directly to the water mains, depending on the model. To establish the connection, the water hose must first be connected to the product.
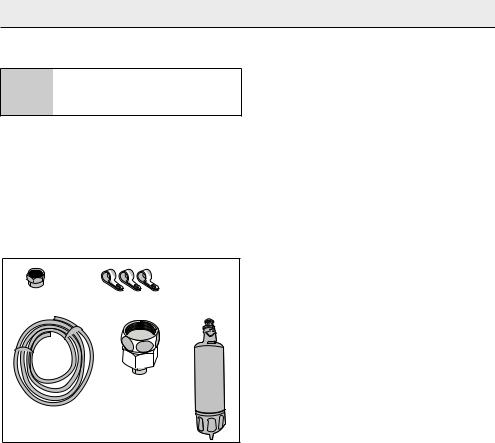
Check to see the following parts are supplied with your product’s model:
1 |
2 |
|
3 |
4 |
*5 |
1.Connector (1 piece): Used to attach the water hose to the rear of the product.
2.Hose clip (3 pieces): Used to fix the water hose on the wall.
3.Water hose (1 piece, 5 meter diameter 1/4 inches): Used for the water connection.
4.Tap adapter (1 piece): Comprises a porous filter, used for connection to the cold water mains.
5.Water filter (1 piece *Optional): Used to connect the mains water to the product. Water filter is not required if carboy connection is available.
Refrigerator / User Guide |
9 / 47 EN |
|
|
|
|
Installation
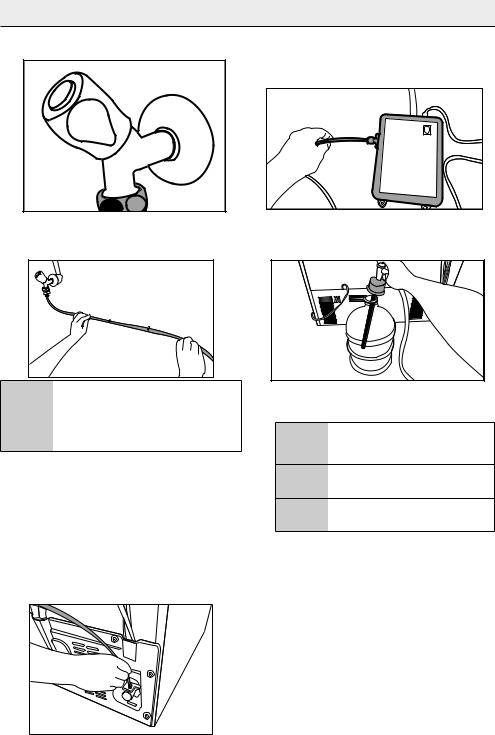
3.6. Connecting water hose to the product
To connect the water hose to the product, follow the instructions below.
1.Remove the connector on the hose nozzle adaptor in the back of the product and run the hose through the connector.
3.7. Connecting to water mains
(Optional)
To use the product by connecting to the cold water mains, a standard 1/2” valve connector must be installed to the cold water mains in your home. If the connector is not available or if you are unsure, consult a qualified plumber.
1.Detach the connector (1) from the tap adaptor
(2).
2. Push the water hose down tightly and connect |
3 |
2 |
1 |
to the hose nozzle adaptor. |
|
|
|
|
|
|
3.Tighten the connector manually to fix on the hose nozzle adaptor. You may also tighten the connector using a pipe wrench or pliers.
4.Connect the other end of the hose to the water mains (See Section 3.7) or, to use carboy, to the water pump (See Section 3.8).
2.Connect the tap adaptor to the water mains valve.
3. Attach the connector around the water hose.
|
10 / 47 EN |
Refrigerator / User Guide |
|
|
|
Installation
4.Attach the connector into the tap adaptor and tighten by hand / tool.
5.To avoid damaging, shifting or accidentally disconnecting the hose, use the clips provided to fix the water hose appropriately.
A WARNING: After turning the tap on, make sure there is no water leak on either end of the water hose. In case of leakage, turn the valve off and tighten all connections using a pipe wrench or pliers.
3.8. For products using water carboy
(Optional)
To use a carboy for the product’s water connection, the water pump recommended by the authorized service must be used.
1.Connect one end of the water hose provided with the pump to the product (see 3.6) and follow the instructions below.
2.Connect the other end of the water hose to the water pump by pushing the hose into the pump’s hose inlet.
3.Place and fasten the pump hose inside the carboy.
4.Once the connection is established, plug in and start the water pump.
C Please wait 2-3 minutes after starting the pump to achieve the desired efficiency.
C See also the pump’s user guide for water connection.
C When using carboy, water filter is not required.
3.9 Water filter
(Optional)
The product may have internal or external filter, depending on the model. To attach the water filter, follow the instructions below.
Refrigerator / User Guide |
11 / 47 EN |
|
|
|
|
Installation
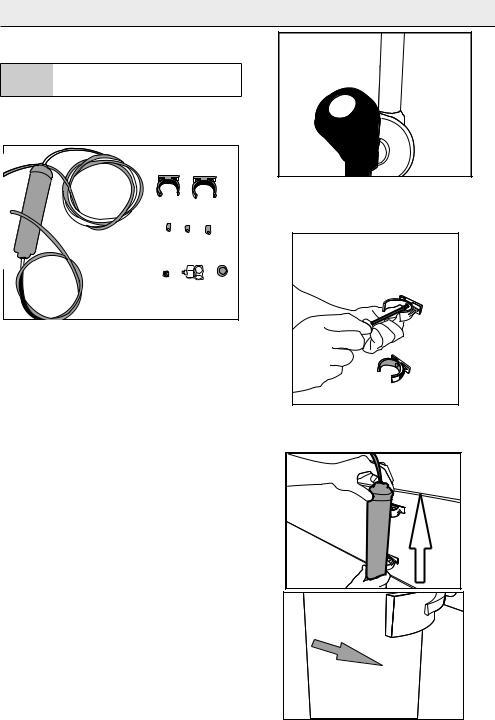
3.9.1.Fixing external filter on the wall (Optional)
A WARNING: Do not fix the filter on the product.
Check to see the following parts are supplied with your product’s model:
5
4
6
1 2 3
1.Connector (1 piece): Used to attach the water hose to the rear of the product.
2.Tap adapter (1 piece): Used for connection to the cold water mains.
3.Porous filter (1 piece)
4.Hose clip (3 pieces): Used to fix the water hose on the wall.
5.Filter connecting apparatus (2 pieces): Used to fix the filter on the wall.
6.Water filter (1 piece): Used to connect the product to the water mains. Water filter is not necessary when using carboy connection.
1.Connect the tap adaptor to the water mains valve.
2.Determine the location to fix the external filter. Fix the filter’s connecting apparatus (5) on the wall.
3.Attach the filter in upright position on the filter connecting apparatus, as indicated on the label. (6)
4.Attach the water hose extending from the top of the filter to the product’s water connection adaptor, (see 3.6.)
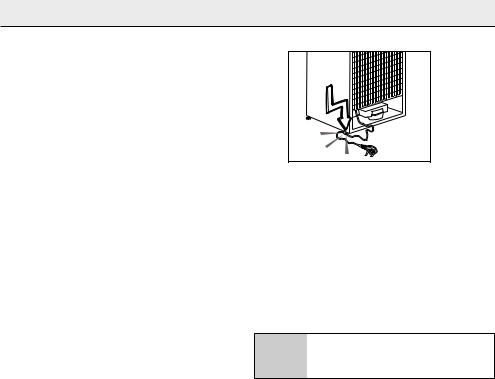
After the connection is established, it should look like the figure below.
|
12 / 47 EN |
Refrigerator / User Guide |
|
|
|

Installation
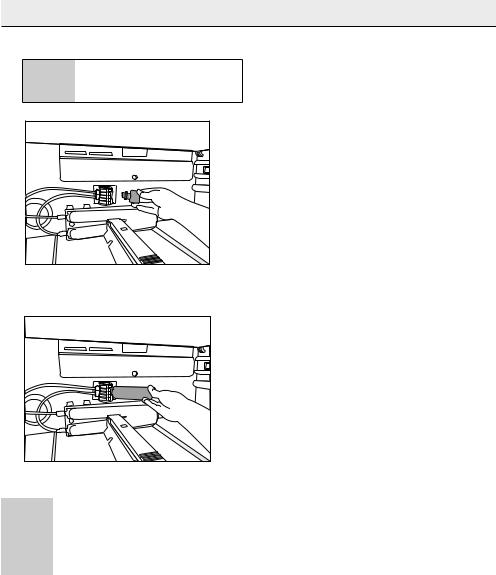
3.9.2.Internal filter
The internal filter provided with the product is not installed upon delivery; please follow the instructions below to install the filter.
1.“Ice Off” indicator must be active while installing the filter. Switch the ON-OFF indicator using the “Ice” button on the screen.
Water line: |
2. Remove the vegetable bin (a) to access the water filter.
Carboy line:
a |
C Do not use the first 10 glasses of water after connecting the filter.
Refrigerator / User Guide |
13 / 47 EN |
|
|
|
|
Installation
3.Remove the water filter by-pass cover by pulling.
C A few drops of water may flow out after removing the cover; this is normal.
4.Place the water filter cover into the mechanism and push to lock in place.
5.Push the “Ice” button on the screen again to cancel the “Ice Off” mode.
C |
The water filter will clear certain foreign |
particles in the water. It will not clear the |
|
|
microorganisms in the water. |
C |
See section 5.2 for activating the filter |
replacing period. |
|
14 / 47 EN |
Refrigerator / User Guide |
|
|
|
 Loading...