


User Manual
V-AMP3
Next-Generation Virtual Guitar Amplifier with USB Audio Interface and energyXT2.5 Recording Software
behringer.com

2 |
V - AMP3 User Manual |
|
Table of Contents |
|
|
Thank you........................................................................ |
2 |
|
Important Safety Instructions....................................... |
3 |
|
Legal Disclaimer.............................................................. |
3 |
|
Limited Warranty............................................................ |
3 |
|
Basic Operation............................................................... |
5 |
|
Audio Connections......................................................... |
5 |
|
Controls and Connectors................................................ |
6 |
|
Operating Modes............................................................ |
8 |
|
Amp/Speaker Simulation............................................. |
10 |
|
Effects Processor........................................................... |
13 |
|
Tuner.............................................................................. |
14 |
|
MIDI |
................................................................................ |
15 |
Application.................................................................... |
16 |
|
Online .......................................................Registration |
17 |
|
Shipment....................................................................... |
17 |
|
Specifications................................................................ |
17 |
|
Thank you
Thank you for choosing the V-AMP 3. This powerful and versatile guitar preamp is the latest in the line of acclaimed V-AMP series processors, adding 4 new amp models over its predecessor, the V-AMP 2. With 32 amp models, 15 speaker cabinet simulations and a host of high-quality digital effects, it’s like having a studio full of guitar gear in a device smaller than your computer keyboard.
In addition to the many features and applications found in the V-AMP 3,
we’ve also included the UCA222 USB audio interface to unlock your full potential as a recording musician. This simple interface features stereo inputs and outputs, optical S/PDIF output, and dedicated monitoring via headphone output—and it requires no external power. Along with this bonus comes a ¼" TRS to stereo RCA adapter cable, low-latency drivers for Windows XP and Vista, and the multiplatform music pro-duction software energyXT2.5 Compact BEHRINGER Edition. Visit behringer.com to find out what this powerful software has to offer.
behringer.com
3 V-AMP3 User Manual
Important Safety
Instructions
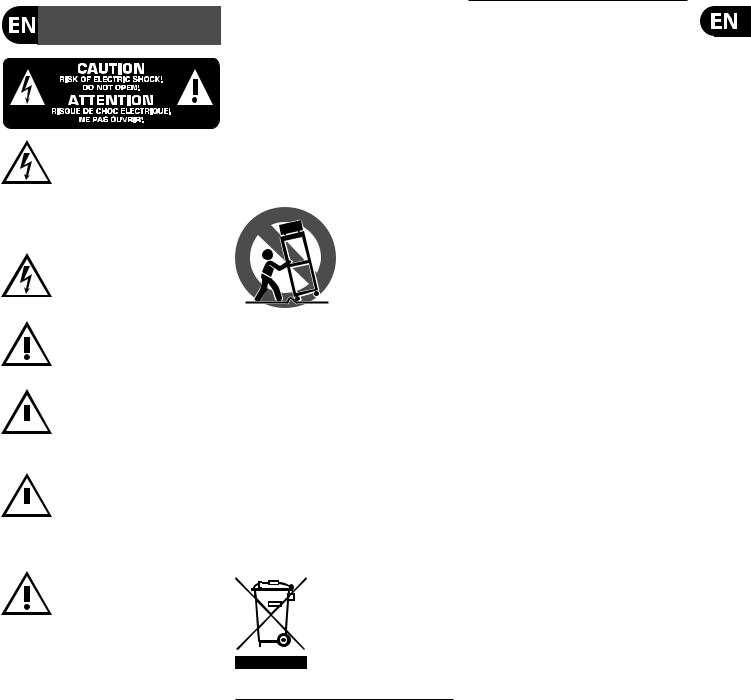
Terminals marked with this symbol carry electrical current of sufficient magnitude to constitute risk of electric shock. Use only
high-quality commercially-available speaker cables with ¼" TS plugs pre-installed. All other installation or modification should be performed only by
qualified personnel.
This symbol, wherever it appears, alerts you to the presence of uninsulated dangerous voltage inside the enclosure - voltage that
may be sufficient to constitute a risk of shock.
This symbol, wherever it appears, alerts you to important operating and maintenance instructions in the accompanying literature.
Please read the manual.
Caution
To reduce the risk of electric shock, do not
 remove the top cover (or the rear section). No user serviceable parts inside. Refer servicing to qualified personnel.
Caution
To reduce the risk of fire or electric shock,
 do not expose this appliance to rain and moisture. The apparatus shall not be exposed to dripping or splashing liquids and no objects filled with liquids, such as vases, shall be placed on the apparatus.
Caution
These service instructions are for use
by qualified service personnel only.
To reduce the risk of electric shock do not perform any servicing other than that contained in the operation instructions. Repairs have to be performed by qualified service personnel.
1.Read these instructions.
2.Keep these instructions.
3.Heed all warnings.
4.Follow all instructions.
5.Do not use this apparatus near water.
6.Clean only with dry cloth.
7.Do not block any ventilation openings. Install in accordance with the manufacturer’s instructions.
8.Do not install near any heat sources such as radiators, heat registers, stoves, or other apparatus (including amplifiers) that produce heat.
9.Do not defeat the safety purpose of the polarized or grounding-type plug. A polarized plug has two blades with one wider than the other. A grounding-type plug has two blades and a third grounding prong. The wide
blade or the third prong are provided for your safety. If the provided plug does not fit into your outlet, consult an electrician for replacement of the obsolete outlet.
10.Protect the power cord from being walked on or pinched particularly at plugs, convenience receptacles, and the point where they exit from the apparatus.
11.Use only attachments/accessories specified by
the manufacturer.
12. Use only with the cart, stand, tripod, bracket,
or table specified by the
manufacturer, or sold with the apparatus. When a cart is used, use caution when
moving the cart/apparatus combination to avoid
injury from tip-over.
13.Unplug this apparatus during lightning storms or when unused for long periods of time.
14.Refer all servicing to qualified service personnel. Servicing is required when the apparatus has been damaged in any way, such as power supply cord or plug is damaged, liquid has been spilled or objects have fallen into the apparatus, the apparatus has been exposed
to rain or moisture, does not operate normally, or has been dropped.
15.The apparatus shall be connected to a MAINS socket outlet with a protective earthing connection.
16.Where the MAINS plug or an appliance coupler is used as the disconnect device, the disconnect device shall remain readily operable.
Legal Disclaimer
Technical specifications and appearance are subject to change without notice. The information contained herein is correct at the time of printing. All trademarks are the property of their respective owners. MUSIC Group accepts no liability for any loss which may be suffered by any person who relies either wholly or in part upon any description, photograph or
statement contained herein. Colors and specifications may vary slightly from product. BEHRINGER products are sold through authorized dealers only. Distributors and dealers are not agents of MUSIC Group and have absolutely no authority to bind MUSIC Group by any express or implied undertaking
or representation. This manual is copyrighted. No part of this manual may be reproduced or transmitted in any form or by any means, electronic or mechanical, including photocopying and recording of any kind, for any purpose, without the express written permission of Red Chip Company Ltd.
ALL RIGHTS RESERVED.
© 2010 Red Chip Company Ltd.
Trident Chambers, Wickhams Cay, P.O. Box 146, Road Town, Tortola, British Virgin Islands
Limited Warranty
§ 1 Warranty
[1]This limited warranty is valid only if you purchased the product from a BEHRINGER authorized dealer in the country of purchase. A list of authorized dealers can be found on BEHRINGER’s website behringer.com under “Where to Buy“, or you can contact the BEHRINGER office closest to you.
[2]MUSIC Group* warrants the mechanical and electronic components of this product to be free of defects in material and workmanship if used under normal operating conditions for a period of one (1) year from
the original date of purchase (see the Limited Warranty terms in § 4 below), unless a longer minimum warranty period is mandated by applicable local laws. If the product shows any defects within the specified warranty period and that defect is not excluded under § 4, MUSIC Group shall, at its discretion, either replace or repair the product using suitable new or reconditioned product or parts.
In case MUSIC Group decides to replace the entire product, this limited warranty shall apply to the replacement product for the remaining initial warranty period, i.e., one (1) year (or otherwise applicable minimum warranty period) from the date of purchase of the original product.
[3]Upon validation of the warranty claim, the repaired or replacement product will be returned to the user freight prepaid by MUSIC Group.
[4]Warranty claims other than those indicated above are expressly excluded.
PLEASE RETAIN YOUR SALES RECEIPT. IT IS YOUR PROOF OF PURCHASE COVERING YOUR LIMITED WARRANTY. THIS LIMITED WARRANTY IS VOID WITHOUT SUCH PROOF OF PURCHASE.
§ 2 Online registration
Please do remember to register your new BEHRINGER equipment right after your purchase at behringer.com under“Support” and kindly read the terms and conditions of our limited warranty carefully. Registering your purchase and equipment with us helps us process
your repair claims quicker and more efficiently. Thank you for your cooperation!
§ 3 Return materials authorization
[1] To obtain warranty service, please contact the retailer from whom the equipment was purchased. Should your BEHRINGER dealer not be located in your vicinity, you may contact the BEHRINGER distributor for your country listed under“Support” at behringer.com. If your country is not listed, please check if your problem can be dealt with by our“Online Support” which may also be found under“Support” at behringer.com. Alternatively, please submit an online warranty claim at
behringer.com BEFORE returning the product. All inquiries must be accompanied by a description of the problem and the serial number of the product. After verifying
the product’s warranty eligibility with the original sales receipt, MUSIC Group will then issue a Return Materials Authorization (“RMA”) number.
behringer.com

4V-AMP3 User Manual
[2]Subsequently, the product must be returned in its original shipping carton, together with the return authorization number to the address indicated by MUSIC Group.
[3]Shipments without freight prepaid will not
be accepted.
§ 4 Warranty Exclusions
[1]This limited warranty does not cover consumable parts including, but not limited to, fuses and batteries. Where applicable, MUSIC Group warrants the valves or meters contained in the product to be free from defects in material and workmanship for a period of ninety (90) days from date of purchase.
[2]This limited warranty does not cover the product
if it has been electronically or mechanically modified in any way. If the product needs to be modified or adapted in order to comply with applicable technical or safety standards on a national or local level, in any country which is not the country for which the product was originally developed and manufactured, this
modification/adaptation shall not be considered a defect in materials or workmanship. This limited warranty does not cover any such modification/adaptation, regardless of whether it was carried out properly or not. Under the terms of this limited warranty, MUSIC Group shall not be held responsible for any cost resulting from such a modification/adaptation.
[3]This limited warranty covers only the product hardware. It does not cover technical assistance for hardware or software usage and it does not cover any software products whether or not contained in the product. Any such software is provided“AS IS” unless expressly provided for in any enclosed software limited warranty.
[4]This limited warranty is invalid if the factoryapplied serial number has been altered or removed from the product.
[5]Free inspections and maintenance/repair work
are expressly excluded from this limited warranty, in particular, if caused by improper handling of the product by the user. This also applies to defects caused by normal wear and tear, in particular, of faders, crossfaders, potentiometers, keys/buttons, guitar strings, illuminants and similar parts.
[6] Damage/defects caused by the following conditions are not covered by this limited warranty:
•improper handling, neglect or failure to operate the unit in compliance with the instructions given in BEHRINGER user or service manuals;
•connection or operation of the unit in any way that does not comply with the technical or safety regulations applicable in the country where the product is used;
•damage/defects caused by acts of God/Nature (accident, fire, flood, etc) or any other condition that is beyond the control of MUSIC Group.
[7]Any repair or opening of the unit carried out by unauthorized personnel (user included) will void the limited warranty.
[8]If an inspection of the product by MUSIC Group shows that the defect in question is not covered by the limited warranty, the inspection costs are payable by the customer.
[9]Products which do not meet the terms of this limited warranty will be repaired exclusively at the buyer’s expense. MUSIC Group or its authorized service center will inform the buyer of any such circumstance. If the buyer fails to submit a written repair order within 6 weeks after notification, MUSIC Group will return the unit C.O.D. with a separate invoice for freight and packing. Such costs will also be invoiced separately when the buyer has sent in a written repair order.
[10]Authorized BEHRINGER dealers do not sell new products directly in online auctions. Purchases made through an online auction are on a“buyer beware” basis. Online auction confirmations or sales receipts are not accepted for warranty verification and MUSIC Group will not repair or replace any product purchased through an online auction.
§ 5 Warranty transferability
This limited warranty is extended exclusively to the original buyer (customer of authorized retail dealer) and is not transferable to anyone who may subsequently purchase this product. No other person (retail dealer, etc.) shall be entitled to give any warranty promise on behalf of MUSIC Group.
§ 6 Claim for damage
Subject only to the operation of mandatory applicable local laws, MUSIC Group shall have no liability to the buyer under this warranty for any consequential or indirect
loss or damage of any kind. In no event shall the liability of MUSIC Group under this limited warranty exceed the invoiced value of the product.
§ 7 Limitation of liability
This limited warranty is the complete and exclusive warranty between you and MUSIC Group. It supersedes all other written or oral communications related to this product. MUSIC Group provides no other warranties for this product.
§ 8 Other warranty rights and national law
[1]This limited warranty does not exclude or limit the buyer’s statutory rights as a consumer in any way.
[2]The limited warranty regulations mentioned herein are applicable unless they constitute an infringement of applicable mandatory local laws.
[3]This warranty does not detract from the seller’s obligations in regard to any lack of conformity of the product and any hidden defect.
§ 9 Amendment
Warranty service conditions are subject to change without notice. For the latest warranty terms and conditions
and additional information regarding MUSIC Group’s limited warranty, please see complete details online at behringer.com.
* MUSIC Group Macao Commercial O shore Limited of
Rue de Pequim No. 202-A, Macau Finance Centre 9/J, Macau, including all MUSIC Group companies
behringer.com
5 V-AMP3 User Manual
Basic Operation
1.Plug the included power cable into the AC IN on the side of the unit. The V-AMP 3 will automatically turn on and resume the previously selected preset.
2.Plug your guitar into the INPUT using a ¼" instrument cable.
3.Connect a monitoring system:
• If using a pair of headphones, connect to the PHONES jack.
• If using a guitar amplifier, connect a ¼" cable from the V-AMP 3’s LEFT LINE OUT jack to the amplifier’s effects loop return jack. Use the Live 3 output configuration for best results. (See Operating Modes section for details.)
• If plugging straight to the house PA system, connect the LINE OUT jacks to a stereo channel on the main house mixer. Use the Live 1 output configuration for best results.
• If using the UCA222 to record or jam to a track on your computer,
you may use the included ¼" TRS-to-RCA adaptor cable to connect the V-AMP 3’s PHONES jack to the UCA222 and monitor the signal with the UCA222 headphone jack.
4.Connect the optional FS112V footswitch to the FOOTSWITCH input. The footswitch allows you to scroll through the presets while playing.
Pressing and holding down the DOWN button on the footswitch accesses the tuner. Tap the DOWN button again to return to normal play mode.
5.Make sure the volume control on your guitar is turned up, then turn up the MASTER knob to desired level.
NOTE: If the current preset volume is set low, there may be a considerable increase in volume when you change presets.
6.Press the TUNER button if you need to tune your guitar.
7.Press the BANK UP and BANK DOWN buttons to scroll through the banks of presets. Press the A – E buttons to select a preset in that bank.
8.Adjust the tone with the GAIN, TREBLE, MID and BASS knobs.
9.Select a new amp model by turning the AMPS knob. Hold the TAP button while turning the AMPS knob to select one of the 2nd level amps (grey lettering).
10.Add an effect by turning the EFFECT SELECT knob to the desired selection. Adjust the EFFECTS knob to determine the level of the effect. Hold the TAP button while turning the EFFECTS knob to adjust the second effects parameter. (see effects table for details)
11.Add reverb by adjusting the REVERB knob.
12.Save your settings. If you have altered a preset or made one from scratch, the preset LED will blink. In order to save this setting, first select the bank you would like to save to, then hold down one of the A – E buttons for
2 seconds. Make sure you save over a preset that you no longer want to keep.
13.Rock out and have fun!
NOTE: The UCA222 will work on both PC and Mac computers without any additional software. However, we recommend that PC users install the low-latency USB ASIO driver for Windows XP/Vista, available for download on our website at behringer.com. Most users will benefit from the most recent version (2.8.17) of the driver, but rare computer chipsets may require the older 2.8.14 version.
Please visit behringer.com regularly for updates, add-ons and tips regarding your V-AMP 3.
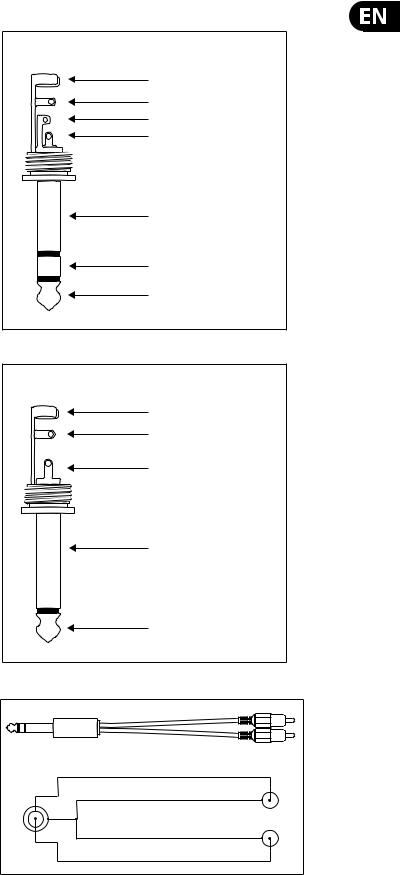
Audio Connections
¼" TRS headphones connector
strain relief clamp
sleeve ring tip
sleeve ground/shield
ring
right signal
tip
left signal
Unbalanced ¼" TS connector
Strain relief clamp
Sleeve
Tip
Sleeve
(ground/shield)
Tip
(signal)
Right channel |
Tip |
Ring |
Sleeve |
|
|
Sleeve |
|
Left channel |
Sleeve |
|
|
Tip |
Tip |
|
¼" TRS to stereo RCA
behringer.com

6 V-AMP3 User Manual
Controls and Connectors
Front panel
[1]GAIN: Adjusts the distortion level of an amp simulation.
[2]TREBLE: Adjusts the upper frequencies of the guitar tone.
[3]MID: Adjusts the mid range frequencies.
[4]BASS: Adjusts the low frequencies.
[5]VOLUME: Adjusts the volume level of the current preset. This will allow you to keep the volume even between various presets.
[6]MASTER: Adjusts the overall output to the PHONES and LINE OUT.
[7]AMPS: Selects the amp simulation. Hold the TAP button while turning the AMPS knob to select one of the 17-32 amp models (grey lettering).
• Each LED ring around the VOLUME, BASS, MID, TREBLE, GAIN, EFFECTS and REVERB knobs has nine LEDs. Either one LED or two neighboring LEDs (in between position) will light on each ring, indicating a total of 17 positions per knob.
• If the TAP button is held down, the TREBLE knob functions as a PRESENCE control. This allows you to add or remove a high-end “shimmer” in the amp tone.
[8]PRESET BUTTONS: Recall saved presets within a bank. These buttons also select various categories in EDIT mode and allow access to Configuration mode. (see EDIT mode and Configuration mode sections)
[9]DISPLAY: Displays current bank and preset in play mode. Other LEDs give the following information:
• TUNER: Displays the pitch of the instrument connected to the unit. (see TUNING section for more details)
• 17-32: Lights when one of the amp simulations 17-32 is selected.
[10]BANK UP and DOWN: In play mode, use these buttons to scroll through the banks of presets. Press both buttons simultaneously to enter EDIT mode. After an edit category has been selected (buttons A – E), use the BANK UP and DOWN buttons to edit parameters.
[11]TAP: Performs seven functions:
• Tap: Tap this button to the rhythm of the music and the selected effect will adapt its parameter to the tempo.
• Presence: While holding down the TAP button, use the TREBLE knob to adjust the PRESENCE setting of the amp simulation.
• 2nd parameter: While holding down the TAP button, use the EFFECTS knob to adjust the 2nd effects parameter of the selected effect.
• Amp models 17 – 32: While holding down the TAP button, use the AMPS knob to select one of the second set of amps (written in grey lettering).
• MIDI Thru: In EDIT MIDI mode, press the TAP button to change MIDI OUT to MIDI THRU. (See the MIDI chapter.)
• Drive: In EDIT DRIVE mode, hold the TAP button while turning the EFFECTS knob to adjust the Wah-Wah effect’s resonance character.
• Input Gain: in Configuration mode, hold the TAP button while turning the GAIN knob to adjust the overall input gain. (See Configuration mode.)
[12]TUNER: Press this button to access the tuner. During tuning mode,
the output signal is muted (depending on the VOLUME setting). During EDIT mode, press this button to exit and return to play mode.
[13]EFFECTS: Selects the effect for the current preset.
[14]EFFECTS SELECT: Adjusts the first parameter for the selected effect. Hold the TAP button while turning the EFFECTS knob to adjust the 2nd effects parameter.
[15]REVERB: Adjusts the amount of reverb for the current preset.
[2] [7] [1] [8]
[13]
[3]
[14]
[4]
[15]
[5]
[10]
[11] [12]
[6][9]
behringer.com
 Loading...