


User’s Manual
Version 1.1 January 2002
ENGLISH
®
V-AMP
V-AMP 2
SAFETY INSTRUCTIONS
CAUTION: To reduce the risk of electric shock, do not remove the cover (or back). No user serviceable parts inside; refer servicing to qualified personnel.
WARNING: To reduce the risk of fire or electric shock, do not expose this appliance to rain or moisture.
This symbol, wherever it appears, alerts you to the presence of uninsulated dangerous voltage inside the enclosure—voltage that may be sufficient to constitute a risk of shock.
This symbol, wherever it appears, alerts you to important operating and maintenance instructions in the accompanying literature. Read the manual.
DETAILED SAFETY INSTRUCTIONS:
All the safety and operation instructions should be read before the appliance is operated.
Retain Instructions:
The safety and operating instructions should be retained for future reference.
Heed Warnings:
All warnings on the appliance and in the operating instructions should be adhered to.
Follow instructions:
All operation and user instructions should be followed.
Water and Moisture:
The appliance should not be used near water (e.g. near a bathtub, washbowl, kitchen sink, laundry tub, in a wet basement, or near a swimming pool etc.).
Ventilation:
The appliance should be situated so that its location or position does not interfere with its proper ventilation. For example, the appliance should not be situated on a bed, sofa, rug, or similar surface that may block the ventilation openings, or placed in a built-in installation, such as a bookcase or cabinet that may impede the flow of air through the ventilation openings.
Heat:
The appliance should be situated away from heat sources such as radiators, heat registers, stoves, or other appliances (including amplifiers) that produce heat.
Power Source:
The appliance should be connected to a power supply only of the type described in the operating instructions or as marked on the appliance.
Grounding or Polarization:
Precautions should be taken so that the grounding or polarization means of an appliance is not defeated.
Power-Cord Protection:
Power supply cords should be routed so that they are not likely to be walked on or pinched by items placed upon or against them, paying particular attention to cords and plugs, convenience receptacles and the point where they exit from the appliance.
Cleaning:
The appliance should be cleaned only as recommended by the manufacturer.
Non-use Periods:
The power cord of the appliance should be unplugged from the outlet when left unused for a long period of time.
Debris and Liquid Entry:
Care should be taken that debris and/or liquids do not enter the enclosure through openings.
Damage Requiring Service:
The appliance should be serviced by qualified service personnel when:
-The power supply cord or the plug has been damaged; or
-Debris or liquid has entered the appliance; or
-The appliance has been exposed to rain; or
-The appliance does not appear to operate normally or exhibits a marked change in performance; or
-The appliance has been dropped, or the enclosure damaged.
Servicing:
The user should not attempt to service the appliance beyond that which is described in the operating instructions. All other servicing should be referred to qualified service personnel.
2

V-AMP 2
FOREWORD
Dear Customer,
Welcome to the community of BEHRINGER users and thank you for the trust you have shown us in buying the V-AMP 2.
It gives me particular pleasure to write this to you because, after months of hard work, our engineers have achieved a highly ambitious goal: to improve on what is already an excellent virtual guitar amp whose highly developed sound and remarkable array of functions offers you maximum flexibility and performance. Naturally, the task of developing our new V-AMP 2 was a great responsibility. At all times the focus was on you, the discerning user and musician. Meeting these demands meant a lot of effort and late nights for us—and a lot of fun, too. A development project of this kind always brings a lot of different people together. That makes it all the better when everyone involved is proud of the result.
Giving you a share in our enjoyment is our philosophy. That‘s because you are the most important member of our team. It is your competent proposals for new products that have helped to shape our company and make it a success. In return we can guarantee you uncompromising quality, excellent sound and technical features at very reasonable price. All of this enables you to let loose your creativity, without the price getting in the way.
We’re often asked how we manage to produce equipment of this quality at such incredibly low prices. The answer is very simple: you make it possible! A large number of satisfied customers means high production volume. High production volume means that we can get better purchasing terms for components, etc. And isn’t it only fair to pass on these benefits to you? After all, your success is our success too!
I would like to thank all of those who have made the V-AMP 2 possible. They have all made their personal contributions, starting with the designers and including the many other employees in our company (many thanks to Volker, Thomas, Jan and Oliver).
Friends, it was worth it!
Thank you,
Uli Behringer
3

V-AMP 2
V-AMP® 
Virtual guitar amplifier with tube simulation and digital multi-effects processor
Authentic virtual guitar preamp with 32 amp and 15 speaker simulation models |
V |
|
|
Dedicated selectors for amp models, speaker cabinets and digital effects |
|
Transparent user interface with direct display of all essential settings |
|
32 simulations of popular guitar amps, ranging from clean to crunch to tube distortion sounds |
|
15 speaker simulations directly selectable and freely combinable with any amp model |
|
|
- |
24-bit high-resolution stereo multi-effects processor with first-class algorithms like chorus, flanging, phasing, rotary, auto-wah, echo, delay, compressor and various effects combinations
Additional effects parameters now directly accessible on the unit
New preamp bypass function allows use as a stereo effects unit without amp model 125 presets, including 50 original artist presets, organized in 25 banks for easy editing
Dedicated reverb control adds 1 of 9 stereo reverb types to any amp, speaker or effects setting
Separate wah-wah effect can be controlled manually or via MIDI and is available in addition to any other effects combination
Effective 3-band EQ with amp model dependent characteristics
New presence control adjusts a high-frequency filter, simulating the negative feedback of tube amps
Extremely low-noise—S/N ratio now 90 dB
Adjustable stereo aux input for line-level signals (CD, drum box, sound card, MIDI backing etc.) Stereo line output with virtual speaker simulation for recording and live applications
Five new, practical configuration modes for various studio and live applications, some with additional global 3-band EQ
Master volume control and stereo headphones output
Extensive MIDI implementation allows complete real-time remote control and automation, data transfer |
|
and access to additional parameters |
AMP |
Built-in auto-chromatic tuner
Tap-tempo function allows real-time adjustment of effects speed parameter
Professional noise reduction system on board
Gig bag and dual footswitch for preset selection and tuner control included
The V-AMP is protected by US patents No. D444,169 and D444,493
Manufactured under ISO9000 certified management system
4

V-AMP 2
TABLE OF CONTENTS
1. INTRODUCTION ...................................................................................................................... |
6 |
|
1.1 |
The new functions of the V-AMP 2 ................................................................................................. |
6 |
1.2 |
Before you begin ............................................................................................................................ |
7 |
|
1.2.1 Serial number ....................................................................................................................... |
7 |
1.3 |
Control elements ............................................................................................................................ |
7 |
|
1.3.1 User interface ....................................................................................................................... |
7 |
|
1.3.2 Connections on the V-AMP 2 side panel .............................................................................. |
9 |
2. EXAMPLES OF USE/CONFIGURATIONS ............................................................................ |
10 |
|
2.1 |
Selecting CONFIGURATION modes ............................................................................................. |
11 |
2.2 |
Standard set-up with guitar, footswitch and external playback ....................................................... |
11 |
2.3 |
Recording ..................................................................................................................................... |
12 |
2.4 |
Live set-up with an external guitar amp ........................................................................................ |
12 |
2.5 |
Live set-up with P.A. system and your own monitor amp on stage................................................ |
13 |
3. V-AMP 2 PRESETS................................................................................................................ |
13 |
|
3.1 |
Calling up presets ......................................................................................................................... |
13 |
3.2 |
Editing presets .............................................................................................................................. |
14 |
3.3 |
Storing presets ............................................................................................................................. |
14 |
3.4 |
Discarding an edited preset/recovering a factory-programmed preset ......................................... |
14 |
3.5 |
Restoring all factory-programmed presets .................................................................................... |
15 |
4. |
AMP/SPEAKER SIMULATION .............................................................................................. |
15 |
|
|
4.1 |
Amp descriptions .......................................................................................................................... |
15 |
|
4.2 |
Speaker descriptions .................................................................................................................... |
17 |
5. |
EFFECTS PROCESSOR ....................................................................................................... |
18 |
|
|
5.1 |
Effect descriptions ........................................................................................................................ |
19 |
|
|
Reverb and delay algorithms ........................................................................................................ |
19 |
|
|
Modulation effects ........................................................................................................................ |
19 |
|
|
Combinations of effect algorithms (multi-effects programs) .......................................................... |
19 |
|
|
Special effects .............................................................................................................................. |
20 |
|
5.2 |
The separate reverb effect ........................................................................................................... |
20 |
6. |
TUNER ................................................................................................................................... |
21 |
|
|
6.1 |
Tuning your guitar ......................................................................................................................... |
21 |
|
6.2 |
Setting reference pitch “A” ............................................................................................................ |
21 |
7. |
INSTALLATION ...................................................................................................................... |
22 |
|
|
7.1 |
Audio connections ........................................................................................................................ |
22 |
|
7.2 |
MIDI connections.......................................................................................................................... |
23 |
|
|
7.2.1 Sending/receiving MIDI-Sysex data .................................................................................... |
23 |
8. |
APPENDIX ............................................................................................................................. |
24 |
|
|
8.1 |
MIDI implementation .................................................................................................................... |
24 |
|
8.2 |
Default cabinets/amp models ....................................................................................................... |
25 |
9. |
SPECIFICATIONS .................................................................................................................. |
26 |
|
10.WARRANTY ........................................................................................................................... |
27 |
||
CAUTION!
Please note that high loudness levels may cause permanent damage to your hearing. Turn the VOLUME control down all the way before switching on the equipment. Be sure to keep the volume at an appropriate level.
5

V-AMP 2
1. INTRODUCTION
Congratulations! The V-AMP 2 you have purchased is the revised version of the V-AMP—a state-of-the-art virtual guitar amplifier that has set new standards. Our ultimate aim in developing it was to create the authentic sound of classic amplifiers by means of “physical modeling” and to combine this with the latest DSP effects.
The V-AMP 2 has a number of decisive advantages over its predecessor, the V-AMP: the number of amp simulations has been doubled, there are now five globally adjustable operating modes, and you can also use this device purely as an effects unit thanks to its innovative Preamp Bypass.
Once again we took up the challenge of creating a device that would still be talked about for years to come. The V-AMP 2 is an all-purpose device that offers 32 authentic amplifier sounds—and, in fact, even special speaker sounds—without causing you any transport problems! In addition, it has all the versatility of sound provided by state-of-the-art multi-effects processor technology. In short: the V-AMP 2 gives you a sound tool that has everything on a musician’s wish-list today.
BEHRINGER is a company with its roots in professional recording studio technology. For many years now we have been successful in developing products for studio and live use. These include microphones and 19" devices of all kinds (compressors, enhancers, noise gates, tube processors, headphone amplifiers, digital effects devices, DI boxes, etc.), monitor and P.A. speakers and professional live and recording mixers. Our entire technical know-how has gone into your V-AMP 2.
Flexibility is the name of the game in the music business. A guitarist today has to be able not only to offer a wide range of sounds, but also to adapt at short notice to different environments—home recording, studio, live gigs. For that very reason, enormous amplifier stacks have become a thing of the past. The V-AMP 2 offers you the maximum number of features in such a compact form that you can set up and pack up in seconds and you can master it with ease.
The V-AMP 2 will still be state-of-the-art years from now because we have equipped it with an EPROM that can be replaced without the slightest difficulty. This means that we can keep on working on new algorithms, taking your ideas and suggestions into account. We will then make these software updates available to you free of charge on the Internet, thus ensuring that the V-AMP 2 remains state-of-the-art in the future too.
But enough of this talk. Nothing we say will convince you as readily as what you hear and feel when you test your V-AMP 2 for the first time. Then you will experience a new generation of virtual guitar amplifiers with some amazing features:
Knock-out sound options that will blow away any conventional guitar amp.
Perfect tube sound emulation without the typical tube amp drawbacks (short lifespan, heat generation, mechanical sensitivity).
Latest DSP technology, giving you a wide range of classic and modern effects sounds.
Rugged, indestructible build, allowing you to use the V-AMP 2 in the toughest conditions on the road.
1.1 The new functions of the V-AMP 2
The V-AMP 2 was designed to be an evolutionary improvement on our popular virtual guitar amp, the V-AMP. Alongside the popular features of its predecessor, the V-AMP 2 offers many new features which will make this unit an indispensable part of your equipment:
16 additional amp sounds—in total, 32 authentic virtual amplification models plus amp bypass available.
5 basic configurations can be selected for different studio and live situations (see chapter 2).
PRESENCE control can now be set for each amp.
An additional effects parameter can now be set directly on the device (see chapter 5).
Globally adjustable 3-band EQ can be set as required in the live modes to match the V-AMP 2 sounds with different amps/combos.
Total preset compatibility for existing V-AMP sounds.
Editor software available free of charge at www.behringer.com/V-AMP 2.
6 |
1. INTRODUCTION |

V-AMP 2
1.2Before you begin
Your V-AMP 2 was carefully packed before it left the factory to protect it from damage in transit. If there are signs of damage on the packaging, we recommend that you immediately examine the device itself for further signs of damage.
In case of damage, do NOT return this device to us, but immediately notify your dealer and the transport company, as any entitlement to damages may otherwise be lost.
A power supply unit which meets the necessary safety requirements is enclosed for connecting the V-AMP 2 to the mains. When the V-AMP 2 is connected to the mains via the power supply unit it is automatically switched on.
Never connect the V-AMP 2 to a power supply unit that is already plugged into the mains! Always connect the V-AMP 2 to the power suply unit first and then plug it into the mains.
The MIDI connections (IN/OUT) are for standard DIN connectors. Data is transferred at zero potential via an optocoupler. Please read chapter 7 “INSTALLATION” for further information.
1.2.1 Serial number
The V-AMP 2’s serial number is located on the rear side. In order to qualify for extended warranty entitlement, please return the completed warranty card to us within 14 days of purchase, or simply register on-line (www.behringer.com).
1.3 Control elements
1.3.1 User interface
Fig. 1.1: Control elements on the user interface
1. INTRODUCTION |
7 |

V-AMP 2
1The MASTER control determines the overall volume of the V-AMP 2.
Apart from the AUX LEVEL control 

 this is the only “conventional” control on the V-AMP 2. All the other controls are encoder-type rotary controls.
2The VOLUME control is for the volume of the selected preset.
3The BASS control in the EQ section is for raising or lowering the low-frequency range.
4The MID control is for raising or lowering the mid-range frequencies.
5TREBLE controls the high-frequency range of the activated preset.
If the TAP key 


 is down, theTREBLE control changes to a PRESENCE control. This enables you to boost/cut a high-frequency filter tuned to whatever amp model is active, thus simulating the frequency-sensitive coupling of tube amps.
6The GAIN control determines the distortion level.
7The AMPS control is for selecting one of 32 different amplifier simulation models. The control is surrounded by a ring of 16 LEDs. Each LED corresponds to two types of amplifier. The first 16 simulations can be selected by turning the AMPS control (marked on the housing in: white).
To select the simulation models 17 - 32 (marked on the housing in: gray), press down the TAP key while making your selection by turning the AMPS control.
The LED “17 - 32” in the bottom left-hand corner of the DISPLAY indicates that one of the simulation models 17 - 32 has been selected.
In adddition you can activate a PREAMP BYPASS by pressing the key combination TAP and TUNER. If PREAMP BYPASS has been selected, none of the LEDs on the AMPS control lights up.
8These five keys are for selecting a preset (A - E) within one bank.
In EDIT mode (activated by simultaneously pressing the arrow keys described in 


 ) the keys perform the function printed directly above them:
A:Accesses the MIDI functions. Use the arrow keys to set the MIDI channels for transmitting and receiving (1 through 16).
B:Selects the DRIVE function. This noticably raises distortion and volume. Use the arrow keys to switch DRIVE on and off. The DRIVE function is wired before the GAIN control.
While editing the DRIVE function, you can also activate and adjust the wah-wah effect by turning the EFFECTS control. The LEDs surrounding the EFFECTS control indicate the position of the pedal. If none of the LEDs lights up, the wah-wah is bypassed.
C:This key activates the CABINETS mode. Use the arrow keys to select the type of speaker or combination of speakers you want. You can also switch off the speaker simuilation completely (“-”). For further details, please refer to chapter 4.2 “Speaker descriptions”.
D:Use this key to select the REVERB function. The arrow keys can be used to select one of nine different types of reverb in addition to the multi-effects processor. For further details see chapter 5.2.
E:Here you can activate the NOISE GATE function. Use the arrow keys to adjust the noise reduction level.
CONFIGURATION: If you press the B and D keys simultaneously in Play mode, you can select the V-AMP 2’s general operating modes allowing adjustments to different studio and live situations (see chapter 2).
9If an effect has been selected via 


 its part of the overall sound can be set using this EFFECTS control. If you select the “Compressor” effect, you can use the EFFECTS control to adjust the compression intensity. If you turn the control to the left until all the LEDs are off, the effect is disabled. This is known as an effect bypass.
By pressing the TAP key you can set a second effects parameter using the EFFECTS control (see tab. 5.1).
8 |
1. INTRODUCTION |
V-AMP 2
10This control is for selecting an effect or a combination of effects. This encoder-type rotary control is also surrounded by a ring of 16 LEDs. Each LED corresponds to one specific effects preset.
11Using the REVERB control, you can add the reverb content of your choice to your overall sound. By turning it to the left until all the LEDs are off, you deactivate the reverb. To fade out the original signal, turn the control to the right until only the last LED lights up.
The LED rings around the VOLUME, BASS, MID, TREBLE, GAIN, EFFECTS and REVERB controls each have nine LEDs. On each ring either one LED or two neighboring LEDs will light up at a time, indicating a total of 17 different positions.
12The TAP button performs three functions:
Tap the rhythm of a piece of music on the TAP button and the selected effect automatically adapts to the tempo of the piece of music.
Holding down the TAP button, you can use the TREBLE control to change the PRESENCE setting of the amp simulation model you’ve selected.
You also can access the second effects parameter set by the EFFECTS control by holding down the TAP button (see tab. 5.1).
13The TUNER button is for switching on the tuner. In addition, this button can also be used to leave the EDIT mode.
14Use the two arrow keys to select a different bank (BANK DOWN and BANK UP). You can skip banks
by holding each of the keys down. To activate the EDIT mode, press both keys simultaneously. If you press one of the keys A - E ( 

 ) in that mode, the arrow keys can be used for setting parameters.
15The DISPLAY shows you what preset bank you have selected and gives you information on parameter changes when you are editing. In TUNER mode the DISPLAY shows the pitch of the instrument connected to the unit. If the amplifier simulations 17 - 32 have been selected, the LED in the bottom left-hand corner of the DISPLAY lights up.
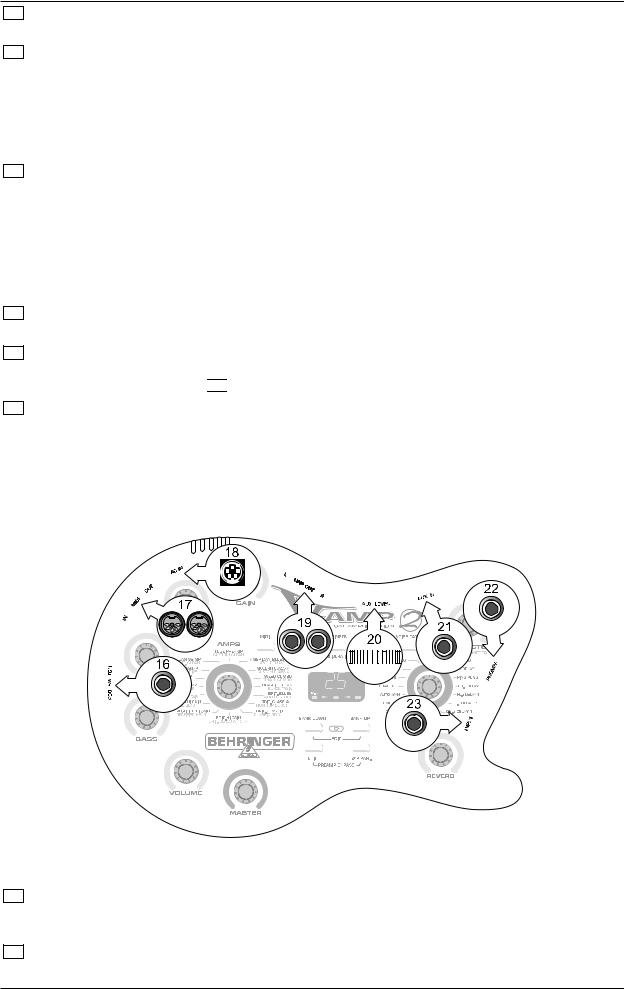
1.3.2Connections on the V-AMP 2 side panel
Fig. 1.2: Connections on the V-AMP 2 side panel
16Connect the stereo jack plug of your FS112V footswitch to the FOOTSWITCH socket. This will enable you to recall the presets from one bank. To switch on the tuner, hold down the DOWN button on the footswitch for more than two seconds. You can also switch the tuner off again using the same button.
17The V-AMP 2 has MIDI inputs and outputs to which you can connect a MIDI foot pedal, e.g. the BEHRINGER MIDI FOOT CONTROLLER FCB1010 or a PC.
1. INTRODUCTION |
9 |
 Loading...