


Avaya J100 Series IP Phones
Partner configuration guide for 3CX
April 2019
Document Version 1.0
Contents
Introduction to J100 Series IP Phones .......................................................................................................... |
4 |
||
Supported models..................................................................................................................................... |
4 |
||
Deployment |
.................................................................................................................................................. |
4 |
|
Avaya J100 ....................................................................IP Phones with Device Enrolment Service (DES) |
4 |
||
Avaya J100 ........................................................................IP Phones with a custom Provisioning Server |
4 |
||
Avaya J100 ......................................................................................................IP Phones with 3CX server |
4 |
||
Provisioning ........................................................................................................................................server |
5 |
||
Files on the Provisioning ....................................................................................................................Server |
5 |
||
Phone configuration ..................................................................................................................................... |
5 |
||
Centralized ..........................................................................................................................configuration |
5 |
||
System Level ......................................................................................................................Configuration |
5 |
||
1.1.1 .................................................................................................. |
Configure Network Settings |
6 |
|
1.1.2 ............................................................................................ |
Configure SIP Interface Settings |
6 |
|
1.1.3 .................................................................................................... |
Configure Service Settings |
7 |
|
1.1.4 ................................................................................................... |
Configure J100 Settings file |
7 |
|
1.2 |
SIP .............................................................................................................Feature Configuration |
7 |
|
1.2.1 ........................................................................................ |
Registration and P2Pcall with 3CX |
8 |
|
1.2.2 ................................................................................................................................. |
Transfer |
9 |
|
1.2.3 ............................................................................................................................. |
Call pickup |
9 |
|
1.2.4 ........................................................................................................................ |
Call Forward |
12 |
|
1.2.5 .......................................................................................................................... |
Conference |
14 |
|
1.2.6 ..................................................................................................................................... |
MWI |
15 |
|
1.2.7 .................................................................................................................... |
Emergency call |
17 |
|
1.2.8 ....................................................................................................................... |
DND support |
17 |
|
1.2.9 ................................................................................................................. |
SRTP call support |
19 |
|
1.2.10 ........................................................................................................... |
Call park and unpark |
20 |
|
1.2.11 ................................................................................................... |
Automatic redial/callback |
21 |
|
1.2.12 ................................................................................................ |
Anonymous calling support |
21 |
|
1.2.13 ..................................................................................................................... |
DTMF support |
22 |
|
1.2.14 ........................................................................................... |
Busy Lamp Field Configuration |
23 |
|
1.2.15 ....................................................................... |
Feature Key Synchronization Configuration |
23 |
|
1.2.16 ............................................................................................. |
Emergency Call Configuration |
23 |
|
|
|
|
2 |
1.2.17 |
User Service Configuration ................................................................................................. |
23 |
1.2.18 |
Directory Configuration ...................................................................................................... |
23 |
1.2.19 |
Call Logs Configuration ....................................................................................................... |
24 |
1.2.20 |
Visual Voice Mail Configuration.......................................................................................... |
24 |
3

Introduction to J100 Series IP Phones
Avaya J100 Series IP Phones provide a range of applications and features for unified communications. The phones leverage the enterprise IP network and eliminate the need of a separate voice network. The phones offer superior audio quality with the amplified handsets and customization with low power requirements in a Session Initiation Protocol (SIP) environment.
The phones can be configured
Supported models
Deployment
Avaya J100 IP Phones with Device Enrolment Service (DES)
To ease deployment and to be able to plug in the phone right out of the box and have the phone automatically configure and login it is recommended to use the Device Enrolment Service (DES). DES allows the phone to be automatically pointed to the appropriate Provisioning Server (either custom provisioning server (below) or 3CX server. To use this service, you must have an account on DES. Please see “Installing and Administering Avaya J100 series IP Phone in third-party call control setup” for more information on the DES. Alternatively, the phone can be pointed to the Provisioning Server via DHCP.
Avaya J100 IP Phones with a custom Provisioning Server
You can configure a custom Provisioning Server and use it to provide the configuration files to the phones. The provisioning server hosts the J100Supgrade.txt file, the J100settings.txt file as well as other configuration files (e.g. language, images, certificates) needed to get the phone configured and connected to the network.
Avaya J100 IP Phones with 3CX server
With 3CX server, you can automatically create the appropriate device (J100settings.txt) and user (<MACaddress>.txtspecific configuration files from the management system on the 3CX Provisioning Server. In this configuration, the phone does not require a custom Provisioning Server and connects to the 3CX Provisioning Server instead. For more information specifically related to the 3CX Provisioning service please see the 3CX support portal https://www.3cx.com/support/
4

Provisioning server
The Provisioning Server is an HTTP or an HTTPS server that hosts the phone firmware and configuration files.
Files on the Provisioning Server
File name |
Content |
J100Supgrade.txt |
Contains pointers to the firmware and upgrade files |
J100setting.txt |
Contains the configurable parameters that apply to all devices in a |
|
given deployment |
<MACaddress>.txt |
Contains configurable parameters that apply to an individual device |
|
in a deployment (typically the username, extension and password) |
|
|
Resource files |
e.g. languages, background and screen saver images, ringtones, |
|
trust certificate files, |
Phone configuration
You can configure Avaya J100 Series IP Phones to work in the 3CX environment in the following ways:
•Centralized configuration using file server
•Configuration through the web interface
Please see “Installing and Administering Avaya J100 series IP Phone in third-party call control setup” for more information on the Configuration through the web interface.
Centralized configuration
You can bulk configure Avaya J100 Series IP Phones by using the 46xxsettings file. The phone can access the settings file via HTTP and HTTPS.
The following configuration files must be available on the file server configured for the devices.
Avaya J100 Configuration Files |
|
Level |
|
Description |
|
|
|
|
|
|
|
|
|
|
J100Supgrade.txt |
|
System |
|
Contains the device firmware load. |
|
|
|
|
|
|
|
|
|
|
46xxsettings.txt |
|
System |
|
Contains configurable parameters that |
|
|
|
|
apply to all devices in a given |
|
|
|
|
deployment. |
|
|
|
|
|
|
|
|
|
|
<MACaddress>.txt |
|
Subscriber |
|
Contains configurable parameters that |
|
|
|
|
apply to an individual device in a |
|
|
|
|
deployment |
|
|
|
|
|
System Level Configuration
This section describes system-wide configuration items in the file that are generally required for each Avaya J129 IP Phone to work with. Subscriber-specific settings are described
5

in the next section. For parameter description, see the Installing and Administering Avaya J129 IP Phone in third-party call control setup for J129.
1.1.1 Configure Network Settings
Step
Step 1
Step 2
Step 3
Step 4
Step 5
Command
SET ENABLE_UDP_TRANSPORT 1
SET DNSSRVR “8.8.8.8”
SET DOMAIN “”
SET SNTPSRVR pool.ntp.org
SET SNTP_SYNC_INTERVAL 144000
1.1.2 Configure SIP Interface Settings
Step
Step 1 |
Step 2 |
Step 3
Step 4
Step 5
Step 6
Step 7
Step 8
Step 9
Step 10
Step 11
Step 12
Step 13
Step 14
Step 15
Step 16
Step 17
Step 18
Step 19
Step 20
Step 21
Step 22
Step 23
Command
SET SIPDOMAIN "3cx.hcm.com"
SET SIP_CONTROLLER_LIST "3cx.hcm.com:5060;transport=tcp" (or udp, tls)
SET ENABLE_G711A 1
SET ENABLE_G711U 1
SET ENABLE_G722 1
SET ENABLE_G726 0
SET G726_PAYLOAD_TYPE 110
SET ENABLE_G729 1
SET ENABLE_OPUS 0
SET SEND_DTMF_TYPE 2
SET DTMF_PAYLOAD_TYPE 120
SET 100REL_SUPPORT 1
SET PLAY_TONE_UNTIL_RTP 1
SET SYMMETRIC_RTP 1
SET REGISTERWAIT 1200
SET WAIT_FOR_UNREGISTRATION_TIMER 32
SET WAIT_FOR_INVITE_RESPONSE_TIMEOUT 60
SET FAILED_SESSION_REMOVAL_TIMER 30
SET TCP_KEEP_ALIVE_STATUS 1
SET TCP_KEEP_ALIVE_TIME 60
SET TCP_KEEP_ALIVE_INTERVAL 10
SET SIP_TIMER_T1 500
SET SIP_TIMER_T2 4000
6

Step 24 SET SIP_TIMER_T4 5000
Step 25 SET ENABLE_SIP_USER_ID 1
Step 26 SET SIMULTANEOUS_REGISTRATIONS 1
Step 27 SET LOCALLY_ENFORCE_PRIVACY_HEADER 1
Step 28 SET ENABLE_STRICT_USER_VALIDATION 0
1.1.3 Configure Service Settings
Step
Step 1
Step 2
Step 3
Step 4
Step 5
Step 6
Step 7
Step 8
Step 9
Step 10
Step 11
Step 12
Step 13
Step 14
Step 15
Command
SET DIALPLAN [23]xxxx|91xxxxxxxxxx|9[2-9]xxxxxxxxx|7xxx
SET NO_DIGITS_TIMEOUT 20
SET INTER_DIGIT_TIMEOUT 5
SET CALLFWDSTAT 7
SET CALLFWDDELAY 1
SET ENABLE_DND 1
SET ENABLE_DND_PRIORITY_OVER_CFU_CFB 0
SET ENABLE_AUTO_ANSWER_SUPPORT 1
SET AUTO_ANSWER_MUTE_ENABLE 1
SET HOLD_REMINDER_TIMER 0
SET CONFERENCE_FACTORY_URI "conference@as.iop2..net"
SET SIPCONFERENCECONTINUE 0
SET PSTN_VM_NUM "*62"
SET SUBSCRIBE_LIST_NON_AVAYA "message-summary"
SET RINGTONESTYLE 0
1.1.4 Configure J100 Settings file
Step
Step 1
Step 2
Step 3
Step 4
Step 5
Step 6
Step 7
Step 8 |
Command
SET ENABLE_AVAYA_ENVIRONMENT 0
SET DISCOVER_AVAYA_ENVIRONMENT 0
SET ENABLE_IPOFFICE 0
SET ENABLE_3PCC_ENVIRONMENT 1
SET 3PCC_SERVER_MODE 0
SET SIPDOMAIN "3cx.hcm.com"
SET TRUSTCERTS 3cx.pem
SET SIP_CONTROLLER_LIST "3cx.hcm.com:5060;transport=tcp" (or udp, tls)
1.2 SIP Feature Configuration
This section provides configuration instructions for SIP features supported by the phone.
7
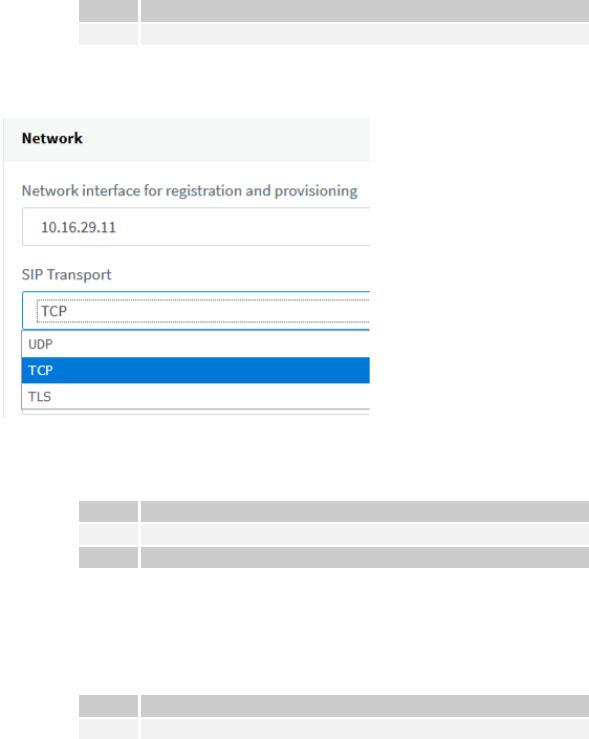
1.2.1 Registration and P2Pcall with 3CX
TCP configuration
Configure J100 Settings file
Step Command
Step 1 SET SIP_CONTROLLER_LIST "3cx.hcm.com:5060;transport=tcp"
In 3Cx server
Step 1: Go to Extensions > "Edit extension xxxx" > Phone Provisioning > SIP Transport: TCP
TLS configuration
Configure J100 Settings file
Step Command
Step 1 SET SIP_CONTROLLER_LIST "3cx.hcm.com:5061;transport=tls"
Step 2 SET TRUSTCERTS 3cx.pem
In 3Cx server
Go to Extensions > "Edit extension xxxx" > Phone Provisioning > SIP Transport: TLS
UDP configuration
Configure J100 Settings file
Step Command
Step 1 J100 settings file: SET SIP_CONTROLLER_LIST "3cx.hcm.com:5060;transport=udp"
In 3CX server
8
 Loading...