


POA8K3S
DIGITAL OVEN / BROILER / AIR FRYER
HORNO CON CONVECCION-ASADOR DIGITAL
FOUR COMPACTE NUMERIQUE
INSTRUCTION MANUAL
MANUAL DE INSTRUCCIONES
MANUEL D’INSTRUCTIONS
Model Number / No. de Modelo / Nos de Modèle:
MODEL / MODELO / MODELÉ: POA8K3S / POA8K3S-IS
BEFORE USE, PLEASE READ AND FOLLOW ALL SAFETY RULES AND OPERATING
INSTRUCTIONS.
Avanti has a policy of continuous improvement on its products and reserves the right to change materials and specifications without
notice.
Avanti Products LLC
P.O. Box 520604 - Miami, Florida 33152
www.avantiproducts.com

2
TABLE OF CONTENTS
Important Safety Instructions
3
Help Us Help You
4
Parts and Features
5
Installation Instructions
6
Before Using Your Appliance
6
Installation of Your Appliance
6
Electrical Connection
6
Operating Your Appliance
7 – 10
Control Panel
7
Using Your Oven
8 – 10
Care and Maintenance
10
Cleaning Your Appliance
10
Storing Your Appliance
10
Troubleshooting Guide
11
Service for Your Appliance
11
Your Avanti Products Warranty
12
Instrucciones en Español
13 – 20
Instructions en Français
21 – 30
Registration Information
Last

3
Page

4
IMPORTANT SAFETY INSTRUCTIONS
~WARNING~
To reduce the risk of fire, electrical shock, or injury when using your
appliance, follow these basic precautions:

5
When using electrical appliances, basic safety precautions should always be followed including
the following:
READ ALL INSTRUCTIONS, PRODUCT LABELS AND WARNINGS BEFORE USING THE
APPLIANCE.
• Do not touch hot surfaces, use handles or knobs. Always use oven mitts when handling hot materials
and allow metal parts to cool before cleaning. Allow the unit to cool thoroughly before putting in or
taking off parts.
• When the unit is not in use and before cleaning, unplug the appliance from the wall outlet. Make sure
the appliance is turned off before unplugging.
• To protect against risk of electrical shock, do not immerse the appliance in water or any other liquids.
• Don’t leave children alone or unattended where the appliance is hot or in operation. This appliance is
not designed to be used by children.
• Never use your appliance for heating the room. Your oven is not designed to heat your kitchen.
• Do not operate this or any appliance with a frayed or damaged cord or plug, after the appliance
malfunctions, is dropped or has been damaged in any manner.
• Do not use attachments not recommended by the manufacturer; they may cause fire, electric shock
or personal injury.
• Do not use outdoors or for commercial purposes.
• Do not use this appliance for other than its intended use.
• Do not let the cord dangle over the edge of a tabletop, countertop or to touch hot surfaces.
• Do not place the appliance near a hot gas, electric burner or in a heated oven.
• Extreme caution should be used when using containers constructed of other than metal or glass.
• A fire may occur if the appliance is covered or touching flammable materials, including curtains,
draperies, walls, etc., when in operation. Do not store any items on top of the appliance when in
operation.
• Do not store any materials, other than manufacturer’s recommended accessories in this unit when
not in use.
• Do not place any flammable materials in the appliance, such as paper, cardboard, plastic or any
materials that may catch fire or melt.
• Never clean the appliance with flammable liquids. The fumes can create a fire hazard or explosion.
• Do not cover the appliance with metal foil. This will cause overheating of the appliance.
• Oversized foods or metal utensils must not be inserted in the appliance as they may create a fire or
risk of electrical shock.
• Do not clean with metal scouring pads. Pieces can break off the pad and touch electrical parts
involving a risk of electrical shock.
• When broiling, use extreme caution when removing tray or disposing of hot grease.
• To turn this appliance off, return all controls to the “0” / “OFF” position, then remove the plug from
wall outlet.
• Cooked food can be very hot, especially pastry filling. Handle with care.
• Never pick up a flaming pan. Turns the controls off. Smother a flaming pan on a surface unit by
covering the pan completely with a well-f itting lid.
• Do not use water on grease fires. Flaming grease outside a pan can be put out by covering it with
baking soda, multipurpose dry chemical, or fire extinguisher. Flame in the oven can be smothered
completely by closing the oven door and turning the oven off or by using baking soda, multipurpose
dry chemical, or fire extinguisher.
This Unit Is For Household Use Only
- SAVE THESE INSTRUCTIONS -

6
HELP US HELP YOU...
Read this guide carefully.
It is intended to help you operate and maintain
your new appliance properly .
Keep it handy to answer your questions.
If you don't understand something or you need
more assistance, please call:
Avanti Customer Service
800-220-5570
Keep proof of original purchase date (such as
your sales slip) with this guide to establish the
warranty period.
Write down the model and serial numbers.
You'll find them on a label located on the back
side of the unit.
Please write these numbers here:
____________________________________
Date of Purchase
____________________________________
Model Number
____________________________________
Serial Number
Use these numbers in any correspondence or
service calls concerning your appliance.
If you received a damaged appliance,
immediately contact the dealer (or builder) that
sold you the appliance.
Save time and money. Before you call for
service, check the Problem Solver Guide. It lists
causes of minor operating problems that you
can correct yourself.
IF YOU NEED SERVICE
We're proud of our service and want you to be
pleased. If for some re ason you are not happy
with the service you receive, here are some steps
to follow for further assistance.
FIRST, contact the people who serviced your
appliance. Explain why you are not pleased. In
most cases, this will solve the problem.
NEXT, if you are still not pleased, write all the
details, including your telephone number, and
send it to:
Customer Servic e
Avanti Products
10880 NW 30 Street
Miami, FL 33172 USA

7
8
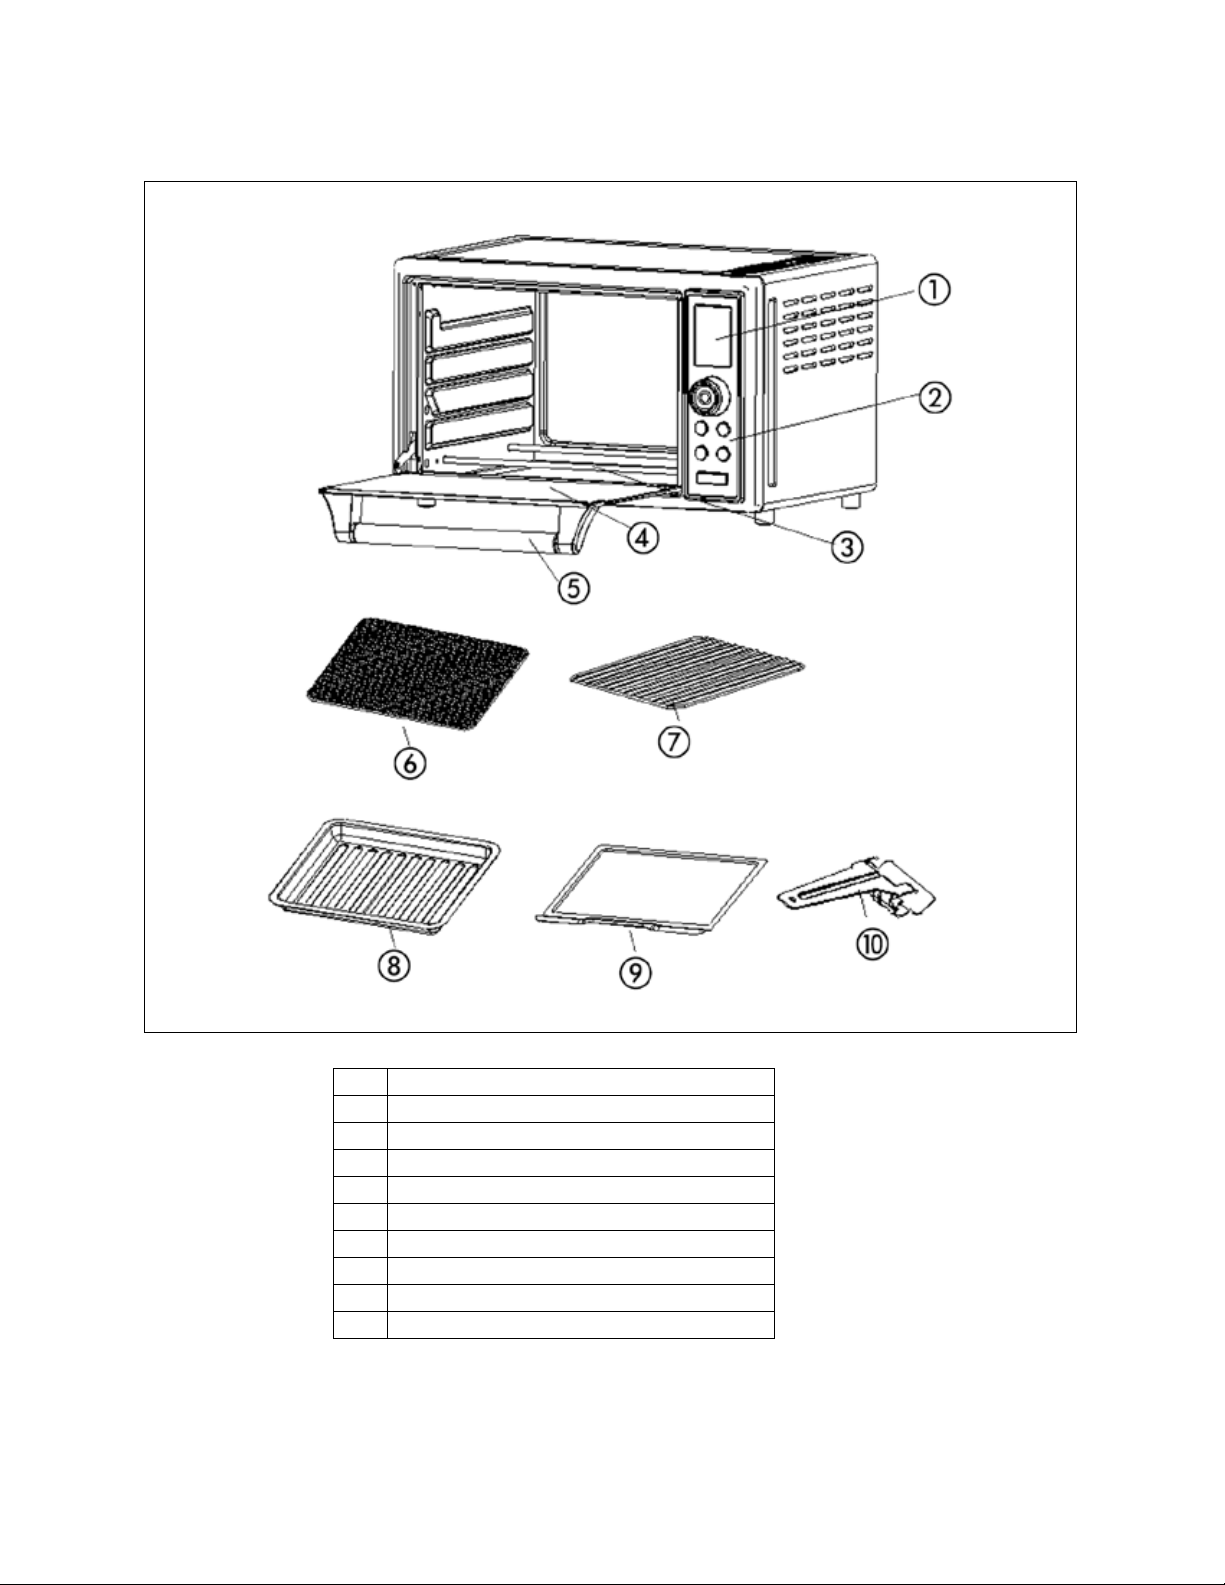
PARTS AND FEATURES
a
Digital Display
b
Control Panel
c
Heating Element
d
Glass Door
e
Handle
f
Air Fryer Rack
g
Oven Rack
h
Baking Tray
i
Crumb Tray
j
Pan Removal Tool

9
INSTALLATION INSTRUCTIONS
Ø Before Using Your Appliance
• Remove the exterior and interior packing.
• Check to be sure you have all of the following parts:
1
Bake / Broil / Drip Pan
1
Air Fry Rack
1
Oven Rack
1
Crumb Tray
1
Tray Removal Tool
1
Instruction Manual
• Remove all the items inside your oven and clean the interior surface with lukewarm water using a soft
cloth.
• Do not attempt to repair or replace any part of your oven unless it is specially recommended in this
manual.
• This appliance requires 1800W and should be the only appliance operating on the circuit.
Installation of Your Appliance
Select a location for the appliance. The location should be in an open area on a flat counter where the
plug will reach an outlet.
• When positioning the appliance, it should be set on a flat, steady surface.
• Do not block air vents. If they are blocked during operation, the oven may overheat and eventually
cause the appliance failure.
• Keep the appliance away from hot air, steam or splashing liquids when choosing a place to locate it,
otherwise, the unit’s operation may be adversely affected, causing it to break down.
• Direct sunlight may affect the acrylic coating and heat sources may increase electrical consumption.
• Plug the appliance into an exclusive properly installed grounded wall outlet. Any questions
concerning power should be directed toward a certified electrician or an authorized Avanti Products
service center.
• Do not place anything on the top of the broiler oven and automatic toaster.
• Keep the appliance at least 5 inches away from rear wall to ensure the proper ventilation.
Ø Electrical Connection
• The appliance has a polarized plug (One blade is wider than the other), to reduce the risk of electric
shock, this plug is intended to fit into the polarized outlet only one way. If the plug does not fit fully
into the outlet, reserve the plug. If it still does not fit, contact a qualified electrician. Do not attempt to
modify the plug in any way.
• A short power cord is provided to reduce the hazards resulting from entanglement or tripping over a
longer cord. An extension cord may be used with care, however, be sure the marked electrical rating
is at least as great as the rating of this appliance. The extension cord should be positioned such that
it does not drape over the counter or tabletop where it can be pulled on by children or tripped over.
The electrical rating of this appliance is listed on the bottom panel of the appliance.
NOTICE
BEFORE YOU USE THIS OVEN FOR THE FIRST TIME: THE HEATING ELEMENTS HAVE A
PROTECTIVE COATING, WHICH MUST BE BURNED OFF BEFORE USE. TO DO THIS, OPEN
THE OVEN DOOR, PRESS THE FUNCTION BUTTON, SELECT THE BAKE SETTING, THEN SET
THE TEMPERATURE TO 450ºF. LEAVE THE APPLIANCE SWITCHED ON FOR
APPROXIMATELY 15 MINUTES. IT IS IMPORTANT TO ENSURE ADEQUATE VENTILATION
DURING PERIOD AS A BURNING SMELL IS NORMAL DURING THIS PROCESS.
10
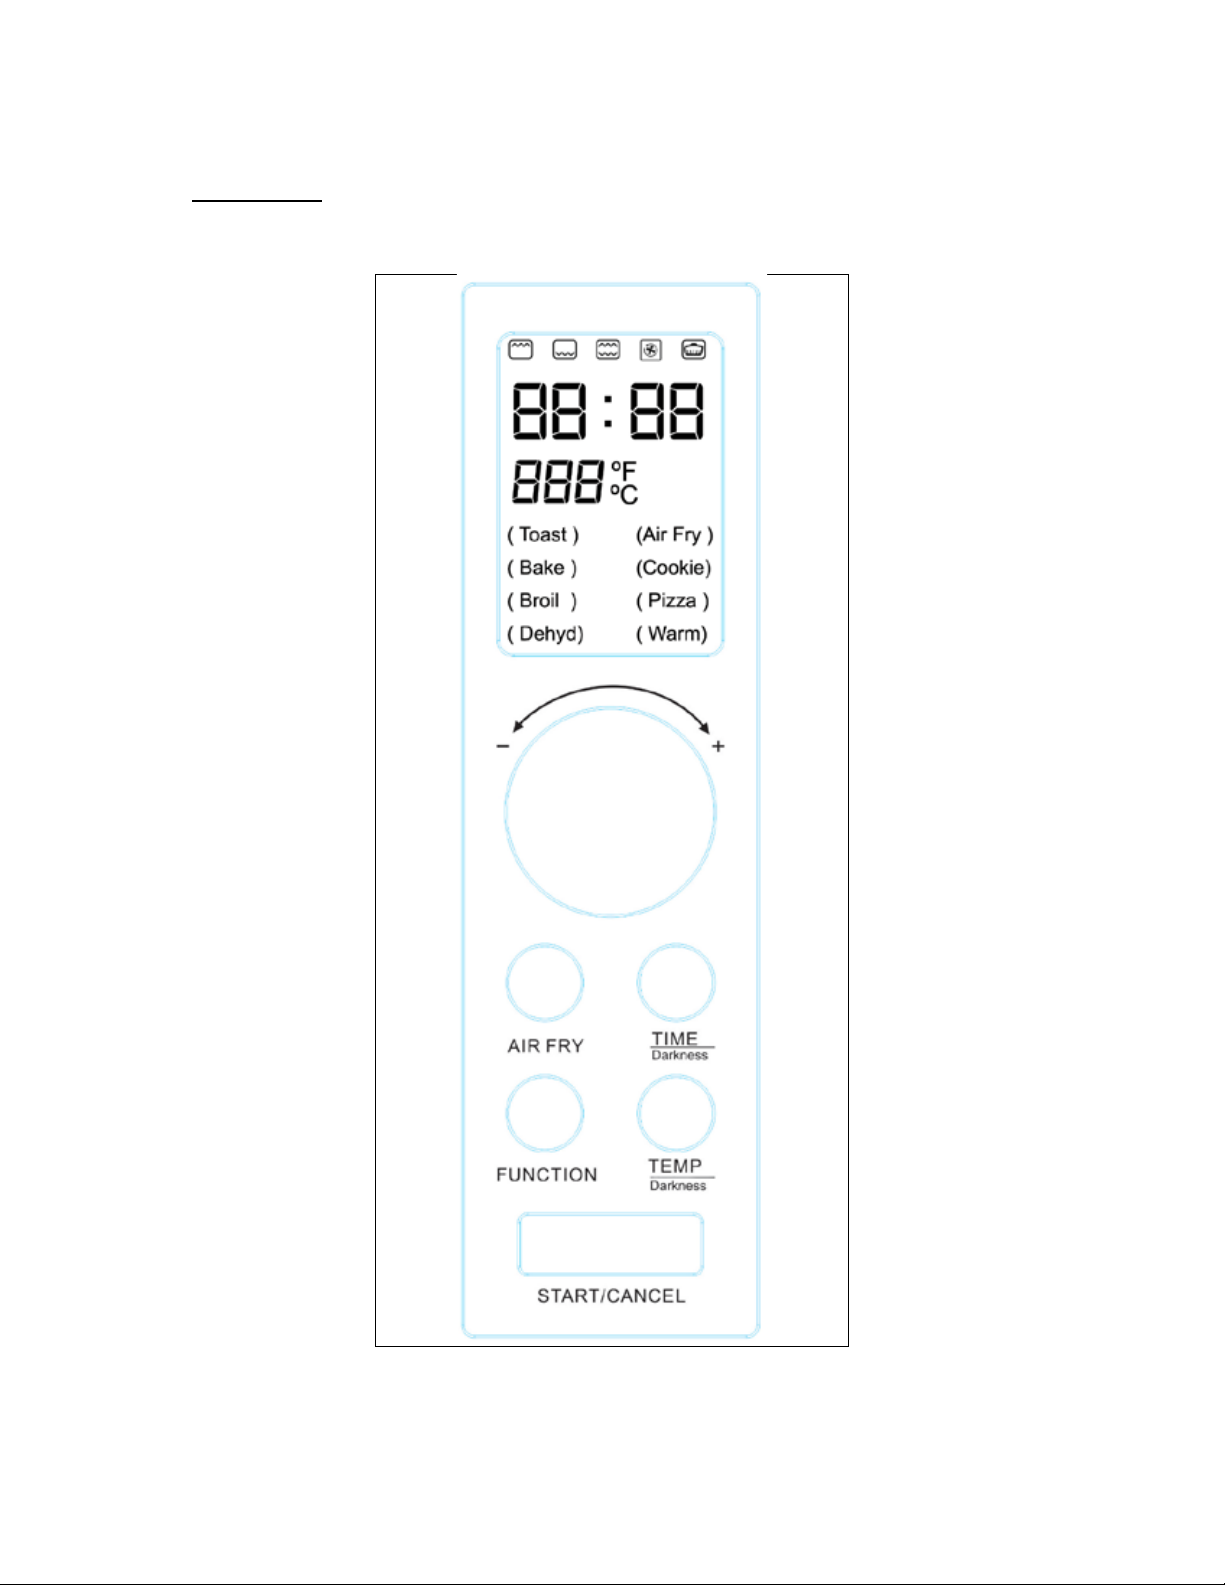
OPERATING YOUR APPLIANCE
Ø Control Panel

11
COOKING FUNCTION SELECTIONS
Select the appropriate function for your use.
There are EIGHT (8) Pre-programmed functions:
Program
Default
time
(Minutes)
Default
temp. ºF
Time
adjustment
Temp.
adjustment
Default function mode
TOAST \ 480
6 Shade Settings
1 – Lightest
6 – Darkest
NO Upper / Lower Elements
Air Fry 20 400ºF
Adjustable to
90 Minutes
Adjustable
150º - 400ºF
Upper / Lower Elements
Convection Fan
BAKE 30 350ºF
Adjustable to
90 Minutes
Adjustable
150º - 450ºF
Upper / Lower Elements
COOKIE 18 350ºF
Adjustable to
90 Minutes
Adjustable
150º - 450ºF
Upper / Lower Elements
BROIL 30 450ºF
Adjustable to
90 Minutes
NO Upper / Lower Elements
PIZZA 20 400ºF
Adjustable to
90 Minutes
Adjustable
150º - 450ºF
Upper / Lower Elements
DEHYD
DEHYDRATE
12 Hours 150ºF
Adjustable up to
12 hours
NO Upper Element
WARM 30 180ºF
Adjustable to
90 minutes
130º - 180ºF Lower Element
NOTE:
Heating elements will cycle on and off during the selected function to maintain the
appropriate temperature.

12
OPERATING YOUR OVEN / AIR FRYER
Press the FUNCTION button to activate the control panel to select any of the cooking functions below:
(When the cooking cycle is completed, open door fully and remove food carefully.)
TOAST
• Press the function button.
• Turn the selector knob until the TOAST function is flashing on the display.
• Press the Time / Darkness or Temp / Darkness button and turn the knob to select the desired
toast shade (1 is the lightest – 6 is the darkest).
• Press the Start / Cancel button to either start or stop the cooking cycle.
Different types of bread require different toasting times. Lighter breads and waffles require a shorter
toasting time. Darker breads, muffins, and English muffins require a longer toast ing time.
AIR FRY
• Press the Air Fry Button
• The Air Fry program will flash on the display.
• Press the Start / Cancel button to start the pre-heating cycle, “PRE” will be shown in the LED
display. After 5 minutes of pre-heating, the unit will beep to advise the oven is pre-heated.
• Open the door, place the food on the tray / air-fry rack, insert the tray / rack on the middle rack
position and close the door.
• Press the Temp button and turn the knob to select the desired cooking temperature.
• Press the time button and turn the knob to select the desired cook time.
Press the Start / Cancel button to either start or stop the cooking cycle.
BAKE
• Press the function button.
• Turn the selector knob until the BAKE function is flashing on the display.
• Press the Temp button and turn the knob to select the desired cooking temperature.
• Press the time button and turn the knob to select the desired cook time.
Press the Start / Cancel button to either start or stop the cooking cycle.
COOKIE
• Press the function button.
• Turn the selector knob until the COOKIE function is flashing on the display.
• Press the Temp button and turn the knob to select the desired cooking temperature.
• Press the time button and turn the knob to select the desired cook time.
Press the Start / Cancel button to either start or stop the cooking cycle.
BROIL
• Press the function button.
• Turn the selector knob until the BROIL function is flashing on the display.
• Press the time button and turn the knob to select the desired cook time.
Press the Start / Cancel button to either start or stop the cooking cycle.
PIZZA
• Press the function button.
• Turn the selector knob until the PIZZA function is flashing on the display.
• Press the Temp button and turn the knob to select the desired cooking temperature.

13
• Press the time button and turn the knob to select the desired cook time.
Press the Start / Cancel button to either start or stop the cooking cycle.
DEHYD - DEHYDRATE
• Press the function button.
• Turn the selector knob until the DEHYD function is flashing on the display.
• Press the time button and turn the knob to select the desired cook time.
Press the Start / Cancel button to either start or stop the cooking cycle.
WARM
• Press the function button.
• Turn the selector knob until the WARM function is flashing on the display.
• Press the time button and turn the knob to select the desired cook time.
Press the Start / Cancel button to either start or stop the cooking cycle.
CARE AND MAINTENANCE
Ø Cleaning Your Appliance
Before cleaning your appliance, unplug it and allow it to cool.
Remove the crumb tray, wire rack and drip/baking pan.
Use a damp cloth to wash the inside with warm water and a mild detergent. Do not Immerse in Water!
Abrasive cleaners, scrubbing brushes and chemical cleaners may damage the continuous clean coating
on this unit.
Wash the crumb tray, wire rack, drip/baking pan and metal handling tool with a mild detergent solution.
The glass oven door should be cleaned regularly with a non-abrasive liquid cleaner.
Rinse with a damp cloth and then a dry one.
The outside of the appliance should be cleaned with mild detergent and warm water.
CAUTION
Failure to unplug the appliance could resul t in electrical shock or personal injury.
Ø Storing Your Appliance
Allow the appliance to cool completely before storing. If storing the appliance for long periods of time,
make certain that the appliance is clean and free of food particles. Store the appliance in a dry location
such as on a table or countertop or in a cupboard shelf. Other than the recommended cleaning, no
further user maintenance should be necessary.
 Loading...