


 Loading...
User’s manual
TL7600
DECT 6.0
accessory cordless headset

Congratulations
on your purchase of this AT&T product. Before using this AT&T product, please read Important safety information on
pages 35-38 of this manual. Please thoroughly read the user’s manual for all the feature operations and troubleshooting information necessary to install and operate your new AT&T
product. You can also visit our website at www.telephones.att.com or call 1 (800) 222-3111. In Canada, dial 1 (866) 288-4268.
Model number: TL7600 (Headset and headset charger)
Type: |
DECT 6.0 accessory cordless headset |
Serial number:
Purchase date:
Place of purchase:
Both the model and serial numbers of your AT&T product can be found on the bottom of the headset charger.
Save your sales receipt and original packaging in case it is necessary to return your product for warranty service.
© 2008-2012 Advanced American Telephones. All Rights Reserved. AT&T and the AT&T logo are trademarks of AT&T Intellectual Property licensed to Advanced American Telephones, San Antonio, TX 78219. Printed in China.

Parts checklist
Check to make sure the headset package includes the following items. Save your sales receipt and original packaging in the event warranty service is necessary.
User’s manual
TL7600
DECT 6.0
accessory cordless headset
|
|
|
|
|
|
|
User's manual |
Cordless headset |
Over the ear hook |
||||
|
|
|
|
|
|
|
|
|
|
|
|
|
|
Headset charger |
Battery compartment cover |
Battery for headset |
||
|
|
|
|
|
|
|
|
|
|
|
|
|
|
|
|
|
|
|
|
|
|
|
|
|
|
|
|
|
|
Charger power adapter |
Behind the neck band |
Over the head band |
User’s manual |
|
TL7600 |
|
DECT 6.0 |
|
accessory cordless headset |
|
Table of contents |
|
Getting started |
|
Quick reference guide - |
|
headset............................................ |
1 |
Headset lights.......................... |
1 |
Headset alert tones............... |
3 |
Quick reference guide - |
|
headset charger.......................... |
4 |
Installation preparation........... |
5 |
Charger installation................... |
6 |
Battery installation.................... |
7 |
Battery charging.......................... |
8 |
Registering the headset.......... |
9 |
To register a headset to |
|
the DECT headset base.... |
10 |
To register the headset |
|
to an AT&T DECT cordless |
|
telephone base..................... |
11 |
Headset attachments............. |
12 |
Over the ear hook............... |
12 |
Over the head band........... |
15 |
Behind the neck band....... |
17 |
Operation |
|
Headset operation................... |
19 |
Making a call.......................... |
19 |
Answering a call on the |
|
headset..................................... |
20 |
Ending a call on |
|
the headset............................. |
20 |
Auto off.................................... |
20 |
Temporary ring tone |
|
silencing................................... |
21 |
Intercom calls and |
|
transfers................................... |
21 |
Options while on calls.......... |
22 |
Volume control..................... |
22 |
Call waiting............................. |
22 |
Switching a call between |
|
handset and headset......... |
23 |
Multiple headset/ |
|
handset use............................ |
24 |
Mute........................................... |
24 |
Replacing a headset............... |
25 |
To deregister all |
|
headsets from your |
|
TL7610/TL7611/TL7612 |
|
headset base.......................... |
25 |
To deregister all headsets |
|
from an AT&T cordless |
|
telephone base..................... |
26 |
Appendix |
|
Troubleshooting........................ |
27 |
Important safety |
|
information................................. |
35 |
Especially about cordless |
|
headsets................................... |
36 |
Precautions for users |
|
of implanted cardiac |
|
pacemakers............................. |
38 |
Pacemaker patients............ |
38 |
Maintenance............................... |
39 |
FCC Part 68 and ACTA.......... |
40 |
FCC Part 15................................ |
43 |
Limited warranty...................... |
45 |
Technical specifications........ |
49 |
DECT 6.0 digital |
|
technology.............................. |
49 |
Operating range................... |
49 |
Extended range and |
|
clarity......................................... |
49 |
Index |
|
Index............................................... |
50 |

Getting started
Quick reference guide - headset
ON/OFF
Press to make, answer, or end a call.
Headset lights
ON/OFF light status
On |
• |
Headset is charging in the headset charger. |
|
• |
Headset is trying to register to the headset base or |
|
|
telephone base. |
|
• |
Headset is searching for the headset base. |
|
|
|
Flash |
• |
Flashes slowly when incorrect battery is installed. |
|
• Flashes three times, followed by a pause. This cycle |
|
|
|
then repeats three more times and then shuts down to |
|
|
indicate the battery level is very low. |
|
• |
Flashes twice every five seconds to indicate the |
|
|
headset is not registered. |
|
• Flashes every 20 seconds to indicate the battery is low |
|
|
|
and needs to be charged in the headset charger. |
|
• |
Flashes every three seconds to indicate the headset |
|
|
is in use. |
|
• |
Flashes quickly when there is an incoming call. |
|
|
|
Getting started
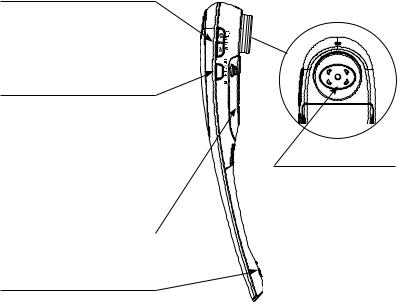
Quick reference guide - headset
VOLUME  /+ –
/+ –
Press the volume keys on the side of the headset to adjust the listening volume when on a call (page 22).
MUTE/FLASH
Press to mute the microphone during a call (page 24).
Press and hold to receive call |
|
|
waiting during a call (page 22). |
EARPIECE |
|
Press to mute the ring tone in |
||
|
||
the earpiece when there is an |
|
|
incoming call (page 21). |
|
Battery compartment cover
Remove to install or replace the battery (page 7).
Microphone

Getting started
Quick reference guide - headset
Headset alert tones
Three quick beeps. |
• |
A VOLUME /+ – key is pressed when |
|
|
the volume is already at its highest or |
|
|
lowest setting. |
|
• |
The headset is not registered and the |
|
|
headset ON/OFF button is pressed. |
|
• |
The headset has gone out of range from |
|
|
the headset base during a call. |
|
|
|
One short beep |
• |
Low battery warning. |
every 20 seconds. |
|
|
|
|
|
One short beep |
• |
The call is muted. |
every 15 seconds. |
|
|
One long beep |
• |
Call waiting alert tone. |
repeated. |
|
|
|
|
|
One short beep. |
• |
The headset ON/OFF key is pressed to |
|
|
go on hook or off hook. |
|
|
|

Getting started
Quick reference guide - headset charger
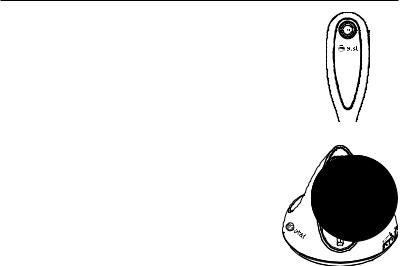
Charging cradle
Place the headset here for charging.
Power cord groove
Place the power cord here.
Power jack
Plug the small end of the charger power adapter here.

Getting started
Installation preparation
You must install and |
See pages 6-8 |
charge the battery before |
STOP! for easy instructions. |
using the headset. |
If you subscribe to high-speed Internet service (DSL - digital subscriber line) through your telephone lines, you must install a DSL filter between the telephone line cord and the telephone
wall jack. The filter prevents noise and caller ID problems caused by DSL interference. Please contact your DSL service provider for more information about DSL filters.
For customer service or product information, visit our website at www.telephones.att.com or call 1 (800) 222-3111. In Canada, dial 1 (866) 288-4268.
Avoid placing the headset charger too close to:
•Communication devices such as television sets, VCRs, or other cordless telephones.
•Excessive heat sources.
•Noise sources such as a window with traffic outside, motors, microwave ovens, refrigerators, or fluorescent lighting.
•Excessive dust sources such as a workshop or garage.
•Excessive moisture.
•Extremely low temperature.
•Mechanical vibration or shock such as on top of a washing machine or work bench.
Getting started
Charger installation
1.Plug the small end of the charger power adapter into the power jack at the bottom of the headset charger. Place the power cord in the power cord slot.
IMPORTANT INFORMATION
2.Plug the charger power adapter into a power outlet not controlled by a wall switch.
1.Use only the power adapter supplied with this product. To order a replacement power adapter, visit our website at
www.telephones.att.com, or call 1 (800) 222-3111. In Canada, dial 1 (866) 288-4268.
2.The power adapter is intended to be correctly oriented in a vertical or floor mount position. The prongs are not designed to hold the plug in place if it is plugged into a ceiling, under-the-table or cabinet outlet.
Getting started
Battery installation
Install the battery as shown below. For optimal performance, charge the headset battery for at least six hours before use. When fully charged, the headset battery provides approximately 10 hours of talk time or 5 days of standby time. When the headset is not in use, recharge by returning it to the headset base.
1
2


 3
3
5


 4
4
1.If the battery compartment cover
is attached, press on both sides of the battery compartment cover and lift it up and off.
2.Insert the battery into the battery compartment with the label THIS SIDE UP facing up.
3.Push the battery plug into the connector inside the compartment according to the color-coded label and place the wires neatly inside the compartment.
4.Insert the tab on the bottom of the battery compartment cover into the battery compartment.
5.Press down gently on the battery compartment cover until it snaps into place.
 NOTE: Remove the ear hook from the headset (see page 14) before battery replacement.
Getting started
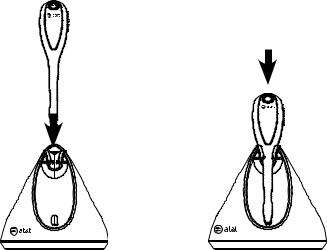
Battery charging
After installing the battery, charge the headset by placing it on the headset charger as shown below. Before registration, the headset ON/OFF light flashes twice every five seconds whether the headset is charging or not. After registration, the headset ON/OFF light is on when the headset is charging.
Insert
1.Insert the headset into the charging cradle.
IMPORTANT INFORMATION
Push


 ON/OFF light
2.Push the headset downward until the ON/OFF light on the headset turns on.
Use only the supplied rechargeable battery or replacement battery
(model BT191545). To obtain a replacement battery, visit our website at
www.telephones.att.com or call 1 (800) 222-3111.
In Canada, dial 1 (866) 288-4268.
Getting started
Registering the headset
You must register your new TL7600 headset with one of the following models before use:
•AT&T DECT cordless headset TL7610/TL7611/TL7612 (see page 10).
You can register a maximum of two headsets to each headset base.
-OR-
•A compatible AT&T DECT cordless telephone (see page 11). You can register a maximum of two headsets to each cordless telephone.
The telephone base recognizes and counts a headset the same as a handset. Refer to your telephone user’s manual for the maximum number of handsets that you can register to the telephone base. If you have the maximum number of handsets registered, you need to follow the deregistration information in your telephone user’s manual.
Visit www.telephones.att.com/headsets for a list of compatible telephones.
The first headset provided with your TL7610/TL7611/TL7612 has a blue ON/OFF light. When you register a second headset, the ON/OFF light of that headset turns orange to help you identify the headsets.
You can only register the headset to one product at a time, so the headset must not be already registered before registering to a headset base or a cordless phone.
 NOTE: See pages 25-26 for instructions on deregistration.
Getting started
Registering the headset
To register a headset to a TL7610/TL7611/TL7612 DECT headset base
1. Make sure the battery is properly installed in the headset (see page 7). The ON/OFF light flashes twice every five seconds to indicate the headset is not registered.
2.Place the headset in the headset base or charger and allow it to charge for at least five minutes before beginning registration.
3.Remove the headset from the headset base or charger.
4.On the headset base, press and hold
the PAIR button until the MUTE light on the headset base turns on (about four seconds) and release the button.
5. Return the headset to the headset base for registration.
Registration may take about 30 seconds to complete. The MUTE light on the headset base turns off. The headset ON/OFF light turns blue on the first headset registered and orange on the second headset registered.
To verify registration was successful, press the headset ON/OFF button and check for a dial tone.
If the registration was not successful, the ON/OFF light on the headset flashes twice every five seconds. To reset the headset, remove the headset from the headset charger and try the registration process again.
10

Getting started
Registering the headset
To register the headset to an AT&T DECT cordless telephone base
1. Make sure the battery is properly installed in the headset (see page 7). The ON/OFF light flashes twice every five seconds to indicate the headset is not registered.
2.Place the headset in the headset charger and allow it to charge for at least five minutes before beginning registration. Remove the headset from the charger and then place the
headset back into the charger.
3.On the telephone base of the cordless phone, press and hold the  /HANDSET LOCATOR button until the IN USE light turns on (about four seconds) and release the button.
If your telephone base has no  HANDSET LOCATOR button:
Press and hold the HOLD button until the screen displays Registering... Please wait, then release the button.
-OR-
Press and hold the  LOCATOR button until the screen displays Registering handset..., then release the button.
4.The headset registers to the telephone base automatically; this may take about 30 seconds to complete. The headset ON/OFF light turns blue on the first headset registered and orange on the second headset registered. To verify registration was successful, press the headset ON/OFF button and check for a dial tone.
 NOTES:
•If the registration fails, the ON/OFF light on the headset flashes twice every five seconds. Reset the headset and try again. Remove the headset from the headset base and press ON/OFF. Then place the headset back into the headset base. Try the registration process again.
•For users of Synapse , SynJ
 , MS2085 Console, or MS2015 Deskset, refer to the user’s manual of your respective model for registration instructions.
Synapse and SynJ
 are trademarks of Advanced American Telephones.
11
Getting started
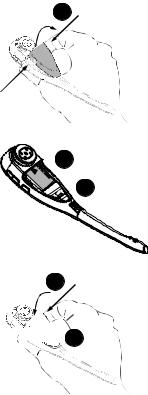
Headset attachments
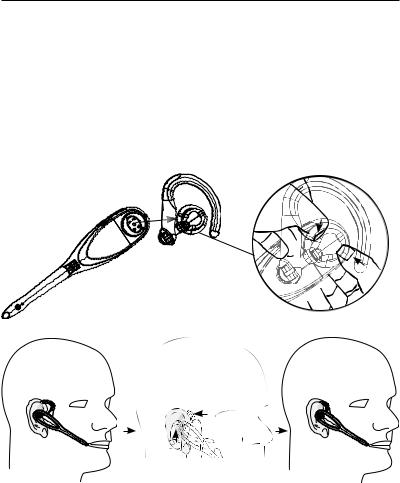
Over the ear hook
To attach the ear hook to the headset:
1.Remove any headset attachment connected to the headset.
2.Insert the earpiece into the ear hook, as shown in Figure 1.
3.Press the ear hook onto the earpiece, as shown in Figure 2.
4.Hook the headset onto the desired ear. Adjust the angle of the headset until the microphone is pointing towards your mouth, as shown in Figure 3.
Figure 1
2
Figure 3
 NOTE: Firmly grip the earpiece with one hand whenever adjusting the headset microphone up or down, as shown in Figure 3.
12
Loading...