


Eee PC User’s Manual
Eee PC 4G (701)
Eee PC 4G Surf
Eee PC 8G
October 2007

Table of Contents
Chaper 1: |
Introducing the Eee PC |
|
About This User’s Manual............................................................................. |
1-2 |
|
Notes for This Manual.................................................................................... |
1-3 |
|
Safety Precautions.......................................................................................... |
1-4 |
|
Transportation Precautions....................................................................... |
1-5 |
|
Charging Your Batteries.............................................................................. |
1-5 |
|
Airplane Precautions.................................................................................... |
1-5 |
|
Preparing your Eee PC................................................................................... |
1-6 |
|
Chaper 2: |
Knowing the Parts |
Top Side.............................................................................................................. |
2-2 |
Bottom Side...................................................................................................... |
2-5 |
Right Side........................................................................................................... |
2-7 |
Left Side.............................................................................................................. |
2-8 |
Rear Side............................................................................................................ |
2-9 |
Chaper 3: |
Getting Started |
|
Power System................................................................................................... |
|
3-2 |
Using AC Power.............................................................................................. |
3-2 |
|
Using Battery Power..................................................................................... |
3-4 |
|
Touchpad Usage............................................................................................. |
3-6 |
|
Keyboard Usage. |
............................................................................................. |
3-8 |
Special Function Keys.................................................................................. |
3-8 |
|
Adjust the window..................................................................................... |
3-10 |
|
First Run Wizard............................................................................................. |
|
3-11 |
Operating Mode |
............................................................................................ |
3-13 |
Shutdown........................................................................................................ |
|
3-14 |
Chaper 4: |
Using the Eee PC |
|
Internet............................................................................................................... |
|
4-2 |
Configuring a wireless network connection....................................... |
4-2 |
|
Configuring a network connection........................................................ |
4-4 |
|
Wireless Point-to-Point Protocol over Ethernet................................. |
4-9 |
|
Browsing web pages.................................................................................. |
4-14 |
|
Enjoying free resources............................................................................. |
4-15 |
|
ii |
Table of Contents |

Table of Contents
Accessing E-mail.......................................................................................... |
4-16 |
Chatting with friends................................................................................. |
4-17 |
Checking the World Clock........................................................................ |
4-19 |
Work ............................................................................................................... |
4-20 |
Office applications...................................................................................... |
4-20 |
Management software.............................................................................. |
4-24 |
Accessories & Dictionary.......................................................................... |
4-27 |
Learn ............................................................................................................... |
4-28 |
Science ......................................................................................................... |
4-28 |
Language........................................................................................................... |
29 |
Math ......................................................................................................... |
4-29 |
Paint ......................................................................................................... |
4-30 |
Web Learn...................................................................................................... |
4-30 |
Play ............................................................................................................... |
4-31 |
Media Player.................................................................................................. |
4-31 |
Music Manager............................................................................................. |
4-32 |
Photo Manager............................................................................................ |
4-33 |
Video Manager............................................................................................. |
4-34 |
Webcam (optional)..................................................................................... |
4-34 |
Sound Recorder........................................................................................... |
4-35 |
Games ......................................................................................................... |
4-35 |
Settings............................................................................................................. |
4-36 |
Anti-Virus........................................................................................................ |
4-36 |
Volume ......................................................................................................... |
4-36 |
Instant Shutdown........................................................................................ |
4-37 |
Printers ......................................................................................................... |
4-37 |
System Info.................................................................................................... |
4-38 |
Date & Time................................................................................................... |
4-38 |
Personalization............................................................................................. |
4-39 |
Add/Remove Software.............................................................................. |
4-39 |
Touchpad....................................................................................................... |
4-42 |
Disk Utility...................................................................................................... |
4-42 |
Diagnostic Tools........................................................................................... |
4-43 |
Desktop Mode.............................................................................................. |
4-44 |
Voice Command.......................................................................................... |
4-45 |
ASUS Eee PC |
iii |

Table of Contents
Task Manager |
................................................................................................4-46 |
Favorites........................................................................................................... |
4-47 |
Chaper 5: |
Installing & Optimizing Windows® XP |
|
Preparing to install Windows® XP.............................................................. |
5-2 |
|
Installing Windows® XP................................................................................. |
5-2 |
|
Optimizing Windows® XP............................................................................. |
5-4 |
|
Changing Virtual Memory.......................................................................... |
5-4 |
|
Turning off System Restore........................................................................ |
5-5 |
|
Compressing Disk Drive.............................................................................. |
5-6 |
|
Relocating Files.............................................................................................. |
5-6 |
|
Deleting unnecessary Windows Components................................... |
5-8 |
|
Clearing System Backup Data................................................................... |
5-8 |
|
Deleting unnecessary document files................................................... |
5-9 |
|
Chaper 6: |
Support DVD & System Recovery |
|
Support DVD information........................................................................... |
6-2 |
|
Running the support DVD......................................................................... |
6-2 |
|
Drivers menu.................................................................................................. |
6-3 |
|
Utilities menu................................................................................................. |
6-4 |
|
Manual |
........................................................................................................... |
6-5 |
Contact ........................................................................................................... |
|
6-5 |
Other information......................................................................................... |
6-6 |
|
System Recovery............................................................................................. |
6-7 |
|
Using Hidden ................................................................................Partition |
6-7 |
|
Using the ..............................................................................Support DVD |
6-8 |
|
Using USB ....................................................................................Flash Disk |
6-8 |
|
Appendix |
|
|
Trademark Statements.................................................................................. |
A-2 |
|
Qualified Vendor .....................................................................................List |
A-3 |
|
Declarations and ........................................................Safety Statements |
A-4 |
|
GNU General Public ....................................................................License |
A-19 |
|
Copyright Information............................................................................... |
A-32 |
|
Limitation of Liability.................................................................................. |
A-33 |
|
Service and Support................................................................................... |
A-33 |
|
iv |
Table of Contents |
About This User’s Manual
Notes for This Manual
Safety Precautions
Preparing Your Eee PC
Introducing1
the Eee PC

About This User’s Manual
You are reading the Eee PC User’s Manual.This User’s Manual provides information regarding the various components in the Eee PC and how to use them.The following are major sections of this User’s Manual:
1.Introducing the Eee PC
Introduces the Eee PC and this User’s Manual.
2.Knowing the Parts
Provides information on the Eee PC’s components.
3.Getting Started
Provides information on getting started with the Eee PC.
4.Using the Eee PC
Provides information on using the Eee PC’s utilities.
5.Installing & Optimizing Windows® XP
Gives you information on how to install and optimize Windows® XP on your Eee PC.
6.Support DVD & System Recovery
Gives you information on the support DVD and system recovery.
7.Appendix
Provides you QVL and gives safety statements.
1- |
Chapter 1: Introducing the Eee PC |
Notes for This Manual
A few notes and warnings are used throughout this guide, allowing you to complete certain tasks safely and effectively.These notes have different degrees of importance as follows:
WARNING! Important information that must be followed for safe operation.
IMPORTANT! Vital information that must be followed to prevent damage to data, components, or persons.
TIP:Tips for completing tasks.
NOTE: Information for special situations.
ASUS Eee PC |
1- |
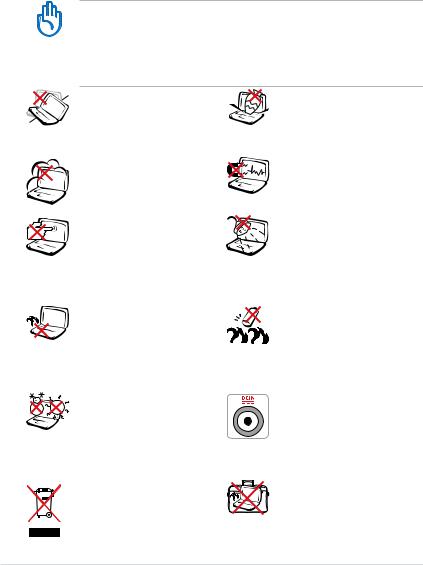
Safety Precautions
The following safety precautions will increase the life of the Eee PC. Follow all precautions and instructions. Except as described in this manual, refer all servicing to qualified personnel. Do not use damaged power cords, accessories, or other peripherals. Do not use strong solvents such as thinners, benzene, or other chemicals on or near the surface.
Disconnect the AC power and remove the battery pack(s) before cleaning.Wipe the Eee PC using a clean cellulose sponge or chamois cloth dampened with a solution of nonabrasive detergent and a few drops of warm water and remove any extra moisture with a dry cloth.
DO NOT place on uneven or unstable work surfaces. Seek servicing if the casing has been damaged.
DO NOT expose to dirty or dusty environments. DO NOT operate during a gas leak.
DO NOT place or drop objects on top and do not shove any foreign objects into the Eee PC.
DO NOT expose to strong magnetic or electrical fields.
DO NOT press or touch the display panel. Do not place together with small items that may scratch or enter the Eee PC.
DO NOT leave the Eee PC on your lap or any part of the body to prevent discomfort or injury from heat exposure.
SAFE TEMP:This Eee PC should only be used in environments with ambient temperatures between 5°C (41°F) and 35°C (95°F)
DO NOT throw the Eee PC in municipal waste. Check local regulations for disposal of electronic products.
DO NOT expose to or use near liquids, rain, or moisture. DO NOT use the modem during electrical storms.
Battery safety warning: DO NOT throw the battery in fire.DO NOT short circuit the contacts. DO NOT disassemble the battery.
INPUT RATING: Refer to the rating label on the bottom of the Eee PC and be sure that your power adapter complies with the rating.
DO NOT carry or cover a Eee PC that is powered ON with any materials that will reduce air circulation such as a carrying bag.
1- |
Chapter 1: Introducing the Eee PC |

Transportation Precautions
To prepare the Eee PC for transport, you should turn it OFF and disconnect all external peripherals to prevent damage to the connectors.The solid-state disk drive’s head retracts when the power is turned OFF to prevent scratching of the solid-state disk drive surface during transport.Therefore, you should not transport the Eee PC while the power is still ON. Close the display panel and check that it is latched securely in the closed position to protect the keyboard and display panel.
The Eee PC’s surface is easily dulled if not properly cared for. Be careful not to rub or scrape surfaces when transporting your Eee PC.You can purchase an optional carrying case for protection from dirt, water, shock, and scratches.
Charging Your Batteries
If you intend to use battery power, be sure to fully charge your battery pack and any optional battery packs before going on long trips. Remember that the power adapter charges the battery pack as long as it is plugged into the computer and an AC power source. Be aware that it takes much longer to charge the battery pack when the Eee PC is in use.
Airplane Precautions
Contact your airline if you want to use the Eee PC on the airplane. Most airlines have restrictions for using electronic devices. Most airlines allow electronic use only between and not during takeoffs and landings.
There are three main types of airport security devices: X-ray machines (used on items placed on conveyor belts), magnetic detectors (used on people walking through security checks), and magnetic wands (hand-held devices used on people or individual items).You can send your Eee PC and diskettes through airport X-ray machines. However, it is recommended that you do not send your Eee PC or diskettes through airport magnetic detectors or expose them to magnetic wands.
ASUS Eee PC |
1- |
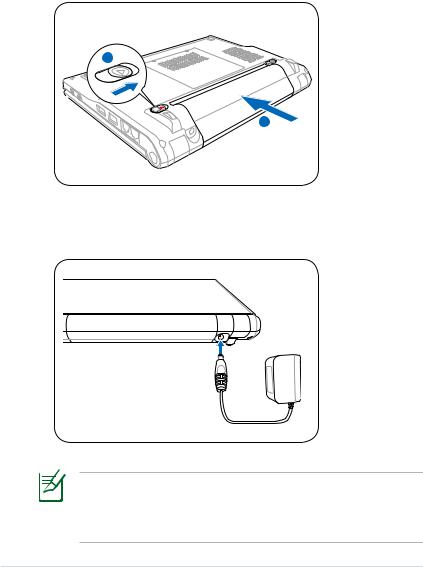
Preparing your Eee PC
These are only quick instructions for using your Eee PC. Read the following chapters for detailed information.
1.Install the battery pack
2
1
2.Connect the AC power adapter
The wall outlet differs in type by country.Your Eee PC ships with an adapter compliant with your national standard.The illustration above is for reference only and may not exactly show your specific configuration. Refer to page 3-2 for more details.
1- |
Chapter 1: Introducing the Eee PC |
3.Open the display panel
4.Turn ON the Eee PC
When you open the display panel, do not force it down to the table or else the hinges may break! Never lift the Eee PC by the display panel!
ASUS Eee PC |
1- |

1- |
Chapter 1: Introducing the Eee PC |
Top Side
Bottom Side
Right Side
Left Side
Rear Side
Knowing the Parts2

Top Side
Refer to the diagram below to identify the components on this side of the Eee PC.
1
2
3
4
5
6
The keyboard will differ for each territory.
2- |
Chapter 2: Knowing the Parts |

1 |
Built-in Camera (optional) |
|
The built-in camera allows picture taking or video |
|
recording. |
2 |
Display Panel |
|
The display panel functions the same as a desktop monitor. |
|
The Eee PC uses an active matrix TFT LCD, which provides |
|
excellent viewing like that of desktop monitors. Unlike |
|
desktop monitors, the LCD panel does not produce any |
|
radiation or flickering, so it is easier on the eyes. Use a soft |
|
cloth without chemical liquids (use plain water if necessary) |
|
to clean the display panel. |
3 |
Power Switch |
|
The power switch allows powering ON and OFF the Eee PC |
|
and recovering from STR. Press the switch once to turn ON |
|
and hold it to turn OFF the Eee PC.The power switch only |
|
works when the display panel is opened. |
4 |
Keyboard |
The keyboard provides keys with comfortable travel (depth at which the keys can be depressed) and palm rest for both hands.
5 |
Touchpad and Buttons |
The touchpad and its buttons comprises a pointing device that provides the same functions as a desktop mouse. Scrolling is available to allow easy web and document navigation.
ASUS Eee PC |
2- |
6 |
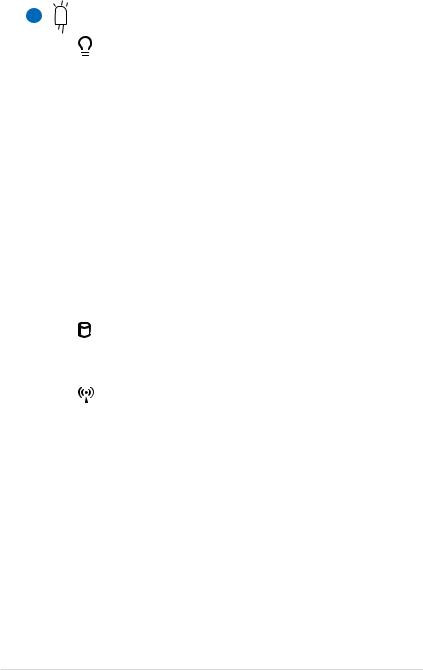
Status Indicators (front) |
Power Indicator
The power indicator lights when the Eee PC is turned ON and blinks slowly when the Eee PC is in the Save-to- RAM (Suspend) mode.This indicator is OFF when the Eee PC is turned OFF.
 Battery Charge Indicator
The battery charge indicator (LED) shows the status of the battery’s power as follows:
ON: The Eee PC’s battery is charging when AC power is connected.
OFF: The Eee PC’s battery is charged or completely drained.
Blinking: Battery power is less than 10% and AC power is not connected.
Solid-State disk (SSD) Indicator
The solid-state disk drive indicator blinks when data is written to or read from the disk drive.
Wireless Indicator
This is only applicable on models with built-in wireless LAN.When the built-in wireless LAN is enabled, this indicator lights.
2- |
Chapter 2: Knowing the Parts |

Bottom Side
Refer to the diagram below to identify the components on this side of the Eee PC.
The bottom side may vary in appearance depending on model.
1 |
2 |
3 |
|||
|
|
|
|
|
|
|
|
|
|
|
|
|
|
|
|
|
|
|
|
|
|
|
|
4
5
6
The bottom of the Eee PC can get very hot. Be careful when handling the Eee PC while it is in operation or recently been in operation. High temperatures are normal during charging or operation. DO NOT use on soft surfaces such as beds or sofas ,which may block the vents. DO NOT PUT THE Eee PC ON YOUR LAP OR OTHER PARTS OF THE BODY TO AVOID INJURY FROM THE
HEAT.
ASUS Eee PC |
2- |
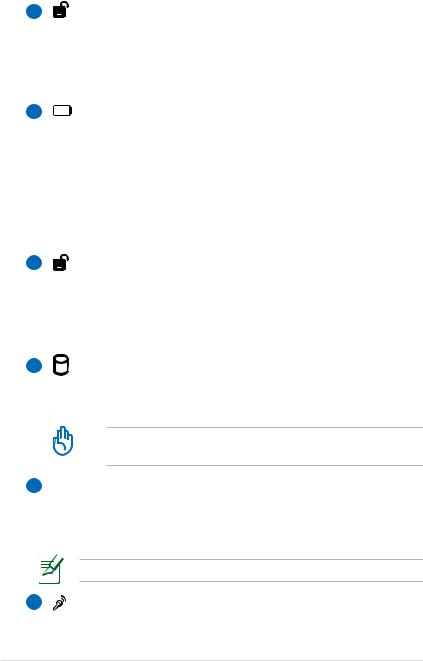
1 |
Battery Lock - Spring |
The spring battery lock keeps the battery pack secure. When the battery pack is inserted, it will automatically lock. When removing the battery pack, this spring lock must be retained in the unlocked position.
2 |
Battery Pack |
The battery pack is automatically charged when connected to an AC power source and maintains power to the Eee PC when AC power is not connected.This allows use when moving temporarily between locations. Battery time
varies by usage and by the specifications for this Eee PC. The battery pack cannot be disassembled and must be purchased as a single unit.
3 |
Battery Lock - Manual |
The manual battery lock is used to keep the battery pack secured. Move the manual lock to the unlocked position to insert or remove the battery pack. Move the manual lock to the locked position after inserting the battery pack.
4 |
Solid-State Disk & Memory Compartment |
5
6
The solid-state disk drive and memory are secured in a dedicated compartment.
The memory module in Eee PC (Easy DIMM) is for use with Eee PC only and is not compatible with other notebooks.


 Reset Button (Emergency)
In case your operating system cannot properly turn OFF or restart, the reset button can be depressed with a pin or a straightened paper clip to restart the Eee PC.
The reset button is not provided on Eee PC 4G Surf model.
Microphone (Built-in)
The built-in mono microphone can be used for skype, voice narrations, or simple audio recordings.
2- |
Chapter 2: Knowing the Parts |
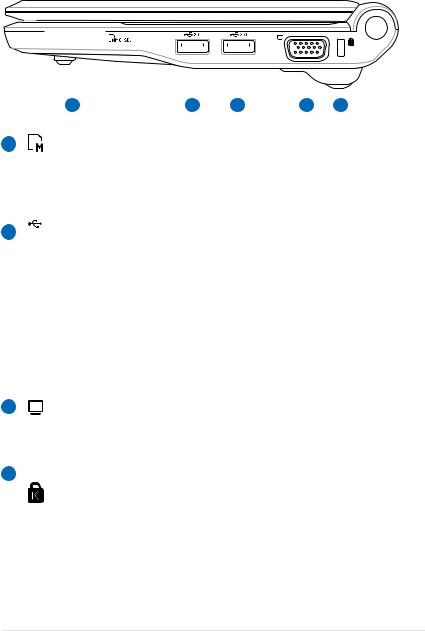
Right Side
Refer to the diagram below to identify the components on this side of the Eee PC.
|
|
|
|
|
|
|
|
|
|
|
|
|
|
|
|
|
|
|
|
|
|
|
|
|
|
|
|
|
|
|
|
|
|
|
|
|
|
|
|
1 |
|
2 |
|
2 |
3 |
4 |
|||||
1 |
Memory Card Slot |
|
|
|
|
|
|
|
|
|
||
The built-in memory card reader can read MMC/SD cards from devices such as digital cameras, MP3 players, mobile phones, and PDAs.
2 2.0 USB Port (2.0/1.1)
3
4
The USB (Universal Serial Bus) port is compatible with USB 2.0 or USB 1.1 devices such as keyboards, pointing devices, cameras, and storage devices, connected in a series up to 12Mbits/sec (USB 1.1) and 480Mbits/sec (USB 2.0). USB allows many devices to run simultaneously on a single computer, with some peripherals acting as additional plug-in sites or hubs. Also, the USB supports hot-swapping function.
Display (Monitor) Output
The 15-pin D-sub monitor port supports a standard VGAcompatible device such as a monitor or projector to allow viewing on a larger external display.
Kensington® Lock Port
The Kensington® lock port allows the Eee PC to be secured using Kensington® compatible security products.These security products usually include a metal cable and lock that prevent the Eee PC to be removed from a fixed object.
ASUS Eee PC |
2- |
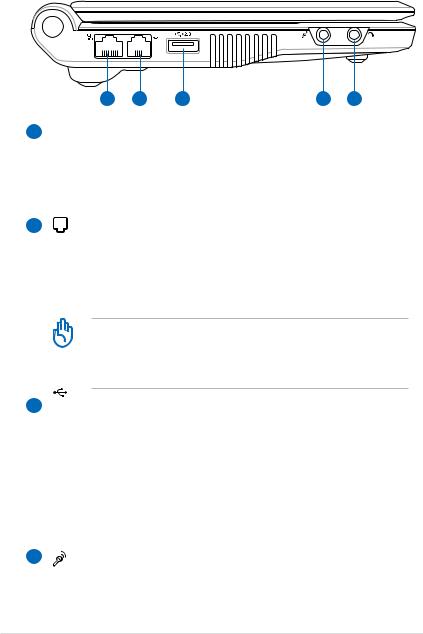
Left Side
Refer to the diagram below to identify the components on this side of the Eee PC.
1 |
2 |
3 |
4 |
5 |
1  LAN Port
The eight-pin RJ-45 LAN port (10/100M bit) supports a standard Ethernet cable for connection to a local network. The built-in connector allows convenient use without additional adapters.
2 |
Modem Port (optional) |
The two-pin RJ-11 modem port supports a standard telephone cable.The internal modem supports up to 56K
V.90 transfers.The built-in connector allows convenient use without additional adapters.
The built-in modem does not support the voltage used in digital phone systems. DO NOT connect the modem port to a digital phone system or else damage will occur to the Eee PC.
3 2.0 USB Port (2.0/1.1)
The USB (Universal Serial Bus) port is compatible with USB 2.0 or USB 1.1 devices such as keyboards, pointing devices, cameras, and storage devices, connected in a series up to 12Mbits/sec (USB 1.1) and 480Mbits/sec (USB 2.0). USB allows many devices to run simultaneously on a single computer, with some peripherals acting as additional plugin sites or hubs. Also, it supports hot-swapping function.
4 |
Microphone Jack |
The microphone jack is designed to connect the microphone used for Skype, voice narrations, or simple audio recordings.
2- |
Chapter 2: Knowing the Parts |
5 |
Headphone Output Jack |
The 1/8” stereo headphone jack (3.55mm) connects the Eee PC’s audio out signal to amplified speakers or headphones. Using this jack automatically disables the built-in speakers.
Rear Side
Refer to the diagram below to identify the components on this side of the Eee PC.
1 |
2 |
1  Battery Pack
The battery pack is automatically charged when connected to an AC power source and maintains power to the Eee PC when AC power is not connected.This allows use when moving temporarily between locations. Battery time
varies by usage and by the specifications for this Eee PC. The battery pack cannot be disassembled and must be purchased as a single unit.
2 |
Power (DC) Input |
The supplied power adapter converts AC power to DC power for use with this jack. Power supplied through this jack supplies power to the Eee PC and charges the internal battery pack.To prevent damage to the Eee PC and battery pack, always use the supplied power adapter.
CAUTION: MAY BECOME WARM TO HOT WHEN IN USE. BE SURE NOT TO COVER THE ADAPTER AND KEEP IT AWAY FROM YOUR BODY.
ASUS Eee PC |
2- |

2-10 |
Chapter 2: Knowing the Parts |
Power System
Touchpad Usage
Keyboard Usage
First Run Wizard
Operating Mode
Shutdown
Getting Started3
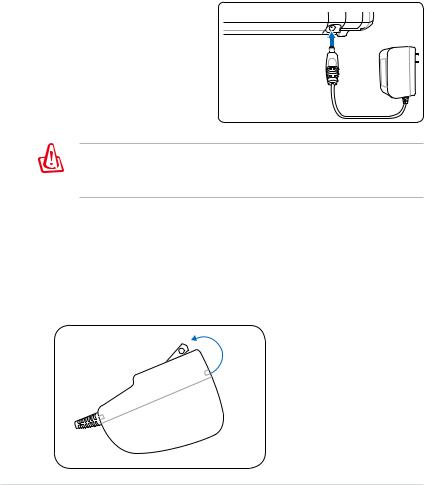
Power System
Using AC Power
The Eee PC power comprises two parts, the power adapter and the battery power system.The power adapter converts AC power
from a wall outlet to the DC power required by the Eee PC.Your Eee PC comes with a universal AC-DC adapter for connection to any 100V-120V as well as 220V-240V outlets without setting switches or using power converters. Different countries may require an adapter to connect the provided US-standard AC power cord to a different standard. Most hotels will provide universal outlets to support different power cords as well as
voltages. It is always best to ask
an experienced traveler about AC outlet voltages before travelling.
THE POWER ADAPTER MAY BECOME WARM TO HOT WHEN IN USE. BE SURE NOT TO COVER THE ADAPTER AND KEEP IT AWAY FROM YOUR BODY.
Installing the prong-plug adapter
Follow the instructions below to install the prong-plug adapter if needed.
1.Incline the prong slightly to a bevel angle.
3- |
Chapter 3: Getting Started |
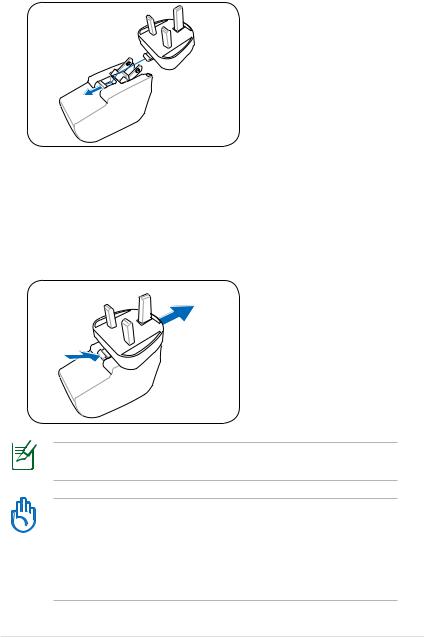
2.Align the plug and snap it in place.
Removing the prong-plug adapter
Follow the instruction below to remove the prong-plug adapter if needed.
•Press the retaining tab and snap the plug out.
This Eee PC may come with either a two or three-prong plug adapter depending on territory to fit your wall outlet.
Damage may occur if you use a different adapter to power the Eee PC or use the Eee PC’s adapter to power other electrical devices. If there is smoke, burning scent, or extreme heat coming from the AC-DC adapter, seek servicing. Seek servicing if you suspect a faulty AC-DC adapter.You may damage both your battery pack(s) and the Eee PC with a faulty AC-DC adapter.
ASUS Eee PC |
3- |
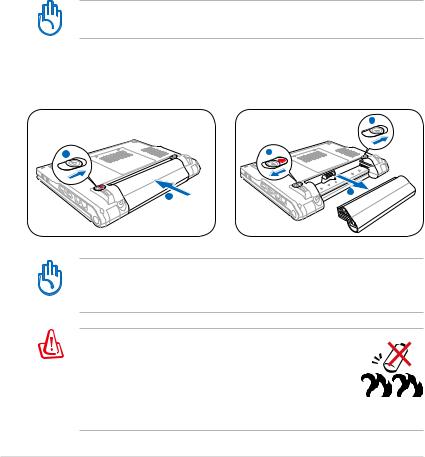
Using Battery Power
The Eee PC is designed to work with a removable battery pack.The battery pack consists of a set of battery cells housed together. A fully charged pack will provide several hours of battery life. Additional battery packs are optional and can be purchased separately through an Eee PC retailer. Remember to fully charge the battery before first use and whenever it is depleted to prolong battery life.
Installing and Removing the Battery Pack
Your Eee PC may not have its battery pack installed. If not, use the following procedures to install the battery pack.
Never attempt to remove the battery pack while the Eee PC is turned ON, as this may result in the loss of working data.
To install the battery pack:
To remove the battery pack:
2
2 |
1 |
1
Only use battery packs and power adapters supplied with this Eee PC or specifically approved by the manufacturer or retailer for use with this model or else damage may occur to the Eee PC.
For safety reasons, DO NOT throw the battery in fire, DO NOT short circuit the contacts, and DO NOT disassemble the battery. If there is any abnormal operation or damage to the battery pack caused by impact, turn OFF the Eee PC and contact an authorized service center.
3- |
Chapter 3: Getting Started |

Emergency Shutdown & Reset
In case your operating system cannot properly turn OFF or restart, there are additional ways to shutdown and reset your Eee PC:
Shutdown: Hold the power button  until the system shuts down.
Reset: Press the reset button 

 .
.
Use a pin or a straightened paper clip to press the power switch.
DO NOT use emergency shutdown/reset while data is being written or read; doing so can result in loss or destruction of your data.
The reset button is not provided on Eee PC 4G Surf model.
ASUS Eee PC |
3- |
Touchpad Usage
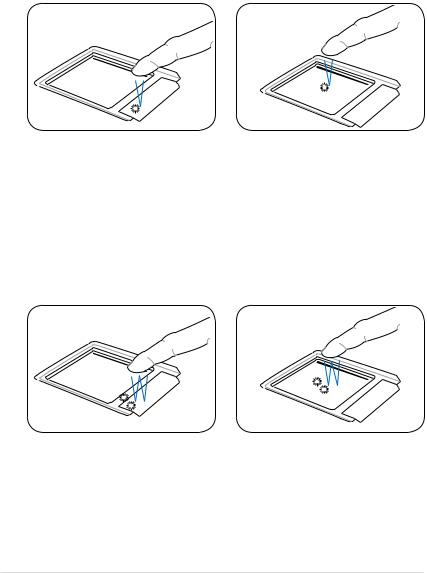
Clicking/Tapping - With the cursor over an item, press the left button or use your fingertip to touch the touchpad lightly, keeping your finger on the touchpad until the item is selected.The selected item will change color.The following 2 illustrations produce the same results.
Double-clicking/Double-tapping - This is a common skill for launching a program directly from the corresponding icon you select. Move the cursor over the icon you wish to execute, press the left button or tap the pad twice in rapid succession, and the system launches the corresponding program. If the interval between the clicks or taps is too long, the operation will not be executed.The following 2 illustrations produce the same results.
3- |
Chapter 3: Getting Started |

Dragging - Dragging means to pick up an item and place it anywhere on the screen you wish.You can move the cursor over the item you select, and while keeping the left button depressed, moving the cursor to the desired location, then release the button. Or, you can simply double-tap on the item and hold while dragging the item with your fingertip.The following illustrations produce the same results.
Scrolling - Slide you finger up or down on the right side of the touchpad to scroll a window up or down. If your display window includes several sub-windows, move the cursor on that pane before scrolling.
ASUS Eee PC |
3- |

Keyboard Usage
Special Function Keys
The following defines the colored hot keys on the Eee PC’s keyboard. The colored commands can only be accessed by first pressing
and holding the function key while pressing a key with a colored command. Some function icons appear on the OS taskbar after activation.
The Hot Key locations on the function keys may vary depending on model but the functions should remain the same. Follow the icons whenever your hot key locations do not match the manual.
zzZ Icon (F1): Places the Eee PC in suspend mode (Save-to-RAM).
Radio Tower (F2): Wireless Models Only:Toggles
the internal wireless LAN ON or OFF with an on- screen-display.When enabled, the corresponding wireless indicator will light.
Sun Down Icon (F3): Decreases the display brightness.
Sun Up Icon (F4): Increases the display brightness.
LCD/Monitor Icons (F5):Toggles between the Eee
PC’s LCD display and an external monitor in this series: Eee PC LCD -> External Monitor -> Both.
Dual display mode does not work in 256 Colors, and supports a resolution of 800 x 480 pixels only.
Connect an external monitor before booting up the Eee PC.
3- |
Chapter 3: Getting Started |
 Loading...