


APRILIA WOULD LIKE TO THANK YOU
for choosing one of its products. We have compiled this booklet to provide a comprehensive overview of your vehicle's quality features. Please, read it carefully before riding the vehicle for the first time. It contains information, tips and precautions for using your vehicle. It also describes features, details and devices to assure you that you have made the right choice. We believe that if you follow our suggestions, you will soon get to know your new vehicle well and that it will continue to give you satisfactory service for many years to come. This booklet is an integral part of the vehicle and must be handed over to the new owner in the event of sale.
APRILIA WIL U BEDANKEN
omdat u één van haar producten heeft gekozen. Wij hebben deze handleiding opgesteld opdat u de kwaliteiten ervan ten volle kan waarderen. Wij raden aan om deze handleiding geheel door te lezen, voordat u met het voertuig gaat rijden. Het bevat informatie, raadgevingen en waarschuwingen in verband met het gebruik van uw voertuig; daarnaast zal u eigenschappen, bijzonderheden en handigheidjes ontdekken die u ervan zullen overtuigen dat u een juiste keuze heeft gemaakt. Wij zijn er zeker van dat indien u hier rekening mee zal houden, u makkelijk zal wennen aan uw nieuw voertuig, waar u lang naar volle tevredenheid gebruik van zal kunnen maken. Deze uitgave is een integrerend deel van het voertuig, en bij verkoop van dit laatste moet het worden overhandigd aan de nieuwe eigenaar.
RX 50 - SX 50
Ed. 03 2009
The instructions in this booklet have been compiled primarily to offer a simple and clear guide to using the vehicle; it also describes routine maintenance procedures and regular checks that should be carried out on the vehicle at an Aprilia Dealer or Authorised Workshop. This booklet also contains instructions for simple repairs. Any operations not specifically described in this booklet require the use of special tools and/or particular technical knowledge; for these operations, please take your vehicle to an Aprilia Dealer or Authorised Workshop.
De instructies in deze handleiding zijn voorbereid om vooral een eenvoudige en duidelijke leidraad te zijn voor het gebruik; men vindt eveneens de handelingen van het klein onderhoud en van de periodieke controles die bij een Dealer of Erkende aprilia Garage moeten uitgevoerd worden. De handleiding bevat tevens instructies voor een aantal eenvoudige herstellingen. De herstellingen die niet uitgebreid in deze uitgave zijn beschreven, vereisen dat men over speciale gereedschappen en/of specifieke technische kennis beschikt; voor het uitvoeren van deze herstellingen raadt men aan om zich te wenden tot een Dealer of Erkende aprilia Garage.
2

Personal safety |
Persoonlijke veiligheid |
Failure to completely observe these instructions will |
Indien deze voorschriften niet of niet volledig worden |
result in serious risk of personal injury. |
opgevolgd, kan dit ernstig letsel aan personen tot ge- |
|
volg hebben. |
Safeguarding the environment |
Bescherming van |
Sections marked with this symbol indicate the correct |
Geeft het juiste gedrag aan dat u aan moet houden |
use of the vehicle to prevent damaging the environ- |
zodat het gebruik van het voertuig geen schade aan- |
ment. |
richt aan de natuur. |
Vehicle intactness |
Staat van het voertuig |
The incomplete or non-observance of these regula- |
Indien deze voorschriften niet of niet volledig worden |
tions leads to the risk of serious damage to the vehicle |
opgevolgd kan dit ernstige schade aan het voertuig, |
and sometimes even the invalidity of the guarantee. |
en eventueel het vervallen van deze garantie tot ge- |
|
volg hebben. |
The symbols shown above are very important. They are used to highlight those parts of the booklet that should be read with particular care. As you can see, each sign consists of a different graphic symbol, making it quick and easy to locate the various topics.
Before starting the engine, read this booklet thoroughly and the "SAFE RIDING" section in particular. Your safety as well as other's does not only depend on the quickness of your reflexes and agility, but also on how well you know your vehicle, the state of maintenance of the vehicle itself and your knowledge of the rules for SAFE RIDING. For your safety, get to know your vehicle well so as to safely ride and master it in road traffic IMPORTANT This booklet is an integral part of the vehicle, and must be handed to the new owner in the event of sale.
Bovengenoemde signalen zijn erg belangrijk. Ze hebben namelijk tot doel om de delen van het boekje aan te geven die u aandachtig door moet lezen. Zoals u ziet, bestaat ieder teken uit een ander grafisch symbool, zodat de bijbehorende onderwerpen meteen duidelijk kunnen worden gevonden in de verschillende delen. Vooraleer men de motor start, leest men aandachtig deze handleiding, en vooral de paragraaf "VEILIG RIJDEN". Uw veiligheid en die van anderen hangt niet enkel af van uw reflexen en vlugheid, maar ook van de kennis en de efficiëntie van het voertuig, en van de kennis van de fundamentele regels voor het VEILIG RIJDEN. We raden daarom aan om vertrouwd te raken met het voertuig, zodat u zich veilig en beheersd kan bewegen in het verkeer. BELANGRIJK Deze handleiding moet beschouwd worden als integrerend deel van het voertuig, en moet worden overhandigd bij de verkoop ervan.
3
4
VEHICLE......................................................................................... |
7 |
Dashboard................................................................................... |
8 |
Analogue instrument panel.......................................................... |
9 |
Key switch.................................................................................... |
11 |
Locking the steering wheel....................................................... |
11 |
Releasing the steering wheel................................................... |
12 |
Switch direction indicators........................................................... |
12 |
Horn button.................................................................................. |
13 |
Rear brake pedal......................................................................... |
13 |
Throttle grip.................................................................................. |
14 |
Front brake control....................................................................... |
14 |
Gear pedal................................................................................... |
15 |
Clutch control............................................................................... |
16 |
Light on/of switch......................................................................... |
16 |
Start-up button............................................................................. |
17 |
Manual starter control.................................................................. |
17 |
Fuel tank...................................................................................... |
18 |
Opening the saddle.................................................................. |
18 |
Keys............................................................................................. |
19 |
Identification................................................................................. |
20 |
USE................................................................................................. |
21 |
Checks......................................................................................... |
22 |
Tyre pressure............................................................................... |
23 |
Running in.................................................................................... |
24 |
Starting up the engine.................................................................. |
27 |
Precautions.............................................................................. |
28 |
Stopping the engine..................................................................... |
29 |
Stand........................................................................................... |
29 |
Suggestions to prevent theft........................................................ |
30 |
Safe driving.................................................................................. |
31 |
MAINTENANCE.............................................................................. |
39 |
|
INDEX |
|
INDEX |
VOERTUING..................................................................................... |
7 |
Legenda......................................................................................... |
8 |
Analoog instrumentenpaneel......................................................... |
9 |
Sleutelschakelaar........................................................................... |
11 |
Inschakeling van het stuurslot.................................................... |
11 |
Stuurslot ontgrendelen............................................................... |
12 |
Schakelaar richtingaanwijzers....................................................... |
12 |
Drukknop claxon............................................................................ |
13 |
Achterrempedaal............................................................................ |
13 |
Gascommando............................................................................... |
14 |
Commando van de voorrem.......................................................... |
14 |
Schakelpedaal............................................................................... |
15 |
Commando van de koppeling........................................................ |
16 |
Lichtschakelaar.............................................................................. |
16 |
Startknop........................................................................................ |
17 |
Commando van de manuele starter............................................... |
17 |
Benzinetank................................................................................... |
18 |
Opening van het zadel............................................................... |
18 |
Sleutels.......................................................................................... |
19 |
Identificatie..................................................................................... |
20 |
GEBRUIK.......................................................................................... |
21 |
Controles........................................................................................ |
22 |
Bandenspanning............................................................................ |
23 |
Inrijden........................................................................................... |
24 |
Starten des motors......................................................................... |
27 |
Voorzorgsmaatregelen............................................................... |
28 |
Het stilleggen van de motor........................................................... |
29 |
Standaard...................................................................................... |
29 |
Tips tegen diefstal.......................................................................... |
30 |
Het veilig rijden.............................................................................. |
31 |
ONDERHOUD................................................................................... |
39 |
5
Gearbox oil level.......................................................................... |
40 |
Transmission chain...................................................................... |
41 |
Tyres............................................................................................ |
43 |
Spark plug dismantlement........................................................... |
44 |
Air filter cleaning.......................................................................... |
45 |
Cooling fluid level......................................................................... |
47 |
Checking the brake oil level......................................................... |
49 |
Braking system fluid top up...................................................... |
51 |
Battery......................................................................................... |
52 |
Use of a new battery................................................................ |
53 |
Long periods of inactivity............................................................. |
54 |
Fuses........................................................................................... |
56 |
Front light group........................................................................... |
57 |
Headlight adjustment............................................................... |
59 |
Front direction indicators............................................................. |
60 |
Rear optical unit........................................................................... |
61 |
Rear turn indicators..................................................................... |
63 |
Idle adjustment............................................................................ |
63 |
Front and rear disc brake............................................................. |
65 |
Transmissions.............................................................................. |
66 |
Periods of inactivity...................................................................... |
68 |
Cleaning the vehicle.................................................................... |
70 |
TECHNICAL DATA......................................................................... |
77 |
PROGRAMMED MAINTENANCE.................................................. |
83 |
Scheduled maintenance table..................................................... |
84 |
Oliepeil van de versnellingsbak..................................................... |
40 |
Transmissieketting......................................................................... |
41 |
Banden........................................................................................... |
43 |
Demonteren van de bougie............................................................ |
44 |
Reiniging van de luchtfilter............................................................. |
45 |
Peil van de koelvloeistof................................................................ |
47 |
Controle van het oliepeil van de remmen...................................... |
49 |
Het bijvullen van vloeistof in de reminstallatie............................ |
51 |
Accu............................................................................................... |
52 |
Inwerkingstelling van een nieuwe accu...................................... |
53 |
Lange stilstand............................................................................... |
54 |
Zekeringen..................................................................................... |
56 |
Voorste optische groep.................................................................. |
57 |
Regeling van de koplamp........................................................... |
59 |
Voorste richtingaanwijzers............................................................. |
60 |
Achterste optische groep............................................................... |
61 |
Achterste richtingaanwijzers.......................................................... |
63 |
Regeling van het minimum toerental............................................. |
63 |
Schijfrem vooraan en achteraan.................................................... |
65 |
Transmissies.................................................................................. |
66 |
Stilstand van het voertuig............................................................... |
68 |
Reinigen van het voertuig.............................................................. |
70 |
TECHNISCHE GEGEVENS.............................................................. |
77 |
GEPLAND ONDERHOUD................................................................ |
83 |
Tabel van het geprogrammeerd onderhoud.................................. |
84 |
6
RX 50 - SX 50
Chap. 01
Vehicle
Hst. 01
Voertuing
7
1 Vehicle / 1 Voertuing
01_01
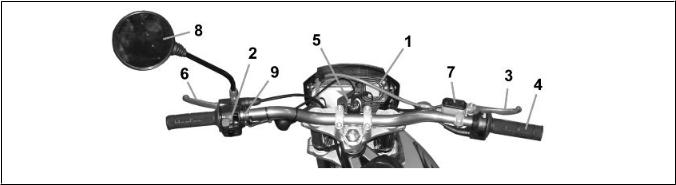
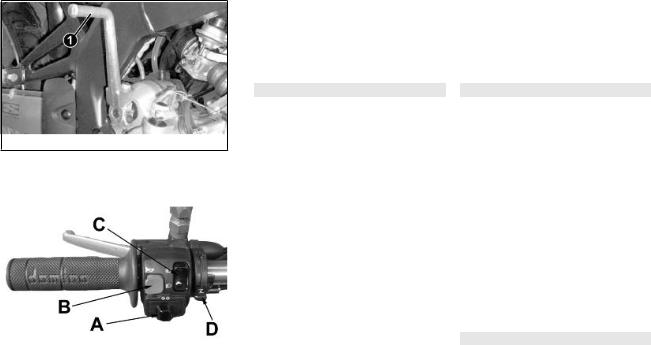
Dashboard (01_01)
KEY:
1.Instrument panel
2.Light switch, horn and stop
3.Front brake lever
4.Throttle grip
5.Ignition lock
6.Clutch control
7.Front brake fluid reservoir
8.Mirror
9.Cold start lever control
Legenda (01_01)
LEGENDE:
1.Dashboard
2.Schakelaar van de lichten, akoestische melder en stop
3.Commando van de voorrem
4.Commando van de gashendel
5.Ontstekingsslot
6.Commando van de koppeling
7.Vloeistoftank van de voorrem
8.Spiegeltje
9.Commandohendel voor de koude start
8
|
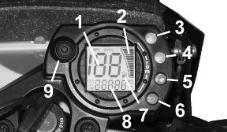
Analogue instrument panel |
||
|
|||
|
(01_02) |
||
|
KEY: |
||
|
1. |
Speedometer |
|
|
2. |
Tachometer |
|
|
3. |
High temperature warning light |
|
01_02 |
4. |
Low oil warning light |
|
5. |
Turn indicator warning light |
||
|
|||
|
6. |
High-beam warning light on |
|
|
7. |
Low fuel warning light |
|
|
8. |
Multifunction indicator |
|
9. Mode Button
ODO Total distance travelled
CLOCK
TRIP Partial distance
SRV Distance for the next vehicle servicing
Functions:
WATER TEMPERATURE WARNING LIGHT : RED, turns on if the coolant temperature exceeds 105º C.
Analoog instrumentenpaneel (01_02)
LEGENDE:
1.Snelheidsmeter
2.Indicator van het toerental van de motor
3.Indicatorlamp voor de excessieve temperatuur
4.Controlelamp oliereserve
5.Controlelamp richtingaanwijzers
6.Controlelamp groot licht aan
7.Indicator brandstofreserve
8.Multifunctionele indicator
9.Toets Mode
ODO Totaal afgelegde afstand
KLOK
TRIP Partiële afstand
SRV Afstand tot de volgende servicebeurt
Functies :
CONTROLELAMP TEMPERATUUR WATER : RODE kleur, licht op wanneer de temperatuur van de koelvloeistof 105º
C overschrijdt.
Voertuing 1 / Vehicle 1
9
1 Vehicle / 1 Voertuing
MIM. OIL LEVEL WARNING LIGHT :
RED, turns on when there is a 0.25 litre oil reserve in the reservoir.
FUEL RESERVE ICON : turns on when there is a 1.3 litre petrol reserve in the tank.
Every time the key is activated, the instrument panel carries out a check (all the segments are active for 3 seconds ).
Once the check is over, the instrument panel displays the last function programmed with the button.
Button operative mode . Push the button for < 3 sec and the functions are displayed as follows:
ODOMETER_ TRIP _CLOCK_SERV-
ICE _ODOMETER
To reset the TRIP, press the button for >
3 sec once the function is displayed.
To set the clock (once the function is displayed):
-push the button for > 3 sec
-the hour flashes,
-hold down the button until the current hour is displayed
-release the button
-the minutes flash
-hold down the button until the current minutes are displayed
CONTROLELAMP MIN. OLIEPEIL :
RODE kleur, licht op wanneer in de tank een oliereserve van 0,25 liter overblijft.
ICOON BRANDSTOFRESERVE : licht op wanneer in de tank een brandstofreserve van 1,3 liter overblijft.
Bij elke activatie van de sleutel voert het dashboard een check uit (alle segmenten zijn actief voor 3 sec).
Na de check zal het dashboard de laatste functie weergeven die werd ingesteld door middel van de drukknop.
Werkingsmodaliteit van de drukknop. door op de drukknop te drukken voor t<
3 sec, volgen de functies elkaar op op de volgende manier:
HODOGRAM _ TRIP _KLOK _SERVICE _HODOGRAM
Om de TRIP te resetten moet de drukknop voor t > 3 sec worden ingedrukt wanneer de functie wordt weergegeven.
Om de klok te resetten, (wanneer de functie wordt weergegeven):
-druk op de drukknop voor t > 3 sec
-de uren knipperen,
-druk op de drukknop tot het gewenste uur wordt bereikt
-laat de drukknop los
-de minuten knipperen
10
- release the button. |
- druk tot de gewenste minuten worden |
|
bereikt |
|
- laat de drukknop los |
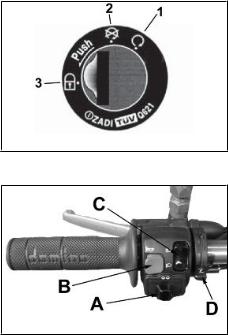
Key switch (01_03)
Key positions:
1.Ready to start-up position, steering lock disengaged, key cannot be extracted.
2.Ignition disabled, extractable key, steering lock disengaged.
3.Ignition disabled, extractable key,
01_03 steering lock engaged.
Sleutelschakelaar (01_03)
Plaats de sleutel:
1.Positie van de predispositie van de start, stuurslot uitgeschakeld, sleutel niet verwijderbaar.
2.Ontsteking geblokkeerd, sleutel verwijderbaar, stuurslot uitgeschakeld.
3.Ontsteking geblokkeerd, sleutel verwijderbaar, stuurslot ingeschakeld.
Locking the steering wheel (01_04)
In order to lock the steering, turn the handlebar fully to the left. Fully insert the key and let it return to its original position, turn it to «3» and take it out.
01_04
Inschakeling van het stuurslot (01_04)
Om de stuurinrichting te blokkeren moet het stuur volledig naar links gedraaid worden. Druk op de sleutel en laat hem los zodat hij naar zijn positie terugkeert, draai hem in de positie «3» en verwijder hem.
Voertuing 1 / Vehicle 1
11
Releasing the steering wheel (01_05)
Insert the key and turn it clockwise.
Stuurslot ontgrendelen (01_05)
Plaats de sleutel en draai hem in wijzerszin.
01_05
01_06
1 Vehicle / 1 Voertuing
Switch direction indicators (01_06)
To activate the left turn indicators, move the lever«A» leftwards; to activate the right turn indicators, move the lever rightwards. The lever automatically goes back to the central position and the indicators remain on. Push the switch to turn them off.
Schakelaar richtingaanwijzers (01_06)
Om de linker knipperlichten in te schakelen, moet het hendeltje «A» naar links worden gedraaid; om de rechter knipperlichten in te schakelen, moet het hendeltje naar rechts gedraaid worden. Het hendeltje keert automatisch terug naar de centrale positie en de knipperlichten blijven ingeschakeld. Om ze uit te schakelen, moet op de schakelaar gedrukt worden.
12
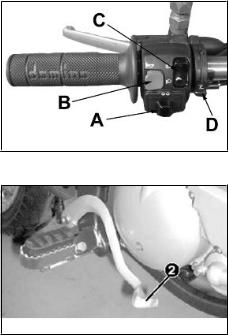
Horn button (01_07) |
Drukknop claxon (01_07) |
Push «B» to sound the horn. |
Druk op «B» om de claxon te activeren. |
01_07
Rear brake pedal (01_08)
The rear brake control pedal «2» is placed on the right hand side of the scooter, at engine level. It must be activated gradually with the toe-end. The rear and front brakes must be used in combination, according to the needs, in order to obtain a more efficient braking.
Also pay attention to the conditions of the 01_08 road! Particularly, to the conditions of asphalt and if it is wet or dirty with sand, oil,
etc.
Achterrempedaal (01_08)
Het pedaal van het commando van de achterrem «2» bevindt zich op de rechter kant van de bromfiets, dichtbij de motor. Deze moet geleidelijk aan geactiveerd worden met de punt van de voet. Combineer de achterrem indien nodig met het gebruik van de voorrem: op deze manier is de remming doeltreffender.
Let op voor de staat van de weg! vooral wanneer de weg geasfalteerd is, en nat of vuil met kiezelsteen, olie, enz.
Voertuing 1 / Vehicle 1
13
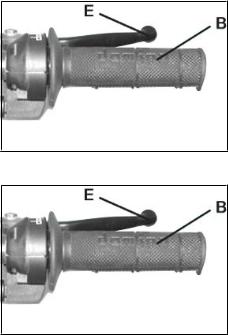
Throttle grip (01_09)
Placed on the right side of the handlebar. When the hand grip «B» is turned downwards, the carburettor valve opens.
01_09
Gascommando (01_09)
Dit bevindt zich op de rechter kant van het stuur. Wanneer het handvat «B» naar beneden wordt gedraaid, gaat de carburatorklep open.
Front brake control (01_10)
The front brake lever «E» is placed on the right hand side of the handlebar. Be particularly careful when using the front brake. Use it gently and measure the power progressively, according to surface conditions, to avoid blocking the wheel.
01_10
Commando van de voorrem (01_10)
Het commando van de voorrem «E» bevindt zich op de rechter kant van het stuur. Let vooral op bij het gebruik van de voorrem, rem niet bruusk, doseer geleidelijk aan de kracht volgens de condities van de ondergrond, en vermijdt om de wielen te doen blokkeren.
1 Vehicle / 1 Voertuing
14
|
|
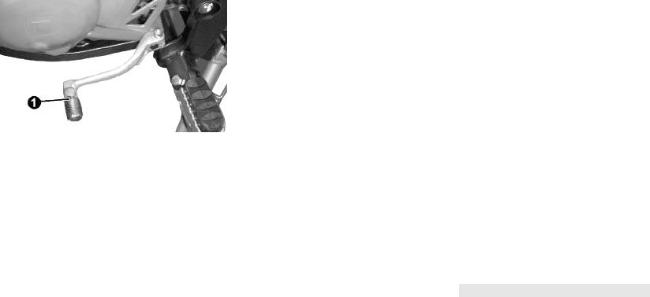
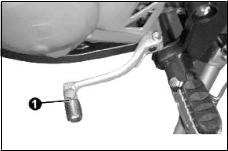
Gear pedal (01_11) |
|
|
|||
|
|
The gear pedal «1» is placed on the left |
|
|
|
hand side of the engine. Activate it with |
|
|
|
your foot to firmly engage the gear. After |
|
|
|
the gear is shifted, take your foot off the |
|
|
|
pedal and the pedal will automatically go |
|
|
|
back to its initial position. Starting from |
|
|
|
the neutral position, gears are engaged |
|
|
|
as follows: |
|
01_11 |
|
- 1st gear is engaged by pushing down |
|
|
|
the pedal |
|
|
|||
|
|
- 2nd, 3rd, 4th, 5th and 6th gears are en- |
|
|
|
gaged by pushing the pedal upwards. |
|
|
|
For downshifting, push the pedal down. |
|
|
|
|
|
|
|
CAUTION |
|
|
|
THE GEAR PEDAL MUST BE OPER- |
|
|
|
ATED BY RELEASING IT AFTER DIS- |
|
|
|
ENGAGING THE CLUTCH AND UN- |
|
|
|
TWISTING THE THROTTLE GRIP. |
|
Schakelpedaal (01_11)
Het schakelpedaal «1» bevindt zich links van de motor. Het wordt geactiveerd met de voet, zodat de versnelling vastberaden wordt ingeschakeld. Na het schakelen moet de voet van het pedaal verwijderd worden, en keert het pedaal automatisch terug naar de beginpositie.
Te beginnen vanaf de vrij, worden de versnellingen op de volgende manier geselecteerd:
-Wanneer het pedaal naar beneden wordt geduwd, wordt naar de 1e versnelling geschakeld
-Wanneer het pedaal naar boven wordt geduwd, wordt naar de 2e, 3e, 4e, 5e en 6e versneling geschakeld.
Om terug te schakelen moet het pedaal naar beneden geduwd worden.
LET OP
HE SCHAKELPEDAAL MAG ENKEL GEACTIVEERD WORDEN NADAT DE KOPPELING ONTKOPPELD WERD, EN NADAT DE GASHENDEL WERD GELOST.
Voertuing 1 / Vehicle 1
15
1 Vehicle / 1 Voertuing
|
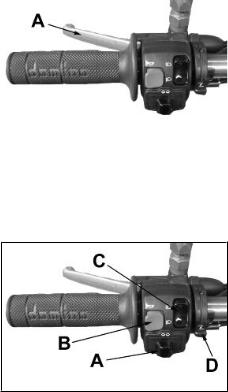
Clutch control (01_12) |
|
|
|
The clutch control lever «A» is placed on |
|
the left hand side of the handlebar. When |
|
it is pulled completely towards the han- |
|
dlebar, the clutch is disengaged and the |
|
engine transmission is released. If the |
|
lever is released slowly, the clutch is en- |
|
gaged coupling the engine to the trans- |
|
mission and which, with a gear engaged, |
01_12 |
will transmit the engine power to the rear |
wheel through the gear. |
Commando van de koppeling (01_12)
De commandohendel van de koppeling «A» bevindt zich op de linker kant van het stuur. Wanneer de hendel volledig naar het stuur wordt getrokken, wordt de koppeling ontkoppeld en wordt de transmissie van de motor bevrijd. Wanneer de hendel langzaam wordt losgelaten, wordt de koppelng ingeschakeld die de motor aan de transmissie koppelt, die met een ingeschakelde versnelling de kracht van de motor overbrengt naar het achterwiel langs de versnellingsbak.
Light on/of switch (01_13)
The light switch «C» has two positions:
-Down, low-beam light
-Up, high-beam light
The lights come on automatically as soon as the engine is started.
01_13
Lichtschakelaar (01_13)
De schakelaar van de lichten «C» heeft twee posities:
-Omlaag, dimlicht
-Omhoog, groot licht
De lichten gaan automatisch aan wanneer de motor wordt gestart.
16
Start-up button (01_14)
The start-up pedal «1» is located on the right hand side of the engine. To start the engine, just push the pedal backwards with your foot.
CAUTION
MAKE SURE THE GEAR IS IN NEUTRAL BEFORE STARTING THE EN-
GINE.
01_14
Startknop (01_14)
Het startpedaal «1» bevindt zich rechts van de motor. Om de motor te starten moet het pedaal met de voet achteruit geduwd worden.
LET OP
CONTROLEER OF DE VERSNELLINGSBAK ZICH IN VRIJ BEVINDT, VOORDAT DE MOTOR WORDT GESTART.
|
|
Manual starter control (01_15) |
|
|
|||
|
|
The manual starter control «D» is located |
|
|
|
on the left hand grip. It has two positions: |
|
|
|
- Lever up: cold start |
|
|
|
- Lever down: start-up in regular condi- |
|
|
|
tions. |
|
|
|
|
|
|
|
CAUTION |
|
01_15 |
|
THE ONLY AIM OF THIS CONTROL IS |
|
|
TO FACILITATE START-UP. USE IT |
||
|
|
||
|
|
ONLY WHEN THE ENGINE IS COLD. |
|
Commando van de manuele starter (01_15)
Het commando van de manuele starter
«D» bevindt zich op het linker handvat.
Het heeft twee posities:
-Hendel omhoog: koude start
-Hendel omlaag: normale start
LET OP
DIT COMMANDO HEEFT ALS ENIG DOEL OM DE START TE VERGEMAKKELIJKEN. GEBRUIK HET ENKEL WANNER DE MOTOR KOUD STAAT.
Voertuing 1 / Vehicle 1
17

1 Vehicle / 1 Voertuing
Fuel tank (01_16)
The fuel tank has a capacity for 7 litres and a 1.30-litre reserve. To fill it up, insert the key in the tank cover lock «1» and, while turning it to the right, lift the cover.
CAUTION
USE UNLEADED PETROL ONLY.
01_16
Benzinetank (01_16)
De benzinetank heeft een capaciteit van 7 liter en een reserve van 1,30 liter. Om te tanken moet de sleutel in het slot van het tankdeksel «1» geplaatst worden, en terwijl de sleutel naar rechts wordt gedraaid moet het deksel omhoog worden gehoffen.
LET OP
GEBRUIK ENKEL LOODVRIJE BENZINE.
Opening the saddle (01_17, 01_18)
To remove the saddle, insert the key in the tank cover lock «1» and, while turning it to the right, lift the cover. After that, remove the two fixing knobs from the saddle «2».
The oil reservoir, the battery and the toolkit compartment are under the saddle.
01_17
Opening van het zadel (01_17, 01_18)
Om het zadel te demonteren moet de sleutel in het slot van het tankdeksel
«1» geplaatst worden, en terwijl de sleutel naar rechts wordt gedraaid moet het deksel omhoog worden gehoffen. Demonteer daarna de bevestigingsknoppen van het zadel «2».
Onder het zadel bevinden zich de olietank, de accu en de gereedschapsruimte.
18

01_18
01_19
Keys (01_19) |
Sleutels (01_19) |
Two keys are supplied together with the scooter, both can be used either for the ignition lock or the fuel tank cover.
The keys are accompanied by a tag marked with the identification code to be quoted when ordering duplicates.
WARNING
WE RECOMMEND KEEPING THE DUPLICATE KEY TOGETHER WITH ITS TAG IN A SAFE PLACE AND NOT ON THE SCOOTER.
19
Bij het voertuig worden twee sleutels geleverd, die onverschillig gebruikt kunnen worden voor het ontstekingsslot en voor het deksel van de brandstoftank.
Bij de sleutels wordt een naamplaatje geleverd met het identificatienummer, dat moet meegedeeld worden bij de aanvraag voor duplicaten.
WAARSCHUWING
ER WORDT AANGERADEN OM HET DUPLICAAT VAN DE SLEUTEL SAMEN MET ZIJN NAAMPLAATJE NIET OP HET VOERTUIG TE BEWAREN.
Voertuing 1 / Vehicle 1
01_20
01_21
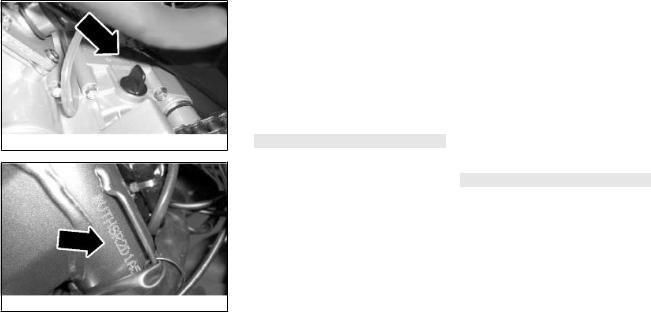
Identification (01_20, 01_21) |
Identificatie (01_20, 01_21) |
The identification registration numbers consist of a prefix followed by a number, stamped on the chassis and on the engine. They must be quoted when requesting spare parts. We recommend that you check that the prefix and chassis number stamped on the vehicle correspond with those in the vehicle documents.
NOTE
ALTERING THE IDENTIFICATION REGISTRATION NUMBERS MAY LEAD TO SERIOUS PENAL SANCTIONS (IMPOUNDING OF THE SCOOTER, ETC.).
De registratienummers voor de identificatie bestaan uit een voorvoegsel dat gedrukt is op het frame en op de motor, gevolgd door een nummer. Deze moeten steeds meegedeeld worden wanneer reserveonderdelen moeten aangevraagd worden. Er wordt aangeraden om de overeenkomst te controleren van het voorvoegsel en het framenummer op het voertuig en diegene op de documenten van het voertuig zelf.
N.B.
HET WIJZIGEN VAN DE REGISTRATIENUMMERS VOOR DE IDENTIFICATIE KAN LEIDEN TOT ERNSTIGE STRAFRECHTELIJKE SANCTIES (INBESLAGNEMING VAN HET VOERTUIG, ENZ.).
1 Vehicle / 1 Voertuing
20
RX 50 - SX 50
Chap. 02
Use
Hst. 02
Gebruik
21

2 Use / 2 Gebruik
Checks
Before starting up the scooter, check:
1. that the fuel and oil tanks are full.
2. that the crankcase oil level is correct.
3. that the transmission is in neutral position.
4. that the tyres are correctly inflated.
5. that the headlight, rear light and turn indicators are in correct working order.
6. that the front and rear brakes are in working order.
7. that the liquid level in the brake pump tanks are correct.
8. that the transmission chain is tightened and properly lubricated.
9. that the coolant level is correct.
SWITCH OFF THE ENGINE BEFORE REFUELLING WITH PETROL. PETROL IS HIGHLY INFLAMMABLE. DO NOT LET PETROL SPILL FROM THE TANK WHILE REFUELLING
Controles
Vooraleer het voertuig in werking wordt gesteld, moet het volgende gecontroleerd worden:
1. of de tanks van de benzine en de olie gevuld zijn.
2. of het oliepeil in de carter zich aan het juiste peil bevindt.
3. of de versnellingsbak in vrij staat.
4. of de banden correct opgeblazen zijn.
5. de correcte werking van de lichten van de koplamp, het achterlichtje en de richtingaanwijzers.
6. de werking van de vooren achterremmen
7. het vloeistofpeil in de tanks van de rempompen.
8. of de transmissieketting in spanning is en goed gesmeerd is.
9. het peil van de koelvloeistof.
VOORALEER MEN BENZINE TANKT, MOET DE MOTOR UITGESCHAKELD WORDEN. BENZINE IS UITERST ONTVLAMBAAR. MORS GEEN BENZINE UIT DE TANK TIJDENS HET TANKEN.
22

Tyre pressure |
Bandenspanning |
A different pressure from the one indicated may cause problems when riding the vehicle. Therefore, we recommend checking and correcting tyre pressure frequently.
Een andere spanning dan wordt aangeduid kan oorzaak zijn van defecten bij het rijden met het voertuig. Daarom wordt aangeraden om regelmatig de bandenspanning te controleren, en ze eventueel te corrigeren.
COLD INFLATION PRESSURE FOR FRONT TYRE
Sx front tyre pressure |
1.7 kg/cm² - 170 kPa (rider only) |
|
|
1.8 kg/cm² - 180 |
kPa (rider and |
|
passenger) |
|
|
|
|
Rx front tyre pressure |
1.0 kg/cm² - 100 kPa (rider only) |
|
|
1.1 kg/cm² - 110 |
kPa (rider and |
|
passenger) |
|
|
|
|
KOUDE BANDENSPANNING VAN DE VOORBAND
Spanning van het linker voorwiel 1,7 Kg/cm² - 170 kPa (enkel bestuurder)
1,8 Kg/cm² - 180 kPa (bestuurder met passagier)
Spanning van het rechter voorwiel 1,0 Kg/cm² - 100 kPa (enkel bestuurder)
1,1 Kg/cm² - 110 kPa (bestuurder met passagier)
COLD INFLATION PRESSURE FOR REAR TYRE
Rx rear tyre pressure |
1.2 k/cm² - 120 kPa (rider only) |
|
1.4 Kg/cm² - 140 kPa (rider and |
|
passenger) |
|
|
Sx rear tyre pressure |
2.0 kg/cm² - 200 kPa (rider only) |
KOUDE BANDENSPANNING VAN DE ACHTERBAND
Spanning van het rechter |
1,2 Kg/cm² - 120 kPa (enkel |
achterwiel |
bestuurder) |
|
1,4 Kg/cm² - 140 kPa (bestuurder |
|
met passagier) |
|
|
Gebruik 2 / Use 2
23
2 Use / 2 Gebruik
2.2 kg/cm² - 220 kPa (rider and |
|
Spanning van het linker achterwiel 2,0 Kg/cm² - 200 kPa (enkel |
passenger) |
|
|
|
bestuurder) |
|
|
|
|
|
|
2,2 Kg/cm² - 220 kPa (bestuurder |
|
||
|
|
met passagier) |
|
|
|
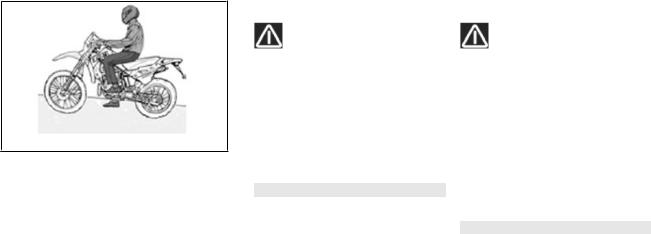
Running in (02_01)
DURING THE FIRST 1000 KM DO NOT RIDE THE VEHICLE OVER 80% OF ITS MAXIMUM SPEED. AVOID OPENING THE ACCELERATOR COMPLETELY AND KEEPING A CONSTANT SPEED FOR LONG STRETCHES. AFTER THE
02_01 FIRST 1000 KM INCREASE SPEED
GRADUALLY UNTIL REACHING MAXIMUM PERFORMANCE.
NOTE
-THE DURABILITY AND THE EFFICIENCY OF YOUR SCOOTER DEPEND STRONGLY ON THE CARE RECEIVED DURING THE RUN-IN PERIOD. DURING THIS PERIOD, THE MECHANISMS OF THE MOBILE PARTS ARE MUTUALLY HARDENED AND ADAPTED.
-A BETTER RUN-IN IS OBTAINED NOT BY RIDING SLOWLY BUT SOFTLY AND CAREFULLY. DURING THIS PERIOD, IT IS ADVISABLE TO RIDE THE VEHICLE AT 3/4 OF MAXIMUM PERFORMANCE. IN THE EVENT THAT
Inrijden (02_01)
TIJDENS DE EERSTE 1000 KM MAG HET VOERTUIG NIET GEBRUIKT WORDEN VOOR MEER DAN 80% VAN DE MAX TOEGESTANE SNELHEID. VERMIJDT OM DE GASHENDEL VOLLEDIG OPEN TE DRAAIEN, EN OM VOOR LANGE TIJD EEN CONSTANTE SNELHEID AAN TE HOUDEN. NA DE EERSTE 1000 KM MOET DE SNELHEID GELEIDELIJK AAN VERHOOGD WORDEN TOT DE MAXIMUM PRESTATIES WORDEN BEREIKT
N.B.
-DE DUUR EN DE EFFICIËNTIE VAN HET VOERTUIG HANGEN ERG AF VAN DE ZORG DIE WORDT GEDRAGEN TIJDENS HET INRIJDEN. TIJDENS DEZE PERIODE HARDEN DE BEWEGENDE DELEN VAN DE MECHANISMEN ZICH, EN PASSEN ZE ZICH AAN ELKAAR AAN.
-HET INRIJDEN GEBEURT NIET BETER DOOR TRAAG TE RIJDEN, MAAR
24

FULL ACCELERATION IS NECESSARY (OVERTAKING MANOEUVRES, STEEP SLOPES, ETC.) TRY TO LIMIT THE TIME TO A MINIMUM.
- GEARBOX OIL MUST BE CHANGED ONCE THE FIRST 1,000 KM ARE COVERED. USE THE RECOMMENDED OIL TYPE AND SPECIFIED QUANTITY ONLY. AFTER THE FIRST 1,000 KM, TAKE YOUR SCOOTER TO AN AUTHORISED APRILIA SERVICE CENTRE FOR A CHECK AND SET UP.
TO OBTAIN OPTIMUM ADJUSTMENT OF MOBILE PARTS, A LONG LIFE AND BETTER PERFORMANCE, IT IS NECESSARY NOT TO FORCE THE VEHICLE DURING THE 500 KM. THE VEHICLE MUST HAVE A SUITABLE RUNIN PERIOD, DURING WHICH THE FOLLOWING PRECAUTIONS MUST BE CONSIDERED:
-AFTER STARTING THE ENGINE, WARM IT UP PROGRESSIVELY, WITHOUT MAXIMUM ACCELERATION (WE RECOMMEND NOT TO EXCEED 3/4 OF THE THROTTLE GRIP OPENING FOR 1ST GEAR) OR OVERCHARGE.
-IN LONG STRETCHES, DO NOT USE FULL SPEED CONSISTENTLY. TURN
DOOR ZACHT EN MET ZORG TE RIJDEN. TIJDENS DEZE PERIODE WORDT AANGERADEN OM TE RIJDEN AAN 3/4 VAN DE MAXIMALE PRESTATIES. WANNEER HET NODIG IS OM VOL GAS TE GEVEN (INHALEN, HELLINGEN, ENZ.), DOE DIT DAN NIET TE LANG.
- NA DE EERSTE 1.000 KM MOET DE OLIE VAN DE VERSNELLINGSBAK VERVANGEN WORDEN. GEBRUIK ENKEL AANBEVOLEN OLIE, EN IN DE AANGEDUIDE HOEVEELHEID. NA DE EERSTE 1.000 KM MOET EEN CONTROLE VAN HET VOERTUIG EN DE AFSTELLING UITGEVOERD WORDEN, IN EEN ERKEND APRILIA SERVICECENTRUM.
OM EEN OPTIMALE REGELING VAN DE BEWEGENDE DELEN, EEN LANGE LEVENSDUUR EN DE BESTE PRESTATIES TE VERKRIJGEN, MAG HET VOERTUIG NIET GEFORCEERD WORDEN TIJDENS DE EERSTE 500 KM. HET VOERTUIG HEEFT EEN GESCHIKTE PERIODE VOOR HET INRIJDEN NODIG. TIJDENS DEZE PERIODE MOET HET VOLGENDE GERESPECTEERD WORDEN:
- NA DE START MOET DE MOTOR GELEIDELIJK AAN OPGEWARMD WORDEN, ZONDER GAS TE GEVEN AAN
Gebruik 2 / Use 2
25
2 Use / 2 Gebruik
THE THROTTLE GRIP SOME SECONDS FROM TIME TO TIME.
-WHEN FACING STEEP SLOPES, DOWNSHIFT TO HAVE BETTER POWER.
-AFTER A LONG RUN DO NOT STOP THE ENGINE SUDDENLY, LEAVE IT RUNNING AT MINIMUM ACCELERATION FOR SOME SECONDS.
-CHECK THE NON-EXISTENCE OF OIL, FUEL OR BRAKE LIQUID LEAKS.
-IN CASE OF ANOMALOUS NOISE, TRY TO IDENTIFY ITS CAUSE IMMEDIATELY. IT IS ESSENTIAL TO MAKE THE CHECKS AND ADJUSTMENTS REQUIRED FOR THE FIRST 500 ÷ 1000 KM COVERED.
HET MAXIMUM TOERENTAL (ER WORDT AANGERADEN OM TIJDENS HET RIJDEN DE GASHENDEL VOOR MAXIMUM 3/4 TE OPENEN) EN ZONDER HEM TE OVERBELASTEN.
-TIJDENS LANGE AFSTANDEN MAG NIET TE LANG VOL GAS GEGEVEN WORDEN, MAAR MOET DE GASHENDEL REGELMATIG VOOR ENKELE SECONDEN LOSGELATEN WORDEN.
-WANNEER STEILE HELLINGEN MOETEN OPGEREDEN WORDEN, SCHAKELT MEN EEN VERSNELLING TERUG ZODAT OVER EEN GOED VERMOGEN BESCHIKT WORDT.
-NA EEN LANGE RIT MAG DE MOTOR NIET ONMIDDELIJK STILGELEGD WORDEN, MAAR MOET HIJ AAN HET MINIMUM TOERENTAL DRAAIEN VOOR ENKELE SECONDEN.
-CONTROLEER OF ER GEEN OLIE-, BRANDSTOFOF REMVLOEISTOFLEKKEN ZIJN.
-PROBEER OM ONMIDDELLIJK DE OORZAAK VAN ELK ABNORMAAL LAWAAI TE VINDEN. HET IS ABSOLUUT NOODZAKELIJK OM DE CONTROLES EN REGELINGEN UIT TE VOEREN DIE WORDEN VOORZIEN VOOR DE EERSTE 500 ÷ 1000 KM.
26

02_02
02_03
02_04
Starting up the engine (02_02, |
Starten des motors (02_02, |
02_03, 02_04) |
02_03, 02_04) |
-Ensure the gear is in neutral position.
-Position the throttle at 1/3 of the stroke.
-Insert the key on and turn it to position
«1».
-Step on the start up pedal.
-Repeat procedures if necessary.
-If the engine is cold, use the carburettor starter «D». Do not activate the starter when the engine is hot.
-Controleer of de versnellingsbak in zijn vrij staat.
-Plaats het gashandvat aan 1/ 3 van de slag.
-Plaats de sleutel in de schakelaar en draai hem in positie «1».
-Handel op het startpedaal.
-Herhaal de handelingen indien nodig.
-Bij koude motor moet de starter van de carburator «D» gebruikt worden. Activeer de starter niet wanneer de motor warm staat.
Gebruik 2 / Use 2
27

2 Use / 2 Gebruik
Precautions |
Voorzorgsmaatregelen |
-DO NOT KEEP MAXIMUM ACCELERATION FOR A LONG TIME. USE THE ENGINE UP TO A 3/4 OF MAXIMUM PERFORMANCE. PETROL WILL BE SAVED AND THE ENGINE LIFE WILL BE LONGER.
-WHEN BRAKING, STOP ACCELERATING.
-BRAKE MODERATELY, CONSIDERING THE TYPE OF ROAD. ON AS- PHALT-TREATED DRY ROADS, START BRAKING WITH THE FRONT BRAKE AND FINISH WITH BOTH. ON WET ROADS, OR WITH SAND OR SMALL STONES, NEVER USE THE FRONT BRAKE AND KEEP MORE DISTANCE TO STOP THE SCOOTER.
-WHEN STARTING OFF, ACCELERATE MODERATELY AND PROGRESSIVELY, RELEASING THE CLUTCH GRADUALLY.
-AT CURVES, DO NOT TURN EXCESSIVELY.
-HOU HET GAS NIET AAN HET MAXIMUM VOOR LANGE TIJD. GEBRUIK DE MOTOR TOT 3/4 VAN DE MAXIMUM PRESTATIES. ZO WORDT BENZINE GESPAARD EN WORDT DE LEVENSDUUR VAN DE MOTOR VERLENGD
-GEEF GEEN GAS WANNEER WORDT GEREMD
-REM GEMATIGD, EN HOU REKENING MET HET TYPE VAN ONDERGROND. OP ASFALT MOET EERST GEREMD WORDEN MET DE VOORREM, EN DAARNA MET BEIDE REMMEN. OP EEN NATTE ONDERGROND, MET ZAND OF KIEZELSTEEN, MAG NOOIT DE VOORREM GEBRUIKT WORDEN EN MOET ER MEER AFSTAND GEHOUDEN WORDEN OM HET VOERTUIG TE KUNNEN STOPPEN
-BIJ HET VERTREK MOET ER GEMATIGD EN GELEIDELIJK AAN GAS GEGEVEN WORDEN, DOOR DE KOPPELING GELEIDELIJK AAN LOS TE LATEN.
-HEL NIET TE VEEL IN BOCHTEN.
28
Stopping the engine (02_05)
To stop the engine, engage gear «1» in neutral position and turn the key switch anticlockwise.
02_05
Het stilleggen van de motor (02_05)
Om de motor stil te leggen moet de versnellingsbak «1» in vrij geplaatst worden, en de sleutelschakelaar in tegenwijzerszin gedraaid worden.
Stand |
Standaard |
To position the scooter on the stand, proceed as follows:
∙get off the scooter on the left side
∙holding it firmly from the handlebar and the saddle, fully flip out the stand with your right foot
∙tilt the scooter and rest the stand on the ground
∙turn the handlebar fully to the left
∙make sure the scooter is stable
Om het voertuig op de standaard te plaatsen, moet het volgende uitgevoerd worden:
∙stap van het voertuig langs de linker kant
∙hou het voertuig stevig vast aan het stuur en het zadel, handel op de standaard met de rechter voet, en klap hem volledig uit
∙hel het voertuig tot de standaard de grond raakt
∙plaats het stuur volledig naar links
∙controleer de stabiliteit van het voertuig
Gebruik 2 / Use 2
29
 Loading...