


Power Macintosh 7600

Installing and Configuring
the Apple PCI Dual-Attached FDDI Card
A
A
A
Engl
ish


Preface / A5
1Installing t he Ca rd and Connecting to the Network / A7
Opening the logic module of the Network Server / A8
Unpacking the card / A11
Installing the card / A12
Attaching the cables and connecting to the network / A16
2Installing and Con f i gur ing th e Device Driver Software / A19
Installing the Common FDDI Software / A20
Installing the FDDI AIX device driver / A22
Configuring the FDDI network interface / A24
3Troublesh ooting and Diagnostics / A2 7
Troubleshooting / A28
Using FDDI diagnostic routines / A29
Obtaining service and support / A29
Appendix Specifications / A31
Con t ents


The Apple Peripheral Connect Interface (PCI) Dual-Attached FDDI Card is a
100 megabit per second (Mbps) single-slot Fiber Distributed Data Interface
(FDDI) card for use with the Apple Network Server. The card and its
associated driver provide physical and data-link services under the TCP/IP
protocol as defined by the ANSI X3T9.5 specifications for FDDI.
IMPORTANT
You must first install AIX 4.1.4.1 before you can use the
FDDI Card. See Instructions to Update AIX for the Network Server to
Version 4.1.4.1.
The Apple PCI Dual-Attached FDDI Card has the following features:
m compliance with PCI Local Bus, version 2.1
m onboard integrated FDDI Station Management (SMT)
m 32-bit, zero wait state PCI Direct Memory Access (DMA) master
m up to 132 Mbps burst DMA rate
m PCI commands for efficient use of cache lines
m support of optical fiber media
m support of Dual Attachment for direct attachment to network ring
m 128K of local buffering
m Motorola MC68840 FDDI chipset
These capabilities are all available as soon as the card is installed in the
Network Server. No special configuring is required.
Preface

About this manual
This manual is aimed at Network Server administrators. It assumes you have a
good understanding of the Network Server hardware, as described in
Setting
Up the Network Server (available in the Network Server accessory kit). You
should also have a working knowledge of the AIX operating system. Using
AIX
®
, AppleTalk Services, and Mac OS Utilities on the Network Server, also
available in your accessory kit, provides a basic introduction. Complete AIX
documentation is available online through the InfoExplorer application.
Chapter 5 of Using AIX, AppleTalk Services, and Mac OS Utilities on the
Network Server tells you how to access and use InfoExplorer.
For more information
Numerous books about FDDI and FDDI token-passing networks are available
at most technical bookstores. In addition, the FDDI Consortium at the
University of New Hampshire is an excellent resource for FDDI information
and training. The Consortium can be accessed on the Internet at
http://www.iol.unh.edu/consortiums/fddi/fddi_consortium.html
A6 Preface

This chapter provides complete instructions for installing the Apple PCI Dual-
Attached FDDI Card in the Network Server. Before proceeding, you should
familiarize yourself with the section on installing PCI cards in
Setting Up the
Network Server. Be sure to follow all recommendations for handling and
installing the card carefully and correctly, so as not to damage either the card
or the computer.
1 Installing the Card and
Connecting to the Network
Opening the logic module of the Network Server
You do not need to remove the cover from the Network Server to install a card.
Instead you open the logic module, following the directions in this section.
1Shut down the Network Server.
See Using AIX, AppleTalk Services, and Mac OS Utilities on the Apple
Network Server if you need more information about safely shutting down the
Network Server.
2Attach a grounding strap to your body
A grounding strap is strongly recommended to avoid damage to the card or the
computer from electrostatic discharge.
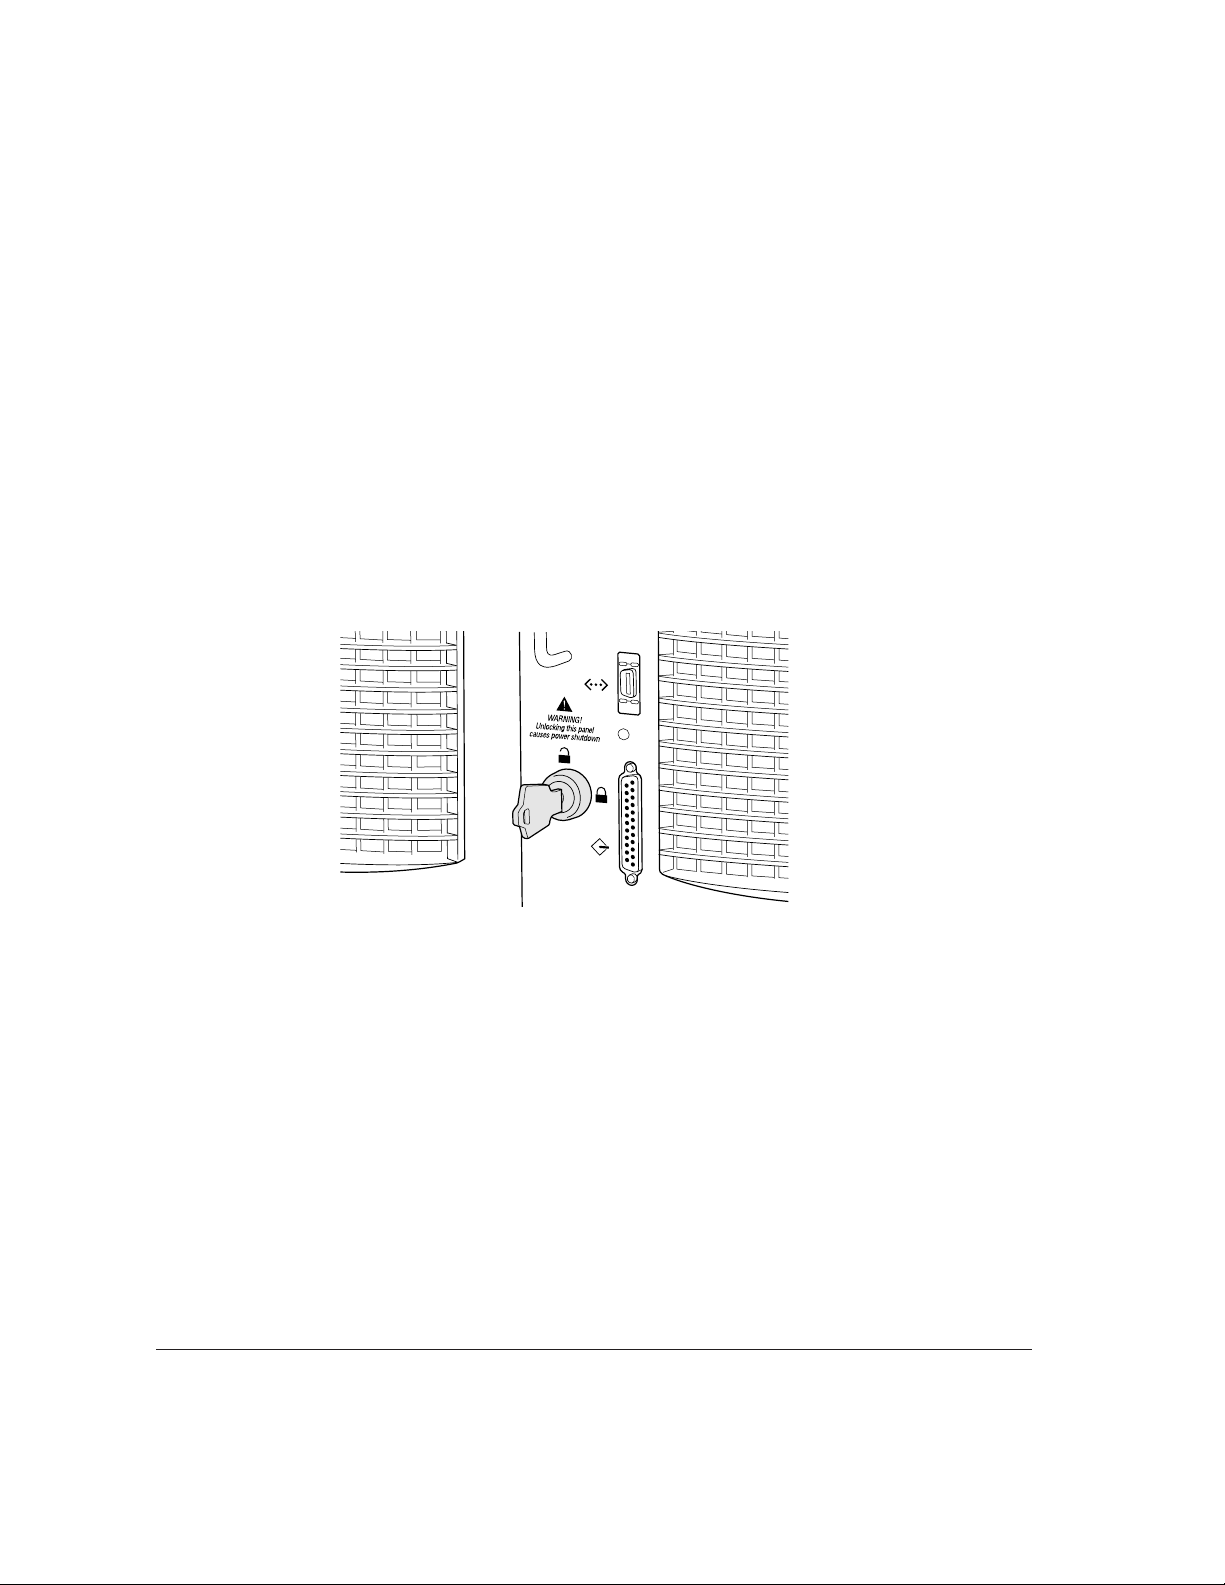
3 Turn the key at the rear of the server to the Unlock position.
A8 Chapter 1 / Installing the Card and Connecting to the Network
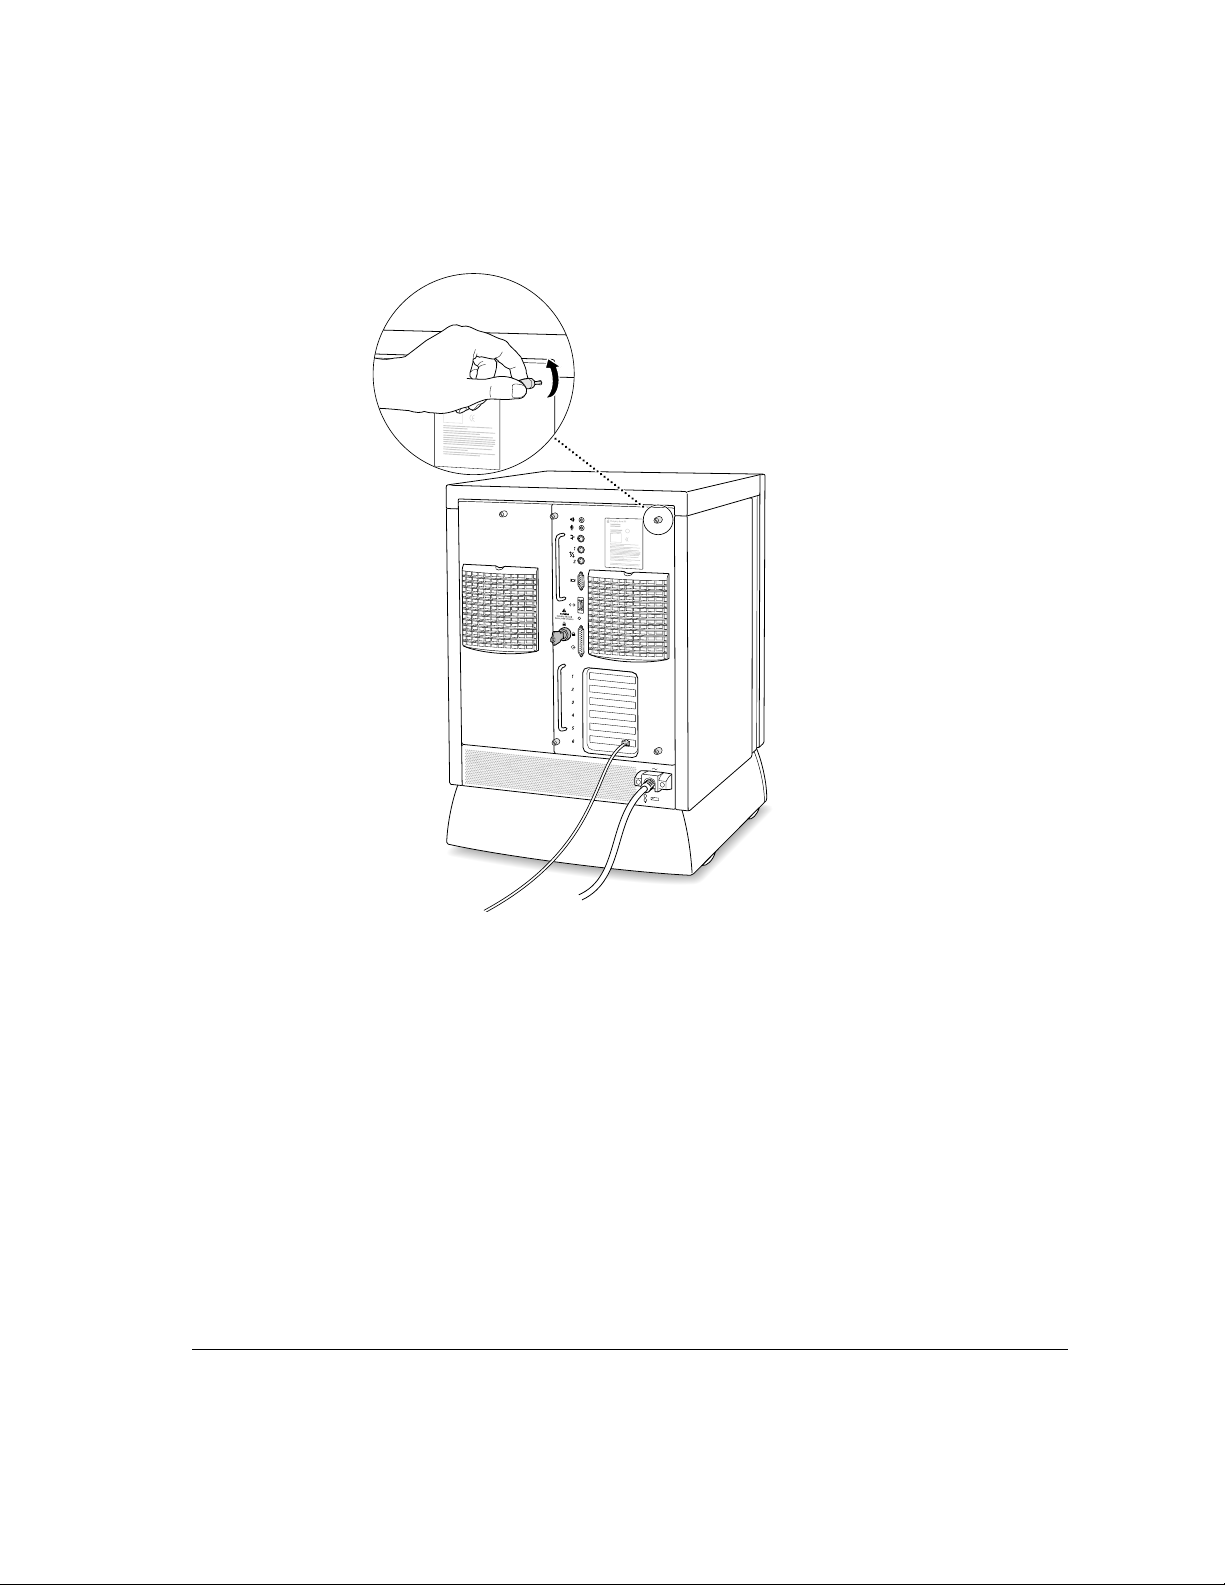
4 Loosen the thumb screws completely.
Opening the logic module of the Network Server A9

5Grasping the logic module by its handles, pull the module out as far as it will go.
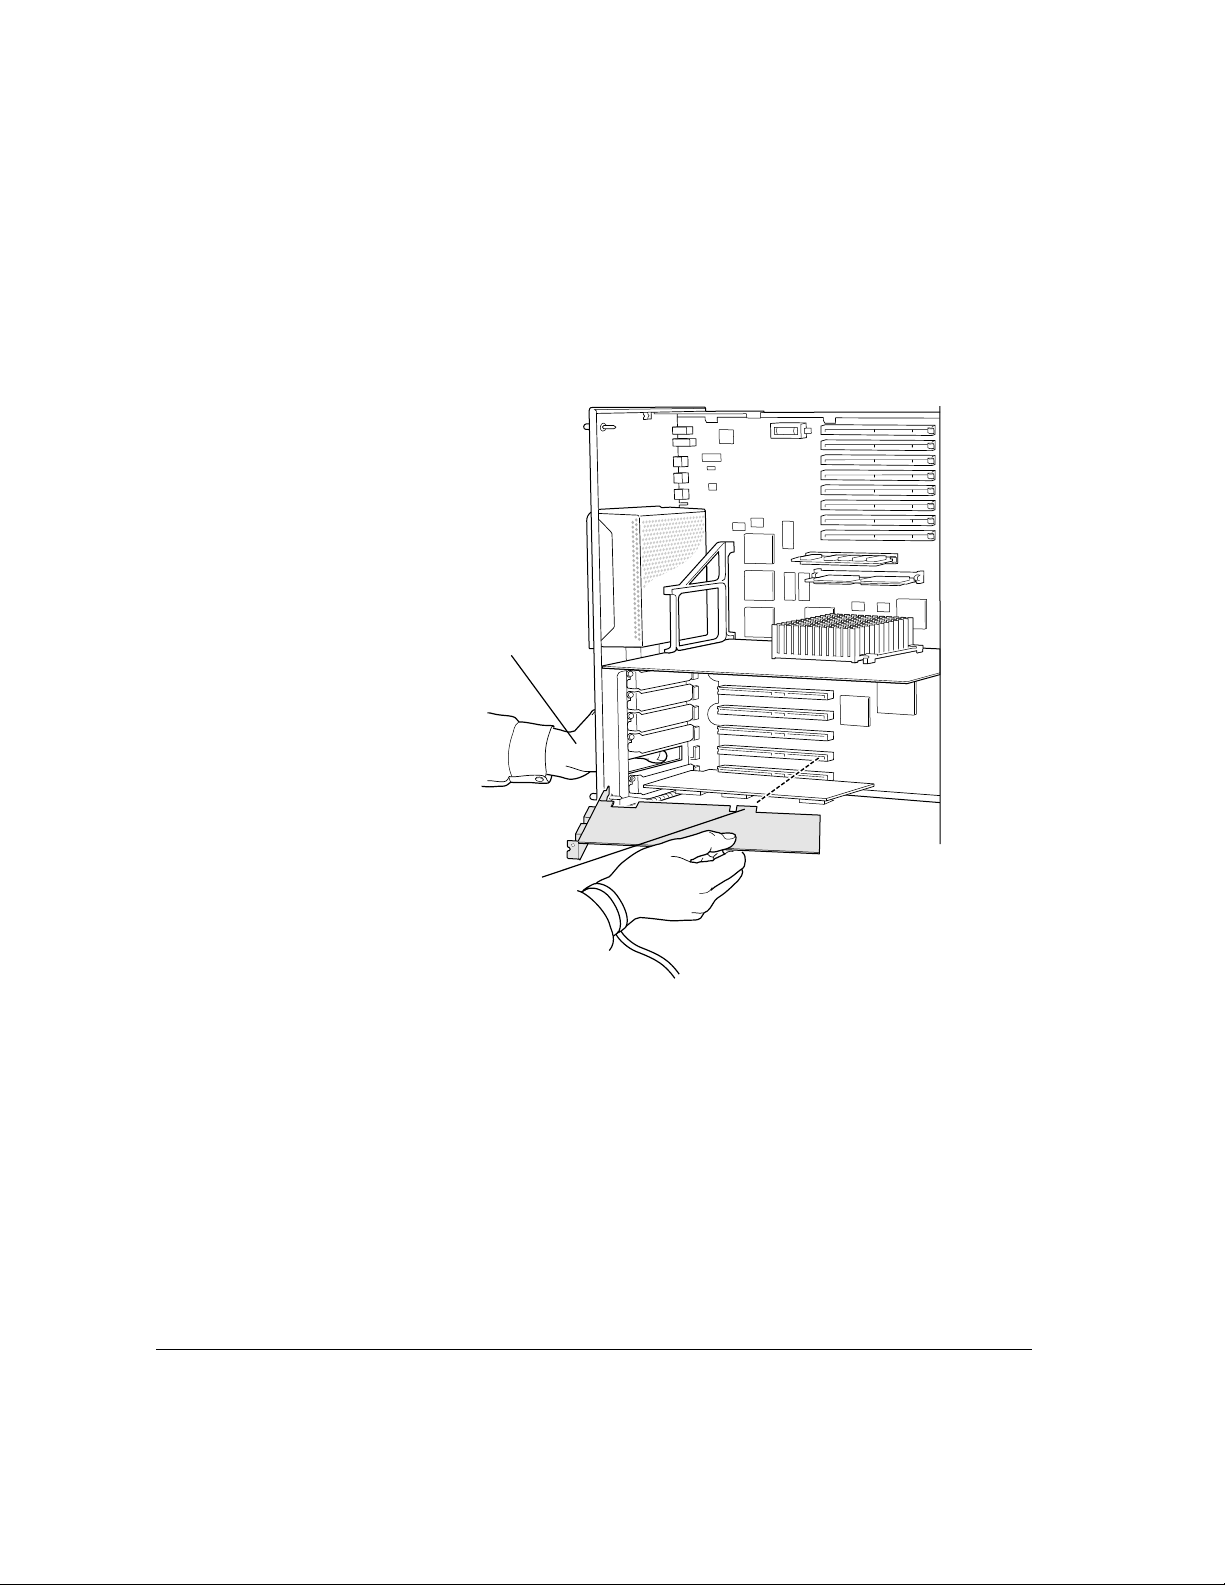
6 Remove the cover plate from the expansion slot you want to use.
Put the screw aside. You will reattach it later to hold the card in place. Put the
cover plate away for safekeeping in case you remove the card later.
A10 Chapter 1 / Installing the Card and Connecting to the Network

Unpacking the card
The package for the Apple PCI Dual-Attached FDDI Card contains an
installation CD-ROM disc, the card itself, and this manual.
1 Remove the protective packing materials from around the card.
Save the packing materials and the package. You can use them should you
need to return the card for service.
2 Carefully remove the card from its antistatic bag.
Inspect for any visible damage that might have occurred during shipment. If
you find any damage, contact your Apple-authorized Network Server dealer or
service representative.
Unpacking the card A11
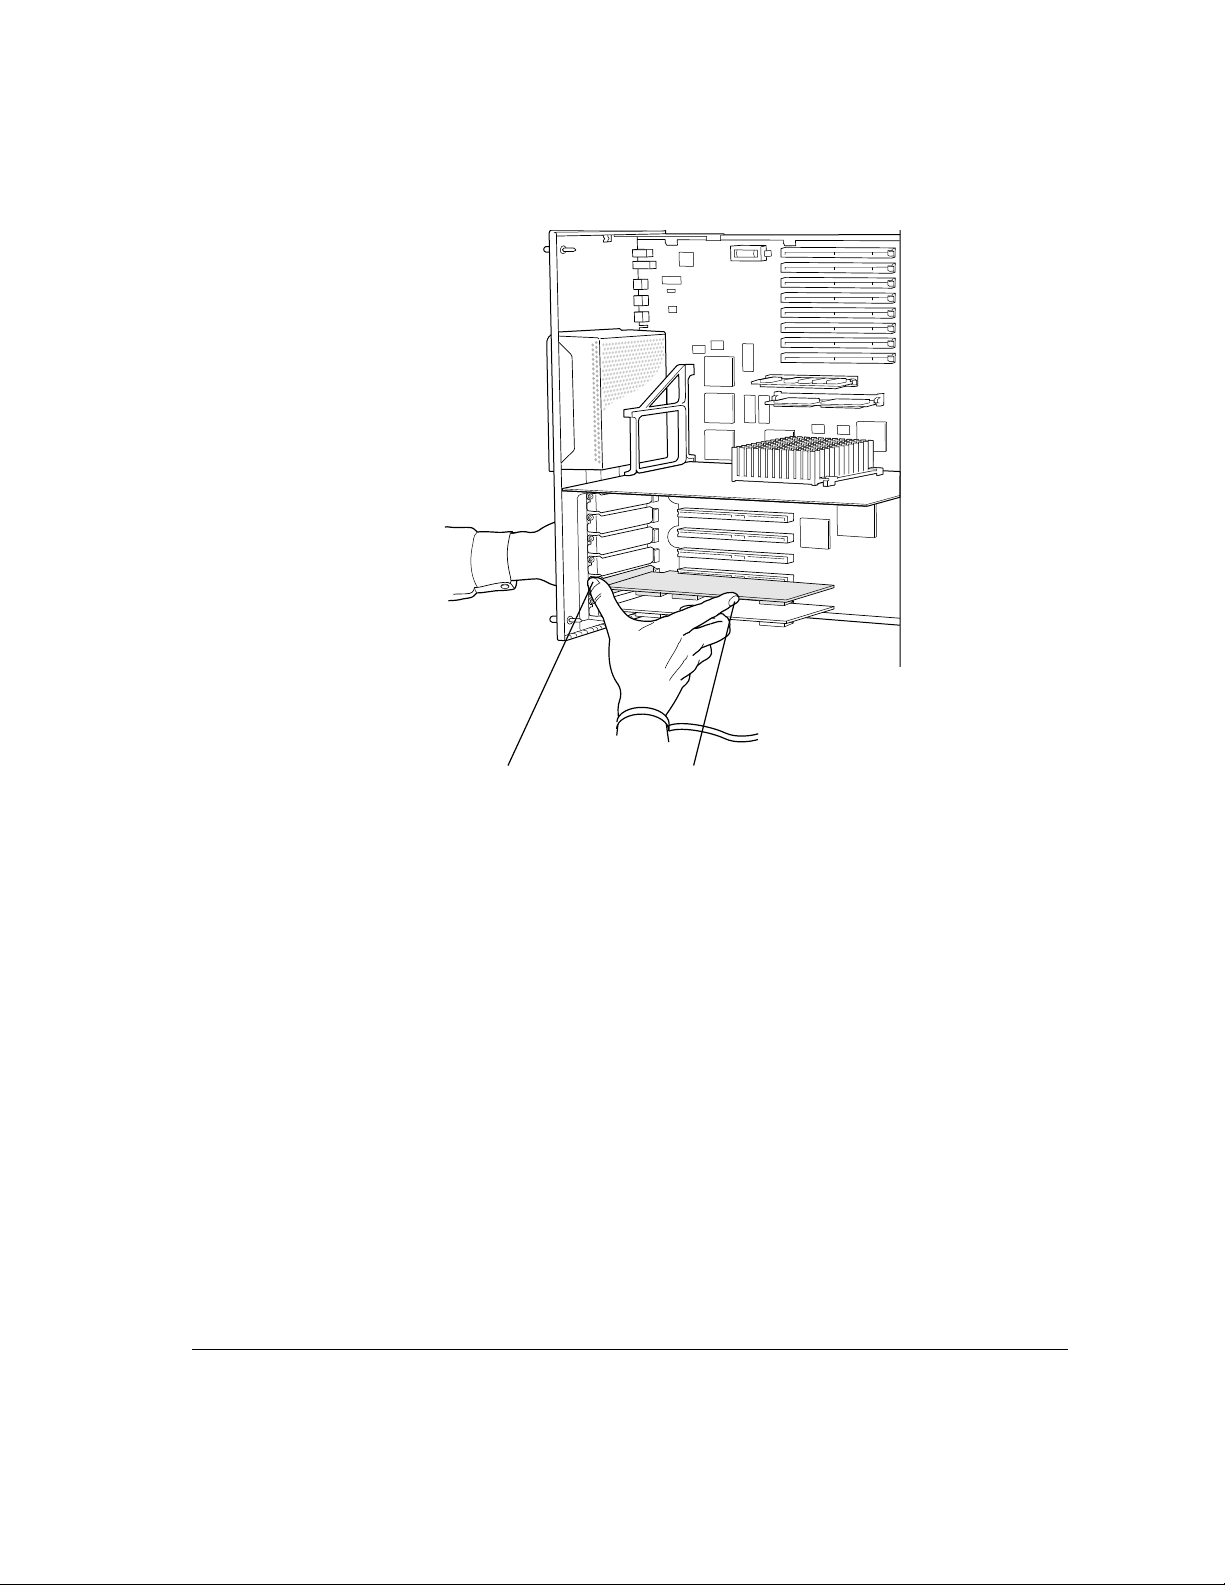
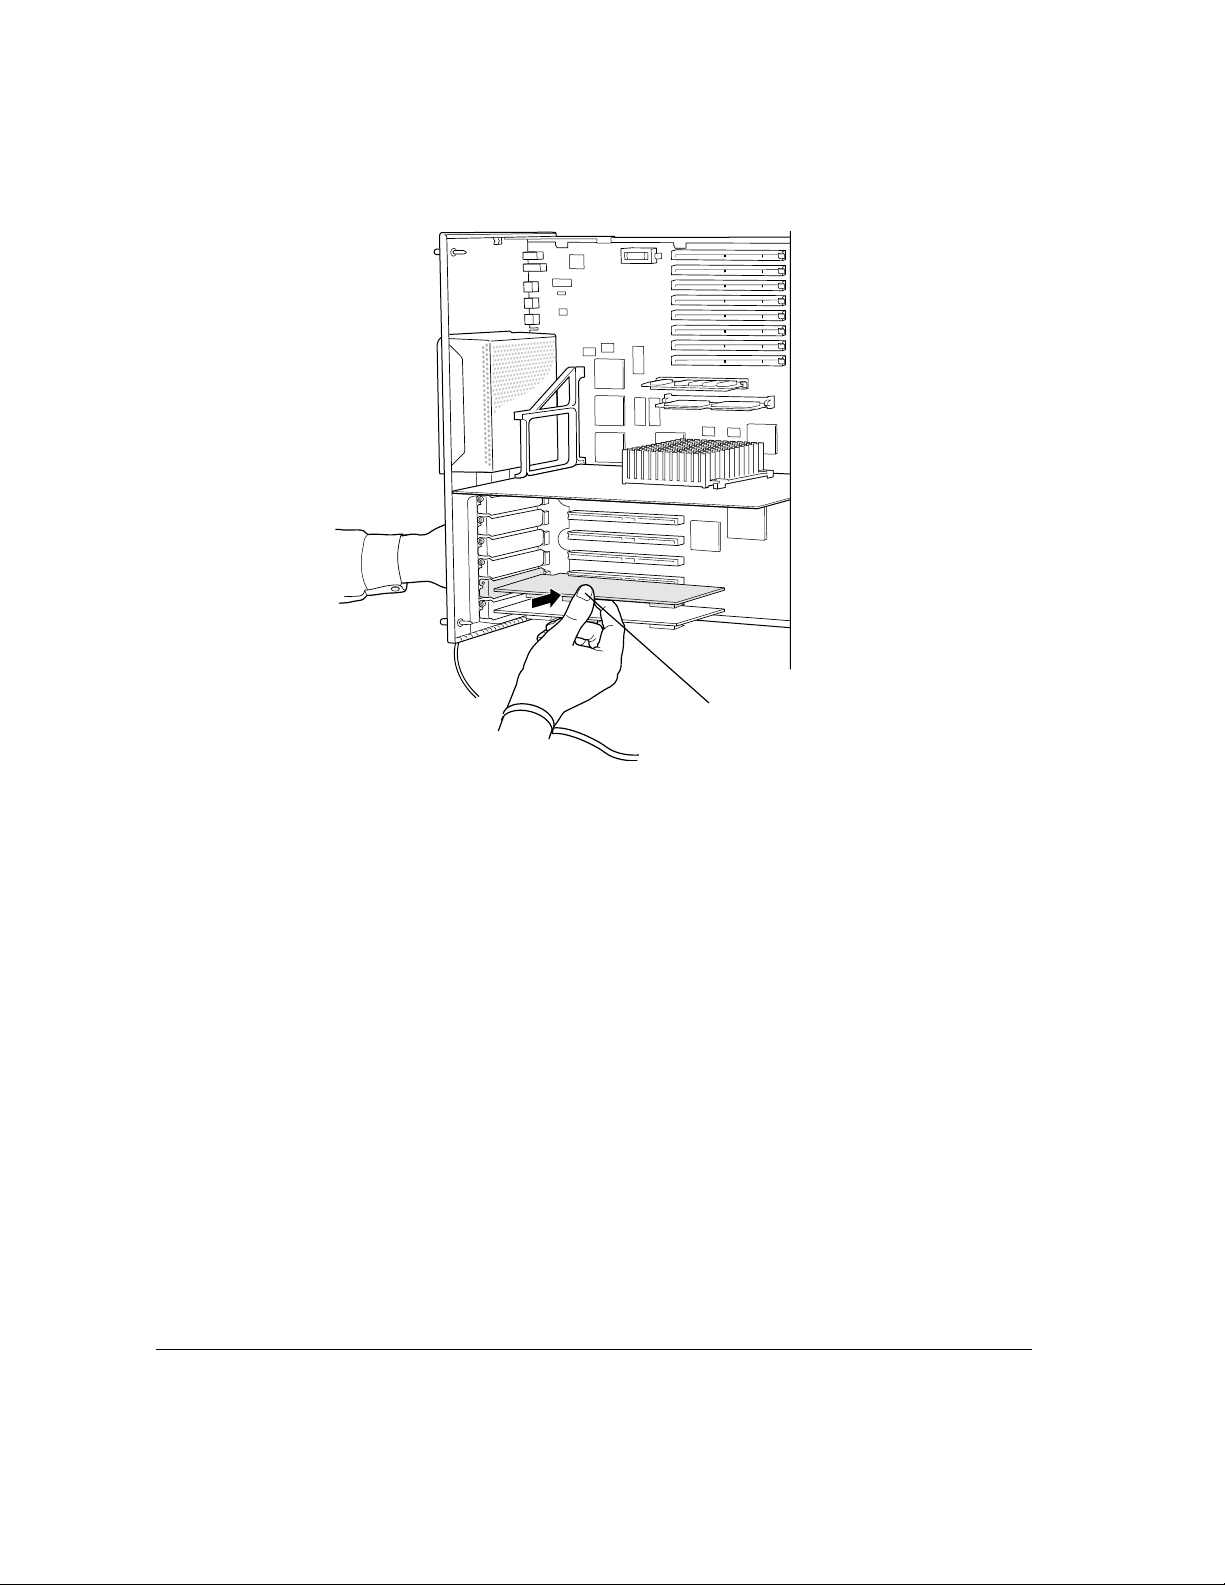
Installing the card
The cable ports on the Apple PC Dual-Attached FDDI card are somewhat
oversized for the Network Server, and require you to slightly modify the
procedure you’ve used to install other cards. Use the illustrations that follow to
install the FDDI card:
A12 Chapter 1 / Installing the Card and Connecting to the Network
Installing the card A13
A14 Chapter 1 / Installing the Card and Connecting to the Network
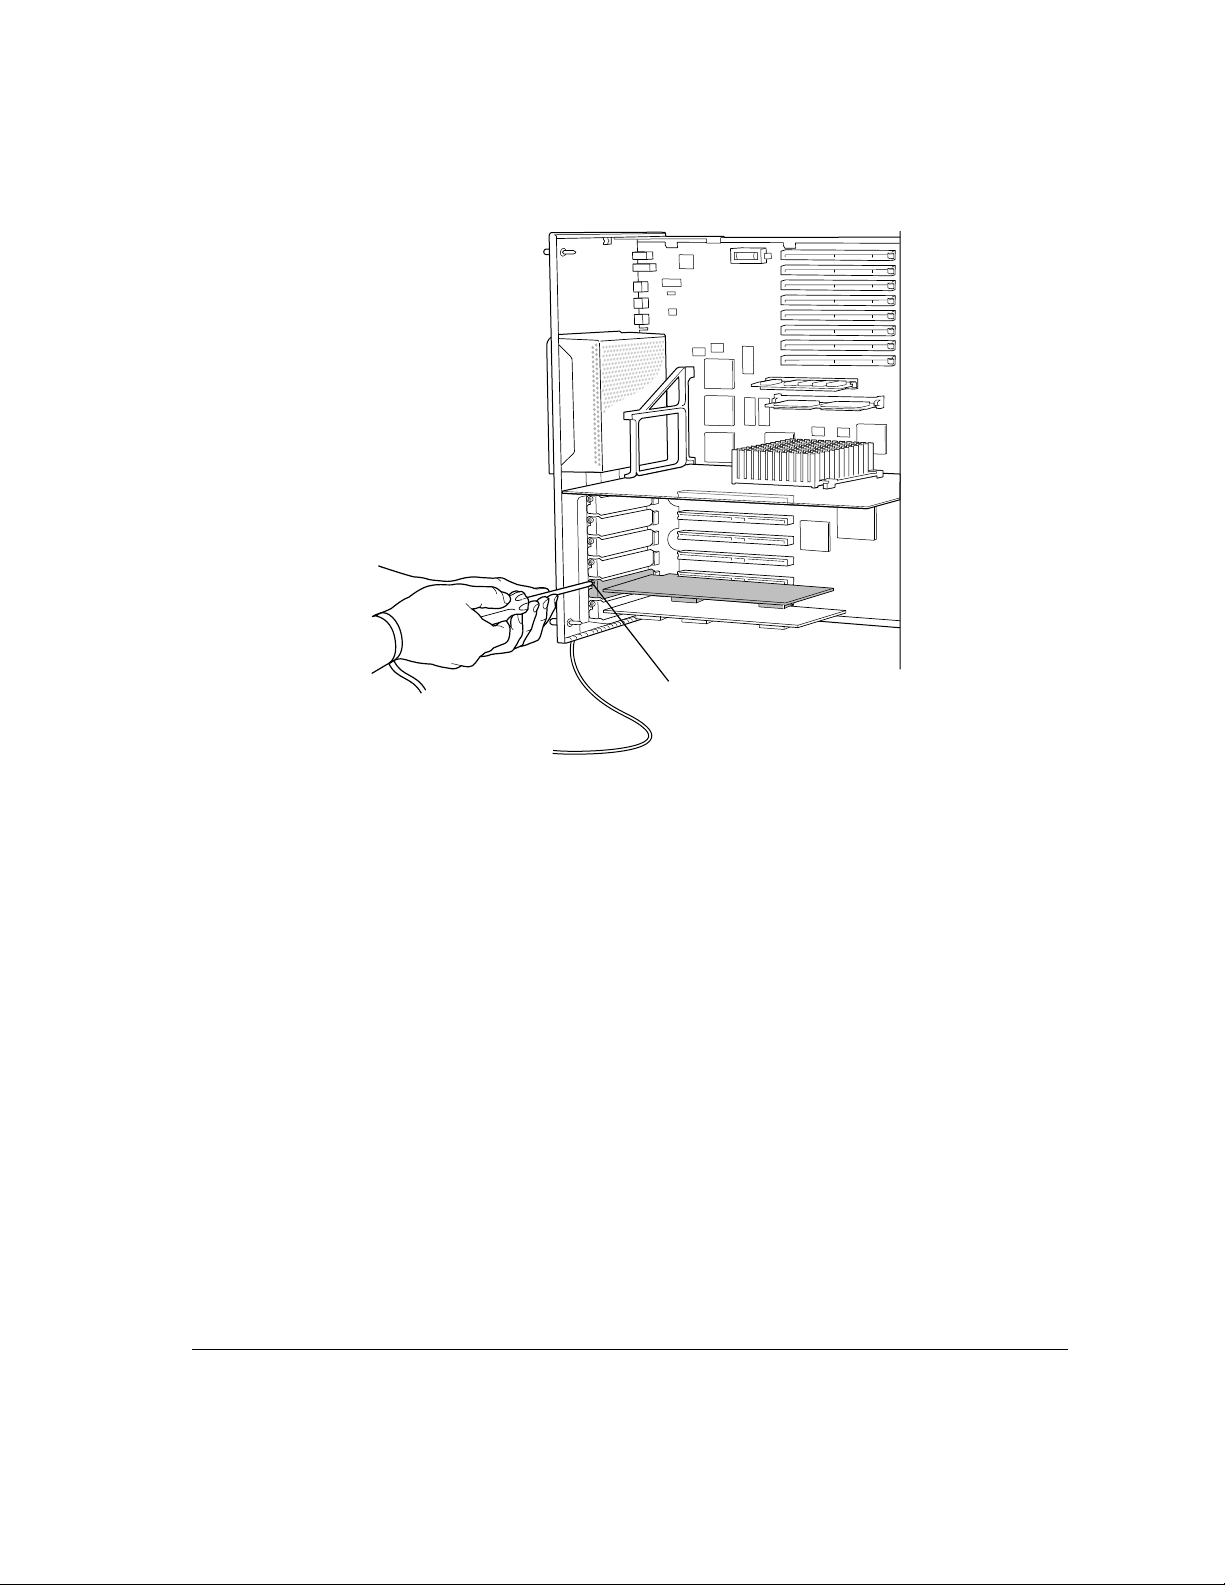
Once the card has been installed, push the logic module back in, tighten the
thumb screws, turn the key to Lock, and reattach all cables. Do not turn on the
computer until you have connected the card to the network.
Installing the card A15

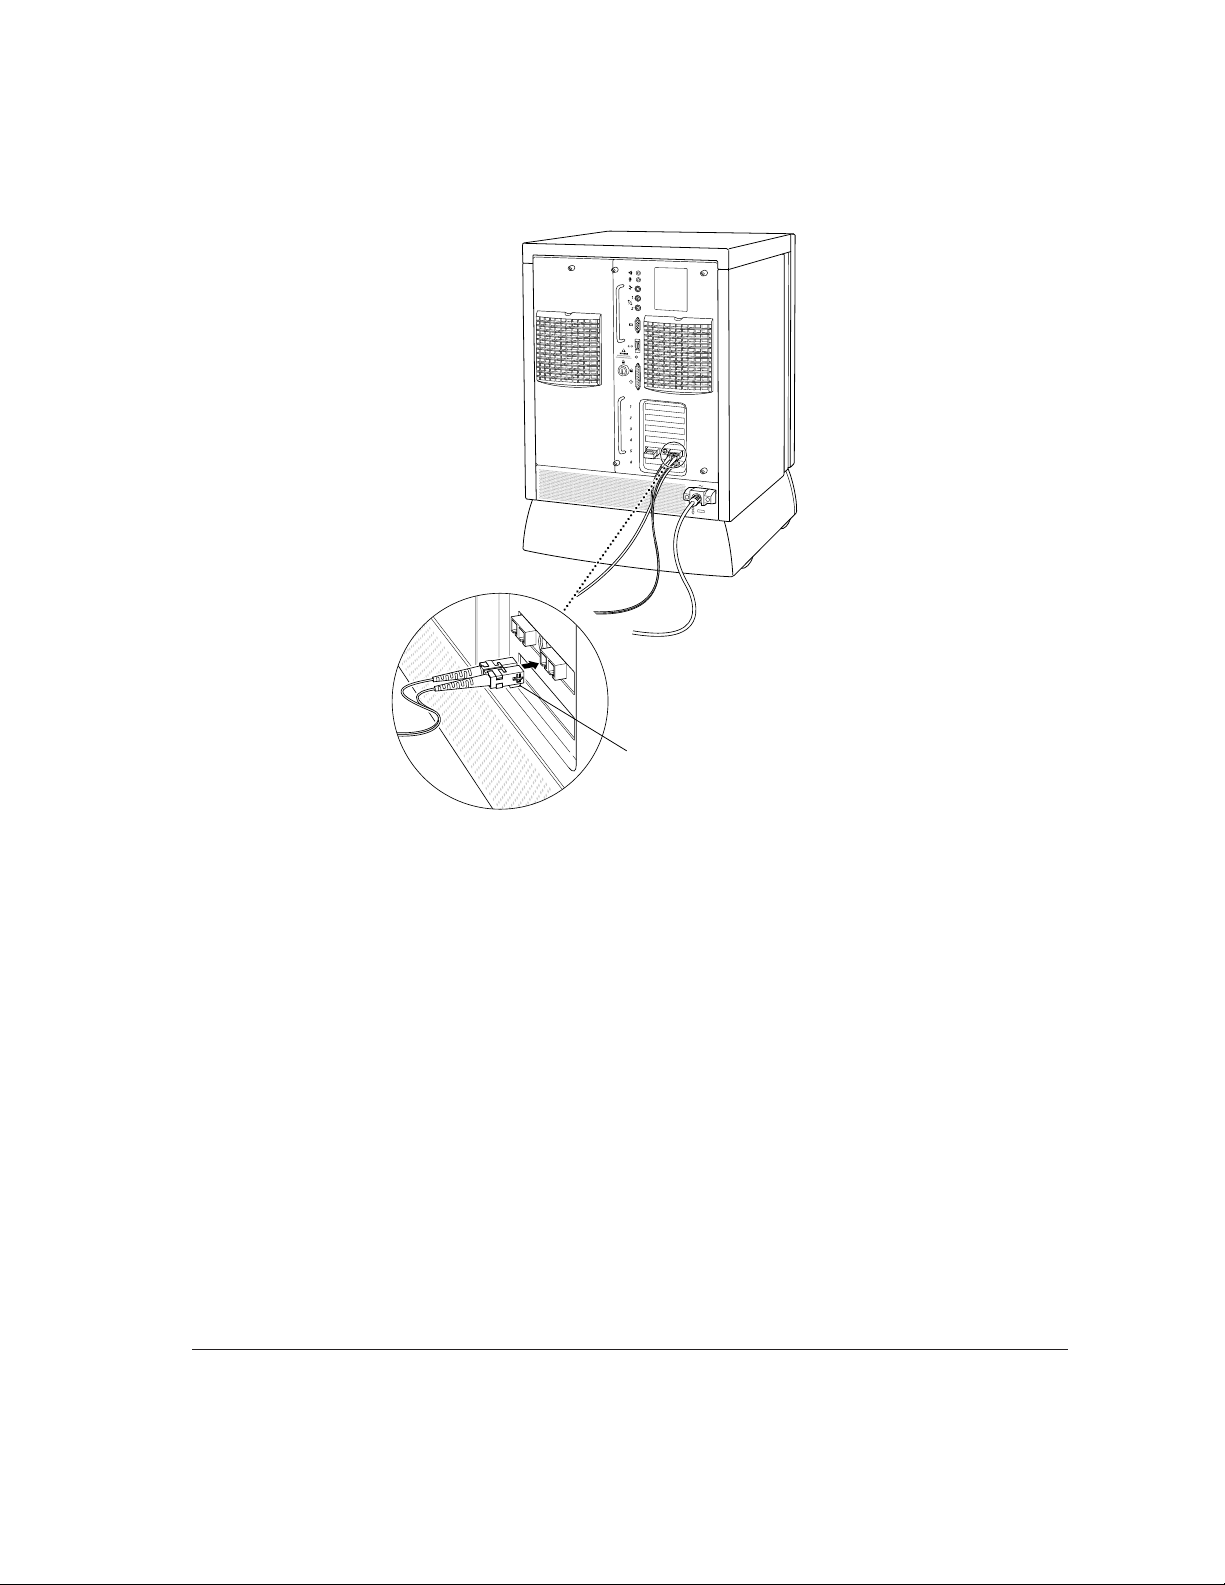
Attaching the cables and connecting to the network
The Apple PCI Dual-Attached FDDI card requires one SC Duplex fiber cable
for single attachment or two cables for dual attachment. Note that each cable
has two connectors, as shown in the illustration that follows.
These cables are not supplied with the card but may be ordered in a variety of
lengths from most large computer suppliers.
Attach each cable to Port A or Port B on the FDDI card, following the cable
manufacturer’ s instructions (if any). Looking at the computer from the back
(toward the logic module), as shown in the illustration that follows, Port A is
on the left.
A16 Chapter 1 / Installing the Card and Connecting to the Network
IMPORTANT
Do not connect the Network Server to the next node on the
network without consulting with your network administrator. Where and how
you should connect, and how the rest of the network will be affected by adding
a node, depends on your particular network.
Attaching the cables and connecting to the network A17


Once you install the FDDI card, you must install a common FDDI software
package and the FDDI device driver software. You must also configure the
FDDI device driver so your Network Server can communicate on the FDDI
network. This chapter describes all of these steps.
IMPORTANT
You must be using Apple’s AIX version 4.1.4.1 or later to use the
FDDI Card. If your Network Server is not running AIX 4.1.4.l, you must first
upgrade your software before installing the FDDI software. See the
Instructions to Update AIX to Version 4.1.4.1 that came with your FDDI card.
2 Installing and Configuring
the Device Driver Software

Installing the Common FDDI Software
After you have AIX Version 4.1.4.1 (or later) running on your Network Server,
you need to install a Common FDDI Software package before you install the
FDDI device driver. The steps you follow depend on whether you have the
Installation CD or the Software Update CD. Refer to the section below for the
CD you are using.
If you have the AIX Installation CD Version 4.1.4.1 (or later)
Follow these steps:
1Type
lslpp -l devices.mca.8ef4.com
In most cases a message appears telling you that the software is not installed.
Continue with step 2.
If a message appears telling you the software is present, then go to next
section, “Installing the FDDI AIX Driver.”
2Insert the AIX Installation CD in the CD drive.
3At the AIX prompt, type the following command and press return:
smitty devinst
The menu for installing additional device software appears.
4Press F4 (or ESC-4).
A pop-up menu listing the device software that can be installed appears.
5Select the appropriate CD device from the list and press Return.
An expanded menu appears.
6Select “Software to install” from the menu and type:
devices.mca.8ef4.com
7Press Return.
A dialog box appears asking you to confirm the installation. Press Return to
begin the installation or press F3 (or ESC 3) to cancel the installation.
When the installation is finished, continue with the next section, “Installing the
FDDI AIX Driver.”
A20 Chapter 2 / Installing and Configuring the Device Driver Software

If you have the Software Update CD
Follow these steps:
1Type
lslpp -l devices.mca.8ef4.com
In most cases a message appears telling you that the0 software is not installed.
Continue with step 2.
If a message appears telling you the software is present, then go to next
section, “Installing the FDDI AIX Driver.”
2 Insert the Network Server Software Update Kit CD in the CD drive.
3 To mount the CD, type the following command and press return:
mount -r -v cdrfs /dev/cd0 /mnt
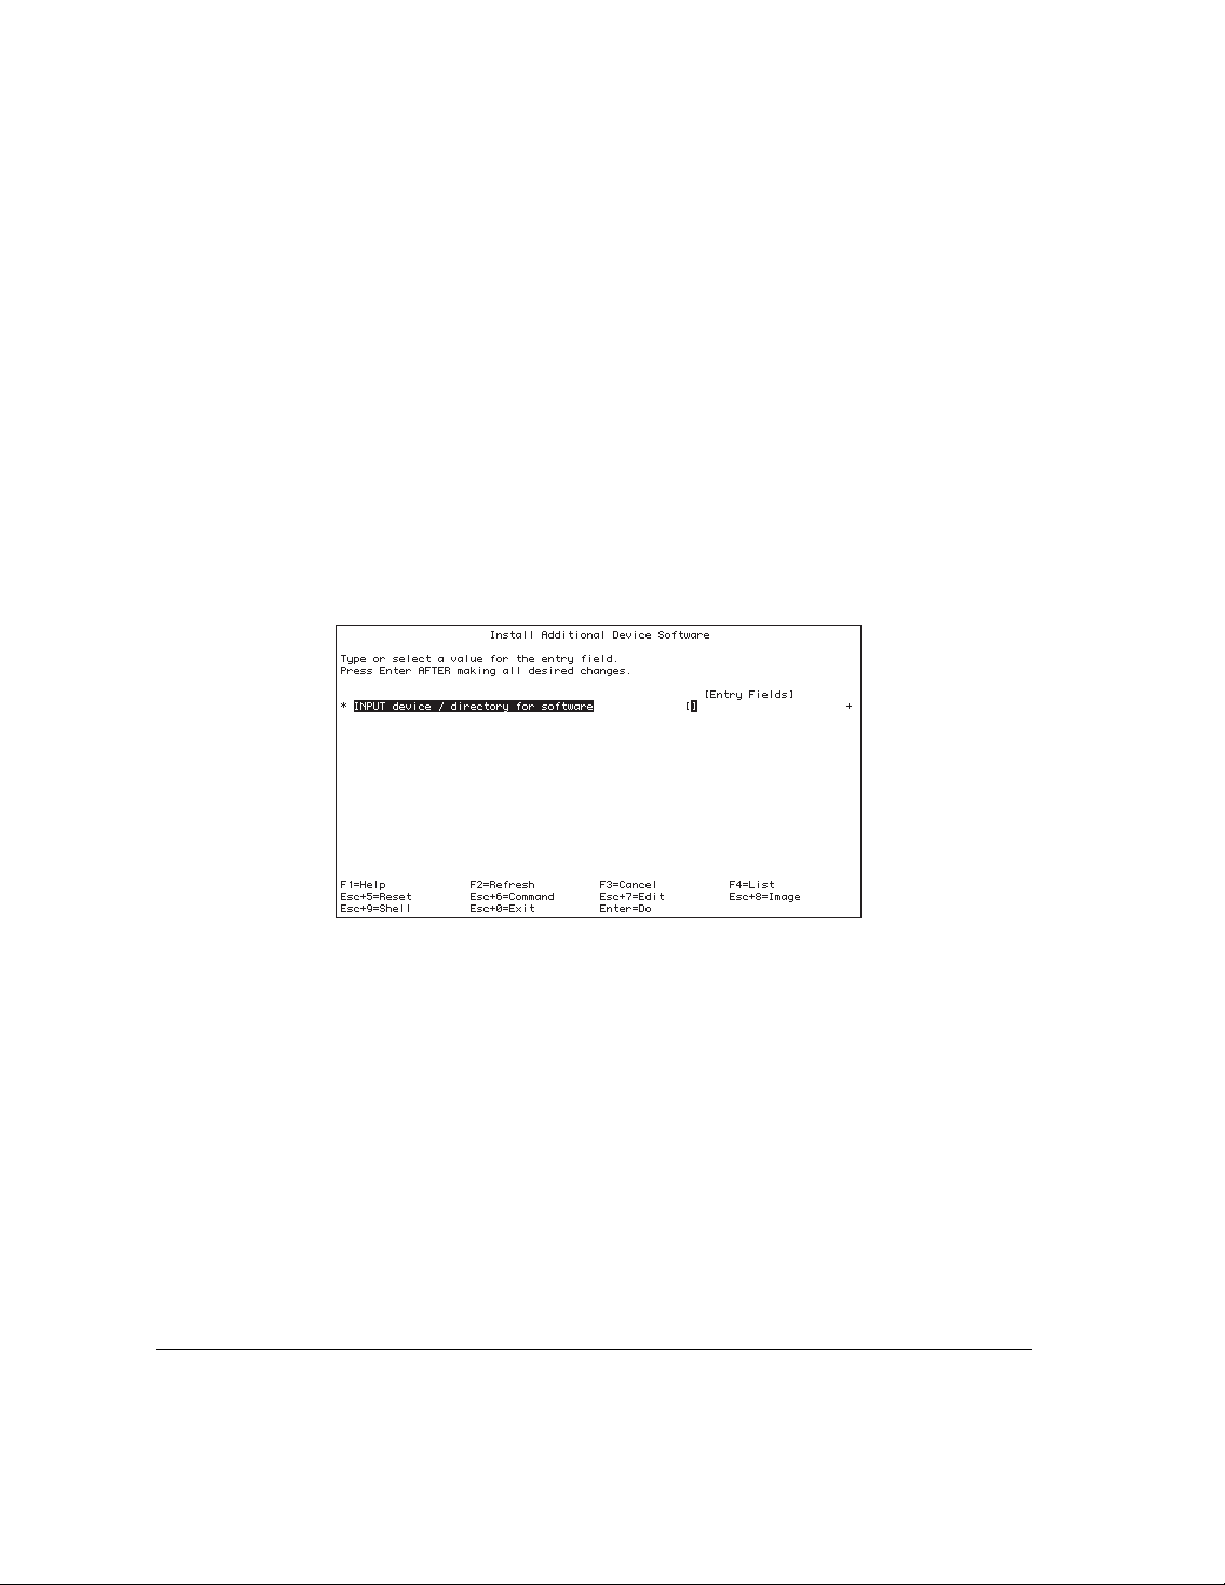
4At the AIX prompt, type the following command and press return:
smitty devinst
The menu for installing additional device software appears.
5 In the “INPUT device/directory for software” field, type:
/mnt/new
6 In the “SOFTWARE to install” field, type:
devices.mca.8ef4.com
7Press Return.
A dialog box appears asking you to confirm the installation. Press Return to
begin the installation or press F3 (or ESC 3) to cancel the installation.
8 To unmount the CD, type:
umount /mnt
When the installation is finished, continue with the next section, “Installing the
FDDI AIX Driver.”
Installing the Common FDDI Software A21
Installing the FDDI AIX device driver
The device driver software is included on the installation floppy disk. The
following instructions can be used to install the driver software using either
the X-windows version of the System Management Interface Tool (SMIT) or
the command line version (SMITTY). The example uses SMITTY, but all the
steps are the same.
Note: To perform the installation you must be logged in as root.
1Insert the installation floppy disk.
2At the AIX prompt, type the following command and press Return:
smitty devinst
The following menu appears:
3In the INPUT entry field, type:
/dev/fd0
A22 Chapter 2 / Installing and Configuring the Device Driver Software
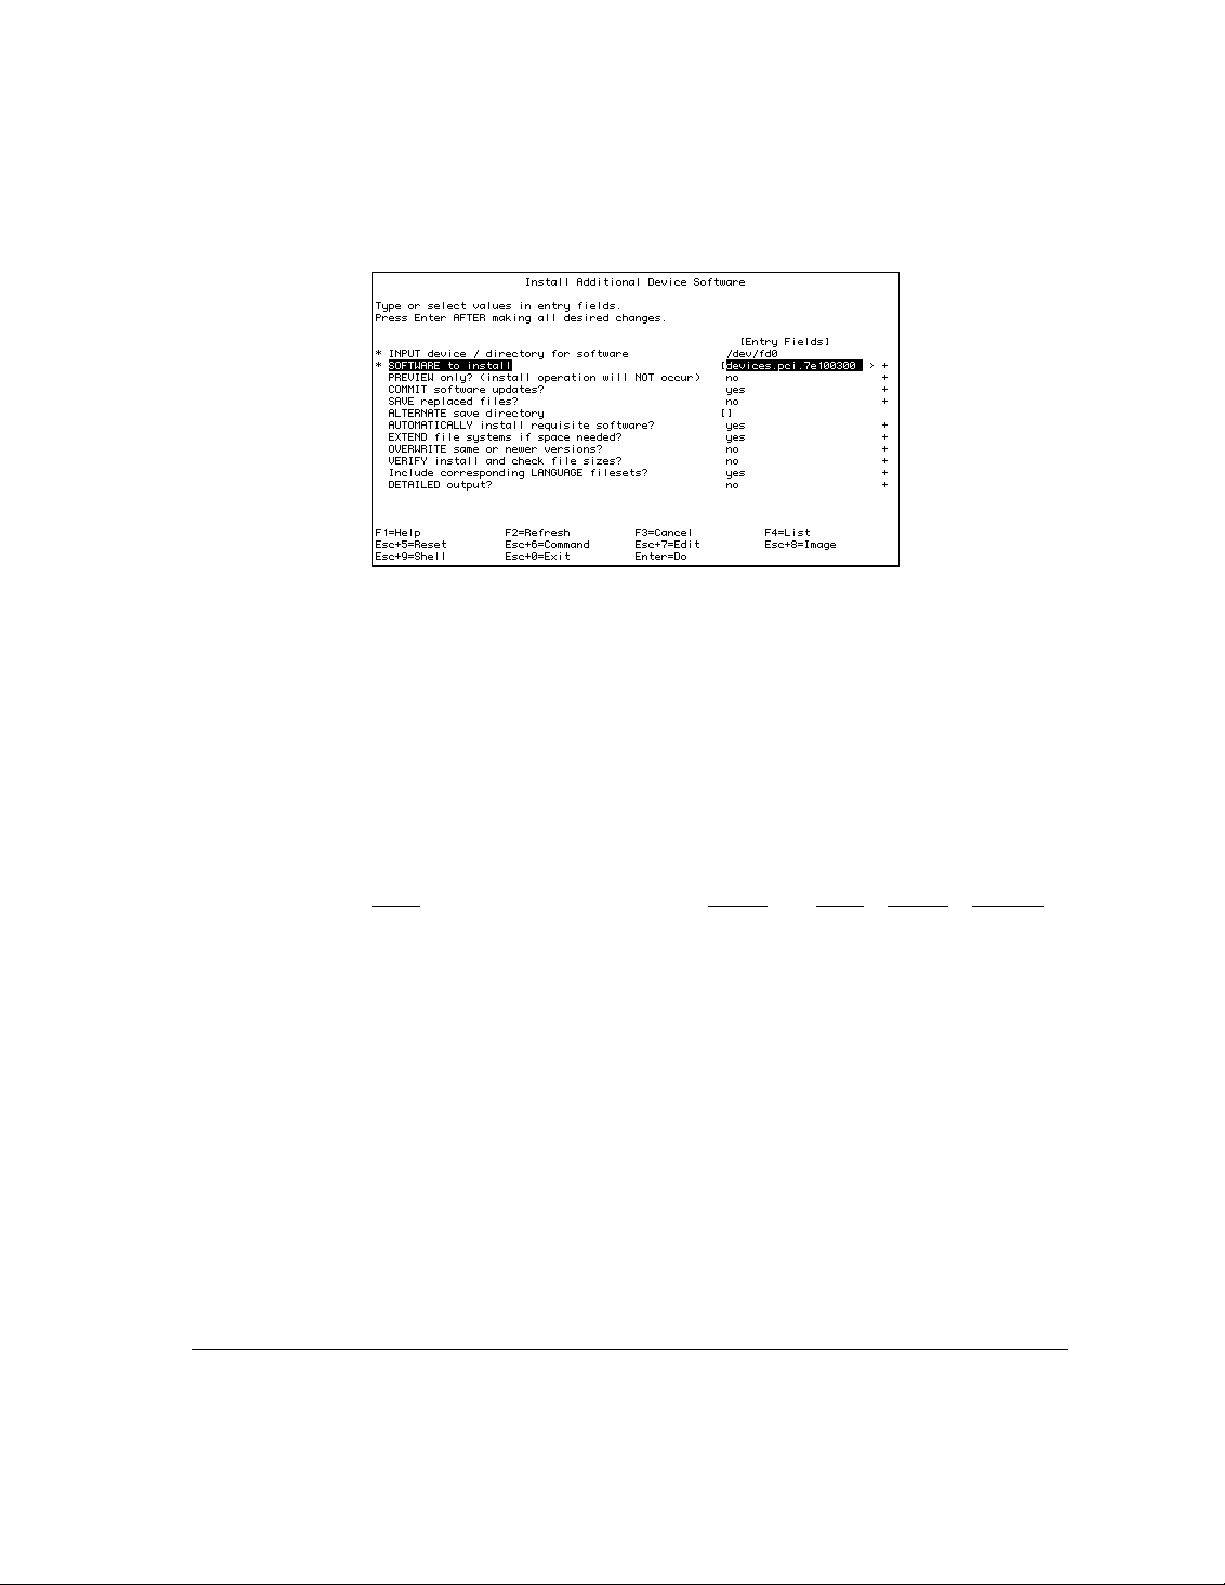
4Press Return to display the configuration options shown in the next screen:
5Type
devices.pci.7e100300
in the SOFTWARE to install field.
If a FDDI driver has already been installed and you want to continue with this
installation you need to type,
Yes in the overwrite field.
A dialog box appears asking you to confirm your selection.
6Press Return again to begin the installation.
Messages on the screen describe the installation process. When you see the
following message, installation is complete:
Installation Summary --------
Name Level Part Event Result
devices.pci.7e100300.rte 2.1.0.0 USR APPLY SUCCESS
devices.pci.7e100300.diag 2.1.0.0 USR APPLY SUCCESS
7Press f10 to exit SMITTY, and then reboot the Network Server.
Configuring the FDDI AIX device driver A23
Configuring the FDDI network interface
You’ll need to have the following information to configure the network
interface for the FDDI card:
m a name and IP address for each FDDI card installed on the Network Server
m the network mask
m the appropriate domain name server name and IP address
m the IP address of the router or gateway the Network Server uses for network
access.
If you don’t have this information, obtain it from your network administrator.
As when you install the device driver, you can configure the card with either
SMIT or SMITTY. The instructions that follow presume you are for using
SMITTY.
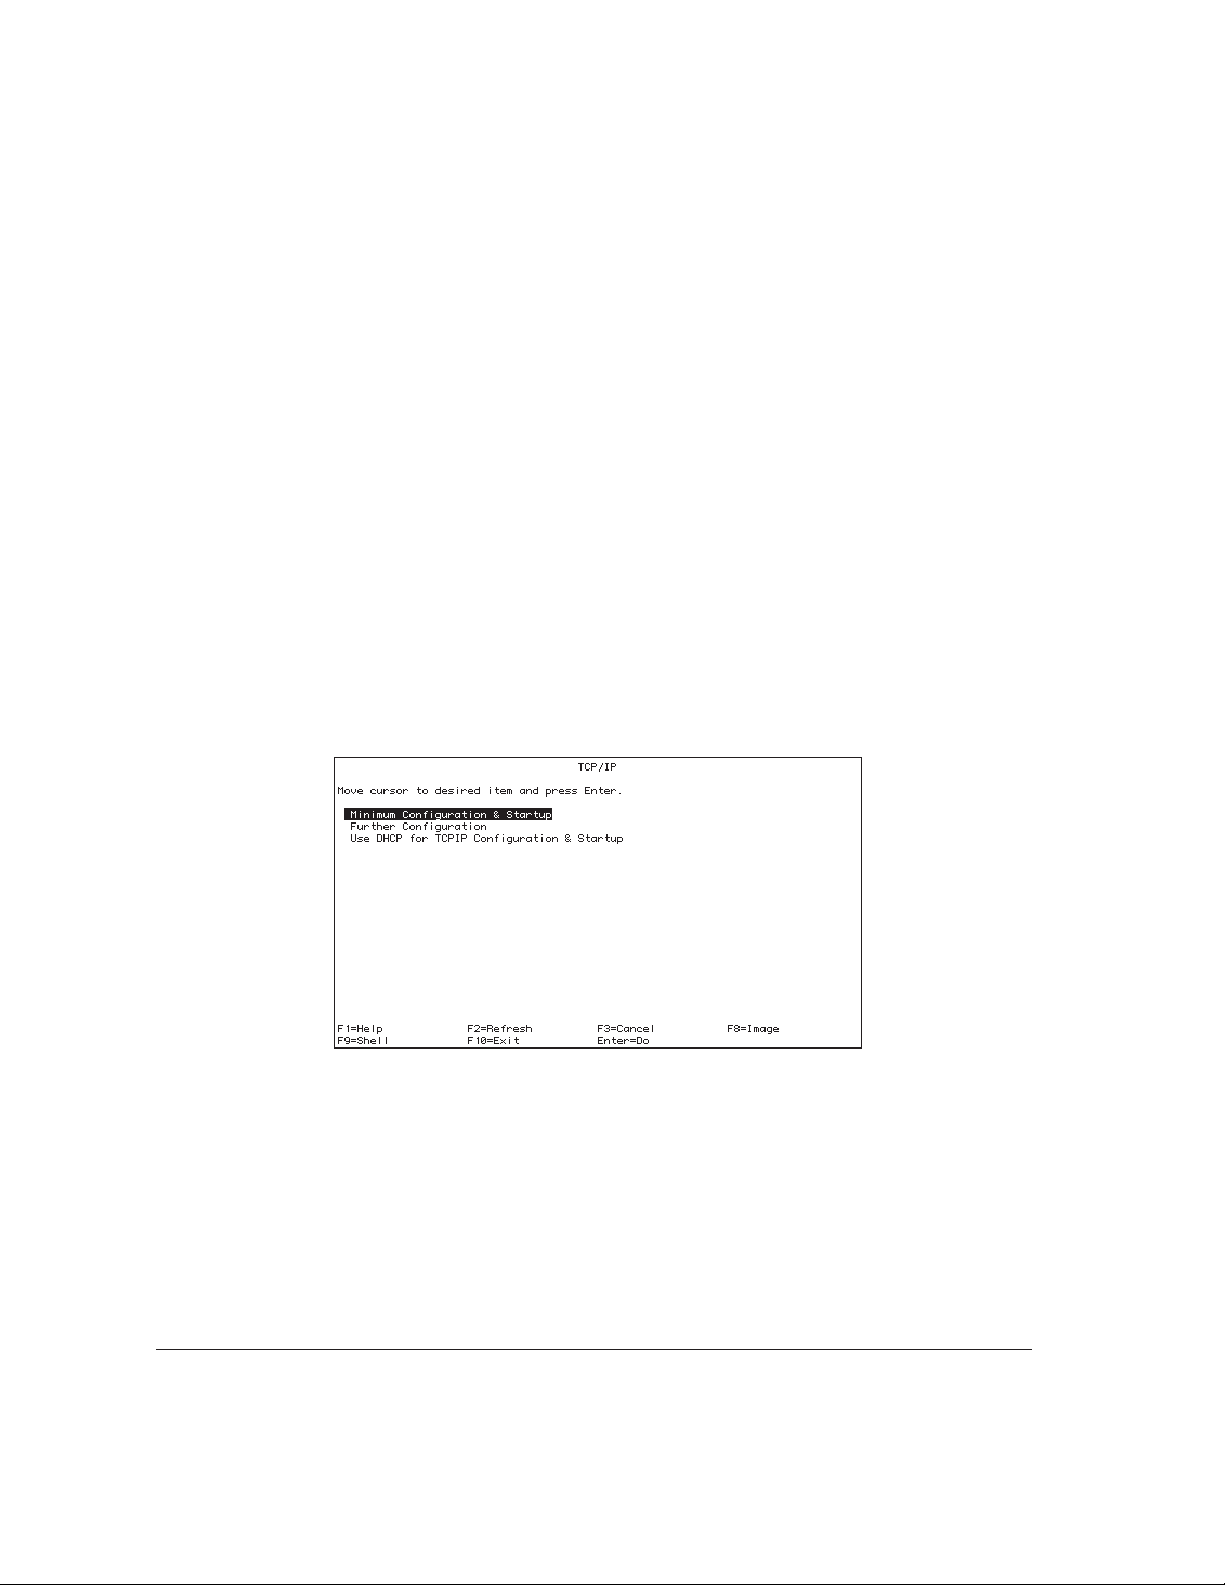
1At the AIX prompt, type the following command and press Return:
smitty tcpip
The TCP/IP configuration screen appears:
A24 Chapter 2 / Installing and Configuring the Device Driver Software
2Select Minimum Configuration & Startup and then press Return.
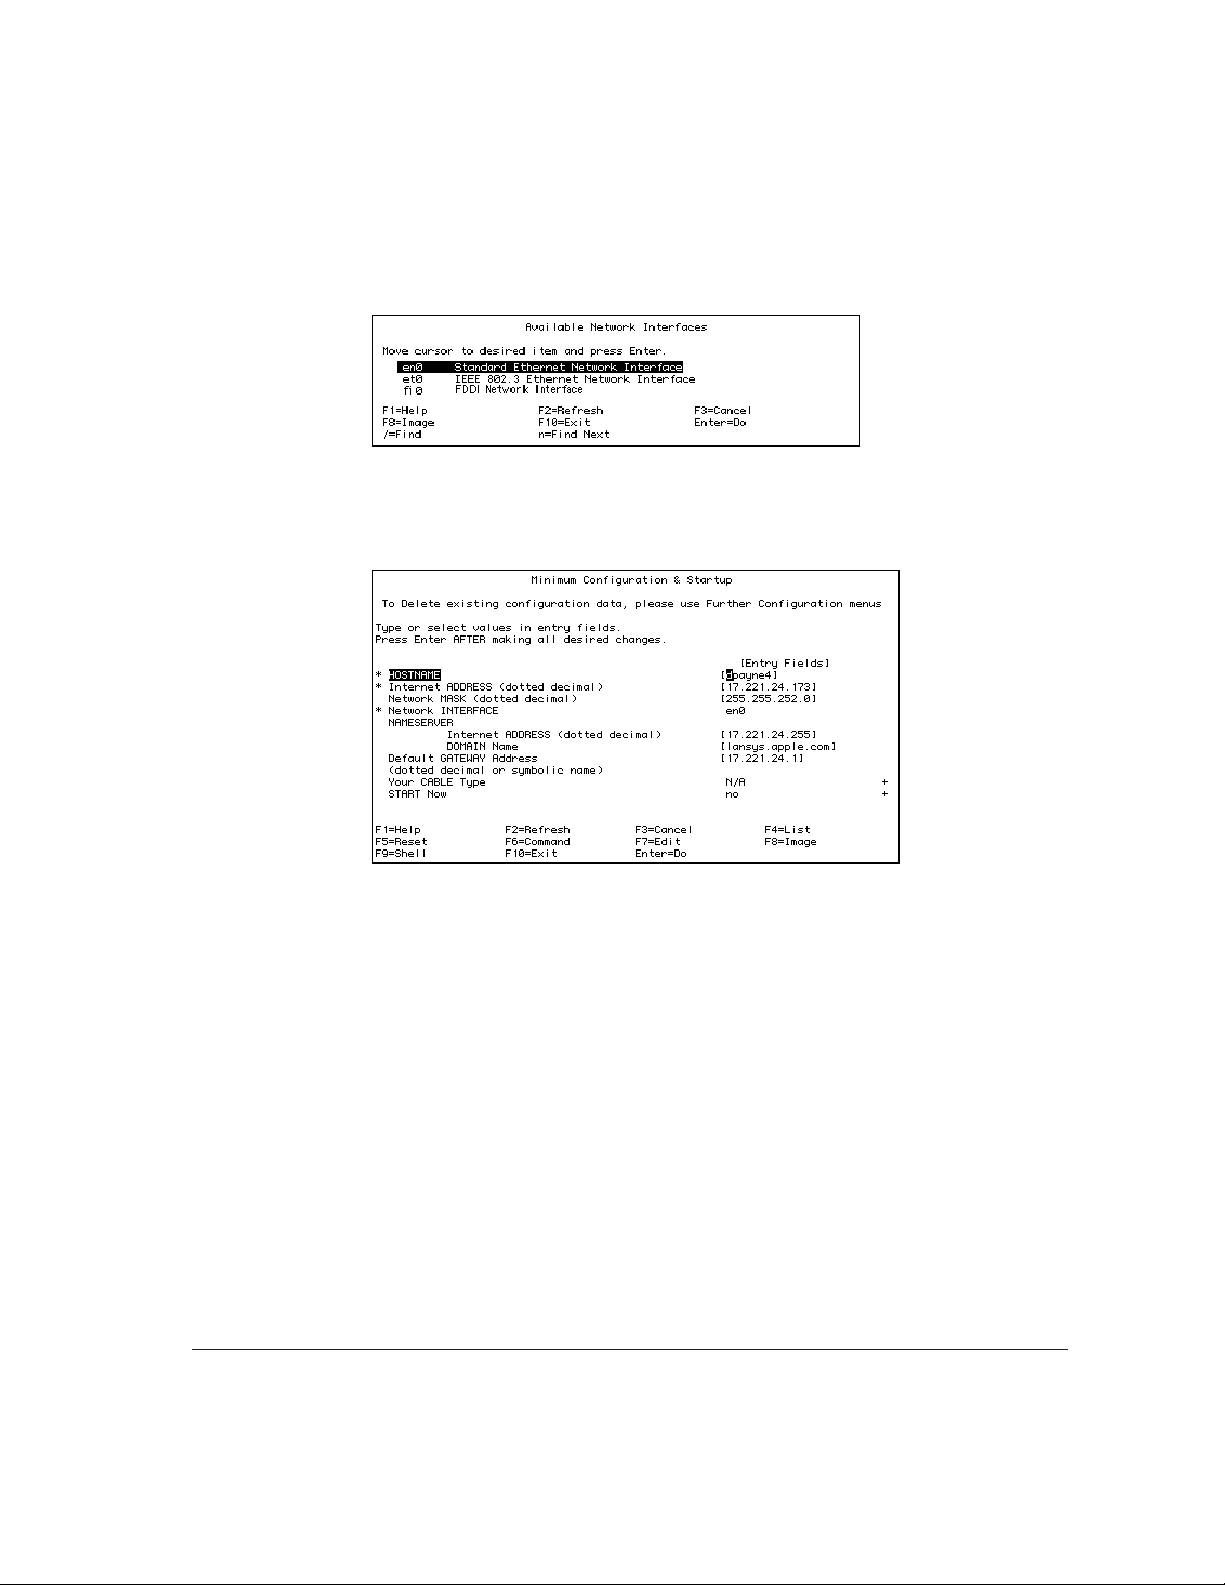
The Available Network Interfaces screen appears.
3Press fi0 and then press Return.
The Minimum Configuration & Startup screen appears.
4 Fill in or edit the entry fields in the Minimum Configuration & Startup screen.
Enter the name and IP address assigned to the FDDI card, the network mask,
the name and IP address of the appropriate domain name server, and the IP
address of the router or gateway the Network Server uses for network access.
If you are connecting more than one FDDI card to the server, each FDDI card
must have a unique IP address
5Press Return.
6Press f10 to exit SMITTY, and then reboot the Network Server.
Configuring the FDDI network interface A25


This chapter suggests possible solutions to common problems that may come
up while you’re using the Network Server with an Apple PCI Dual-Attached
FDDI Card. Try the suggestions in the order they are listed, until you resolve
the problem.
The chapter gives you information about using FDDI diagnostic routines.
Finally, the chapter includes information on obtaining service and support if
you encounter problems you can’t solve.
3 Troubleshooting and Diagnostics

Troubleshooting
AIX won’t boot.
1. Check to see that the system is plugged in and turned on
2. Check to see that the card you just installed is properly seated in the slot.
3. Try installing the card in a different PCI slot.
4. Remove the card and see if the system boots up and works normally.
5. Try installing another card that you know is good. If the problem continues,
see “Obtaining Service and Support,” later in this chapter.
A network application no longer works.
If an application worked prior to the installation of the card, there is probably a
hardware conflict. See “Obtaining Service and Support,” later in this chapter.
The Network Server card cannot connect to the ring or communicate with other hosts on
the network.
1. Make sure the card is seated correctly in the bus expansion slot.
2. Verify that both cables are properly connected, and that Ports A and B are
connected to the correct ports on their adjacent nodes.
3. Use a utility such as PING to test the Network Server’s ability to
communicate on the network.
4. Install the card in another PCI slot and try again.
5. Try installing another card that you know is good. If the problem continues,
see “Obtaining Service and Support,” later in this chapter.
A28 Chapter 3 / Troubleshooting and Diagnostics

Using FDDI diagnostic routines
A number of diagnostic routines were installed when you installed the FDDI
device driver software. To run these routines, use either SMIT or smitty to
open the AIX diagnostics utility. Complete information on AIX diagnostics
and on the AIX diagnostics utility is available through InfoExplorer. Chapter 5
of
Using AIX, AppleTalk Services, and Mac OS Utilities on the Apple Network
Server tells you how to access and use InfoExplorer.
Obtaining service and support
See the service and support information packaged with your Network Server
for phone numbers and other information that can help you solve problems
that may come up with your Apple PCI Dual-Attached FDDI Card.
Obtaining service and support A29

 Loading...