


Power Macintosh
User’s Manual
Includes setup, troubleshooting, and important health-related information for Power Macintosh 7600 series computers
K Apple Computer, Inc.
© 1996 Apple Computer, Inc. All rights reserved.
Under the copyright laws, this manual may not be copied, in whole or in part, without the written consent of Apple. Your rights to the software are governed by the accompanying software license agreement.
The Apple logo is a trademark of Apple Computer, Inc., registered in the U.S. and other countries. Use of the “keyboard” Apple logo (Option-Shift-K) for commercial purposes without the prior written consent of Apple may constitute trademark infringement and unfair competition in violation of federal and state laws.
Every effort has been made to ensure that the information in this manual is accurate. Apple is not responsible for printing or clerical errors.
Apple Computer, Inc. 1 Infinite Loop
Cupertino, CA 95014-2084 (408) 996-1010
Apple, the Apple logo, AppleScript, AppleShare, AppleTalk, GeoPort, ImageWriter, Inter•Poll, LaserWriter, LocalTalk, Macintosh, MacTerminal, PlainTalk, Power Macintosh, PowerTalk, QuickTime, and StyleWriter are trademarks of Apple Computer, Inc., registered in the U.S. and other countries.
AppleCD, Apple Desktop Bus, At Ease, AudioVision, Balloon Help, Chicago, Disk First Aid, eWorld, Finder, Macintosh PC Exchange, and QuickDraw are trademarks of Apple Computer, Inc.
Adobe and PostScript are trademarks of Adobe Systems Incorporated or its subsidiaries and may be registered in certain jurisdictions.
The Energy Star logo is a service mark of the U.S. Environmental Protection Agency.
Helvetica and Times are registered trademarks of Linotype-Hell AG and/or its subsidiaries.
NuBus is a trademark of Texas Instruments.
PowerPC and the PowerPC logo are trademarks of International Business Machines Corporation, used under license therefrom.
Simultaneously published in the United States and Canada.
Mention of third-party products is for informational purposes only and constitutes neither an endorsement nor a recommendation. Apple assumes no responsibility with regard to the performance or use of these products.

Contents
|
Communications regulation information |
vi |
|
|||||
Preface |
Welcome to Power Macintosh |
ix |
|
|
||||
|
|
|
|
|
|
|
|
|
Part I |
|
|
|
|
|
|
|
|
1 |
Getting Started |
1 |
|
|
|
|
|
|
|
Plugging in the computer |
3 |
|
|
|
|||
|
Installing an expansion card |
7 |
|
|
|
|||
|
Connecting a monitor |
7 |
|
|
|
|
||
|
Connecting the mouse and keyboard |
|
10 |
|
||||
|
Connecting other equipment |
12 |
|
|
|
|||
|
Turning the computer on |
12 |
|
|
|
|||
|
Problems turning your computer on? |
|
15 |
|
||||
|
What’s next? |
16 |
|
|
|
|
|
|
|
Learning the basics |
|
17 |
|
|
|
|
|
|
Reviewing the basics |
|
19 |
|
|
|
|
|
|
Saving energy with the Energy Saver control panel |
21 |
||||||
|
Turning the computer off |
23 |
|
|
|
|||
|
Where to find answers |
25 |
|
|
|
|||
iii

2 Getting Help |
27 |
|
|
Getting answers to your questions |
28 |
||
Identifying objects on the screen |
36 |
||
Learning useful shortcuts |
37 |
|
|
3 Connecting Additional Equipment |
39 |
||||
Your computer at a glance |
|
39 |
|
|
|
About your computer’s A/V panel |
42 |
|
|||
Connecting audio equipment |
42 |
|
|
||
Connecting video equipment |
48 |
|
|
||
Connecting external SCSI devices |
54 |
|
|||
Expanding memory |
57 |
|
|
|
|
Installing internal drives |
58 |
|
|
||
Connecting network cables |
|
59 |
|
|
|
4 Installing and Using Application Programs |
61 |
|||
Installing application programs |
61 |
|
|
|
Working with several programs at a time |
63 |
|
||
Backing up your files |
65 |
|
|
|
Using Power Macintosh application programs |
65 |
|||
5 Using the Optional CD-ROM Drive |
67 |
|
Inserting a CD-ROM disc |
68 |
|
Ejecting a CD-ROM disc |
69 |
|
Playing audio CDs 70 |
|
|
Working with Photo CDs |
71 |
|
Sharing a CD-ROM disc over a network |
72 |
|
iv Contents

Part II |
|
|
|
|
|
|
|
6 |
Troubleshooting |
75 |
|
|
|
|
|
|
When you have questions |
75 |
|
|
|
||
|
If you have trouble |
75 |
|
|
|
|
|
|
Solutions to common problems |
79 |
|
||||
|
Solutions to CD-ROM problems |
91 |
|
||||
|
If your computer’s performance decreases |
97 |
|||||
|
Solving printer problems |
98 |
|
|
|
||
|
Obtaining updated Apple software |
|
98 |
|
|||
|
Initializing a hard disk 103 |
|
|
|
|||
|
Repairing a damaged disk |
106 |
|
|
|
||
|
Installing or reinstalling system software |
110 |
|||||
|
Installing or reinstalling CD-ROM software |
119 |
|||||
|
|
|
|
|
|
|
|
Part III |
|
|
|
|
|
|
|
Appendix A Health, Safety, and Maintenance Tips |
123 |
||||||
|
Health-related information about computer use 123 |
||||||
|
Safety instructions |
128 |
|
|
|
|
|
|
Handling your computer equipment |
129 |
|
||||
|
Cleaning your equipment |
135 |
|
|
|
||
|
Locking and unlocking the mouse |
|
137 |
|
|||
Appendix B Installing an Expansion Card |
|
139 |
|
||||
|
Expansion card power requirements |
140 |
|
||||
|
Card installation |
140 |
|
|
|
|
|
|
Upgrading the processor |
150 |
|
|
|
||
Appendix C Special Keys on Your Keyboard |
151 |
|
|||||
|
Typing special characters and symbols 153 |
||||||
|
Special key combinations |
155 |
|
|
|
||
|
Index |
157 |
|
|
|
|
|
Contents v

Communications regulation information
FCC statement
This equipment has been tested and found to comply with the limits for a Class B digital device in accordance with the specifications in Part 15 of FCC rules. See instructions if interference to radio or television reception is suspected.
Radio and television interference
The equipment described in this manual generates, uses, and can radiate radio-frequency energy. If it is not installed and used properly—that is, in strict accordance with Apple’s instructions—it may cause interference with radio and television reception.
This equipment has been tested and found to comply with the limits for a Class B digital device in accordance with the specifications in Part 15 of FCC rules. These specifications are designed to provide reasonable protection against such interference in a residential installation. However, there is no guarantee that interference will not occur in a particular installation.
Note: If a 10BASE-T Ethernet connector is used, the system complies only with the FCC Part 15, Class A limits and the CISPR 22, Class A limits, and may not be used in a residential area.
You can determine whether your computer system is causing interference by turning it off. If the interference stops, it was probably caused by the computer or one of the peripheral devices.
If your computer system does cause interference to radio or television reception, try to correct the interference by using one or more of the following measures:
mTurn the television or radio antenna until the interference stops.
mMove the computer to one side or the other of the television or radio.
mMove the computer farther away from the television or radio.
mPlug the computer into an outlet that is on a different circuit from the television or radio. (That is, make certain the computer and the television or radio are on circuits controlled by different circuit breakers or fuses.)
If necessary, consult an Apple-authorized service provider or Apple. See the service and support information that came with your Apple product. Or, consult an experienced radio/television technician for additional suggestions.
IMPORTANT Changes or modifications to this product not authorized by Apple Computer, Inc., could void the FCC Certification and negate your authority to operate the product.
This product was tested for FCC compliance under conditions that included the use of Apple peripheral devices and Apple shielded cables and connectors between system components. It is important that you use Apple peripheral devices and shielded cables and connectors between system components to reduce the possibility of causing interference to radios, television sets, and other electronic devices. You can obtain Apple peripheral devices and the proper shielded cables and connectors through an Apple-authorized dealer. For non-Apple peripheral devices, contact the manufacturer or dealer for assistance.
vi Communications Regulation Information
DOC statement
DOC Class B Compliance This digital apparatus does not exceed the Class B limits for radio noise emissions from digital apparatus as set out in the interference-causing equipment standard entitled “Digital Apparatus,” ICES-003 of the Department of Communications.
Observation des normes—Classe B Cet appareil numérique respecte les limites de bruits radioélectriques applicables aux appareils numériques de Classe B prescrites dans la norme sur le matériel brouilleur : “Appareils Numériques”, NMB-003 édictée par le ministre des Communications.
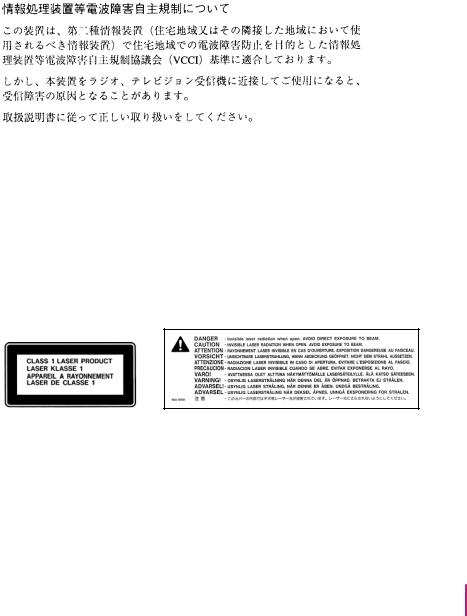
VCCI statement
CD-ROM drive
WARNING Making adjustments or performing procedures other than those specified in your equipment’s manual may result in hazardous exposure.
WARNING Do not attempt to disassemble the cabinet containing the laser. The laser beam used in this product is harmful to the eyes. The use of optical instruments, such as magnifying lenses, with this product increases the potential hazard to your eyes. For your safety, have this equipment serviced only by an Apple-authorized service provider.
If you have an internal Apple CD-ROM drive in your computer, your computer is a Class 1 laser product. The Class 1 label, located in a user-accessible area, indicates that the drive meets minimum safety requirements. A service warning label is located in a service-accessible area. The labels on your product may differ slightly from the ones shown here.
Class 1 label |
Service warning label |
Communications Regulation Information |
vii |

Welcome to Power Macintosh
Congratulations on the purchase of your new Macintosh. Your computer is designed to give you the highest performance combined with real ease of use—it’s easy to set up, easy to use, and easy to expand. This book will guide you through the setup procedure, tell you how to expand your Macintosh, and provide many tips on using your new system.
Your Macintosh computer is powered by the new † microprocessor (or “chip”). This microprocessor was designed by Apple Computer, Inc., Motorola, Inc., and IBM Corporation. The † microprocessor uses Reduced Instruction Set Computing (RISC) technology to deliver very high performance at the lowest possible cost. The † RISC microprocessor represents the state of the art in microprocessor design.
Your new Macintosh will run almost all your existing Macintosh software, but for best performance and greatest speed, look for the new software programs designed especially for Power Macintosh computers. You’ll find Power Macintosh programs at any software store that carries products for Macintosh.
ix

Chapter 1 |
Getting Started |
Chapter 2 |
Getting Help |
Chapter 3 |
Connecting Additional Equipment |
Chapter 4 |
Installing and Using Application Programs |
Chapter 5 |
Using the Optional CD-ROM Drive |
partI

Follow the instructions in this
chapter to set up your computer
and learn the basics.
1 Getting Started
The illustration on the next page shows all the equipment you will need to set up your computer and begin using it. (Note that your monitor and keyboard may look slightly different depending on what you purchased.)
Place your equipment on a sturdy, flat surface near a grounded wall outlet. (Your Power Macintosh was designed to be used and carried in the horizontal position, as shown on the next page—it should not be used tipped on its side.) You may place monitors weighing up to 70 pounds (31.75 kilograms) on top of the computer.
Before following the setup instructions in this chapter, you may want to read “Arranging Your Office” in Appendix A (in the section on health-related information) for tips on adjusting your work furniture so that you’re comfortable when using the computer.
1

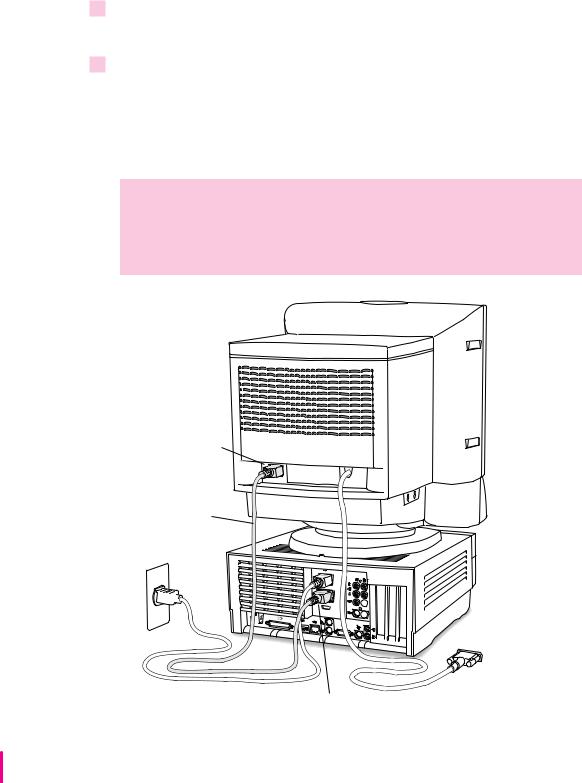
Macintosh computer
Monitor
Keyboard cable
(sometimes built into the keyboard as shown here)
Keyboard
Mouse
|
Monitor cable |
Apple PlainTalk Microphone (optional) |
(sometimes built into the monitor) |
Monitor power cord
Computer power cord |
(sometimes built into the monitor) |
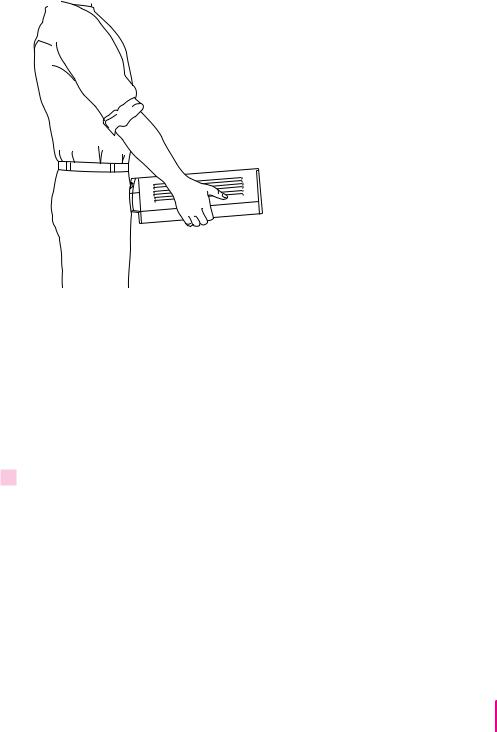
IMPORTANT When picking up your computer, be sure to grasp it by the sides. Grasping it by the front or back can cause the computer’s cover to lift off.
When lifting or carrying the computer, always grasp it by the sides, as shown. Do not lift or carry the computer by grasping the front and back.
Plugging in the computer
Before you plug your Macintosh into a wall socket, carefully read all the setup instructions in this chapter. Then, before you connect anything to your Macintosh, follow the instructions in this section to plug it in. The plug grounds the computer and protects it from electrical damage while you are setting up. When you are ready to begin, follow these steps:
1Make sure the voltage switch on the back of the computer is set for the kind of voltage system to which you will be connecting.
The voltage switch must be set correctly to avoid damaging your computer. If you don’t know the voltage used in the country you’re in, refer to the table “Voltages for Different Locations” later in this chapter.
Getting Started |
3 |
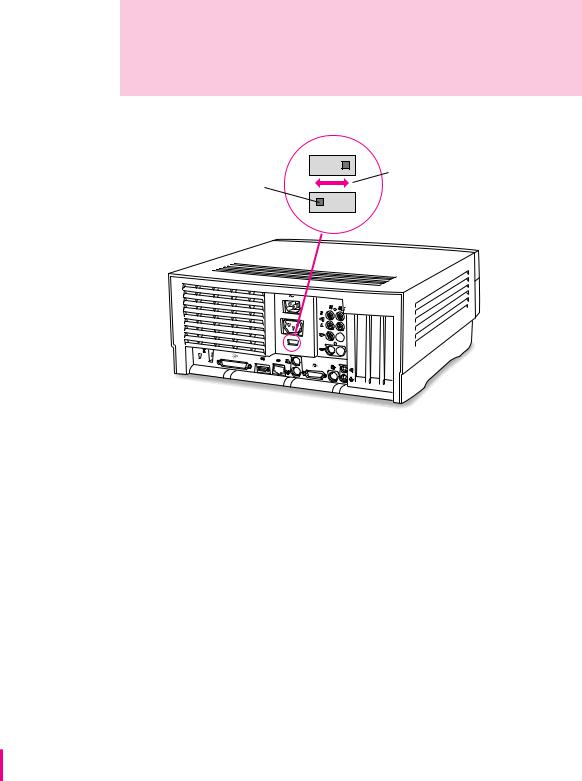
WARNING Setting the correct voltage for your computer does not set the voltage for your monitor even if the monitor’s power cord is connected directly to your computer. To protect your monitor, be sure to use the appropriate adapter or voltage converter, if one is necessary.
Check to see that the voltage switch on the back of your computer is properly set before you plug it in.
If you need to change the setting, insert a small screwdriver here and slide the switch.
Set the switch to show “115” for voltages in the 100–130V range. Set the switch to show “230” for voltages in the 200–270V range.
4 Chapter 1

Voltages for different locations
Country |
Single voltage |
Japan |
100 |
South Korea |
100/220 |
Jamaica, Taiwan |
110 |
Peru |
110/220 |
Brazil, Lebanon |
110–220 |
Philippines |
115 |
Bermuda, Canada, Puerto Rico, United States, Venezuela |
120 |
Mexico |
127 |
Saudi Arabia |
127/220 |
Hong Kong |
200 |
India, South Africa |
220–250 |
Israel, Pakistan, Singapore |
230 |
Australia, Kuwait, Malta, New Zealand, Northern Ireland, |
|
Papua New Guinea, Oman, Qatar, United Kingdom |
240 |
Austria, Belgium, Denmark, Finland, France, Germany, Greece, |
|
Italy, Luxembourg, Netherlands, Norway, Portugal, Spain, |
|
Sweden, Switzerland |
220–230 |
Bahrain, Chile, China (People’s Republic), Czechoslovakia, |
|
Egypt, Greenland, Hungary, Iceland, Indonesia, Iran, Jordan, |
|
Liechtenstein, Nepal, Paraguay, Poland, Romania, |
|
United Arab Emirates, Russia and the Commonwealth of |
|
Independent States (CIS), Yemen, Yugoslavia |
220 |
|
|
|
|
Getting Started |
5 |
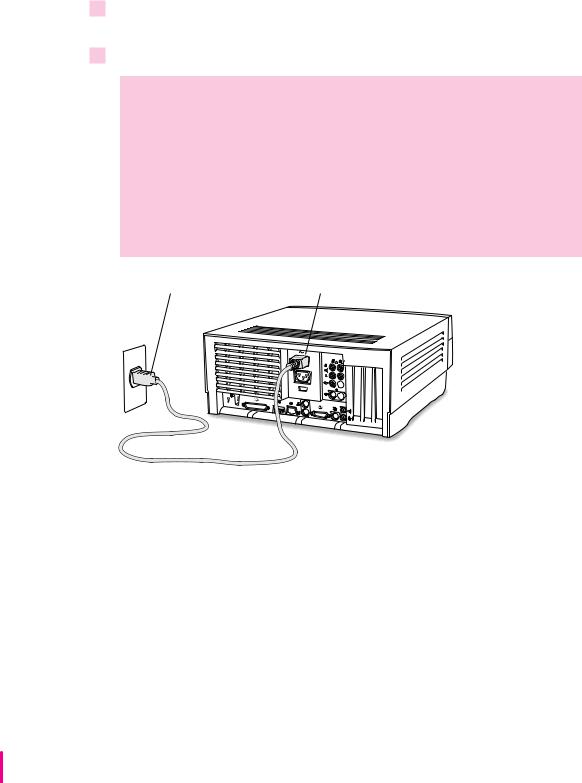
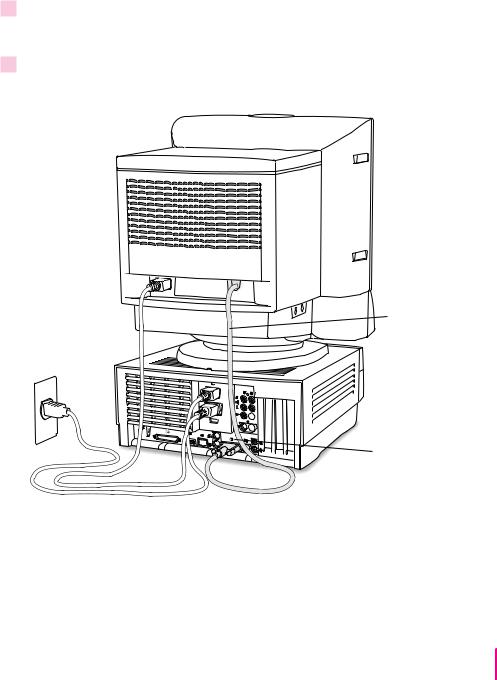
2Plug the socket end of the computer’s power cord into the recessed power socket (marked with the symbol ≤) on the back of the computer.
3Plug the other end of the power cord into a three-hole grounded outlet or power strip.
WARNING Be sure to set the voltage switch on the back of your computer for the voltage system to which you’re connecting the computer.
This equipment is intended to be electrically grounded. Your Macintosh is equipped with a three-wire grounding plug—a plug that has a third (grounding) pin. This plug will fit only a grounded AC outlet. This is a safety feature. If you are unable to insert the plug into the outlet, contact a licensed electrician to replace the outlet with a properly grounded outlet. Do not defeat the purpose of the grounding plug!
Power cord plug |
Power cord socket |
IMPORTANT The only way to disconnect power completely is to unplug the power cord. Make sure that at least one end of the power cord is within easy reach so that you can unplug the computer when you need to.
6 Chapter 1

Installing an expansion card
If you purchased a PCI expansion card for your Macintosh, install it now. (See Appendix B, “Installing an Expansion Card,” for instructions.)
If you don’t have to install an expansion card, go on to the next section, “Connecting a Monitor.”
Connecting a monitor
You can connect many types of monitors to your Macintosh computer, including most standard monitors. See the Technical Information booklet that came with your computer for a complete list.
This section contains instructions on connecting most types of monitors. Monitors from manufacturers other than Apple may require adapters for their monitor cables and power cords. If you are connecting a non-Apple monitor, also refer to the instructions that came with the monitor.
Connecting the monitor power cord
Monitors have two cords to connect: a power cord and a monitor cable. To connect the monitor power cord, follow these steps:
1Place the monitor on top of the computer.
Keep these considerations in mind:
m You can place monitors weighing up to 70 lbs. (31.75 kg) on top of the computer.
m Allow a few inches for air circulation around the computer and monitor.
m Make sure that the top of the screen is slightly below eye level when you’re sitting at the keyboard.
m Position the monitor to minimize glare and reflections on the screen from overhead lights and windows.
For further suggestions about locating your computer equipment, consult “Arranging Your Office” in Appendix A (in the section on health-related information).
Getting Started |
7 |
2Connect the monitor power cord to the monitor.
On some monitors, the cord is already attached.
3Plug in the monitor power cord.
Some monitor power cords are designed to plug into the back of your computer.
Some monitor power cords must be connected to a grounded electrical outlet, not to the computer. Check the information that came with the monitor.
WARNING Setting the correct voltage for your computer does not set the voltage for your monitor even if the monitor’s power cord is connected directly to your computer. To protect your monitor, be sure to use the appropriate adapter or voltage converter, if one is necessary.
Monitor power socket
Monitor power cord
Monitor power socket
8 |
Chapter 1 |
Connecting the monitor cable
After you plug in the monitor power cord, you connect the monitor cable to the computer’s monitor port.
To connect the monitor cable, follow these steps:
1Attach the monitor cable to the monitor.
On some monitors, the cable is already attached.
2Attach the monitor cable to the monitor port on the back panel of the computer.
See the information that came with the monitor to use its special features.
Monitor cable
™ Monitor port
Getting Started |
9 |
Connecting the mouse and keyboard
You have a choice of several keyboards for your Macintosh. The way you connect the mouse and keyboard depends on whether the keyboard has a separate cable or a built-in cable.
Connecting a keyboard with a built-in cable
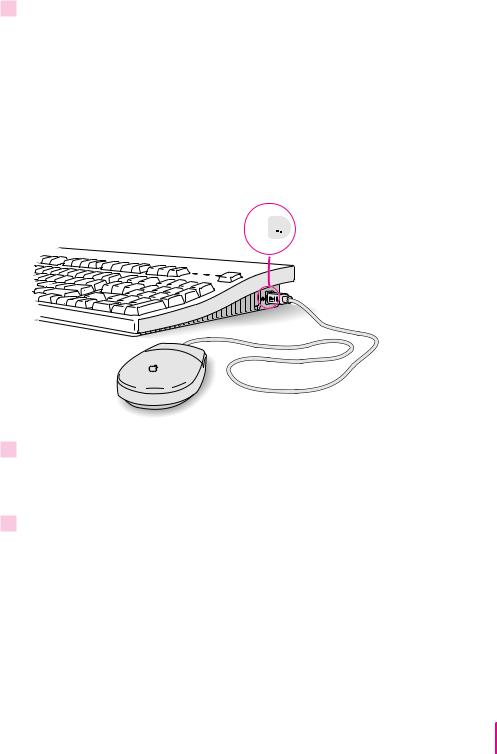
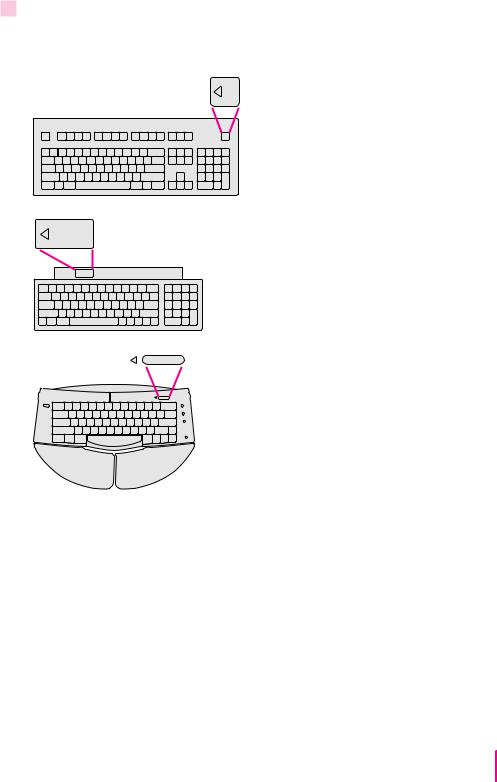
1Plug the mouse cable into the recessed port on the back of the keyboard.
The plug and the port are marked with the ◊ icon (symbol). The positions of the port and icon on your keyboard may be different from those pictured.
By the way: A port marked with the ◊ icon is called an Apple Desktop Bus (ADB) port.
Plug the mouse cable into the recessed port on the keyboard. The flat part of the plug should be pointing down, as shown here.
This cable plugs into the Apple Desktop Bus (ADB) port, marked with the ◊ icon, on the back of the computer.
2Plug the keyboard cable into the port marked with the ◊icon on the back of the computer.
Some monitors have a port to which you can connect the keyboard or mouse. See the information that came with your monitor.
10 Chapter 1
Connecting a keyboard with a separate cable
1Plug the mouse cable into the port on either side of the keyboard.
Most right-handed people prefer to use the mouse with their right hand; most left-handed people prefer to use their left hand. Plug the mouse into the port on the side you prefer.
The plug and the port are marked with the ◊ icon (symbol). Align the symbols before you insert the plug. (The positions of the port and icon on your keyboard may be different from those pictured here.)
By the way: A port marked with the ◊ icon is called an Apple Desktop Bus (ADB) port.
ADB icon 


2Plug the keyboard cable (both ends are the same) into the other port on the keyboard.
If you plugged the mouse cable in on the right, for example, plug the keyboard cable in on the left.
3Plug the keyboard cable into the port marked with the ◊icon on the back of the computer.
Some monitors have a port to which you can connect the keyboard or mouse. See the information that came with your monitor.
Getting Started |
11 |

Connecting other equipment
If you are new to the Macintosh, it’s a good idea to get some experience using your computer before you connect other equipment, such as a printer or scanner. To learn basic Macintosh skills, continue with the instructions in this chapter.
When you’re ready to connect other equipment to your Macintosh, see the instructions in Chapter 3.
Turning the computer on
WARNING Setting the correct voltage for your computer does not set the voltage for your monitor even if the monitor’s power cord is connected directly to your computer. To protect your monitor, be sure to use the appropriate adapter or voltage converter, if one is necessary.
To turn on the computer for the first time, follow these steps:
1Turn on your monitor.
See the information that came with your monitor for the location of the power switch. On Apple monitors, the power switch is usually located on the front of the unit.
By the way: When the monitor is plugged into the computer, you only need to turn on the monitor once. From now on, the monitor will turn off automatically when you shut down the computer, and it will turn on
automatically when you start up the computer. (If the monitor is not plugged into the computer, it must be turned on separately each time you turn on the computer.)
12 Chapter 1
2Turn on your computer by pressing the Power key on the keyboard.
The Power key is marked with a triangle. Its location depends on which keyboard you have.
You hear a tone from the computer as it starts up.
Getting Started |
13 |
3Check to see what’s on your screen.
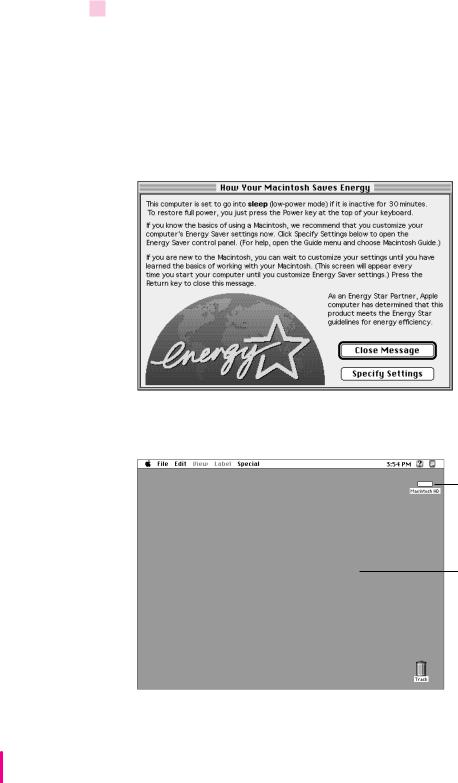
You’ll see a sequence of messages describing what is happening, followed by the Energy Star dialog box.
m If you’re a beginning Macintosh user, press the Return key.
m If you’re an experienced Macintosh user, you may want to set your energysaving options now (refer to the information about saving energy in Macintosh Guide, available in the Guide [h] menu, and “Saving Energy With the Energy Saver Control Panel” later in this chapter).
mIf, when you press Return, you see the Macintosh desktop (shown here), your system software is already set up correctly.
Hard disk icon
Macintosh desktop
14 Chapter 1

Skip now to “What’s Next?”
mIf you see a blinking question mark, see “Solutions to Common Problems” in Chapter 6.
mIf you see anything else on your screen, or if you see nothing at all, see the section “Problems Turning Your Computer On?” later in this chapter.
Note: To save energy, your computer is automatically set to put itself to sleep if you haven’t used it for 30 minutes or more (the screen dims). If your computer attempts to go to sleep while you’re setting it up, simply press a key on the keyboard to “wake it up.”
Problems turning your computer on?
If you don’t see anything on the screen, check these items to see if you can identify the problem:
mIs the computer plugged into a power source? If it is plugged into a power strip, is the power strip turned on?
mIs the computer turned on? The power-on light on the front panel should be on. If it isn’t on, press the power button (marked with the symbol I), also on the front panel.
mAre the keyboard and mouse cables connected correctly? (Don’t connect or disconnect the keyboard or mouse cable while the computer is on. You could damage your equipment.)
mIs the monitor power cord plugged in?
mIs the monitor cable attached firmly to both the monitor and computer?
mIs the monitor turned on? (Check the power-on light on the front of the monitor.)
mIs the brightness control on the monitor adjusted correctly? (On most monitors, the brightness control is marked with the symbol ¤.)
mIs the computer asleep? (Press a key on the keyboard to wake the computer. It may take a moment or two for the computer to wake up.)
Getting Started |
15 |

What’s next?
You’ve finished setting up your computer. Continue with one of the following steps:
mIf you are new to the Macintosh, turn to the next section, “Learning the Basics.” When you’ve learned the basic Macintosh skills, turn to the section “Saving Energy With the Energy Saver Control Panel” to learn how to set energy-saving options for your computer.
mIf you are an experienced Macintosh user, turn to the section “Saving Energy With the Energy Saver Control Panel” later in this chapter to learn how to set energy-saving options for your computer. Then turn to Chapter 2, “Getting Help,” to learn about Macintosh Guide, your main source of information when you’re working with the Macintosh.
mIf you want to connect additional equipment, such as a microphone, to your computer, see Chapter 3, “Connecting Additional Equipment,” for instructions.
mIf you want to install application software on your computer, see Chapter 4, “Installing and Using Application Programs,” for information on setting up your programs. You’ll need this information to properly set up any software programs specifically designed for Power Macintosh computers.
IMPORTANT If you need to turn off your computer at any point, please see “Turning the Computer Off” later in this chapter. It is very important to use the correct procedure for shutting down your Macintosh before turning it off.
16 Chapter 1
Learning the basics
If you are new to the Macintosh, you should begin by looking at the easy-to-use program called the Macintosh Tutorial. The tutorial teaches you the basic skills you’ll need to use your computer. To start the tutorial, follow these steps:
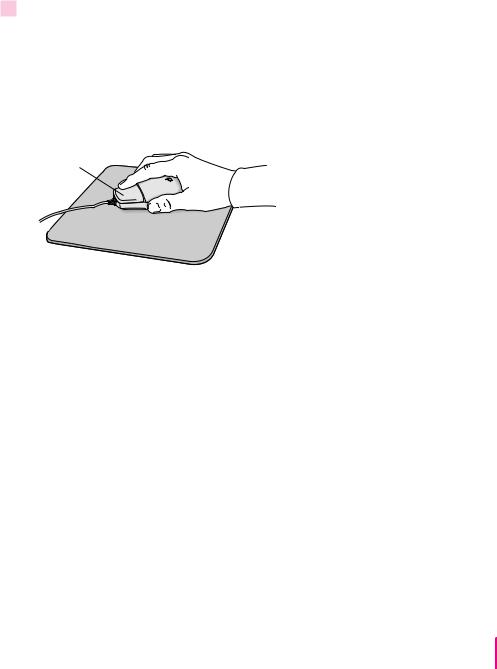
1Slide your mouse along your mouse pad or desk.
Hold the mouse as shown, with the cable pointing away from you. Rest the heel of your palm on the desk and grasp the sides of the mouse between your thumb and fingers. Use your wrist and fingers to slide the mouse around with the index finger resting on the mouse button. Don’t press the mouse button (under your index finger). Notice that the arrow (8) on the screen moves in the same direction that you move the mouse.
Mouse button
If the arrow doesn’t move, make sure that the cables connecting the mouse and keyboard are secure and that your mouse is positioned as shown in the illustration.
Getting Started |
17 |
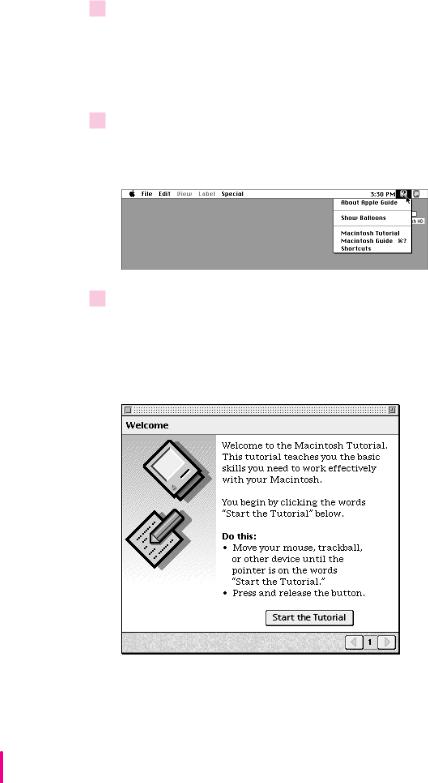
2Move the tip of the arrow (8) to the question mark (h) in the upper-right portion of the screen.
If you run out of room on your mouse pad or desk while moving the mouse, pick up the mouse and place it where there’s more room. (The arrow on the screen moves only when the mouse is in contact with the mouse pad or desk.)
3With the tip of the arrow on the question mark, press and hold down the mouse button.
A list of choices (called a menu) appears. This is the Guide (h) menu, which is the place to go when you have a question about how to use your computer.
4While holding down the mouse button, move the arrow until the words “Macintosh Tutorial” are highlighted, then release the mouse button.
A window appears welcoming you to the tutorial. You can set this book aside for now and follow the instructions on the screen. When you have completed the tutorial, return to this book.
18 Chapter 1
Reviewing the basics
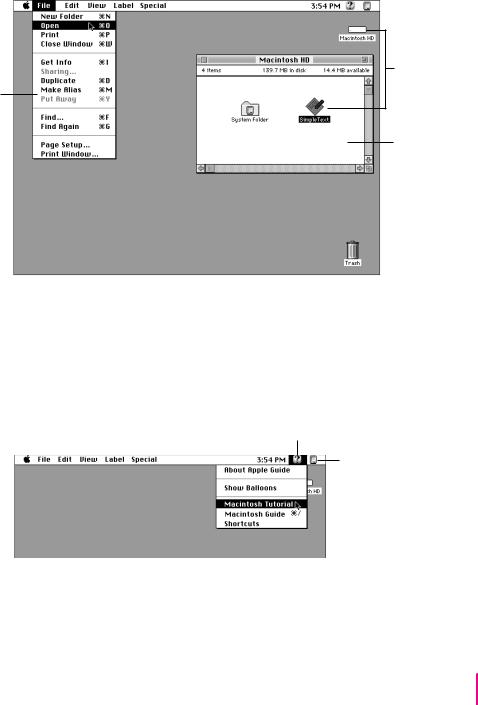
You can use the following illustrations to review the elements you use on your screen to do work with your computer.
Icons
Menu
Window
Menus
The strip across the top of the screen is called the menu bar. The symbols and words in it represent menus of commands. To open a menu, place the pointer on the symbol or word for the menu and press the mouse button.
Guide menu
To find an answer to a question, look in the Guide (h) menu.
Application menu
You can have several application programs open at once. To see which program is active or to switch from one program to another, use this menu (called the Application menu).
Getting Started |
19 |
 Loading...