


 Loading...
iPad
User Guide
For iOS 4.3 Software

Contents
9 Chapter 1: At a Glance
9Overview
10Buttons
12Micro-SIM Card Tray
13Home Screen
17Multi-Touch Screen
18Onscreen Keyboard
23 Chapter 2: Getting Started
23What You Need
24Setting Up iPad
24 Syncing with iTunes
29 Connecting to the Internet
31 Adding Mail, Contacts, and Calendar Accounts
33 Disconnecting iPad from Your Computer
33 Viewing the User Guide on iPad
33 Battery
35Using and Cleaning iPad
36Chapter 3: Basics
36Using Apps
40Printing
42Searching
43Using Bluetooth Devices
44File Sharing
45Using AirPlay
46Security Features
47 Chapter 4: Safari
47 About Safari
47 Viewing Webpages
50Searching the Web
51Bookmarks
52Web Clips
2
53 Chapter 5: Mail
53 About Mail
53Setting Up Email Accounts
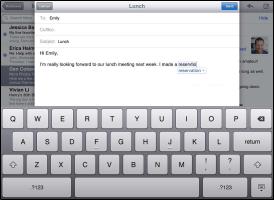
54Sending Email
55Checking and Reading Email
58Searching Email
59Printing Messages and Attachments
59Organizing Email
60 Chapter 6: Camera
60About Camera
61Taking Photos and Recording Videos
62Viewing and Sharing Photos and Videos
62Trimming Videos
62Uploading Photos and Videos to Your Computer
63Chapter 7: FaceTime
63About FaceTime
64Signing In
65Making a FaceTime Call
65While You’re Talking
66Chapter 8: Photo Booth
66About Photo Booth
66Selecting an Effect
67Taking a Photo
67Viewing and Sharing Photos
68Uploading Photos to Your Computer
69Chapter 9: Photos
69 About Photos
69Syncing Photos and Videos with Your Computer
70Importing Photos and Videos from iPhone or a Digital Camera
70Viewing Photos and Videos
73Sharing Photos
75Assigning a Photo to a Contact
75Printing Photos
75Wallpaper and Lock Screen Photos
76Using Picture Frame
77 Chapter 10: Videos
77About Videos
78Playing Videos
78 Controlling Video Playback
Contents |
3 |
|
|
79Syncing Videos
80Watching Rented Movies
80Watching Videos on a TV
80Deleting Videos from iPad
81Chapter 11: YouTube
81Finding and Viewing Videos
83Controlling Video Playback
84Managing Videos
84Watching YouTube on a TV
85 Chapter 12: Calendar
85About Calendar
85Syncing Calendars
86Adding, Editing, and Deleting Calendar Events
86Viewing Your Calendars
88Searching Calendars
88Subscribing to Calendars
89Responding to Meeting Invitations
90Importing Calendar Files from Mail
90Alerts
91 Chapter 13: Contacts
91About Contacts
92Syncing and Adding Contacts
92Searching Contacts
93Managing Contacts
93Using Contact Information
94Unified Contacts
95Chapter 14: Notes
95Writing and Reading Notes
96Searching Notes
96Emailing Notes
96Syncing Notes
97Chapter 15: Maps
97About Maps
97Finding and Viewing Locations
102Getting Directions
103Showing Traffic Conditions
103Finding and Contacting Businesses
104Sharing Location Information
4 |
Contents |
|
|
105 Chapter 16: iPod
105 Adding Music and More to iPad
105 Playing Music and Other Audio
109 Using Playlists
112 Home Sharing
112Transferring Content
113Chapter 17: iTunes Store
113About the iTunes Store
113Transferring Content
114Finding Music, Videos, and More
114Following Artists and Friends
115Purchasing Music or Audiobooks
116Purchasing or Renting Videos
117Listening to or Watching Podcasts
117Checking Download Status
118Syncing Content
118Viewing Apple ID Information
118Verifying Purchases
119Chapter 18: App Store
119About the App Store
120Browsing and Searching
120Getting More Information
121Buying Apps
121Using Apps
122Updating Apps
122Writing Reviews
123Deleting Apps
123Syncing Purchases
124Chapter 19: iBooks
124About iBooks
125Syncing Books and PDFs
125Using the iBookstore
126Reading Books
127Reading PDFs
127Changing a Book’s Appearance
128Searching Books and PDFs
128Looking up the Definition of a Word
128Having a Book Read to You
128Printing or Emailing a PDF
129Organizing the Bookshelf
Contents |
5 |
|
|
130 Chapter 20: Game Center
130 About Game Center
130 Setting Up Game Center
132 Games
134Friends
135Your Status and Account Information
136Parental Controls
137Chapter 21: Accessibility
137Universal Access Features
138VoiceOver
148Zoom
149Large Text
149White on Black
149Mono Audio
149Speak Auto-Text
150Triple-Click Home
150Closed Captioning and Other Helpful Features
151Chapter 22: Settings
151About Settings
151Airplane Mode
152VPN
152Wi-Fi
153Notifications
153Location Services
154Carrier
154 Cellular Data
154Brightness & Wallpaper
155Picture Frame
155 |
General |
163 |
Mail, Contacts, Calendars |
166 |
Safari |
168iPod
168Video
169Photos
169FaceTime
170Notes
170Store
171Appendix A: iPad in the Enterprise
171iPad at Work
171Using Configuration Profiles
6 |
Contents |
|
|
172Setting Up Microsoft Exchange Accounts
172VPN Access
173LDAP and CardDAV Accounts
174Appendix B: International Keyboards
174Adding Keyboards
174Switching Keyboards
175Chinese
177Japanese
177Korean
177Vietnamese
178Creating Dictionaries
179Appendix C: Tips and Troubleshooting
179Tips and Troubleshooting
180iTunes and Syncing
181Backing Up iPad
182Updating and Restoring iPad Software
184Safari, Mail, and Contacts
185Sound, Music, and Video
187FaceTime
188iTunes Store and App Store
188Restarting and Resetting iPad
188iPad Still Doesn’t Respond After Reset
188Safety, Service, and Support Information
189Disposal and Recycling Information
189Apple and the Environment
190 Index
Contents |
7 |
|
|
At a Glance |
1 |
|
|
|
|
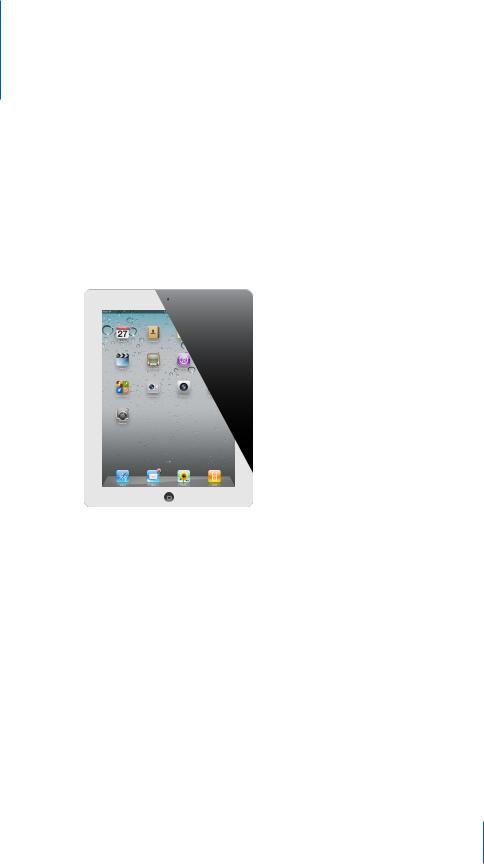
Read this chapter to learn about iPad features, how to use the controls, and more.
Overview
Status bar |
Front |
camera |
App icons
Multi-Touch screen
Home |
|
|
|
|
|
|
|
|
|
|
|
|
|
|
|
|
|
|
|
Sleep/Wake |
Microphone |
|
|
Headphone |
|||
|
|
|
|
|
|
|
|
|
|
||||
Back |
|
|
|
|
|
|
jack |
||||||
|
|
|
|
|
|
||||||||
camera |
|
|
|
|
|
|
Micro-SIM tray |
||||||
|
|
|
|||||||||||
Side Switch |
|
|
|
|
|
|
|
|
|
||||
|
|
|
|
|
|
|
|
||||||
|
|
|
|
|
|
|
(on some models) |
||||||
Volume |
|
|
|
|
|
|
|
|
|
|
|||
|
|
|
|
|
|
|
|
|
|
||||
|
|
|
|
|
|||||||||
buttons |
|
|
|
||||||||||
|
|
|
|
|
|
Speaker |
|
Dock connector |
|
|
|
|||
9
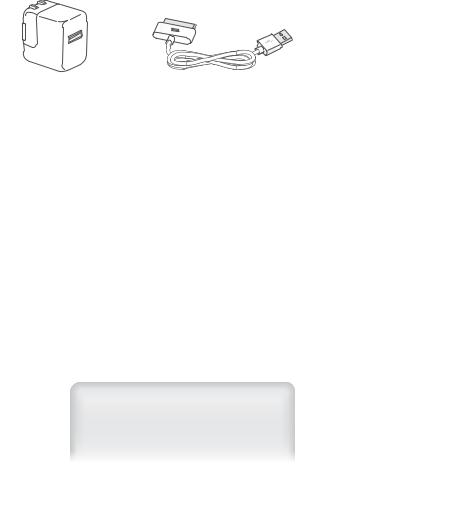
Accessories
10W USB Power Adapter |
Dock Connector to USB Cable |
|
|
Item |
What you can do with it |
|
|
10W USB power adapter |
Use the 10W USB power adapter to provide power to iPad |
|
and charge the battery. |
|
|
Dock Connector to USB Cable |
Use this cable to connect iPad to your computer to sync, |
|
or to the 10W USB power adapter to charge. Use the cable |
|
with the optional iPad Dock, or plug it directly into iPad. |
|
|
Buttons
A few simple buttons make it easy to turn iPad on and off and adjust the volume.
Sleep/Wake Button
You can lock iPad by putting it to sleep when you’re not using it. When you lock iPad, nothing happens if you touch the screen, but music continues playing and you can use the volume buttons.
Sleep/Wake  button
Lock iPad |
Press the Sleep/Wake button. |
|
|
Unlock iPad |
Press the Home button or the Sleep/Wake button, |
|
then drag the slider. |
|
|
Turn iPad off |
Press and hold the Sleep/Wake button for a few seconds |
|
until the red slider appears, then drag the slider. |
|
|
Turn iPad on |
Press and hold the Sleep/Wake button until the Apple |
|
logo appears. |
|
|
If you don’t touch the screen for a minute or two, iPad locks automatically. To change this, see “Auto-Lock” on page 157. If you want to require a passcode to unlock iPad, see “Passcode Lock” on page 157.
10 |
Chapter 1 At a Glance |
|
|
You can use the iPad Smart Cover, available separately, to automatically unlock iPad 2 when you open the cover and lock iPad 2 when you close it. See “iPad Cover Lock/Unlock” on page 158.
Volume Buttons
Use the volume buttons to adjust the audio volume of songs and other media, and of alerts and sound effects.
Side
Switch 

Volume  buttons
Increase the volume |
Press the Volume Up button. To set a volume limit for |
|
music and other media, in Settings, choose iPod > Volume |
|
Limit. |
|
|
Decrease the volume |
Press the Volume Down button. |
|
|
Mute the sound |
Press and hold the Volume Down button to mute audio or |
|
video playback. |
|
|
Suppress notifications and |
Slide the Side Switch down to mute notifications and |
sound effects |
sound effects.This switch doesn’t mute audio or video |
|
playback. See “Sounds” on page 156. |
|
|
You can also use the Side Switch to lock the screen rotation. In Settings, choose General > Use Side Switch…, then tap Lock Rotation. See “Side Switch” on page 160.
WARNING: For important information about avoiding hearing loss, see the iPad Important Product Information Guide at support.apple.com/manuals/ipad.
Chapter 1 At a Glance |
11 |
|
|
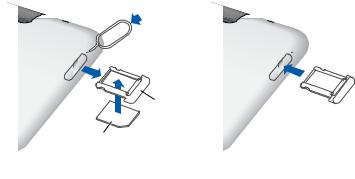
Micro-SIM Card Tray
The micro-SIM card in some iPad Wi-Fi + 3G models is used for cellular data. It’s also known as a third form factor (or 3FF) SIM. If your micro-SIM card wasn’t preinstalled or if you change cellular data carriers, you may need to install or replace the micro-SIM card.
 SIM eject tool


 SIM tray
Micro-SIM card
Open the SIM tray:
1Insert the tip of the SIM eject tool into the hole on the SIM tray.
Press firmly and push the tool straight in until the tray pops out. If you don’t have a SIM eject tool, you can use the end of a paper clip.
2Pull out the SIM tray to install or replace the micro-SIM card.
For more information, see “Joining a Cellular Data Network ” on page 30.
12 |
Chapter 1 At a Glance |
|
|
Home Screen
Press the Home  button at any time to go to the Home screen, which contains your iPad apps. Tap any icon to open the app.
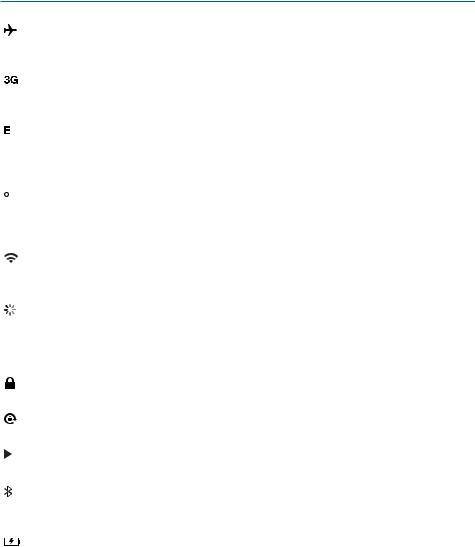
Status Icons
The icons in the status bar at the top of the screen give information about iPad:
|
Status icon |
What it means |
|
|
|
|
|
|
|
Airplane mode |
Shows that airplane mode is on—you can’t access the |
|
|
|
Internet, or use Bluetooth® devices. Non-wireless features |
|
|
|
are available. See “Airplane Mode” on page 151. |
|
|
|
|
|
|
3G |
Shows that your carrier’s 3G network (iPad Wi-Fi + 3G) is |
|
|
|
available, and you can connect to the Internet over 3G. |
|
|
|
See “Connecting to the Internet” on page 29. |
|
|
|
|
|
|
EDGE |
Shows that your carrier’s EDGE network (some iPad Wi-Fi |
|
|
|
+ 3G models) is available, and you can connect to the |
|
|
|
Internet over EDGE. See “Connecting to the Internet” on |
|
|
|
page 29. |
|
|
|
|
|
|
GPRS |
Shows that your carrier’s GPRS network (some iPad Wi-Fi |
|
|
|
+ 3G models) is available, and you can connect to the |
|
|
|
Internet over GPRS. See “Connecting to the Internet” on |
|
|
|
page 29. |
|
|
|
|
|
|
Wi-Fi |
Shows that iPad has a Wi-Fi Internet connection. The more |
|
|
|
bars, the stronger the connection. See “Connecting to the |
|
|
|
Internet” on page 29. |
|
|
|
|
|
|
Activity |
Shows network and other activity. Some third-party apps |
|
|
|
may also use this icon to indicate an active process. |
|
|
|
|
|
|
VPN |
Shows that you’re connected to a network using VPN. See |
|
|
||
|
|
|
“VPN” on page 152. |
|
|
|
|
|
|
Lock |
Shows that iPad is locked. See “Sleep/Wake Button” on |
|
|
|
page 10. |
|
|
|
|
|
|
Screen orientation lock |
Shows that the screen orientation is locked. See “Viewing |
|
|
|
in Portrait or Landscape” on page 16. |
|
|
|
|
|
|
Play |
Shows that a song, audiobook, or podcast is playing. See |
|
|
|
“Playing Songs” on page 105. |
|
|
|
|
|
|
Bluetooth |
White icon: Bluetooth is on and a device, such as a headset |
|
|
|
or keyboard, is connected. Gray icon: Bluetooth is on, but |
|
|
|
no device is connected. No icon: Bluetooth is turned off. |
|
|
|
|
|
|
Battery |
Shows the battery level or charging status. See “Charging |
|
|
|
the Battery” on page 33. |
|
|
|
|
Chapter 1 At a Glance |
13 |
|
|
iPad Apps
The following apps are included with iPad:
|
Browse websites on the Internet. Rotate iPad sideways for widescreen viewing. Double- |
|
|
tap to zoom in or out—Safari automatically fits the webpage column to the screen. |
|
Safari |
Open multiple pages. Sync bookmarks with Safari or Microsoft Internet Explorer on |
|
your computer. Add Safari web clips to the Home screen for fast access to favorite |
||
|
||
|
websites. Save images from websites to your Photo Library. Print webpages using |
|
|
AirPrint. See Chapter 4,“Safari,” on page 47. |
|
|
|
|
|
Send and receive mail using many of the most popular email services, Microsoft |
|
|
Exchange, or most industry-standard POP3 and IMAP mail services. Send and save |
|
photos.View PDF files and other attachments, or open them in other apps. Print |
||
messages and attachments using AirPrint. See Chapter 5,“Mail,” on page 53. |
||
|
||
|
|
|
|
Organize your favorite photos and videos into albums. Watch a slideshow. Zoom in |
|
|
for a closer look. Share photos and videos using mail or MobileMe (sold separately), or |
|
Photos |
print photos using AirPrint. See Chapter 9,“Photos,” on page 69. |
|
|
||
|
|
|
|
Sync with your iTunes library and listen to your songs, audiobooks, and podcasts on |
|
|
iPad. Create and manage playlists, or use Genius to create playlists for you. Listen to |
|
iPod |
Genius Mixes of songs from your library. Use Home Sharing to play music from your |
|
computer. Stream your music or videos wirelessly to an Apple TV or compatible audio |
||
|
||
|
system using AirPlay. See Chapter 16,“iPod,” on page 105. |
|
|
|
|
|
Keep your calendar current on iPad, or sync it with your Mac OS X or Windows calendar. |
|
|
Subscribe to others’ calendars. Sync over the Internet with Microsoft Exchange or |
|
Calendar |
CalDAV servers. See Chapter 12,“Calendar,” on page 85. |
|
|
||
|
|
|
|
Organize your address book and keep it up to date on iPad, or sync it with |
|
|
your Mac OS X or Windows address book. Sync wirelessly with MobileMe (sold |
|
Contacts |
separately), Google Contacts, Yahoo! Address Book, and Microsoft Exchange. See |
|
Chapter 13,“Contacts,” on page 91. |
||
|
||
|
|
|
|
Jot notes on the go—reminders, grocery lists, brilliant ideas. Send them in email. Sync |
|
|
notes to Mail or Microsoft Outlook or Outlook Express. See Chapter 14,“Notes,” on |
|
Notes |
page 95. |
|
|
||
|
|
|
|
See a classic, satellite, hybrid, or terrain view of locations around the world. Zoom in for |
|
|
a closer look, or check out Google Street View. Find your current location. Get detailed |
|
Maps |
driving, public transit, or walking directions and see current highway traffic conditions. |
|
Find businesses in the area. See Chapter 15,“Maps,” on page 97. |
||
|
||
|
|
|
|
Play movies, TV shows, podcasts, videos from your iTunes library or your movie |
|
|
collection. Buy or rent movies on iPad using the iTunes Store. Download video |
|
Videos |
podcasts. See Chapter 10,“Videos,” on page 77. |
|
|
||
|
|
|
|
Play videos from YouTube’s online collection. Search for any video, or browse featured, |
|
|
most viewed, most recently updated, and top-rated videos. Set up and log in to your |
|
YouTube |
YouTube account—then rate videos, sync your favorites, show subscriptions, and more. |
|
See Chapter 11,“YouTube,” on page 81. |
||
|
||
|
|
14 |
Chapter 1 At a Glance |
|
|
|
Search the iTunes Store for music, audiobooks, TV shows, music videos, and movies. |
|
|
Browse, preview, purchase, and download new releases, top items, and more. Buy or rent |
|
iTunes |
movies and TV shows to view on iPad. Download podcasts. Read reviews, or write your |
|
own reviews for your favorite store items. See Chapter 17,“iTunes Store,” on page 113. |
||
|
||
|
|
|
|
Search the App Store for apps you can purchase or download. Read reviews, or write |
|
|
your own reviews for your favorite apps. Download and install the apps on your Home |
|
App Store |
screen. See Chapter 18,“App Store,” on page 119. |
|
|
||
|
|
|
|
Discover new games and share your game experiences with friends. Invite a friend, or |
|
|
request a match with an opponent. Check player rankings on the leaderboards. Gain |
|
Game |
achievements for extra points. See Chapter 20,“Game Center,” on page 130. |
|
|
||
Center |
|
|
|
|
|
|
Make video calls to other FaceTime users over Wi-Fi. Use the front camera to talk face to |
|
|
face, or the back camera to share what you see. See Chapter 7,“FaceTime,” on page 63. |
|
FaceTime |
|
|
|
|
|
|
Take photos and record videos. View them on iPad, email them, or upload them to your |
|
|
computer or the Internet. Tap to set the exposure. Trim and save video clips. Upload |
|
Camera |
videos directly to YouTube or MobileMe. See Chapter 6,“Camera,” on page 60. |
|
|
||
|
|
|
|
Use the front or back camera to take a snapshot. Add a special effect, such as twirl or |
|
|
stretch, before you take a snapshot. Snapshots are saved in an album in the Photo app. |
|
Photo |
See Chapter 8,“Photo Booth,” on page 66. |
|
|
||
Booth |
|
|
|
|
|
|
Personalize your iPad settings in one convenient place—network, mail, web, music, |
|
|
video, photos, and more. Set up Picture Frame, mail accounts, contacts, and calendars. |
|
Settings |
Manage your cellular data account (iPad Wi-Fi + 3G). Set auto-lock and a passcode for |
|
security. See Chapter 22,“Settings,” on page 151. |
||
|
||
|
|
Additionally, you can get the following apps from the App Store on iPad:
|
Download the free iBooks app from the App Store. Tap the store button and browse |
|
|
tens of thousands of ePub and PDF books—many of them free. Print PDFs using |
|
iBooks |
AirPrint. Use bookmarks and highlights to save your place and note your favorite |
|
passages. See Chapter 19,“iBooks,” on page 124. |
||
|
||
|
|
|
|
Use Multi-Touch gestures to create and share documents on iPad. Develop letters, |
|
|
flyers, brochures, reports, and more. Begin a document on iPad and finish it on your |
|
Pages |
computer. You can purchase the Pages app from the App Store. |
|
|
||
|
|
|
|
Develop spreadsheets with tables, charts, photos, and text. With a few taps, you can |
|
|
organize data, perform calculations, and manage lists. Numbers offers many templates |
|
Numbers |
or you can choose the Blank template to create a unique spreadsheet. You can |
|
purchase the Numbers app from the App Store. |
||
|
||
|
|
|
|
Choose from Keynote themes to create a presentation. Add photos and videos from |
|
|
the Photos app; organize data with tables and charts; and when your presentation is |
|
Keynote |
ready, use full-screen view to play it on iPad. Import Keynote presentations you create |
|
on your computer. You can purchase the Keynote app from the App Store. |
||
|
||
|
|
Chapter 1 At a Glance |
15 |
|
|
Note: App functionality and availability may vary depending on where you purchase and use iPad.
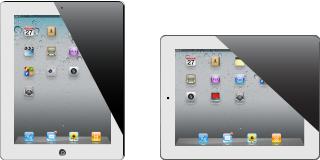
Viewing in Portrait or Landscape
You can view iPad‘s built-in apps in either portrait or landscape orientation. Rotate iPad and the screen rotates too, adjusting automatically to fit the new orientation.
You may prefer landscape orientation for viewing webpages in Safari, for example, or when entering text. Webpages automatically scale to the wider screen, making the text and images larger. The onscreen keyboard also becomes larger, which may help increase your typing speed and accuracy. Lock the screen orientation if you want to keep the screen from rotating.
Lock the screen in portrait or landscape orientation: Double-click the Home  button to view the Multitasking status bar, then flick from left to right.Tap
  to lock the screen orientation.
You can also set the Side Switch to lock the screen orientation instead of silencing sound effects and notifications. Go to Settings > General.
16 |
Chapter 1 At a Glance |
|
|

Multi-Touch Screen
The controls on the Multi-Touch screen change dynamically, depending on the task you’re performing.To control iPad, use your fingers to tap, double-tap, and swipe.
Adjusting Brightness
To adjust the screen’s brightness, double-click the Home  button to view the Multitasking status bar. Flick from left to right, then drag the brightness slider.
Brightness
You can use Auto-Brightness to automatically adjust the screen’s brightness. In Settings, choose Brightness & Wallpaper, then turn Auto-Brightness on or off.
See “Brightness & Wallpaper” on page 154.
Using Lists
Some lists have an index along the side to help you navigate quickly.
Index
Find items in an indexed list: Tap a letter to jump to items starting with that letter. Drag your finger along the index to scroll quickly through the list.
Choose an item: Tap an item in the list.
Depending on the list, tapping an item can do different things—for example, it may open a new list, play a song, open an email message, or show someone’s contact information.
Return to a previous list: Tap the back button in the upper-left corner.
Chapter 1 At a Glance |
17 |
|
|

Zooming In or Out
When viewing photos, webpages, email, or maps, you can zoom in and out. Pinch your fingers together or apart. For photos and webpages, you can double-tap (tap twice quickly) to zoom in, then double-tap again to zoom out. For maps, double-tap to zoom in and tap once with two fingers to zoom out.
Zoom is also an accessibility feature that lets you magnify the entire screen of any app you’re using and helps you see what’s on the display. See “Zoom” on page 148.
Onscreen Keyboard
The onscreen keyboard appears automatically anytime you need to type. Use the keyboard to enter text, such as contact information, email, and web addresses. The keyboard corrects misspellings, predicts what you’re typing, and learns as you use it.
You can also use an Apple Wireless Keyboard to type. When you use an external keyboard, the onscreen keyboard doesn’t appear. See “Using an Apple Wireless Keyboard” on page 20.
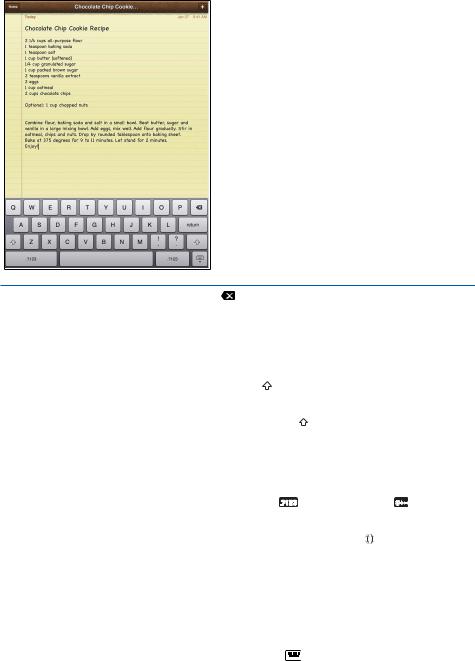
Typing
Depending on the app you’re using, the intelligent keyboard may automatically suggest corrections as you type, to help prevent mistyped words.
Enter text:
1Tap a text field, such as in a note or new contact, to bring up the keyboard.
2Tap keys on the keyboard.
18 |
Chapter 1 At a Glance |
|
|
If you touch the wrong key, you can slide your finger to the correct key.The letter isn’t entered until you release your finger from the key.
Backspace to delete the |
Tap |
. |
|
|
|
|
|
|
|
previous character |
|
|
|
|
|
|
|
|
|
|
|
|
|
|
|
|
|
||
Quickly type a period and space |
Double-tap the space bar. |
|
|||||||
|
You can turn this feature on or off in Settings > General > |
||||||||
|
Keyboard. |
|
|
|
|
|
|
||
|
|
|
|
|
|
|
|||
Type uppercase |
Tap the Shift key before tapping a letter. Or touch and |
||||||||
|
hold the Shift key, then slide to a letter. |
|
|||||||
|
|
|
|
|
|
|
|
||
Turn caps lock on |
Double-tap the Shift |
key. The Shift key turns blue, and |
|||||||
|
all letters you type are uppercase. Tap the Shift key to turn |
||||||||
|
caps lock off. |
|
|
|
|
|
|
||
|
You can turn this feature on or off in Settings > General > |
||||||||
|
Keyboard. |
|
|
|
|
|
|
||
|
|
|
|
|
|
|
|
|
|
Show numbers, punctuation, |
Tap the Number |
key. Tap the Symbol |
key to see |
||||||
or symbols |
additional punctuation and symbols. |
|
|||||||
|
|
|
|
|
|
|
|||
Use an international keyboard |
Touch and hold the Next Keyboard |
|
|
|
key to display |
||||
|
|||||||||
|
a menu of languages, then tap the language. See |
||||||||
|
Appendix B,“International Keyboards,” on page 174. |
||||||||
|
You can add or remove international keyboards in |
||||||||
|
Settings > General > Keyboard. |
|
|||||||
|
|
|
|
|
|
|
|||
Type letters or symbols that aren’t |
Touch and hold the related letter or symbol, then slide to |
||||||||
on the keyboard |
choose a variation. |
|
|
|
|
|
|
||
|
|
|
|
|
|
|
|
||
Hide the onscreen keyboard |
Tap the Keyboard |
|
key to hide the onscreen keyboard. |
||||||
|
|||||||||
|
|
|
|
|
|
|
|
|
|
Chapter 1 At a Glance |
19 |
|
|
Using an Apple Wireless Keyboard
For ease of typing, you can use an Apple Wireless Keyboard with iPad.
The Apple Wireless Keyboard connects using Bluetooth, so you must pair the keyboard with iPad. See “Pairing Bluetooth Devices” on page 43.
Once the keyboard is paired with iPad, it connects whenever the keyboard is within range (up to 33 feet or 10 meters). You can tell that the keyboard is connected if the onscreen keyboard doesn’t appear when you tap in a text field.
Switch the language when using a hardware keyboard: Hold down the Command key and tap the space bar to display a list of available languages. Tap the space bar again to choose a language.
Disconnect a wireless keyboard from iPad: Hold down the power button on the keyboard until the green light goes off.
iPad disconnects the keyboard when it’s out of range.
Unpair a wireless keyboard from iPad: In Settings, choose General > Bluetooth, tap  next to the keyboard name, then tap “Forget this Device.”
You can apply different layouts to a wireless keyboard. See Appendix B,“International Keyboards,” on page 174 and “Keyboard Layouts” on page 22.
Dictionary
For many languages, iPad has dictionaries to help you type. The appropriate dictionary is activated automatically when you select a supported keyboard.
To see a list of supported languages, from Settings, choose General > International > Keyboards.
iPad uses the active dictionary to suggest corrections or complete the word you’re typing. You don’t need to interrupt your typing to accept the suggested word.
20 |
Chapter 1 At a Glance |
|
|
Accept or reject dictionary suggestions:
mm To reject the suggested word, finish typing the word as you want it, then tap the suggestion to dismiss it before typing anything else. Each time you reject a suggestion for the same word, iPad becomes more likely to accept your word.
mm To use the suggested word, type a space, punctuation mark, or return character.
Reset dictionary suggestions: In Settings, choose General > Reset > Reset Keyboard Dictionary. This resets all the suggestions you’ve made to the dictionary.
Turn Auto-Correction on or off: In Settings, choose General > Keyboard, then turn
Auto-Correction on or off. Auto-Correction is normally on.
Turn Speak Auto-text on or off: In Settings, choose General > Accessibility, then turn
Speak Auto-text on or off. Speak Auto-text speaks the text suggestions.
Note: If you’re entering Chinese or Japanese characters, tap one of the alternatives the dictionary suggests.
Editing—Cut, Copy, and Paste
The Multi-Touch screen makes it easy to make changes to text you’ve entered. An onscreen magnifying glass helps you position the insertion point precisely where you need it. Grab points on selected text let you quickly select more or less text. You can also cut, copy, and paste text and photos within apps, or across multiple apps.
Position the insertion point: Touch and hold to bring up the magnifying glass, then drag to position the insertion point.
Select text: Tap the insertion point to display the selection buttons. Tap Select to select the adjacent word, or tap Select All to select all text.You can also double-tap a word to select it. In read-only documents such as webpages, touch and hold a word to select it.
Drag the grab points to select more or less text. Cut or copy text: Select text, then tap Cut or Copy.
Chapter 1 At a Glance |
21 |
|
|
Paste text: Tap the insertion point, then tap Paste to insert the last text that you cut or copied. Or, select text, then tap Paste to replace the text.
Undo the last edit: Shake iPad, or tap undo on the keyboard.
Keyboard Layouts
You can use Settings to set the layouts for the onscreen software keyboard and for any hardware keyboards. Available layouts depend on the keyboard language.
Select a keyboard layout: In Settings, choose General > Keyboard > International Keyboards, then select a keyboard. For each language, you can make separate selections for both the onscreen software keyboard and any external hardware keyboards.
The software keyboard layout determines the layout of the keyboard on the iPad screen. The hardware keyboard layout determines the layout of an Apple Wireless Keyboard connected to iPad.
22 |
Chapter 1 At a Glance |
|
|

Getting Started |
2 |
|
|
|
|
Connect iPad to your computer and use iTunes to set up, register, and sync content.
What You Need
·WARNING: To avoid injury, read all operating instructions in this guide and safety information in the iPad Important Product Information Guide at support.apple.com/manuals/ipad before using iPad.
To use iPad, you need:
ÂÂ A Mac or a PC with a USB 2.0 port and one of the following operating systems: ÂÂ Mac OS X version 10.5.8 or later
ÂÂ Windows 7, Windows Vista, or Windows XP Home or Professional with Service Pack 3 or later
ÂÂ iTunes 10.2 or later, available at www.itunes.com/download ÂÂ An Apple ID
ÂÂ Broadband Internet access
23
Setting Up iPad
Before you can use iPad, you must use iTunes to set it up. You can also register iPad and create an Apple ID (not available in some countries) if you don’t already have one.
Set up iPad:
1Download and install the latest version of iTunes from www.itunes.com/download.
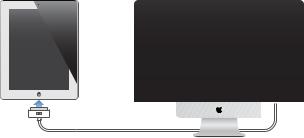
2Connect iPad to a USB 2.0 port on your Mac or PC using the cable that came with iPad.
3Follow the onscreen instructions in iTunes to register iPad and sync iPad with music, video, and other content from your iTunes library, and with your contacts, calendars, and bookmarks on your computer.
In the Set Up Your iPad screen, select “Automatically sync contacts, calendars and bookmarks” to have those items sync automatically when you connect iPad to your computer.
Syncing with iTunes
Use iTunes to sync your music, videos, downloaded apps, and other iTunes library content from your computer. You can also sync your contacts, calendars, and your browser bookmarks. iTunes lets you choose the content and information that you want to sync with iPad. By default, iTunes syncs automatically whenever you connect iPad to your computer. When you sync, you can also transfer information you create or purchase on iPad to your computer.
Setting Up Syncing
You can set iTunes to sync the following: ÂÂ Music
ÂÂ Movies
ÂÂ TV Shows
ÂÂ Games and apps downloaded from the App Store ÂÂ Music videos
ÂÂ Podcasts
24 |
Chapter 2 Getting Started |
|
|
ÂÂ Books and audiobooks ÂÂ iTunes U collections
ÂÂ Photos and videos (in your computer’s photo app or folder)
ÂÂ Contacts—names, phone numbers, addresses, email addresses, and more ÂÂ Calendars—appointments and events
ÂÂ Notes
ÂÂ Email account settings ÂÂ Webpage bookmarks
You can adjust sync settings whenever you connect iPad to your computer.
Sync your music, audiobooks, podcasts, iTunes U collections, videos, books, and apps from your iTunes library. If you don’t already have content in iTunes, go to the iTunes Store (available in some countries) to preview and download content to iTunes. You can also add music to your iTunes library from your CDs. To learn about iTunes and the iTunes Store, open iTunes and choose Help > iTunes Help.
Contacts, calendars, notes, and webpage bookmarks are synced with applications on your computer. New entries or changes you make on iPad are synced to your computer, and vice versa.
iTunes also lets you sync photos and videos, either from an application or from a folder.
Email account settings are synced only one direction, from your computer’s email app to iPad.This allows you to customize your email accounts on iPad without affecting email account settings on your computer.
Note: You can also set up email accounts directly on iPad. See “Adding Mail, Contacts, and Calendar Accounts” on page 31.
iTunes Store and App Store purchases you make on iPad are synced with the iTunes library on your computer when you connect. You can also purchase or download content and apps from the iTunes Store on your computer, and then sync them to iPad.
Chapter 2 Getting Started |
25 |
|
|
You can set iPad to sync only a portion of what’s on your computer. For example, you might want to sync only certain music playlists, or only unwatched video podcasts.
Important: You should log in to your own user account on your computer before connecting iPad.
Set up iTunes syncing:
1Connect iPad to your computer, and open iTunes (if it doesn’t open automatically).
2In iTunes, select iPad in the sidebar.
3Configure the sync settings in each of the settings panes.
See the following section for a description of each pane.
4Click Apply in the lower-right corner of the screen.
By default,“Open iTunes when this iPad is connected” is selected.
26 |
Chapter 2 Getting Started |
|
|

iPad Settings Panes in iTunes
The following sections provide an overview of each of the iPad settings panes. For more information, open iTunes and choose Help > iTunes Help.
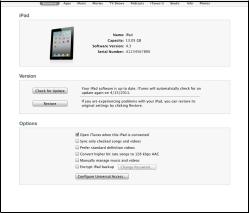
Summary Pane
Select “Open iTunes when this iPad is attached” to have iTunes open and sync iPad automatically whenever you connect it to your computer. Deselect this option if you want to sync only by clicking the Sync button in iTunes. For more information about preventing automatic syncing, see “Preventing Automatic Syncing” on page 29.
Select “Sync only checked songs and videos” if you want iTunes to skip unchecked items in your iTunes library when syncing.
Select“Manually manage music and videos”to turn off automatic syncing in the Music and Video settings panes.
Select “Encrypt iPad backup” if you want to encrypt the information stored on your computer when iTunes makes a backup. Encrypted backups are shown with a lock  icon, and require a password to restore the information to iPad. See “Updating and Restoring iPad Software” on page 182.
To turn on accessibility features, click Configure Universal Access. For more information, see “Universal Access Features” on page 137.
Info Pane
The Info pane lets you configure the sync settings for your contacts, calendars, email accounts, and web browser.
ÂÂ Contacts
You can sync contacts with applications such as Mac OS X Address Book, Yahoo! Address Book, and Google Contacts on a Mac, or with Yahoo! Address Book, Google Contacts, Windows Address Book (Microsoft Outlook Express), Windows Vista Contacts, or Microsoft Outlook 2003, 2007, or 2010 on a PC. (On a Mac, you can sync contacts with multiple applications. On a PC, you can sync contacts with only one application at a time.)
If you sync with Yahoo! Address Book, you only need to click Configure to enter your new login information when you change your Yahoo! ID or password after you’ve set up syncing.
ÂÂ Calendars
You can sync calendars from applications such as iCal on a Mac, or from Microsoft Outlook 2003, 2007, or 2010 on a PC. (On a Mac, you can sync calendars with multiple applications. On a PC, you can sync calendars with only one application at a time.)
Chapter 2 Getting Started |
27 |
|
|
ÂÂ Mail Accounts
You can sync email account settings from Mail on a Mac, and from Microsoft Outlook 2003, 2007, or 2010 or Microsoft Outlook Express on a PC. Account settings are only transferred from your computer to iPad. Changes you make to an email account on iPad don’t affect the account on your computer.
Note: The password for your Yahoo! email account isn’t saved on your computer, so it can’t be synced and must be entered on iPad. In Settings, choose “Mail, Contacts, Calendars,” tap your Yahoo! account, and enter the password.
ÂÂ Other
Sync bookmarks from Safari on a Mac, or from Safari or Microsoft Internet Explorer on a PC.
Sync notes in the Notes app on iPad with notes in Mail on a Mac or with Microsoft Outlook 2003 or 2007 on a PC.
ÂÂ Advanced
Select one or more of these options if your want to replace the information on iPad with the information on your computer during the next sync.
Apps Pane
Use the Apps pane to sync App Store apps, arrange apps on the iPad Home screen, or copy documents between iPad and your computer.
Select “Automatically sync new apps” to sync new apps to iPad that you downloaded or synced from another device. If you delete an app on iPad, you can reinstall it from the Apps pane if it was previously synced.
You can create documents on iPad, and then copy them to your computer. You can also copy documents from your computer to iPad, and use them with apps that support file sharing. Apps that support file sharing are shown in the File Sharing Apps list. For more information about file sharing, see“File Sharing” on page 44.
Music, Movies, TV Shows, Podcasts, and iTunes U Panes
Use these panes to specify the media you want to sync. You can sync all music, movies, TV shows, podcasts, and iTunes U collections, or select the content you want on iPad.
To watch rented movies in your iTunes library on iPad, transfer them to iPad using the Movies pane.
Books Pane
You can sync books you’ve downloaded from the iBookstore, and many free ePub books from other sources. You can also sync audiobooks, and if the book has more than one part, just the portions you want.
28 |
Chapter 2 Getting Started |
|
|
Photos Pane
You can sync photos and videos with iPhoto 6.0.6 or later, or Aperture 3.0.2 or later on a Mac; or with Adobe Photoshop Elements 8.0 or later on a PC. You can also sync photos and videos in any folder on your computer that contains images or videos.
Preventing Automatic Syncing
You can prevent iPad from syncing automatically when you connect iPad to a different computer.
Prevent automatic syncing for all iPads: In iTunes choose iTunes > Preferences (on a Mac) or Edit > Preferences (on a PC), click Devices, then select “Prevent iPods, iPhones, and iPads from syncing automatically.”
If this checkbox is selected, iPad won’t sync automatically, even if “Open iTunes when this iPad is connected” is selected in the Summary pane.
Prevent automatic syncing one time, without changing settings: Open iTunes, connect iPad to your computer, then press and hold Command-Option (on a Mac) or Shift-Control (on a PC) until iPad appears in the sidebar.
Sync manually: In iTunes, select iPad in the sidebar, then click Sync in the lower-right corner of the window. Or, if you’ve changed any sync settings, click Apply.
Connecting to the Internet
iPad can join AirPort and other Wi-Fi networks at home, at work, or at Wi-Fi hotspots around the world.When joined to a Wi-Fi network that’s connected to the Internet, iPad connects to the Internet automatically whenever you use Mail, Safari, YouTube, the App Store, or the iTunes Store. iPad connects to the Internet using a Wi-Fi network. iPad Wi-Fi + 3G can also connect to the Internet using a cellular data network. Data service is sold separately.
Joining a Wi-Fi Network
Use Wi-Fi settings to turn on Wi-Fi and join Wi-Fi networks.
Turn on Wi-Fi: Choose Settings > Wi-Fi and turn Wi-Fi on.
Join a Wi-Fi network: Choose Settings > Wi-Fi, wait a moment as iPad detects networks in range, then select a network (fees may apply to join some Wi-Fi networks).
If necessary, enter a password and tap Join (networks that require a password appear with a lock  icon).
Once you join a Wi-Fi network, iPad automatically connects to it whenever the network is in range. If more than one previously used network is in range, iPad joins the one last used.
When iPad has a Wi-Fi connection, the Wi-Fi  icon in the status bar shows the connection strength. The more bars you see, the stronger the connection.
For information about configuring Wi-Fi settings, see“Wi-Fi” on page 152.
Chapter 2 Getting Started |
29 |
|
|
Joining a Cellular Data Network
Before you can join a cellular data network on iPad Wi-Fi + 3G, you must sign up for a cellular data plan with an iPad service carrier in your area. With some carriers, you can choose a data plan, track your data usage, and change or cancel your plan on iPad.
On some models, 3G, EDGE, and GPRS provide Internet connectivity over the cellular network available through your carrier’s wireless service. Check the carrier’s network coverage in your area for availability.
If iPad is connected to the Internet using the cellular data network, you see the 3G ( ), EDGE (
 ), or GPRS (
 ) icon in the status bar.
Turn Data Roaming on: If you’re outside your carrier’s network, you may be able to use a cellular data network from another carrier. In Settings, choose Cellular Data and turn Data Roaming on.
Important: Roaming charges may apply. To avoid data roaming charges, make sure
Data Roaming is turned off.
Monitor your cellular data network usage: In Settings, choose Cellular Data > View Account.
Set up a cellular data plan on iPad: From the iPad Home screen, tap Settings and choose Cellular Data. Tap View Account, then follow the onscreen instructions.
Cellular data settings may vary depending on the carrier.
iPad is unlocked, so you can choose your preferred carrier. Cellular data settings vary, depending on the carrier. If your iPad Wi-Fi + 3G didn’t come with a micro-SIM card, contact your carrier to set up an account and obtain a compatible micro-SIM card.
Not all carriers offer 3G data plans.
Internet Access on an Airplane
Airplane mode on iPad Wi-Fi + 3G turns off the iPad radio transmitters to comply with airline regulations. In some regions, where allowed by the aircraft operator and applicable laws and regulations, you can turn on Wi-Fi while airplane mode is on, to:
ÂÂ Send and receive email ÂÂ Browse the Internet
ÂÂ Sync your contacts and calendars over the air ÂÂ Stream YouTube videos
ÂÂ Purchase music and apps
For more information, see “Airplane Mode” on page 151.
30 |
Chapter 2 Getting Started |
|
|
Loading...