


 Loading...
Apple MC721LL-A, MC373LL-A, MC375LL-A, MB470LL-A, MB077LL-A User Manual
...MacBook Pro
Essentials
Contents
4 Chapter 1: Welcome
4Say hello to MacBook Pro
5Chapter 2: MacBook Pro at a glance
5Take a tour
6What’s included
7Trackpad
8Keyboard
9Chapter 3: Get started
9 Set up
11 Find your way around
13Quickly open apps
13Charge the battery
14Migrate your data
15Chapter 4: MacBook Pro basics
15Use your MacBook Pro
15Access all your content, anywhere with iCloud
16Use your MacBook Pro and iOS devices together
19Wirelessly share, print, and play
21Make video calls with FaceTime
21Use an external display
22Back up and restore
23Get answers
24 Chapter 5: Apps
24About apps
24Safari
25Mail
26Calendar
27Notes
28Messages
29Maps
30Spotlight
31iTunes
32Photos, iMovie, and GarageBand
33Pages, Numbers, and Keynote
2
34 Chapter 6: Safety, handling, and support
34 Important safety information
37Important handling information
38Understanding ergonomics
38Apple and the environment
39Learning more, service, and support
40FCC compliance
40Canadian regulatory compliance
41Europe—EU Declaration of Conformity
41ENERGY STAR® Compliance Statement
42Disposal and recycling information
43Software License Agreement
Contents |
3 |
Welcome |
1 |
|
|
Say hello to MacBook Pro |
|
Take a look around. Want a quick tour of the features of your MacBook Pro? Go to Take a tour. Get started. Press the power button and you’re up and running. For tips, see Set up.
See what you can do. Make video calls with FaceTime, share files with AirDrop, sync your important documents, photos, music, apps, contacts, and calendars across devices with iCloud and Handoff, and use your iOS device and your MacBook Pro together to make and receive phone calls and texts, or to create an instant hotspot. Learn more in Use your MacBook Pro.
Unleash your creativity. Edit HD video with Final Cut Pro X, make music with GarageBand, create presentations with Keynote, and more. Go to About apps to get inspired.
4
MacBook Pro at a glance |
2 |
|
Take a tour
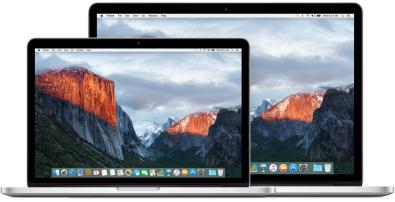
The MacBook Pro with Retina display is packed with advanced technologies in a remarkably thin and light design. It’s both powerful and portable, so you can take it with you and create when you’re on the go. This guide is for both the 13-inch and 15-inch MacBook Pro with Retina display models.
|
MagSafe 2 |
|
|
Headphone |
||||
|
|
|
||||||
|
|
|
|
|
|
|
|
|
|
|
|
|
|
|
|
|
|
|
|
|
|
|
|
|
|
|
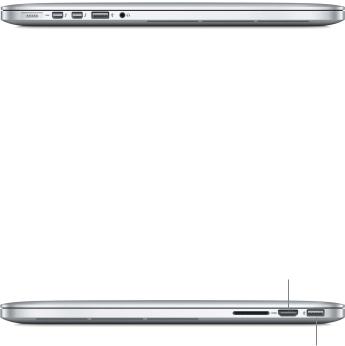
Thunderbolt 2 |
|
|
|
|
USB 3 |
|||
|
|
|||||||
••
••
••
••
MagSafe 2 power port: Guide the MagSafe connector into the MagSafe 2 port for a fast and sure connection. The magnetic connector also allows the power cord to break away cleanly if there’s undue tension.
Thunderbolt 2 ports: This ultrafast and ultraflexible technology lets you connect high-speed peripherals such as RAID arrays, external displays, and docking stations. Thunderbolt to
FireWire and Thunderbolt to Gigabit Ethernet adapters (sold separately) offer increased expandability and connectivity.
USB 3 ports: Connect an iPad, iPhone, iPod, digital camera, camcorder, external storage, or printer quickly and easily. The MacBook Pro USB 3 ports support USB 3 and USB 2 devices.
Headphone port: Plug in stereo headphones or a digital 5.1 surround-sound speaker system and experience high-quality sound while watching movies or listening to your favorite music.
HDMI
SDXC card slot |
USB 3 |
••
••
SDXC card slot: Easily transfer photos, videos, and data to and from your MacBook Pro, with the latest high-capacity SD cards.
HDMI port: Allows easy connection to HDTVs and projectors. Play movies, presentations, and more, with HD resolution and multichannel audio on your HDTV.
5
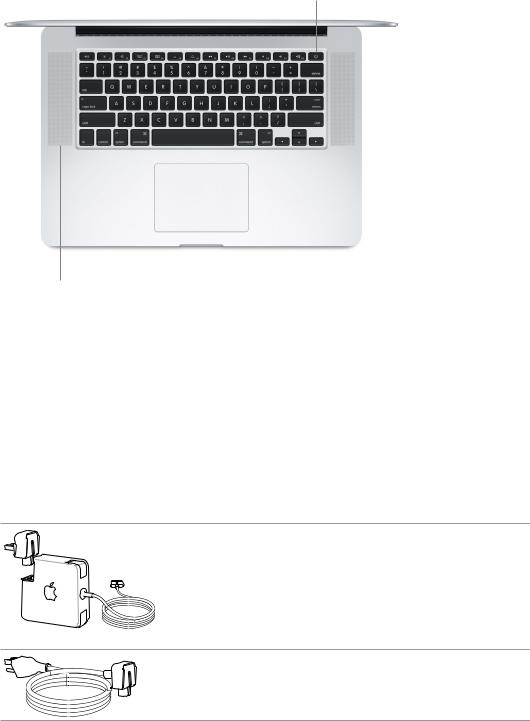
FaceTime HD camera |
|
Power button |
|
||
|
|
|
Dual microphones |
Force Touch trackpad |
(15-inch model) |
|
••
••
••
••
FaceTime HD camera: Make FaceTime video calls or take pictures and video. If the light is glowing, the camera is on.
Dual microphones: The dual microphones reduce background noise and optimize microphone performance. On the 13-inch MacBook Pro, the microphones are located on the left side, next to the headphone port.
Power button: Turn your MacBook Pro on or off, or put it to sleep.
Force Touch trackpad: Control your MacBook Pro with gestures. The entire trackpad surface acts as a button so you can easily click anywhere. For more on using gestures, see Trackpad.
What’s included
To use your MacBook Pro, you need these two simple accessories, included in the box:
60W or 85W MagSafe 2 Power Adapter: To charge your MacBook Pro, use the included power adapter. Make sure the AC plug is fully inserted into the power adapter and the electrical prongs on the AC plug are fully extended, then plug the adapter into a power outlet. The magnetic connector helps guide the plug into the port and disconnects easily.
When the adapter is connected, an LED on the magnetic connector lights up. An amber light shows that your MacBook Pro is charging, and a green light shows that it has a full charge.
AC power cord: To extend the reach of your power adapter, attach the included AC power cord. Then plug the three-prong end of the AC power cord into a power outlet.
Adapters and other accessories are sold separately at store.apple.com or your local
Apple Retail Store. Be sure to review the adapter or accessory documentation to make sure you’re choosing the right product for your MacBook Pro.
Chapter 2 MacBook Pro at a glance |
6 |
Trackpad
You can do a lot on your MacBook Pro using simple trackpad gestures—scroll through webpages, zoom in on documents, rotate photos, and more. And now with the
Force Touch trackpad, pressure-sensing capabilities add an entirely new level of interactivity.
The trackpad senses how hard you press, giving you more options and greater control with every touch. It also provides feedback—if you drag or rotate objects, you feel a subtle vibration when they’re aligned, letting you work with greater precision.
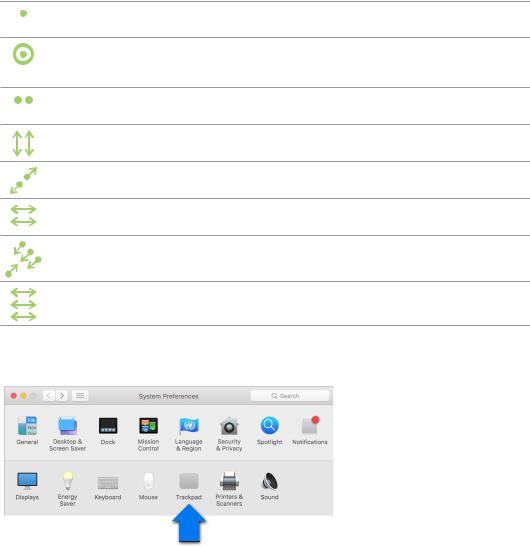
Here are some common gestures:
Click: Press anywhere on the trackpad. Or enable “Tap to click” in Trackpad preferences, and simply tap.
Force click: Click and then press deeper. You can use Force click to look up more information—click a word to see its definition, an address to see a preview in Maps, and more.
Secondary click (right click): Click with two fingers to open shortcut menus. If“Tap to click”is enabled, tap with two fingers.
Two-finger scroll:Slide two fingers up or down to scroll.
Pinch to zoom: Pinch your thumb and finger open or closed to zoom in or out of photos and webpages.
Swipe to navigate: Swipe left or right with two fingers to flip through webpages, documents, and more—like turning a page in a book.
Open Launchpad: Quickly open apps in Launchpad. Pinch closed with four or five fingers, then click an app to open it.
Swipe between apps: To switch from one full-screen app to another, swipe left or right with three or four fingers.
Customize your gestures. Choose Apple menu ( ) > System Preferences or click the System
Preferences icon in the Dock, then click Trackpad.
Learn more about each gesture, set the pressure you prefer to use, select whether to use pressure-sensing features, and customize other trackpad features in Trackpad preferences.
Chapter 2 MacBook Pro at a glance |
7 |
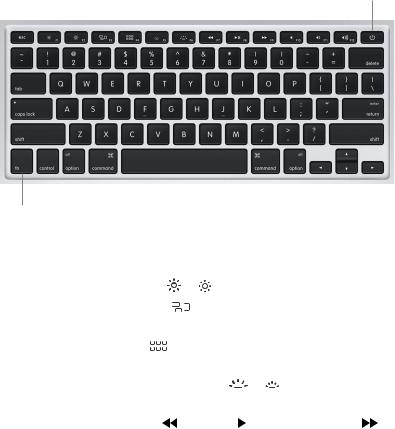
Keyboard
Power button
Function (fn) key
•• Function (fn) key: Hold this key while you press a function key (F1 to F12) to make the key do its assigned action. To learn how to customize function keys, click the Help menu in the menu bar, then search for “function keys” in Mac Help.
•• |
Brightness keys (F1, F2): Press |
or to increase or decrease the brightness of the screen. |
||||||
•• |
Mission Control key (F3): Press |
to view what’s running on your MacBook Pro, including all |
||||||
|
your spaces and open windows. |
|
|
|
|
|
|
|
•• |
Launchpad key (F4): Press |
to instantly see all the apps on your MacBook Pro. Click an app to |
||||||
|
open it. |
|
|
|
|
|
|
|
•• |
Keyboard illumination keys (F5, F6): Press |
|
|
or |
to increase or decrease the brightness of |
|||
|
the keyboard. |
|
|
|
|
|
|
|
•• |
Media keys (F7, F8, F9): Press |
to rewind, |
|
|
|
to play or pause, or |
to fast-forward a song, |
|
|
|
|||||||
|
movie, or slideshow. |
|
|
|
|
|
|
|
•• Mute key (F10): Press  to mute the sound coming from the built-in speakers and headphone port.
•• Volume keys (F11, F12): Press 
 or
or  to increase or decrease the volume of sound coming from the built-in speakers and headphone port.
•• Power button: Press and hold  for 3 seconds to turn your MacBook Pro on or off. Press
  to put MacBook Pro to sleep.
Chapter 2 MacBook Pro at a glance |
8 |
Get started |
3 |
|
Set up
The first time you turn on your MacBook Pro, Setup Assistant walks you through the simple steps needed to start using your new Mac.
To get the most out of MacBook Pro, be sure to connect to Wi-Fi and turn on Bluetooth®, get an Apple ID, and sign in to iCloud. You can do these steps quickly and easily with Setup Assistant— but if you want to do them later, here’s how:
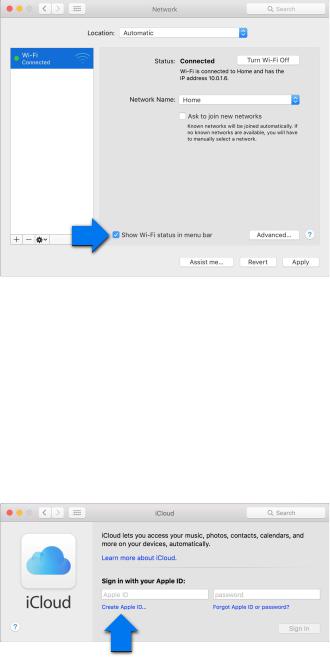
Connect to Wi-Fi. Click the Wi-Fi status icon  in the menu bar, then choose a Wi-Fi network and enter the password, if necessary.
If you don’t see the Wi-Fi status icon  , choose Apple menu ( ) > System Preferences, then click Network. Select Wi-Fi in the list on the left, then select “Show Wi-Fi status in menu bar.”
9
Turn offWi-Fi.Click the Wi-Fi status icon  in the menu bar, then choose Turn Wi-Fi Off.
Turn Bluetooth on or off.Click the Bluetooth icon  in the menu bar, then choose Turn
Bluetooth On or Turn Bluetooth Off.
If you don’t see the Bluetooth icon  , choose Apple menu ( ) > System Preferences, click
Bluetooth, then select “Show Bluetooth in menu bar.”
Get an Apple ID. Your Apple ID is the account you use for just about everything you do with Apple, including buying music, movies, and TV shows from the iTunes Store, downloading apps from the App Store, and storing your content in iCloud.
If you don’t already have an Apple ID, you can create one in iCloud preferences. Choose Apple menu ( ) > System Preferences. Click iCloud, then click Create Apple ID.
Chapter 3 Get started |
10 |

Set up iCloud on your Mac. After you have an Apple ID, it’s easy to set up iCloud on your Mac.
Choose Apple menu ( ) > System Preferences and click iCloud. In the window that appears, enter your Apple ID and password. Then select the features you want to use.
Important: Be sure to use the same Apple ID for iCloud on all your devices.
For more information about setting up iCloud, click the Help menu in the menu bar, then search for “set up iCloud” in Mac Help.
With iCloud, you can store all your content—documents, movies, music, photos, and more— in the cloud, and access them anywhere you go.To find out more about what you can do with iCloud and MacBook Pro, see Access all your content, anywhere with iCloud.
Find your way around
Overview
Start at the desktop. It’s home base for your Mac—where you can organize your files, quickly open apps, search for anything on your Mac and beyond, and more.
|
Menu bar |
|
Help menu |
|
Finder window |
|
Wi-Fi |
|
Spotlight |
|
|
|
|
|
|
||||||
|
|
|
|
|
|
|
|
|
|
|
|
|
|
|
|
|
|
|
|
|
|
|
|
|
|
|
|
|
|
|
|
|
Finder |
|
Dock |
|
System Preferences |
|
|
Chapter 3 Get started |
11 |
Finder
Use the Finder to organize and find all your files—including documents, images, movies, and music—or to quickly preview a file.
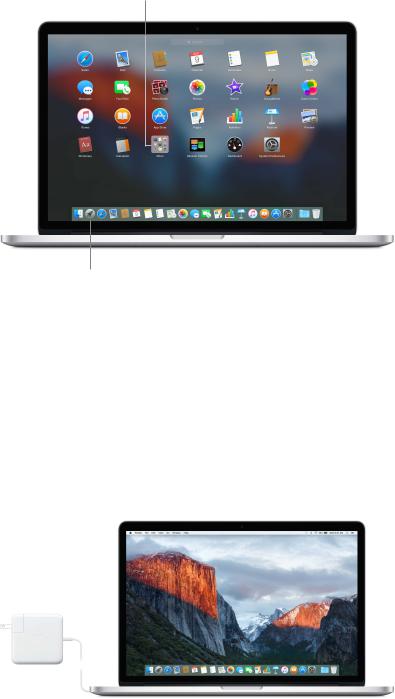
Open a Finder window. Click the Finder icon in the Dock, at the bottom of the screen.
Dock
The Dock, at the bottom of the screen, is a convenient place to keep the apps and documents you use frequently. You can make the Dock larger or smaller, add or remove items, move it to the left or right side of your screen, or even set it to hide when you’re not using it.
Add an item to the Dock. Drag the item and drop it where you want it. Place apps to the left of the line in the Dock, and files or folders to the right.
Remove an item from the Dock. Drag it out of the Dock. The item isn’t removed from your Mac—just from the Dock.
Change how the Dock looks. Choose Apple menu ( ) > System Preferences, then click Dock.
System Preferences
Make your MacBook Pro perfect for you. You can use Energy Saver preferences to change sleep settings, use Desktop & Screen Saver preferences to add a desktop background or choose a screen saver, and more.
Open System Preferences. Choose Apple menu ( ) > System Preferences, or click the System
Preferences icon in the Dock. Then click the preference you want to set.
Spotlight
Find anything on your MacBook Pro—and beyond. Spotlight provides results from your Mac as well as other sources like Wikipedia, Maps, weather, stocks, and sports.
Search for anything. Click  at the top-right of the screen or press Command–Space bar, then start typing.
Menu bar
The menu bar runs along the top of the screen. Use the icons and menus there to connect to a Wi-Fi network, check your Wi-Fi status  , change the volume
 , check your battery charge
 , and more.
Help
You can find answers to many of your questions in the Help menu.
Get help. Click the Help menu in the menu bar, then type a question or term in the search field.
Choose a topic from the results list, or choose Show All Help Topics to see all results.
To get help using an app, just click the Help menu while you’re using the app.
Chapter 3 Get started |
12 |
Quickly open apps
Your MacBook Pro comes with apps for all the things you love—browsing the web, checking email, creating documents and presentations, sharing photos, enjoying movies, and more. You can quickly open apps from Spotlight, from the Dock, or with Launchpad.
Folders
Launchpad |
Mac App Store |
Open an app. Click the app’s icon in the Dock, or click the Launchpad icon in the Dock and click the app you want. You can also search for the app using Spotlight, then open the app directly from your Spotlight search results.
Organize apps in Launchpad. Drag an app onto another app to create a folder. Drag more apps to the new folder to add them. To remove an app from a folder, just drag it out.
Get more apps. Click the App Store icon in the Dock. When you download apps from the Mac App Store, they appear in Launchpad. To quickly get updates to apps and OS X, click Updates in the Mac App Store.
Charge the battery
The battery in your MacBook Pro recharges whenever MacBook Pro is connected to power.
Charge the battery. Connect your MacBook Pro to a power outlet using the included cable and 60W (13-inch model) or 85W (15-inch model) MagSafe 2 Power Adapter. The battery recharges more quickly when the computer is shut down or in sleep.
Chapter 3 Get started |
13 |

Check the battery’s charge. Look at the battery status icon at the right of the menu bar to see the battery level or charging status. Click the icon to show how much power you have left if you keep using the apps, peripheral devices, and system settings you’re now using.
Charging Charged
Conserve battery power. To extend battery life on a given charge, reduce the display brightness, close apps, and disconnect peripheral devices you’re not using. You can change your power settings in Energy Saver preferences (click the System Preferences icon in the Dock, then click Energy Saver). If your MacBook Pro is in sleep or standby mode when a device is connected to it, the device’s battery may drain.
For more information about the internal rechargeable battery in your MacBook Pro, and for conservation and performance tips, go to www.apple.com/batteries.
Migrate your data
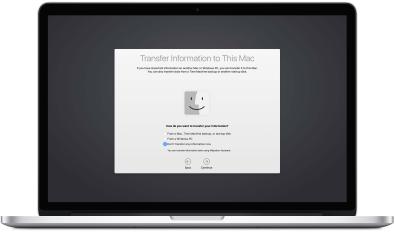
It’s easy to move your files and settings from another Mac or a PC to your MacBook Pro.You can transfer the data when you first set up your MacBook Pro, using Setup Assistant. If you want to transfer data later, you can use Migration Assistant to wirelessly copy your files from another Mac, a PC, or a Time Machine backup, using an AirPort base station (available separately).
You can transfer data over a wireless network if both computers are connected to the same network.
Use Migration Assistant. Open a Finder window, then go to Applications > Utilities and double click Migration Assistant. Follow the onscreen instructions to transfer information using Wi-Fi. For more information, see Move your content to your new Mac.
Copy files from a storage device.Connect the device to the USB port  or Thunderbolt port
  on your MacBook Pro, then manually drag files to your MacBook Pro.
For more information about Time Machine backups, see Back up and restore.
Chapter 3 Get started |
14 |
Loading...