


 Loading...
Apple Technician Guide
MacBook Pro (15-inch, Mid 2010)
2010-08-05

Apple Inc.
© 2010 Apple Inc. All rights reserved.
Under the copyright laws, this document may not be copied, in whole or in part, without the written consent of Apple.
Every effort has been made to ensure that the information in this document is accurate. Apple is not responsible for printing or clerical errors.
Apple
1 Infinite Loop Cupertino, CA 95014-2084 USA
+ 1 408 996 1010 www.apple.com
Apple, the Apple logo, Mac, MacBook, and Macintosh are trademarks of Apple Inc., registered in the U.S. and other countries.
Please send feedback to smfeedback3@apple.com.

MacBook Pro (15-inch, Mid 2010)
Contents
About This Guide
Manual Updates 9
Update 11 June 2010 9
Update 14 May 2010 9
Update 20 April 2010 9
Apple Technician Guide Introduced 13 April 2010 9
Feedback 10
Basics
Overview 12
Specifications |
12 |
Battery Precaution and Tool 13 |
|
The Glass Panel |
13 |
Keycap Replacement 14 |
|
Required Tools |
14 |
Serial Number Location 15 |
|
System Serial Number on Bottom Case |
15 |
Bar Code Serial Numbers on Memory Bracket 15 |
|
Transferring the System Serial Number |
16 |
Troubleshooting
General Troubleshooting |
18 |
||
Update System Software |
18 |
||
Apple Service Diagnostics |
18 |
||
Test Points 18 |
|
|
|
Troubleshooting Theory 18 |
|||
Hardware vs. Software |
19 |
|
|
Clamshell Service Diagnostic Read Me 19 |
|||
Emerging Issues |
19 |
|
|
Functional Overview |
20 |
|
|
Block Diagram |
21 |
|
|
Liquid Contact Indicators |
22 |
||
Common Reset Procedures 22

Display Issue:Pixel Anomalies 24
Symptom Charts 25
Startup and Power Issues 25
No Power 25 Won’t Start Up 28
Intermittent Shutdown 30
No Video/Bad Video 35
Battery Isn’t Recognized or Won’t Charge 38
Kernel Panic/System Crashes 41 |
|
|
|||
Battery Run Time Too Short |
43 |
|
|
||
Won’t Run on Power Adapter Alone |
44 |
|
|||
Power Adapter Issue |
45 |
|
|
|
|
Noise / Hum / Vibration |
46 |
|
|
|
|
Burnt Smell / Odor |
48 |
|
|
|
|
Battery Leaking or Swollen |
49 |
|
|
||
Uncategorized Symptom |
49 |
|
|
||
Communications 50 |
|
|
|
|
|
Ethernet Port/Device Issue |
50 |
|
|
||
AirPort/Bluetooth:Defective Wireless Devices |
52 |
||||
No/Poor Wireless Signal |
55 |
|
|
|
|
AirPort Card:Kernel Panic |
59 |
|
|
||
Wireless Performance Issue / Slow Connection |
60 |
||||
Wireless Input Device Doesn’t Pair |
62 |
|
|||
Display 64 |
|
|
|
|
|
Display Anomalies 64
Defective Camera / Built-in iSight Not Operating Correctly 69
Backlight Issue / No Backlight |
71 |
|
|
||
Noise / Unstable Flickering |
73 |
|
|
||
Mechanical/Physical Damage |
74 |
|
|
||
Cosmetic Defects |
74 |
|
|
|
|
Uncategorized Symptom |
74 |
|
|
|
|
Mass Storage 75 |
|
|
|
|
|
Hard Drive Read/Write Issue |
75 |
|
|
||
Hard Drive Not Recognized/Not Mounting |
76 |
||||
Hard Drive Noisy |
78 |
|
|
|
|
Optical Drive Won’t Accept/Reject Media |
79 |
||||
Optical Drive Read/Write Data Error 81 |
|
||||
Optical Drive Not Recognized/Mount |
82 |
|
|||
Optical Drive Noisy 83 |
|
|
|
|
|
Optical Drive Not Performing to Specs |
85 |
|
|||
Uncategorized Symptom |
86 |
|
|
|
|
Input/Output Devices 87
USB Port Does Not Recognize Known Devices 87 Built-in Keyboard Does Not Work Properly 88 Specific Keys Don’t Work 89

Built-in Trackpad Does Not Work 90 |
|
Built-in Keyboard Has Dim or No Keyboard Backlight 91 |
|
Built-in Keyboard Is Not Recognized 93 |
|
Built-in Trackpad Does Not Track Properly 94 |
|
Apple Remote Inoperable |
95 |
Built-in Speaker Has No Audio 96 |
|
Distorted Sound from Internal Speaker 97 |
|
Audio:Microphone 99 |
|
SD (Secure Digital) Memory Card Will Not Insert Into Slot 100 |
|
SD (Secure Digital) Memory Card Not Recognized By System 101 |
|
Camera Issues 102 |
|
FireWire Port Not Recognizing Known Devices 103 |
|
Uncategorized Symptom |
104 |
Mechanical Issues:Thermals and Enclosure 105 |
|
Reset/Power Button Stuck |
105 |
System Runs Hot 107 |
|
Uncategorized Symptom |
108 |
Take Apart
General Information |
110 |
|
|||
Connector Types on Logic Board |
110 |
||||
Battery Precaution |
113 |
|
|||
Battery Removal Tool |
113 |
|
|||
Icon Legend |
114 |
|
|
|
|
Temperature Concerns |
114 |
|
|||
Replacement Steps |
114 |
|
|||
Note About Images in This Guide |
114 |
||||
Screw Sizes |
114 |
|
|
|
|
Bottom Case 115 |
|
|
|
||
Removal |
116 |
|
|
|
|
Replacement |
118 |
|
|
|
|
Battery 119 |
|
|
|
|
|
Removal |
120 |
|
|
|
|
Replacement |
121 |
|
|
|
|
Hard Drive and Bracket |
123 |
|
|||
Removal |
124 |
|
|
|
|
Replacement |
127 |
|
|
|
|
Reinstalling Software That Came with the Computer 129 |
|||||
Installing Mac OS X |
129 |
|
|||
Installing Applications |
129 |
|
|||
Hard Drive/IR/Sleep Indicator Cable 130

Memory 132
Removal 133
Replacement 134
AirPort/Bluetooth Flex Cable 135
AirPort/Bluetooth Card With Holder 137
Optical Drive 143
Optical Drive Data Cable 145
Camera Cable Guide 147
LVDS Cable Guide 150
Display Assembly 153
Display Clutch Cover 156
Removal 157
Replacement 158
Right Speaker / Subwoofer 160
Fan, Right 164
Fan, Left 166
Logic Board 168
Removal 169
Replacement 172
Heatsink 173
Removal 174
Replacement 175
Trackpad 176
Removal 177
Replacement 179
Left Speaker 182
Microphone 184
MagSafe Board |
186 |
Battery Indicator Light Cable and Board 188 |
|
Center Bracket |
190 |
Top Case 192 |
|

Views
Exploded Views 196
Main Assembly 1 196
Main Assembly 2 197
Main Assembly 3 198
External Views 199
Front View 199
Port View 200
Screw Locations 201
Screw Chart 210

Apple Technician Guide
About This Guide
MacBook Pro (15-inch, Mid 2010)
© 2010 Apple Inc. All rights reserved.

Manual Updates
Update 11 June 2010
Troubleshooting
•General Troubleshooting:Common Reset Procedures:Resetting the System Management Controller (SMC):Updated step 3 to clarify LED behavior on the MagSafe connector; deleted statement that resetting the SMC requires resetting the date and time.
Update 14 May 2010
Basics
• Overview:Added new section“Keycap Replacement.”
Troubleshooting
•Symptom Charts:Input/Output Devices:Built-In Keyboard Does Not Work Properly:Changed fist step in Action column of Deep Dive to refer to Keycap Replacement articles HT4002 and HT4003.
•Symptom Charts:Input/Output Devices:Specific Keys Don’t Work:Changed last step in Quick Check column to refer to Keycap Replacement articles HT4002 and HT4003.
Take Apart
•Right Speaker/Subwoofer:Added note about inspecting top and bottom snubbers.
•Top Case:Added note about transferring black plastic standoff to new case.
Update 20 April 2010
Updated ASD and AHT numbers in Basics Overview chapter.
Apple Technician Guide Introduced 13 April 2010
2008-10-19 |
MacBook Pro (15-inch, Mid 2010) Manual Updates 9 |

Feedback
We want your feedback to help improve this and future Technician Guides!
Please email any comments to:
smfeedback3@apple.com
2010-08-05 |
MacBook Pro (15-inch, Mid 2010) About This Guide — Feedback 10 |
Apple Technician Guide
Basics
MacBook Pro (15-inch, Mid 2010)
© 2010 Apple Inc. All rights reserved.
Overview
Specifications
The MacBook Pro (15-inch, Mid 2010) computer features a 2.4, 2.53, or 2.66 GHz Intel dual core processor. For full technical specifications, refer to AppleCare Tech Specs: http://support.apple.com/specs/
2010-08-05 |
MacBook Pro (15-inch, Mid 2010) Basics — Overview 12 |
Battery Precaution and Tool
This computer contains an internal-only battery that is serviceable by Apple-authorized service providers only.Tamper-proof screws are employed to prevent customers from attempting to remove it. Note:Before you begin any procedure, disconnect the battery from the logic board. Failure to do so could damage the computer.
To remove the security screws holding the battery in place, you will need a special tool, a large tri-lobe #0 screwdriver, Apple part number 922-8991, available through GSX.
The Glass Panel
Warning: The glass panel for this model is not a serviceable part. If the glass is broken or scratched, replace the display assembly. Attempting to remove the glass can permanently shatter the display face and damage other parts.
To clean the glass panel, use the Apple polishing cloth (922-8245) and iKlear Apple Polish or Brillianize anti-static spray cleaning solution. Alternatively, IPA (isopropyl alcohol) can be used.
2010-08-05 |
MacBook Pro (15-inch, Mid 2010) Basics — Overview 13 |

Keycap Replacement
Service packages of 78 replacement keycaps are now available in the U.S. and Canada (U.S. version keyboard only) for designated MacBook and MacBook Pro computers.The packages allow you to replace individual keycaps rather than the entire top case.
There are four different keycap packages, based on the color of the key and the type of keyboard (version D and S).
Part number |
Key color |
Keyboard |
922-9277 |
Black |
Version D |
922-9279 |
Black |
Version S |
922-9278 |
White |
Version D |
922-9280 |
White |
Version S |
|
|
|
For step-by-step instructions, refer to the relevant support article:“MacBook/MacBook Pro: Black Keycap Replacement”(HT4002) or “MacBook:White Keycap Replacement”(HT4003).
For an overview of the differences among keycap procedures, refer to “MacBook/MacBook Pro:Keycap Replacement Matrix”(HT4001).
Required Tools
Caution: To prevent scratches or other cosmetic damage to the computer housing, use a soft cloth as a protective layer when removing and installing the external screws.
The following tools are required to service the computer:
•Clean, soft, lint-free cloth
•ESD wrist strap and mat
•Magnetic Phillips #00 screwdriver
•Magnetic Phillips #000 screwdriver (preferably with a long handle)
•Torx T6 screwdriver
•Large tri-lobe screwdriver, for battery removal (Apple part number 922-8991)
•Black stick (Apple probe tool, part number 922-5065) or other nonconductive nylon or plastic flatblade tool
•Thermal grease (Apple thermal compound syringe)
•Alcohol wipes
•Foam wedge fixture for display assembly removal (part number 922-8779)
•Kapton tape
•Tweezers, ESD safe, extra fine points, for flat cable replacement
Refer to Knowledge Base article“Hand Tools for Desktop and Portable Repairs--AP/CA/EU/JP/ LA/US”to purchase tools:
http://docs.info.apple.com/article.html?artnum=500200
In addition, the following software programs are required for troubleshooting:
•Apple Service Diagnostic (ASD), version 3S136
•Apple Hardware Test, version 3A186
2010-08-05 |
MacBook Pro (15-inch, Mid 2010) Basics — Overview 14 |
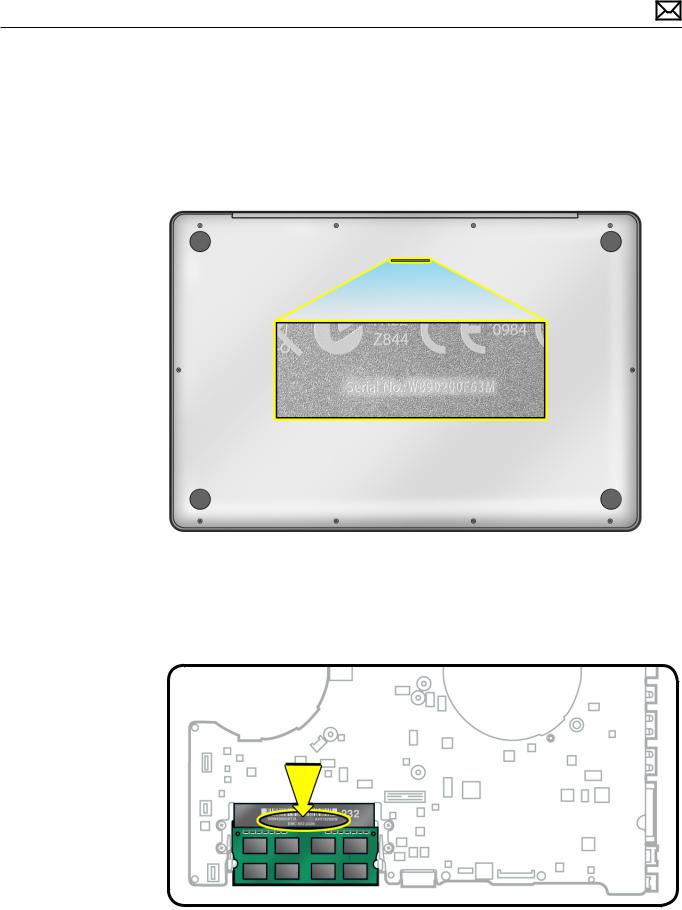
Serial Number Location
System Serial Number on Bottom Case
Turn over the computer to see the system serial number etched on the bottom case.
Bar Code Serial Numbers on Memory Bracket
Additional bar code serial numbers are available inside the bottom case on the bracket that holds the memory DIMMs.The first number (13 alphanumeric characters) is for the logic board; the second number (11 alphanumeric characters) is the system serial number for the computer.
2010-08-05 |
MacBook Pro (15-inch, Mid 2010) Basics — Serial Number Location 15 |
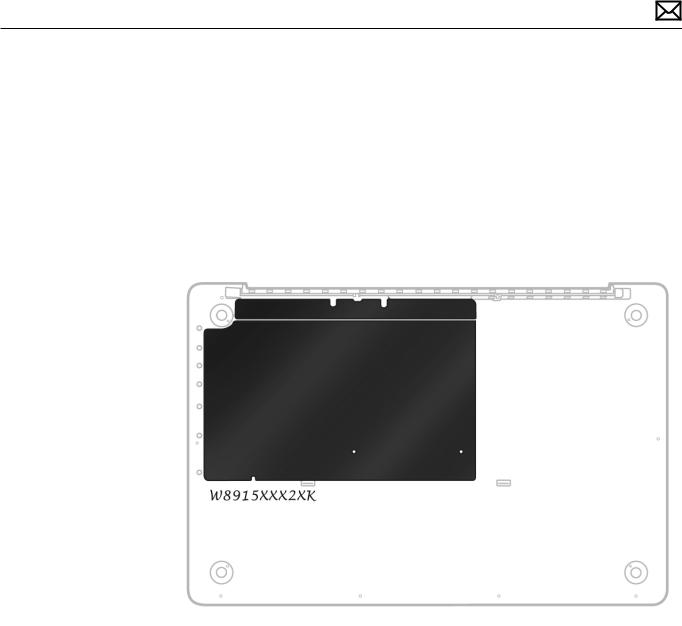
Transferring the System Serial Number
When replacing a bottom case, retain the customer’s bottom case until the repair is complete. Before installing the replacement bottom case, use a fine-tip permanent marker to write the original system serial number legibly in uppercase box letters directly onto the inside of the new bottom case.
CAUTION:Take great care in deciphering the small typeface of the etched serial number on the bottom case.You might need a magnifying glass to see it clearly. It is imperative that you transfer the correct alphanumeric characters. Keep in mind that Apple serial numbers always use the numbers 1 and 0 instead of the Roman letters“I”and“O.”
2010-08-05 |
MacBook Pro (15-inch, Mid 2010) Basics — Serial Number Location 16 |

Apple Technician Guide
Troubleshooting
MacBook Pro (15-inch, Mid 2010)
© 2010 Apple Inc. All rights reserved.

General Troubleshooting
Update System Software
Important:Whenever possible before beginning troubleshooting, ensure the latest software and firmware updates have been applied.
Apple Service Diagnostics
Run Apple Service Diagnostic to determine if any of the thermal sensors are malfunctioning. Replace any failing sensors. See chart below for correlation between error code and part.
Name |
Location |
TC0D |
Logic Board |
TC0P |
Logic Board |
TG0D |
Logic Board |
TG0H |
Logic Board |
TG0P |
Logic Board |
TG0T |
Logic Board |
Th2H |
Logic Board |
TN0D |
Logic Board |
TN0P |
Logic Board |
Tm0P |
Logic Board |
Ts0P |
Trackpad flex |
TB0T |
Battery pack |
TB1T |
Battery pack |
TB2T |
Battery pack |
TB3T |
Battery pack |
Test Points
There is no silkscreen text on final production logic boards.Test points mentioned in troubleshooting charts are solely for reference.
Troubleshooting Theory
For general information on troubleshooting theory, refer to:
http://service.info.apple.com/service_training/en/006/troubleshoot/index.php?page=intro
2010-08-05 |
MacBook Pro (15-inch, Mid 2010) General Troubleshooting — Apple Service Diagnostics 18 |

Hardware vs. Software
For information on how to isolate a hardware issue from a software issue, refer to:
TS1394—Mac OS X:Troubleshooting installation and software updates <http://support.apple. com/kb/TS1394>
HT2956—Troubleshooting Mac OS X installation from CD or DVD <http://support.apple.com/ kb/HT2956>
For information on how to troubleshoot a software issue, refer to:
HT1199—Mac OS X:How to troubleshoot a software issue <http://support.apple.com/kb/ HT1199>
Clamshell Service Diagnostic Read Me
Isolating video and wireless issues in portable computers can be time consuming and confusing.The Clamshell Service Diagnostic (CSD) is a new diagnostic tool that checks Apple’s latest portable computers for the presence of AirPort, Bluetooth, LCD and Ambient Light Sensor (ALS) to assist you in quickly making a failure determination.
Troubleshooting benefits of using CSD include:
•Quick way (less than 1 minute) to determine if clamshell-related modules (AirPort, Bluetooth, LCD and ALS) are electrically connected without taking apart the system.
•Results of CSD can help pinpoint if any clamshell cables may need to be reseated to logic board.
•Diagnostic results can help isolate a video or wireless issue to either the clamshell or the logic board, to avoid unnecessary replacements of these components.
CSD checks for the presence of the computer’s:
•AirPort
•Bluetooth
•LCD
•ALS
CSD does not check for the presence of the computer’s:
•iSight camera
•externally connected hardware components (such as USB or FireWire devices)
CSD does not check for issues with the OS X or other software-related problems such as application or extension conflicts.
Emerging Issues
For the latest on troubleshooting issues, refer to Global Service Exchange (GSX) and reference Service Source, Knowledge Base and the Service News tabs for product specific information.
2010-08-05 |
MacBook Pro (15-inch, Mid 2010) General Troubleshooting — Hardware vs. Software 19 |

Functional Overview |
Refer to this diagram for symptoms related to MacBook Pro (15-inch, Mid 2010) logic board connectors. |
Keyboard Backlight:
-no keyboard backlight illumination
AirPort/Bluetooth card:
-any of these communications failing, -no startup (if AirPort cable is shorted)
AirPort/Bluetooth antennas:
-poor/no AirPort reception,
-unable to reliably pair Bluetooth devices
Camera + Camera LED +Ambient Light Sensor:
-no camera function,
-no LED when camera is on,
-no keyboard illumination (when ALS is covered by hand)
Sata Optical Drive:
-no optical drive visible on Sata bus, -no boot from optical drive
Right Speaker & subwoofer:
-no sound from right speaker or woofer, -distorted right or center sound
Ram: |
|
Fan: |
|
LCD |
|
-no boot, |
|
-intermittent shutdown, |
|
+ LCD Backlight: |
|
-freezes, |
|
-freezes when too hot, |
|
-poor / no video on internal LCD, |
|
-kernel panic, |
|
-noisy fan |
|
-no LCD backlight |
|
-video artifacts when integrated GPU is |
|
|
|
|
|
used (shared ram) |
|
|
|
|
|
|
|
|
|
|
|
|
|
|
|
|
|
Sata Hard Drive
+Infrared receiver
+Sleep LED indicator:
-no hdd visible on Sata bus, -no boot from hd,
-no sleep LED status, -no infrared reception,
-no power on (shorting SMC)
Battery :
-not running when battery only,
-no power on (without a correct model of AC adapter present)
Trackpad + trackpad button thermal sensor:
-no cursor movement, -no click action,
-unit running slow (no trackpad thermal sensor input)
Keyboard
+ Power On button:
-no power on (without shorting pads on logic board),
-dead keys
Magsafe connector (underneath mlb):
-no power on, -no battery charge
Connectors located on the opposite side of the MLB:
Left speaker -no left sound,
-distorted left sound
Microphone
-no internal microphone sound input
Battery indicator LEDs
+battery level button
+magnetic sleep sensor:
-no battery error indication, -no battery level while charging,
-no battery level shown when button pressed, -no sleep when clamshell closed,
-no video on internal display (sleep sensor stuck)
MacBook Pro (15-inch, Mid 2010) General Troubleshooting — Functional Overview 20
2010-08-05
Block Diagram
Refer to this diagram to see how modules are interrelated.
2010-08-05 |
MacBook Pro (15-inch, Mid 2010) General Troubleshooting — Block Diagram 21 |

Liquid Contact Indicators
Liquid contact indicators (LCI) have been added to specific locations on current Mac portables to help determine if systems have been damaged by liquid.The sensors are visible only when the bottom case and some of the modules have been removed. Normally represented by small white dots, the LCIs turn red when they have come in contact with liquid, such as from an accidental spill.
For more information, refer to support article HT3400: “About liquid contact indicators (LCI) on portable computers.”http://support.apple.com/kb/HT3400
Common Reset Procedures
When a reset procedure is required for troubleshooting, follow the applicable steps:
Resetting the System Management Controller (SMC)
To reset power management via the SMC chip:
1.If the computer is on, turn it off by choosing Shutdown from the Apple ( ) menu.
2.Connect the power adapter to the computer and to a working power source.
3.Important:Use the keys on the left side of the keyboard. On the built-in keyboard, press Shift-Control-Option along with the power button once.
Note: When the LED on the MagSafe connector is orange, resetting the SMC will change it to green for a few seconds, indicating that SMC was correctly reset.
4.Wait 5 seconds and press the power button to restart the computer. Note:If bottom case is removed, you may alternately reset the SMC by disconnecting the power adapter and the main battery, and holding the power button down for five seconds.
For more information:
http://www.apple.com/support
HT3964—Apple Portables:Resetting the System Management Controller (SMC) <http://support.apple.com/kb/HT3964>
2010-08-05 |
MacBook Pro (15-inch, Mid 2010) General Troubleshooting — Liquid Contact Indicators 22 |

Resetting the Parameter RAM (PRAM)
To reset PRAM,
1.If the computer is on, turn it off.
2.Locate the following keys on the keyboard:Command, Option, P, and R.You will need to hold these keys down simultaneously in Step 4.
Note:If the keyboard does not have an Option key, use the Alt key instead.
3.Turn on the computer.
4.Press and hold the Command-Option-P-R keys.
Important:You must press this key combination before the gray screen appears.
5.Hold the keys down until the computer restarts and you hear the startup sound for the second time.
6.Release the keys.
For more information:
http://www.apple.com/support
HT1379—Apple Portables:Resetting the PRAM <http://support.apple.com/kb/HT1379>
Starting Up in Safe Mode
A Safe Boot is a special way to start Mac OS X when troubleshooting.To start up into Safe Mode (Safe Boot),
1.Make sure the computer is shut down.
2.Press the power button.
3.Immediately after you hear the startup tone, press and hold the Shift key.
Note:The Shift key should be held as soon as possible after the startup tone but not before.
4.Release the Shift key when you see the screen with the gray Apple and progress indicator (looks like a spinning gear). During startup, ”Safe Boot”appears on the Mac OS X startup screen.To leave Safe Mode, restart the computer normally, without holding down any keys during startup.
For more information:
http://www.apple.com/support
HT1564—What is Safe Boot, Safe Mode? <http://support.apple.com/kb/HT1564>
TS1884—Safe Boot take longer than normal startup <http://support.apple.com/kb/TS1884>
2010-08-05 |
MacBook Pro (15-inch, Mid 2010) General Troubleshooting — Common Reset Procedures 23 |

Display Issue:Pixel Anomalies
When displaying a single color over the screen area, the LCD panel might show one or more pixels that are not properly lit.To determine if the display has an acceptable number of pixel anomalies, follow the steps below:
1.Set the display image to one of the following colors:all-white, all-red, all-green, all-blue, or all-black display. Knowledge Base article 112125:“Service Diagnostics Matrix,”has the LCD Tester Diagnostic Utility that will generate these patterns on the screen.
2.Using a jeweler’s loupe, pocket microscope, or other magnifying device, identify and count each pixel anomaly:
|
|
Bright subpixel anomaly = subpixel that is always on |
||
|
|
Dark subpixel anomaly = subpixel that is always off |
||
3. |
The number of acceptable pixel anomalies for this computer is: |
|||
|
|
|
|
|
|
|
Bright |
Up to 3 |
|
|
|
Dark |
Up to 5 |
|
|
|
Combination |
Up to 7 |
|
4. |
If the number of subpixel anomalies exceeds the acceptable number shown above, |
|||
|
replace the LCD panel display assembly. Numbers outside the acceptable range would be |
|||
|
|
|
|
|
|
|
Bright |
4 or more |
|
|
|
Dark |
6 or more |
|
|
|
Combination |
8 or more |
|
5. |
If the number of subpixel anomalies is acceptable, explain to the customer that the |
|||
|
pixel anomalies are within specifications, and no repair is necessary. |
|||
Important:Do not release the specifications to customers. Instead, inform them that a certain number of subpixel anomalies are considered acceptable, and these factors apply to all manufacturers using LCD technology—not just Apple products.
When speaking with customers, please use the following explanation:
•Active-matrix LCD technology uses rows and columns of addressable locations (pixels) that render text and images on screen. Each pixel location has three separate subpixels (red, green, and blue) that allow the image to be rendered in full color. Each subpixel has a corresponding transistor responsible for turning the subpixel on or off.
•There are typically millions of these subpixels on an LCD display. For example, the LCD panel used in the Apple Cinema HD display is made up of 2.3 million pixels and 6.9 million red, green, and blue subpixels. Occasionally, a transistor does not work perfectly, which may result in the affected subpixel being turned on (bright) or turned off (dark). With the millions of subpixels on a display, it is quite possible to have a low number of faulty transistors on an LCD.Therefore, a certain number of subpixel anomalies are
considered acceptable. Rejecting all but perfect LCD panels would significantly increase the retail price for products using LCD displays.These factors apply to all manufacturers using LCD technology—not just Apple products.
2010-08-05 |
MacBook Pro (15-inch, Mid 2010) General Troubleshooting — Display Issue:Pixel Anomalies 24 |

Symptom Charts
Follow the steps in the order indicated below. If an action resolves the issue, retest the system to verify. Note:A compilation of Quick Check tables is available at http://service.info.apple. com/QRS/en/quickreference.pdf.
Note: There is no silkscreen text on final production logic boards.The photos shown with test points are from pre-production units and are solely for reference.
Startup and Power Issues
No Power
Unlikely cause:display assembly, speakers, optical drive, hard drive
Quick Check
Symptom |
Quick Check |
|||
|
|
|
||
No Power / Dead Unit |
1. |
Verify AC power presence with MagSafe LED |
||
• |
No power |
|
indicating on or charge state. |
|
• |
No image |
2. |
Verify battery status as being partly charged, |
|
• |
No startup chime |
|
charging with AC power. |
|
• No fan or hard drive spin |
3. |
Reset SMC. |
||
• No reset sound from optical |
||||
4. |
Run Battery Diagnostic Utility. |
|||
|
drive |
|||
|
|
|
||
•No sleep LED activity
•No light if Caps Lock pressed
•Non-operational
Deep Dive
Check |
Result |
Action |
Code |
|
|
|
|
1. Isolate peripherals as cause. |
Yes |
Suspect peripherals as cause. |
|
Disconnect all peripherals and |
|
Reconnect each one at a time, |
|
external devices and verify unit |
|
verifying unit operation as |
|
starts. |
|
external device is reinstalled. |
|
|
|
|
|
|
No |
Go to step 2 |
|
|
|
|
|
2010-08-05 |
MacBook Pro (15-inch, Mid 2010) Symptom Charts — Startup and Power Issues 25 |

2. Reset SMC (remove all system |
Yes |
Corrupt SMC state preventing |
|
|
|
power for 1 minute), and verify |
|
power on. Issue resolved with |
|
|
unit starts. Can system start up |
|
SMC reset. |
|
|
after SMC reset. |
|
|
|
|
|
|
|
|
|
|
No |
Go to step 3 |
|
|
|
|
|
|
3. Will system power up with |
Yes |
System can start up from |
P11 |
|
|
battery only? Check battery |
|
known-good battery. Original |
|
|
level LED indicator for status |
|
battery possibly at fault or |
|
|
of battery charge or battery |
|
needs to be charged.Verify |
|
|
use error. Inspect battery |
|
original battery functionality |
|
|
connector for burn marks or |
|
and charge; then verify AC |
|
|
damaged pins if substituting a |
|
adapter functionality. Go to |
|
|
known-good battery to verify |
|
step 4. |
|
|
starting on battery. |
|
|
|
|
|
|
|
|
|
|
No |
System will not power using |
|
|
|
|
known-good battery only. Go |
|
|
|
|
to step 5 |
|
|
|
|
|
|
4. Customer battery may be run |
Yes |
Battery is recognized, |
|
|
|
down, or not recognized. |
|
charging and health is good. |
|
|
Verify customer battery in |
|
Return to test unit with |
|
|
a known-good system is |
|
customer battery and AC |
|
|
recognized and accepting |
|
adapter power. Go to step 6. |
|
|
a charge. Confirm customer |
|
|
|
|
battery is not consumed nor |
|
|
|
|
No |
Replace customer battery |
P10 or |
|
|
defective. |
|||
|
|
for not charging (P10) or not |
P11 |
|
|
|
|
||
|
|
|
recognized (P11). Customer |
|
|
|
|
to purchase a replacement |
|
|
|
|
battery if consumed. |
|
|
|
|
|
|
5. |
Inspect battery cable |
Yes |
Battery power restored, retest |
|
|
connection at logic board and |
|
unit with customer battery |
|
|
reseat if necessary. Replace |
|
and AC adapter power. Go to |
|
|
battery if battery cable is |
|
step 6. |
|
|
damaged or burned.Verify if |
|
|
|
|
No |
Logic board is expected to |
|
|
|
the system powers on from a |
|
||
|
|
power on with battery only. |
|
|
|
charged battery. |
|
|
|
|
|
Inspect and test power on |
|
|
|
|
|
|
|
|
|
|
key. Go to step 10. |
|
|
|
|
|
|
6. |
Inspect MagSafe power |
Yes |
Power adapter is good, go to |
|
|
adapter.Verify AC adapter is |
|
step 7 |
|
|
correct wattage, compatible |
|
|
|
|
No |
Release stuck pin(s). Replace |
P14 |
|
|
with product and works on |
|||
|
|
adapter if it is not working, |
|
|
|
known-good computer. |
|
|
|
|
|
or if it has wire damage or |
|
|
|
|
|
|
|
|
|
|
burned pins. |
|
|
|
|
|
|
2010-08-05 |
MacBook Pro (15-inch, Mid 2010) Symptom Charts — Startup and Power Issues 26 |

7. |
Inspect MagSafe port on |
Yes |
Go to step 8 |
|
|
computer for physical damage, |
|
|
|
|
No |
Clean port assembly. Replace |
X03 |
|
|
debris or metal fragments |
|||
|
|
MagSafe board if necessary. |
|
|
|
attracted to magnetic |
|
|
|
|
|
|
|
|
|
connector.Verify if MagSafe |
|
|
|
|
connector is clean and free |
|
|
|
|
from defects. |
|
|
|
|
|
|
|
|
8. |
Verify adapter status LED |
Yes |
System starts and has power. |
|
|
turns on green then orange |
|
MagSafe LED indicates power |
|
|
indicating power and battery |
|
is flowing to logic board. |
|
|
charge in progress. |
|
Verify customer battery will |
P11 |
|
A green LED can indicate a full |
|
also charge. Review battery |
|
|
|
|
||
|
battery, removal of battery or |
|
health to ensure customer |
|
|
battery not recognized. |
|
satisfaction. |
|
|
|
|
|
|
|
|
No |
AC power is down or battery |
|
|
|
|
is not charging. Go to step 9 |
|
|
|
|
|
|
9. |
Verify power from adapter is |
Yes |
Logic board has power |
X03 |
|
present on logic board. |
|
adapter energy to start |
|
|
Remove system battery, use |
|
system. MagSafe cable reseat |
|
|
AC power only. Reseat or test |
|
or replacement resolved issue. |
|
|
known-good MagSafe cable to |
|
If still no system power on |
|
|
achieve power for logic board. |
|
indications, go to step 10 |
|
|
|
|
|
|
|
|
No |
AC adapter power not going |
|
|
|
|
to logic board power supplies. |
M21 |
|
|
|
Replace logic board. |
|
|
|
|
|
|
10. |
Remove two screws on metal |
Yes |
Power on key works fine, issue |
|
|
cable cover to access keyboard |
|
resolved. |
|
|
connector and plug a known |
|
|
|
|
good powered AC adapter. |
|
Power on key works after |
|
|
-Try to power system using top |
|
keyboard cable is reseated. |
|
|
|
Issue resolved. |
|
|
|
case power key. If no power on, |
|
|
|
|
|
Power on key was stuck, had |
|
|
|
reseat keyboard flex cable to |
|
|
|
|
logic board and retest. |
|
to disconnect keyboard cable |
|
|
|
|
to be able to power on by |
|
|
If no power on , short the two |
|
shorting pin 5 to ground. |
|
|
pads (as illustrated) and verify |
|
Replace top case for stuck |
K05 |
|
if system powers on. |
|
power on key. |
|
|
|
|
|
|
|
- If no power on, the power |
No |
No logic board power on |
|
|
|
when shorting power button |
|
|
|
key may be stuck. Disconnect |
|
|
|
|
|
pads on logic board. |
|
|
|
keyboard cable and try |
|
|
|
|
|
Replace logic board. |
|
|
|
shorting the two pads again. |
|
M01 |
|
|
|
|
||
|
Verify if system powers on. |
|
|
|
|
|
|
|
|
2010-08-05 |
MacBook Pro (15-inch, Mid 2010) Symptom Charts — Startup and Power Issues 27 |

Won’t Start Up
Unlikely cause:display assembly, speakers, fan, camera, microphone
Quick Check
Symptom |
Quick Check |
||
|
|
|
|
Power but No start up |
1. |
Reset SMC. |
|
• No startup chime, some video |
2. |
Verify startup process passes initial memory |
|
activity, Apple logo, startup |
|||
|
checks – no beep errors or flashing sleep LED |
||
spin dial |
|
indicators. Display activity is starting up. |
|
• Startup chime with possible |
3. |
Clear PRAM.Verify starts up from user drive. |
|
beep tones. |
|||
4. |
Connect known-good external bootable device |
||
• Fan, hard drive spin or optical |
|||
|
and press Alt key during startup then select |
||
drive reset sound |
|
||
|
external startup device to bring up system for |
||
• Sleep LED is on , blinking or |
|
||
|
diagnostics. |
||
went out |
5. |
Verify presence and status of user hard drive. Use |
|
• Caps Lock LED toggles when |
|||
|
Disk Utility to repair drive and file permissions. |
||
pressed |
|
||
|
|
||
|
|
|
|
Deep Dive
Check |
Result |
Action |
Code |
|
|
|
|
|
|
1. |
Reset SMC and Clear PRAM to |
Yes |
User hard drive bootable, |
|
|
set default startup device to |
|
issue resolved default |
|
|
internal hard disk drive (HDD). |
|
settings. |
|
|
|
|
|
|
|
|
No |
Customer system not starting |
|
|
|
|
up. Go to step 2 |
|
|
|
|
|
|
2. |
Verify if system is indicating a |
Yes |
Troubleshoot memory issues. |
|
|
memory error with a repeated |
|
Go to step 3 |
|
|
1 or 3 flashes sequence of |
|
|
|
|
No |
Continue with startup |
|
|
|
sleep LED or beep tones (if |
|
||
|
|
sequence verification. Go to |
|
|
|
sound is enabled). |
|
|
|
|
|
step 4 |
|
|
|
|
|
|
|
|
|
|
|
|
3. |
Reseat customer memory |
Yes |
Customer memory defective |
X02 |
|
and/or swap in known- |
|
and replaced. Continue to |
|
|
good memory to isolate bad |
|
verify startup process. Go to |
|
|
memory and replace defective |
|
step 4 |
|
|
parts. |
|
|
|
|
No |
Should known-good memory |
M07 |
|
|
|
|||
|
|
|
fail in one or more slots, |
|
|
|
|
replace logic board. |
|
|
|
|
|
|
2010-08-05 |
MacBook Pro (15-inch, Mid 2010) Symptom Charts — Startup and Power Issues 28 |

4. |
Hold the Alt (Option) key |
Yes |
System starting up from |
|
|
during startup and verify there |
|
customer hard drive. Startup |
|
|
is a bootable hard drive shown |
|
issue resolved. |
|
|
in Startup Manager. Choose |
|
|
|
|
No |
Customer hard drive not |
|
|
|
customer hard drive.Verify if |
|
||
|
|
present or does not start up |
|
|
|
system can start up from this |
|
|
|
|
|
from this drive. Continue to |
|
|
|
drive. |
|
|
|
|
|
find bootable device. Go to |
|
|
|
|
|
|
|
|
|
|
step 5. |
|
|
|
|
|
|
5. |
Insert product OS install disc |
Yes |
Starts up from optical drive - |
|
|
in optical drive. Install disc |
|
customer hard drive not yet |
|
|
is bootable and should be |
|
bootable. Go to step 8. |
|
|
present in Startup Manager. |
|
|
|
|
No |
Computer has no internal |
|
|
|
Verify if system can start up |
|
||
|
|
bootable devices.Test |
|
|
|
from OS install disc. |
|
|
|
|
|
external startup devices. Go |
|
|
|
|
|
|
|
|
|
|
to step 6. |
|
|
|
|
|
|
6. |
Boot from a known-good |
Yes |
System started up from |
|
|
bootable copy of product OS |
|
external device and reports |
|
|
on a USB drive or network |
|
data regarding internal SATA |
|
|
server to start up and verify |
|
devices. Go to step 7. |
|
|
internal mass storage devices |
|
|
|
|
No |
No startup devices available. |
M02 |
|
|
are available using System |
|||
|
|
Replace logic board |
|
|
|
Profiler and Disk Utility. |
|
|
|
|
|
|
|
|
|
|
|
|
|
7. |
Troubleshoot optical drive |
Yes |
Cable reseat solved issue. |
|
|
cable connection, optical cable |
|
Continue to verify hard drive |
|
|
failure or optical drive failure |
|
issues. Go to step 8. |
|
|
step by step: |
|
|
|
|
|
Defective optical drive cable |
X03 |
|
|
-Reseat optical drive cable and |
|
||
|
|
found and replaced. Continue |
|
|
|
retest, |
|
|
|
|
|
to verify hard drive issues. Go |
|
|
|
-Replace with known-good |
|
|
|
|
|
to step 8. |
|
|
|
optical drive cable and retest, |
|
|
|
|
-Test with known-good optical |
|
|
|
|
|
Defective optical drive found |
J03 |
|
|
drive. |
|
||
|
|
and replaced. Continue to |
|
|
|
|
|
|
|
|
|
|
verify hard drive issues. Go to |
|
|
|
|
step 8. |
|
|
|
|
|
|
|
|
No |
Replace logic board |
M19 |
|
|
|
|
|
8. |
Use Disk Utility loaded from |
Yes |
Customer hard drive available |
|
|
OS install disc to verify if hard |
|
for inspections and repair. Go |
|
|
drive is available on device list. |
|
to step 10. |
|
|
Verify if customer hard drive is |
|
|
|
|
No |
Hard drive not present, |
|
|
|
listed in Disk Utility. |
|
||
|
|
troubleshoot hard drive and |
|
|
|
|
|
|
|
|
|
|
cable. Go to step 9. |
|
|
|
|
|
|
2010-08-05 |
MacBook Pro (15-inch, Mid 2010) Symptom Charts — Startup and Power Issues 29 |
9. |
Troubleshoot hard drive cable |
Yes |
After SATA cable is reseated, |
|
|
connection, cable failure or |
|
customer hard drive visible in |
|
|
drive failure step by step: |
|
Disk Utility. Go to step 10. |
|
|
-Reseat hard drive cable and |
|
|
|
|
|
Defective hard drive SATA |
X03 |
|
|
retest, |
|
||
|
|
cable found and replaced. |
|
|
|
-Replace with known-good |
|
Customer hard drive is now |
|
|
hard drive cable and retest, |
|
visible in Disk Utility. Go to |
|
|
-Test with known-good hard |
|
step 10. |
|
|
|
|
|
|
|
drive. |
|
Suspect customer hard drive |
|
|
|
|
|
|
|
|
|
defective. Attempt OS restore. |
|
|
|
|
Go to step 10. |
|
|
|
|
|
|
|
|
No |
Known-good hard drive and |
M19 |
|
|
|
known-good hard drive cable |
|
|
|
|
used, but still no hard drive |
|
|
|
|
seen. Replace logic board |
|
|
|
|
|
|
10. |
Boot system with Shift Key |
Yes |
Go to software |
|
|
down.Verify if system boots in |
|
troubleshooting article |
|
|
Safe Mode. |
|
|
|
|
No |
Go to step 11 |
|
|
|
|
|
||
|
|
|
|
|
11. |
Use Disk Utility to repair |
Yes |
OS on customer hard drive |
|
|
customer hard drive and repair |
|
repaired, issue resolved. |
|
|
permissions if system OS found |
|
|
|
|
|
|
|
|
|
on hard drive.Verify if hard |
No |
Hard drive not bootable, |
|
|
drive is bootable after software |
|
perhaps missing OS. Go to |
|
|
repairs. |
|
step 12 |
|
|
|
|
|
|
12. |
Use Disk Utility to partition |
Yes |
Customer hard drive now |
|
|
customer hard drive with one |
|
starts up from new OS image. |
|
|
GUID partition then restore |
|
Issue resolved |
|
|
Mac OS from product OS install |
|
|
|
|
No |
Replace hard drive. |
H02 |
|
|
disc.Verify if hard drive is |
|||
|
|
|
|
|
|
bootable after OS instal. |
|
|
|
|
|
|
|
|
Intermittent Shutdown
Unlikely cause:hard drive, optical drive
Troubleshooting Shutdown Issues
Before troubleshooting shutdown issues, always do the following:
•Run the available Apple diagnostics to check for cause of previous shutdown(s). Running ASD also helps isolate any abnormal value reading from a thermal, voltage, or current sensor or from a fan speed meter.
•Collect all available information from the user on shutdown details:periodicity, power state when issue happens, running applications, running time before shutdown.
2010-08-05 |
MacBook Pro (15-inch, Mid 2010) Symptom Charts — Startup and Power Issues 30 |
Loading...