


 Loading...
Mac OS X Server
Wiki Tools Deployment Guide
Version 10.6 Snow Leopard
KKApple Inc.
© 2009 Apple Inc. All rights reserved.
The owner or authorized user of a valid copy of Mac OS X Server software may reproduce this publication for the purpose of learning to use such
software. No part of this publication may be reproduced or transmitted for commercial purposes, such as selling copies of this publication or for providing paid-for support services.
Every effort has been made to ensure that the information in this manual is accurate. Apple Inc. is not responsible for printing or clerical errors.
Apple
1 Infinite Loop
Cupertino, CA 95014 408-996-1010 www.apple.com
Use of the “keyboard” Apple logo (Option-Shift-K) for commercial purposes without the prior written consent of Apple may constitute trademark infringement and unfair competition in violation of federal and state laws.
Apple, the Apple logo, iCal, iPod, iPod touch, iTunes, Keynote, Leopard, Mac, Mac OS, Pages, QuickTime, and Safari are trademarks of Apple Inc., registered in the U.S. and other countries. Finder, iPhone, and Snow Leopard are trademarks of Apple Inc.
Adobe, the Adobe logo, Acrobat, the Acrobat logo, Distiller, PostScript, and the PostScript logo are trademarks or registered trademarks of Adobe Systems incorporated in the U.S. and/or other countries.
Other company and product names mentioned herein are trademarks of their respective companies. Mention of third-party products is for informational purposes only and constitutes neither an endorsement nor a recommendation. Apple assumes no responsibility with regard to the performance of these products.
019-1405/2009-08-01

Contents
7 Preface: About This Guide
7What’s in This Guide
8Documentation Map
9Viewing PDF Guides Onscreen
9Printing PDF Guides
10Getting Additional Information
Part I Wiki Tools Walkthrough
12 Chapter 1 Overview of Wiki Tools
12Browser Requirements
12About Wikis
13About Blogs
13About Web Calendars
14About Mailing Lists
15Chapter 2 Using My Page
16About My Page
17Logging In and Logging Out
18Changing My Page Settings
19Changing Account Settings
19Changing Your Password
20Changing Your Mail Rules
20Setting Up Vacation Notices
21Customizing Your Personal Blog
21 Choosing Who Can View Your Blog and Add Comments
23 Chapter 3 Creating Wikis and Blogs
23About Administrators
24Creating a Wiki
25Deleting Wikis
26Changing Wiki Settings
26 Changing General Wiki Settings
3
27Enabling and Disabling Wiki Services
28Choosing Who Can Access a Wiki and Setting Access Permissions
30Adding a Custom Sidebar to the Wiki Homepage
30Changing Advanced Wiki Settings
31Creating a Personal Blog
31Deleting a Personal Blog
32 Chapter 4 Working with Content
32Creating Wiki Pages and Blog Posts
33Deleting Wiki Pages or Blog Posts
34Editing Wiki or Blog Content
34Renaming Wiki Pages or Blog Posts
35Changing Paragraph Styles
35Changing List Styles and Indentation
35Changing Text Styles
36Adding or Removing Links to Other Pages
37Inserting Media
39 Attaching Files
39Inserting and Editing Tables
40Viewing and Editing HTML Source
41Using a Blog Editing Application
41Viewing or Restoring Older Versions of a Page
42Adding or Removing Comments
43Chapter 5 Navigating Wiki Tools
43Understanding Access Control
44About Searching
45Searching Across a Single Wiki
45Searching Across Multiple Wikis
46Saving Your Search
46About Tags
47Adding or Removing Tags
47Viewing All Tags Used in a Wiki
48Editing and Removing Tags from a Wiki
48Viewing Favorite Pages
50Previewing Attachments with Quick Look
51 Chapter 6 Keeping Up to Date
51Viewing Updates on My Page
52Watching Wikis and Blogs
53About RSS
55 Subscribing to an RSS Feed
4 |
Contents |
|
|
57 Chapter 7 Using the Web Calendar
57Navigating through the Web Calendar
58Working with Calendars
58Creating and Deleting Calendars
59Renaming Calendars
59 Applying Calendar Colors
59Showing and Hiding Calendars
60Working with Events
60 Creating, Editing and Deleting Events
60Sending, Viewing, and Accepting or Rejecting Invitations
61Changing Event Details
62Changing Event Notes
62 Rescheduling Events
62Viewing and Previewing Events
63Changing Calendar Settings
64Working with Web Calendars in iCal
65Chapter 8 Viewing Wiki Tools on iPhone or iPod touch
65About Using Wiki Tools on iPhone or iPod touch
65Viewing My Page on iPhone or iPod touch
66Viewing Wikis and Blogs on iPhone or iPod touch
67Viewing Group Calendar Events on iPhone or iPod touch
67 Searching on iPhone or iPod touch
67Adding or Removing Tags on iPhone or iPod touch
68Adding or Removing Comments on iPhone or iPod touch
68Marking Pages with a Star on iPhone or iPod touch
Part II Deploying Wiki Tools
70 Chapter 9 Streamlining Projects
70 Project Wiki Blueprint
72Creating Navigable Wikis
73Eliminating Duplicate Versions of Content
74Managing Project Personnel
74Parallelizing Effort
75Creating High-Level Views
75Reusing Information
76Keeping Interested Parties Aware of Project Updates
77Chapter 10 Improving Internal Documentation
77Internal Documentation Wiki Blueprint
79Choosing Which Documents to Convert to Wiki Format
Contents |
5 |
|
|
79Reducing the Need for Single Ownership
80Maintaining Documents in Wikis Instead of Word Processor Files
82Chapter 11 Communicating More Effectively withWikiTools
83Choosing the Right Method of Communication
84Problems with Email
85Eliminating Response Threads
86Reducing Spam
86Creating Navigable Information
87Chapter 12 Using Wiki Tools in the Classroom
87Classroom Wiki Blueprint
92Preventing Misinformation
92Creating Wiki Yearbooks
92Posting Assignments on a Wiki
93Posting Additional Information on a Wiki
93Using Wikis for Group Sign Up
94Using Wikis for Persistent Projects
95 Index
6 |
Contents |
|
|

About This Guide
Preface
This guide provides a starting point for using wiki tools.
Mac OS X Server includes several web-based tools including wikis, blogs, web calendars, and mailing list archives. Collectively, these are referred to as wiki tools. You can use wiki tools to streamline projects, coordinate teams, and improve communication.
What’s in This Guide
This guide includes the following two parts:
ÂÂ Part I,“Wiki Tools Walkthrough” describes everything you need to know about how to use wiki tools. You’ll learn how to create wikis and blogs, edit them, use tags, and browse wikis on your iPhone.
ÂÂ Part II,“Deploying Wiki Tools” provides tips, strategies, and examples for using wiki tools to streamline projects, coordinate teams, and improve communication.
Note: Because Apple periodically releases new versions and updates to its software, images shown in this book may be different from what you see on your screen.
7

Documentation Map
Mac OS X Server v10.6 has a suite of guides that cover managing web services used by wiki tools. The documentation map below shows some related documentation that you need to set up web services for wiki tools. You can get these guides in PDF format from the Mac OS X Server Resources website at www.apple.com/server/macosx/resources/.
Getting Started
Explains how to set up collaboration services using Server Preferences.
Introduction to Command-Line Administration
Explains how to use NIX shell commands to onfigure and manage servers and services.
Administration
Explains how to set up and customize
iCal service, which is used
Wiki Tools
Deployment Guide
Describes wiki tools and concepts, and explains how to deploy wiki tools in your environment.
Wiki Server
Administration
Explains how to set up wiki services
using Server Admin, and how to customize and extend the services.
Wiki Help
Provides onscreen instructions and answers when you’re using wiki tools.
iPhone Wiki Help
Provides onscreen instructions and answers when you’re using iPhone wiki tools.
8 |
Preface About This Guide |
|
|
Viewing PDF Guides Onscreen
While reading this PDF:
ÂÂ Show bookmarks to see the guide’s outline, and click a bookmark to jump to the corresponding section.
ÂÂ Search for a word or phrase to see a list of places where it appears in the guide. Click a listed place to see the page where it occurs.
ÂÂ Click a cross-reference to jump to the referenced section. Click a web link to visit the website in your browser.
Printing PDF Guides
If you want to print this guide, you can take these steps to save paper and ink: ÂÂ Save ink or toner by not printing the cover page.
ÂÂ Save color ink on a color printer by looking in the panes of the Print dialog for an option to print in grays or black and white.
ÂÂ Reduce the bulk of the printed document and save paper by printing more than one page per sheet of paper. In the Print dialog, change Scale to 115%. Then choose Layout from the untitled pop-up menu. If your printer supports two-sided (duplex) printing, select one of the Two-Sided options. Otherwise, choose 2 from the Pages per Sheet pop-up menu, and optionally choose Single Hairline from the Border menu. (If you’re using Mac OS X v10.4 or earlier, the Scale setting is in the Page Setup dialog and the Layout settings are in the Print dialog.)
You may want to enlarge the printed pages even if you don’t print double sided, because the PDF page size is smaller than standard printer paper. In the Print dialog or Page Setup dialog, try changing Scale to 115%.
Preface About This Guide |
9 |
|
|
Getting Additional Information
For more information, consult these resources:
ÂÂ Apple Support website (support.apple.com/)—access hundreds of articles from Apple’s support organization.
ÂÂ Apple Discussions website (discussions.apple.com/)—share questions, knowledge, and advice.
ÂÂ Apple Mailing Lists website (www.lists.apple.com/)—subscribe to mailing lists so you can communicate using email.
ÂÂ Mac OS X Server website (www.apple.com/server/macosx/)—enter the gateway to extensive information about Mac OS X Server.
10 |
Preface About This Guide |
|
|
Part I: Wiki Tools Walkthrough |
I |
|
|
|
|
|
Find out about wiki tools and how to use them. |
Chapter 1 |
Overview of Wiki Tools |
Chapter 2 |
Using My Page |
Chapter 3 |
Creating Wikis and Blogs |
Chapter 4 |
Working with Content |
Chapter 5 |
Navigating Wiki Tools |
Chapter 6 |
Keeping Up to Date |
Chapter 7 |
Using the Web Calendar |
Chapter 8 |
Viewing Wiki Tools on iPhone or iPod touch |

Overview of Wiki Tools |
1 |
|
|
|
|
Learn about wiki tools.
Mac OS X Server v10.6 includes several web-based wiki tools that allow users to express themselves or to easily form, coordinate, and organize teams.
Browser Requirements
Wiki content can be viewed in any web browser. However, to take advantage of certain features, such as editing wiki pages and viewing the updates list, your browser must support modern web technologies. Examples of modern browsers include:
ÂÂ Safari 3 or later ÂÂ Firefox 3 or later
ÂÂ Internet Explorer 7 or later
About Wikis
A wiki is a web-based, collaborative editing environment for groups. Depending on how the wiki administrator sets permissions, anyone who can view wiki content can also add or edit content.
Wikis have several advantages over other tools:
Advantage |
Description |
Fast and easy |
To edit wiki pages, click the Edit (pencil) button on a page you |
|
want to edit. Add content and use a simple toolbar to apply styles, |
|
add links to other sites, attach files, or insert media.You don’t need |
|
to learn additional tools. |
|
|
Streamlined |
If you see a page you’d like to correct or add content to, you can |
|
change it yourself.With other tools, you’d need to find the owner |
|
of the content and describe the issue to the owner, and then the |
|
owner would need to change the content. |
|
|
Customizable |
It’s easy to change how users navigate to information, through a |
|
broad or deep navigational hierarchy, or through tags. |
|
|
12

Advantage |
Description |
Dynamic |
Because wiki content can be updated by a large group of people, |
|
it is much more dynamic than a static medium like PDF. |
|
|
Parallel content creation |
Multiple people can edit wiki content on different pages |
|
simultaneously. |
|
|
Cross-reference information |
It’s easy to link together information within and outside of the wiki. |
|
|
About Blogs
A blog is like an online journal. Entries are arranged chronologically with the newest entries listed first.
The blog and the wiki share the same simple editing toolbar and thus share a lot of the same advantages.The biggest difference between a blog and a wiki is that the blog has a sense of time, but the wiki doesn’t. In a blog, new content is found more easily than older content. In a wiki, content is found by need or by navigation, rather than by time.
Blogs are available for users and groups. Users can edit their own blog as well as group blogs they have access to.
About Web Calendars
Users and groups can have web calendars. User web calendars let you schedule private events or send event invitations to other users. Other users can’t see your web calendar.
A group web calendar is like a hallway calendar—it’s a very visible calendar that everyone in a group can edit. It’s very good for highlighting important dates. However, you can’t send invitations through group calendars.
Because the web calendar uses iCal server, all users who have set up their server account in iCal will have synced calendars. Event changes made in the web calendar are reflected in iCal, and event changes in iCal are reflected in the web calendar.
If you sync group web calendars, the local iCal version of the calendars are read-only. Any changes you make to the group web calendars are synced with iCal but you can’t edit the calendars in iCal.
The web calendar simplifies creating events and sending invitations.Web calendars don’t allow dependencies, so it’s not good for project management where milestones often depend on each other. It also doesn’t allow delegates, so you should use iCal if you want to use delegates.
Chapter 1 Overview of Wiki Tools |
13 |
|
|
About Mailing Lists
Every wiki group can have a logged mailing list. All mail sent to the group’s email address is archived in the mailing list. Unlike the wiki and blog, content in logged mailing lists can’t be changed or commented on. However, logged mail can be tagged, and because they each have a URL, you can link to them.
The group email address is groupname-wiki@serverurl.
For example, if your group’s name is Aardvark and the URL of your wiki server is www.example.com, the group email address is aardvark-wiki@example.com.
14 |
Chapter 1 Overview of Wiki Tools |
|
|
Using My Page |
2 |
|
|
|
|
Learn about My Page, a personalized hub for wiki tools.
Mac OS X Server v10.6 wiki tools include My Page, a personalized hub that makes it easy to get updates on pages you’re interested in, access available wikis and blogs, view your personal calendar, access webmail, and change your personal settings.
15
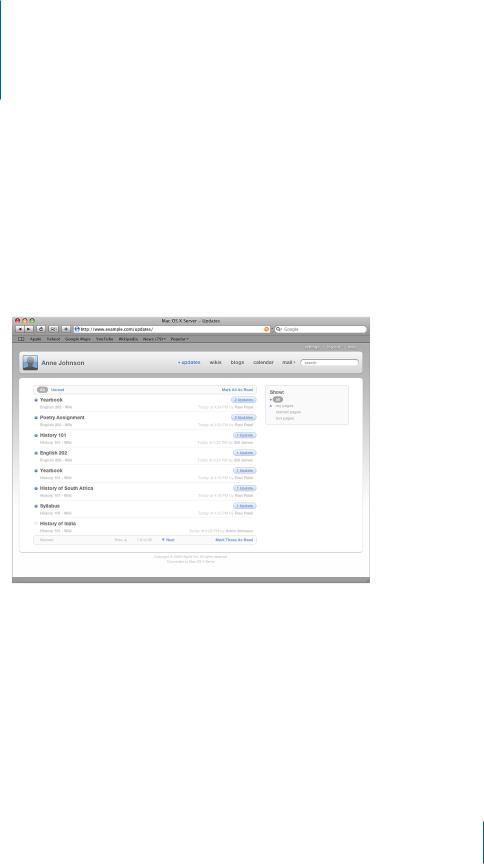
About My Page
My Page is a personalized central hub for wiki tools.
My page
Updates |
Wikis list |
Blogs list |
Personal calendar |
Group wikis |
User blogs |
Wiki pages |
Blog |
Calendar |
Mailing list archive |
Blog |
Blog posts |
Events |
Mailing list entries |
Blog posts |
My Page gives you quick access to: ÂÂ Updates
View and filter content updates and comments on wiki pages and blog posts.
See “Viewing Updates on My Page” on page 51. ÂÂ Wikis
Navigate to wikis or create a new wiki. See “Creating a Wiki” on page 24. ÂÂ Blogs
Navigate to personal blogs or create your own blog. See “Creating a Personal Blog” on page 31.
ÂÂ Calendar
View a personal calendar that you can use to send and receive invitations to events. See Chapter 7,“Using the Web Calendar,” on page 57.
16 |
Chapter 2 Using My Page |
|
|
ÂÂ Mail
Access webmail. For information, click Help in webmail. ÂÂ Search
Search content across all wikis and blogs you have access to. See “About Searching” on page 44.
ÂÂ Settings
Change account and personal blog settings. See “Changing My Page Settings” on page 18.
Logging In and Logging Out
If you’re not logged in, you only have access to publicly accessible wikis and blogs. You can search content across all publicly accessible wikis, but not private wikis or blogs.
Depending on the wiki or blog you’re viewing, unauthenticated users might not be able to add content or create pages, perform administrative functions, or add comments. The wiki or blog can also moderate comments from unauthenticated users. Unmoderated comments are invisible until they are approved.
In My Page, you can tell if you’re logged in because your account name appears at the upper left. If it says “Log in to my page,” you’re not logged in.
In a public wiki or blog, you can tell you’re logged in if a link named “Log Out (account name)” appears. If it says “Log In,” you’re not logged in.
When you access private wikis or blogs, you’re prompted to log in if you’re logged out or if the account you’re logged in as doesn’t have access to the wiki or blog.
To log in:
1In My Page, click “Log in to my page.” In a public wiki or blog, click Log In.
If you open a private wiki, you’re prompted to log in.
2Enter your user name and password.
3If you want to remain logged in after you close your browser, select “Remember Me.”
4Click Log In.
To log out:
mm In My Page, click “log out.”
mm In a wiki or blog, click “Log Out (account name).”
Chapter 2 Using My Page |
17 |
|
|

Changing My Page Settings
When you’re logged in to My Page, you can change your settings. My Page settings are grouped into several categories:
Category |
Settings |
|
Account |
ÂÂ |
Profile Image |
|
ÂÂ |
Preferred Email |
|
|
|
Password |
ÂÂ |
Password Change |
|
|
|
Mail Rules |
ÂÂ |
Rules |
|
|
|
Vacation Notice |
ÂÂ |
Notification Status |
|
ÂÂ |
Vacation Begins and Ends |
|
ÂÂ |
Email Subject |
|
ÂÂ |
Vacation Message |
|
|
|
Blog |
ÂÂ |
Blog Name |
|
ÂÂ |
Theme |
|
ÂÂ |
Podcasting |
|
ÂÂ |
iTunes Category |
|
|
|
Blog Access |
ÂÂ |
Public or Private |
|
ÂÂ |
Comments |
|
ÂÂ |
Comment Moderation |
|
|
|
Password settings are available only if the server is configured to allow online password changing. Mail rules and vacation notice settings are available only if the server is configured to support server-side mail rules.The blog and blog access settings are available if you have a personal blog.
To change My Page settings:
1While viewing My Page, click "settings.”
2Click a settings category on the left and then change settings as desired.
3Click Save.
18 |
Chapter 2 Using My Page |
|
|

Changing Account Settings
Account Preferences settings include:
Setting |
Description |
|
Profile Image |
Displayed in the upper left corner of My Page, as the default |
|
|
image of your blog, and when you leave comments. |
|
|
|
|
Preferred Email |
Email is sent to this address when: |
|
|
ÂÂ |
Someone creates a wiki or gives you access to an existing wiki |
|
|
and decides to notify you |
|
ÂÂ |
Mailing lists you belong to receive mail |
|
If you don’t set a preferred email address, the wiki uses the |
|
|
address found in your directory record. |
|
|
|
|
To view account settings:
1While viewing My Page, click “settings.”
2Select Account.
To change your profile image:
1While viewing account settings, click the current profile image next to“Profile Image.”
2Click Choose File, choose a file, click Choose, and then click OK.
3Click Save.
To change your preferred email address:
1While viewing account settings, enter an email address in the Preferred Email field.
2Click Save.
Changing Your Password
If your server supports online password changing, you can change your password in My Page settings.
To change your password:
1While viewing My Page, click “settings.”
2Select Password.
If there is no Password pane in settings, your server doesn’t support online password changing.
3Enter your current password in the Old Password field and your new password in the New Password field, and then confirm your password in the Confirm Password field.
Chapter 2 Using My Page |
19 |
|
|
Changing Your Mail Rules
If your server is configured to support server-side mail rules, you can create mail rules to filter or transfer mail. For example, if you subscribe to mailing lists, you can have emails from them transfer into their own mail folder. You’ll still receive mailing list messages, but they won’t clutter your inbox.
To view mail rules:
1While viewing My Page, click “settings.”
2Select Mail Rules.
To add mail rules:
1While viewing mail rules settings, use the If pop-up menus to choose criteria for transferring or filtering received emails.
2Choose a destination for the email from the “Transfer Email to” pop-up menu.
3Click Add New Rule.
4Click Save.
To delete mail rules:
1While viewing mail rules settings, click Delete next to rules you want to delete. If no rules are shown, you don’t have mail rules.
2Click Save.
Setting Up Vacation Notices
If your server is configured to support server-side mail rules, you can set up vacation notices. If you enable vacation notices, if someone sends you an email during a specified period of time, an email is automatically sent to them. If they send you multiple emails in a day, they are sent a single vacation notice email that day.
If you’re away from your email for an extended period of time, setting up a vacation notice is a good way to inform people of your unavailability and your expected return date.
To set up a vacation notice:
1While viewing My Page, click “settings.”
2Select Vacation Notice.
3To enable vacation notices, for Enabled, select On; to disable vacation notices, select Off.
4Click the date next to Vacation Begins and then select the date when notifications will start being sent.
5Click the date next to Returning On and then select the date when notifications will stop being sent.
20 |
Chapter 2 Using My Page |
|
|
6In the Email Subject field, enter the subject line of the email that will be sent.
7In the Vacation Message area, enter the body of the email that will be sent.
8Click Save.
Customizing Your Personal Blog
If you’ve already created a personal blog, you can use settings to change its name or theme and to enable podcasting.
To view blog settings:
mm While viewing My Page, click “settings” and then select Blog. mm While viewing your blog’s homepage, click Settings.
To change your blog’s name:
1While viewing blog settings, edit the Blog Name field.
2Click Save.
To change your blog’s theme:
1While viewing blog settings, click Change Theme.
2Select a theme from the list.
3If the theme includes a banner, you can upload a new banner by choosing Upload
New from the Banner Image pop-up menu, then click Choose File, choose a file, and click Choose.
4Click OK.
5Click Save.
To enable podcasting:
1While viewing blog settings, select Enabled next to Podcasting.
2Choose a category from the iTunes Category pop-up menu.
Categorized podcasts are more likely to be found than podcasts without a category.
3Click Save.
Choosing Who Can View Your Blog and Add Comments
If you’ve already created a personal blog, you can choose whether to make it publicly or privately accessible. If you make it publicly accessible, you can allow anyone to view it or restrict access to anyone who logs in. If you make it privately accessible, you can choose specific users or groups who are allowed to view it.
You can restrict who is allowed to add comments: anyone, authenticated users (anyone with an account on the server), or no one. You can also enable comment moderation for all comments or for anonymous comments. If comment moderation is enabled, unmoderated comments aren’t shown unless you approve the comments.
Chapter 2 Using My Page |
21 |
|
|
To view blog access settings:
1While viewing My Page, click “settings.”
2Select Blog Access.
To make your blog publicly accessible:
1While viewing blog access settings, select “This blog can be read by anyone.”
2If you want to restrict access to only those with accounts on the server, select “Users must log in to read.”
3Click Save.
To make your blog privately accessible:
1While viewing blog access settings, select “This blog can only be read by the following people and groups.”
2For every person or group who you want to view your blog, enter their name in the field.
While you’re entering a name, the server checks for matching people or groups. If a match is found, select the match from the menu that appears. If no match is found, make sure you entered the name of the person or group correctly.
3If you want to remove someone from the access list, hold the cursor over the name of the person or group and click Delete (X).
4Click Save.
To enable comments:
1While viewing blog access settings, choose who is allowed to add comments in the Comment pop-up menu.
2Click Save.
To enable comment moderation:
1While viewing blog access settings, choose which type of comments should be moderated in the Comment Moderation pop-up menu.
2Click Save.
22 |
Chapter 2 Using My Page |
|
|

Creating Wikis and Blogs |
3 |
|
|
|
|
Learn how to create and delete wikis and personal blogs.
Creating wikis and a personal blog is easy in wiki tools. After creating a wiki, you can choose who can view or edit it, and customize it to suit your team’s needs.
About Administrators
People who can access a wiki or a blog fall into two categories: administrators and users. Each wiki or blog can have different access permissions, so you might be an administrator for a few wikis and a user for other wikis.
An administrator (also known as an admin) has privileges that users don’t. For example, an administrator can:
ÂÂ Change wiki settings such as:
ÂÂ Changing the wiki image (displayed at the upper left) ÂÂ Renaming the wiki
ÂÂ Describing the wiki
ÂÂ Setting a contact email ÂÂ Changing the wiki theme
ÂÂ Change which services are available ÂÂ Enabling podcasting
ÂÂ Choosing who has access to the wiki and what level of access they have ÂÂ Changing who can comment or moderate comments
ÂÂ Adding a sidebar to the homepage
ÂÂ Choosing which server address the wiki appears under ÂÂ Edit the tags list
ÂÂ Remove other people’s comments
ÂÂ Permanently delete wiki pages or blog posts
23
There are two types of administrators: server administrator and individual wiki or blog administrator. A server administrator has administrative privileges for all wikis and blogs on the server. An individual wiki or blog administrator has administrative privileges for a specific wiki or blog.
Creating a Wiki
Your wiki server can allow anyone who has an account on the wiki server to create a wiki. It can also restrict who can create wikis to a specific group of people.
When you create a wiki, you become an administrator for that wiki and can then customize the wiki to suit your needs.
To create a wiki:
1While viewing My Page, click Wikis.
2Click “Create a new Wiki.”
If this button isn’t shown, you can’t create a wiki on the server.
3Enter a name and description for the wiki and click Create.
The line under the Wiki Name field shows a preview of the URL for the wiki.You can’t change this URL later, but you can rename the wiki. If you want a specific URL, enter a name that gives you the URL you want and rename the wiki later.
The description appears under the name of the wiki in the wiki list on My Page.
4When prompted to choose a theme, select a theme and then click Next. You can change the theme after creating the wiki.
5When prompted to set wiki access, select one of the following and then click Next:
24 |
Chapter 3 Creating Wikis and Blogs |
|
|
Option |
Who can access the wiki |
Options |
Public |
Depending on how you set |
If you want to restrict access |
|
the the options, anyone who |
to only those with accounts on |
|
has access to the wiki server or |
the server, and require them to |
|
anyone with an account |
log in, select “Users must log in |
|
|
to read.” |
|
|
If you want to allow everyone to |
|
|
read content, but require people |
|
|
to log in to create or edit wiki |
|
|
content, select “Users must log |
|
|
in to write.” |
|
|
|
Private |
A specific group of people who |
You can enter the names of |
|
has access to the wiki server |
users or groups to give access |
|
|
to, whether they can read and |
|
|
write or only read the wiki, |
|
|
and select whether to send a |
|
|
welcome email to new wiki |
|
|
members. |
|
|
The welcome email includes a |
|
|
URL link to the new wiki. |
|
|
|
6Click Done to create your wiki.
You can also click Wiki Settings to view your wiki’s settings.
Deleting Wikis
A wiki administrator can delete the wiki. When you delete a wiki, all content in the wiki, blog, calendar, and mailing list is destroyed.
WARNING: Deleting a wiki is permanent. Make sure you back up all critical data stored in the wiki before deleting it.
To delete a wiki:
1While viewing My Page, click Wikis.
2Hold the pointer over the link to the wiki and then click the Delete (X) link.
If the Delete (X) link doesn’t appear, you don’t have administrator access to the wiki and you can’t delete it.
3When prompted to confirm, click Delete.
Chapter 3 Creating Wikis and Blogs |
25 |
|
|

Changing Wiki Settings
A wiki administrator can change wiki settings. Wiki settings are grouped into several categories:
Category |
Settings |
|
General |
ÂÂ |
Change the wiki icon (displayed in the top left) |
|
ÂÂ |
Rename the wiki |
|
ÂÂ |
Describe the wiki |
|
ÂÂ |
Set a contact email |
|
ÂÂ |
Change the wiki theme |
|
|
|
Services |
ÂÂ |
Change which services are available |
|
ÂÂ |
Enable blog podcasts |
|
|
|
Permissions |
ÂÂ |
Choose who has access to the wiki and what level of access |
|
|
they have |
|
ÂÂ |
Choose who can comment and which comments are moderated |
|
|
|
Sidebar |
ÂÂ |
Add a sidebar to the home page |
|
|
|
Advanced |
ÂÂ |
Choose which server addresses the wiki appears under |
|
|
|
Advanced wiki settings are available only for server administrators.
To change wiki settings:
1While viewing a wiki, click the name of the wiki at the upper-left of the page to view the wiki’s homepage.
2Click Settings under “Admin functions” on the right side of the page.
If you don’t see “Admin functions,” you’re not an administrator for the wiki and can’t change wiki settings.
3Click a settings category on the left and change settings as needed.
4Click “save.”
The following topics describe specific settings and how to change them.
Changing General Wiki Settings
A wiki administrator can change general wiki settings such as the wiki icon and title shown at the top of the wiki and the text shown when viewing the list of wikis in My Page. The image and title are shown in both locations, but the description and contact email are shown only when viewing the list of wikis in My Page.
Wiki icons are resized to 52 x 52 on the wiki server.
You can also apply a wiki theme, which affects the following:
ÂÂ Background design ÂÂ Color scheme
26 |
Chapter 3 Creating Wikis and Blogs |
|
|
ÂÂ Font type, size, and spacing ÂÂ Button and toolbar design ÂÂ Layout
ÂÂ Banner image
Themes are separate from content. When you change a theme, you only change how content looks—not the content itself.
To view general wiki settings:
mm While viewing a wiki’s settings, click General.
To change a wiki’s icon:
1While viewing a wiki’s general settings, click the image next to Wiki Icon.
2Click Choose File, choose a file, click Choose, and then click OK.
3Click Save.
To change a wiki’s name, description, or contact email:
1While viewing a wiki’s general settings, edit the Wiki Name, Description, or Contact
Email fields.
2Click Save.
To change themes:
1While editing a wiki’s general settings, click Change Theme.
2Select a theme, and click OK.
3Click Save.
Enabling and Disabling Wiki Services
A wiki administrator can change whether the blog, web calendar, and mailing list archive services are enabled or disabled for a wiki. You can’t disable the wiki service.
If you disable a service and later reenable it, your content is still there.
You can also enable podcasts for the wiki’s blog. Podcasts are downloadable radioand TV-style shows. You can enable podcasts so that whenever you attach an audio or movie file to a new blog entry, it becomes available as a podcast. Any blog post with media can be subscribed to in iTunes.
To enable or disable wiki services:
1While viewing a wiki’s settings, click Services.
2Select the services listed under “Group services” to enable them. To disable them, deselect the services.
3Click Save.
Chapter 3 Creating Wikis and Blogs |
27 |
|
|
To enable blog podcasts:
1While editing a wiki’s settings, click Services.
2Select “Blog.”
3Select “Create a podcast for this wiki’s blog.”
4In iTunes Category, choose the category for these podcasts in iTunes.
5Click Save.
Choosing Who Can Access a Wiki and Setting Access Permissions
A wiki administrator can control access to a wiki by making it publicly or privately accessible.
ÂÂ If you make it publicly accessible, you can allow it to be viewed by anyone who can access the wiki server or only people who have a wiki server account. You can also allow pages to be created or edited by everyone with wiki server accounts or only specific people.
ÂÂ If you make a wiki privately accessible, you can allow particular individuals or groups to view your wiki content, and read or write content.
You can add users or groups as wiki administrators. Wiki administrators are allowed to read and write wiki content and change wiki settings.
You can restrict who is allowed to add comments: anyone, authenticated users (those with an account on the server), or no one. You can also enable comment moderation for all comments, or for anonymous comments. If you enable comment moderation, unmoderated comments aren’t shown unless a wiki administrator approves them.
To view wiki permissions:
mm While viewing a wiki’s settings, click Permissions.
To make a wiki publicly accessible:
1While viewing the wiki’s permissions settings, select “This wiki can be read and edited by anyone.”
2If you want to restrict access to only those with accounts on the server and require them to log in, select “Users must log in to read.”
3If you want to restrict content creation and editing to only those with accounts on the server, select “Users must log in to write.”
ÂÂ If you want to allow everyone with accounts on the server to create or edit wiki content, select “All authenticated users can write.”
ÂÂ If you want to restrict content creation and editing to specific people, select“Only the following users and groups can write.”
In the Public field, enter the name of each person or group who you want to be able to view or edit the wiki.
28 |
Chapter 3 Creating Wikis and Blogs |
|
|
When you enter a name, the server checks for matching people or groups. If a match is found, select the match from the menu that appears. If no match is found, make sure you entered the name correctly.
If you want to remove a person or group from the access list, hold the cursor over the name and click Delete (X).
4Click Save.
To make a wiki privately accessible:
1While viewing the wiki’s permissions settings, select “This wiki can be read and edited by only the following users and groups.”
2In the Private field, enter the name of each person or group who you want to be able to view or edit the wiki.
When you enter a name, the server checks for matching people or groups. If a match is found, select the match from the menu that appears. If no match is found, make sure you entered the name correctly.
3After adding a person or group to the access list, click the pop-up menu at the right of a name in the list and choose whether the person or group can read and write wiki content or only read wiki content.
4If you want to remove a person or group from the access list, hold the cursor over the name and click Delete (X).
5If you want the server to send an email notification to everyone with access to the wiki, select “Send welcome email to new members.”
6Click Save.
To make someone a wiki administrator:
1While viewing the wiki’s permissions settings, enter in the Admins field the name of each person or group who you want to be able to view or edit your wiki.
When you enter a name, the server checks for matching people or groups. If a match is found, select the match from the menu that appears. If no match is found, make sure you entered the name correctly.
2If you want to remove a person or group from the admin list, hold the cursor over the name and click Delete (X).
3Click Save.
To enable comments on a wiki:
1While viewing the wiki’s permissions settings, choose from the Comment pop-up menu who is allowed to add comments.
2Click Save.
Chapter 3 Creating Wikis and Blogs |
29 |
|
|

To enable comment moderation on a wiki:
1While viewing the wiki’s permissions settings, choose from the Comment Moderation pop-up menu which type of comments should be moderated.
2Click Save.
Adding a Custom Sidebar to the Wiki Homepage
Sidebars are lists of recently updated pages shown on the wiki’s homepage. The default sidebars include:
Sidebar |
Description |
What’s Hot |
Lists the most recently updated or new pages that are tagged |
|
with “hot,” in reverse chronological order. |
|
|
Recent Changes |
Lists the most recently updated or new pages, in reverse |
|
chronological order. |
|
|
A wiki administrator can add a custom sidebar that shows pages tagged with a specific tag, in reverse chronological order of when the pages were last edited. For example, you could create a custom sidebar named “Status Reports” of all pages tagged with “status.”Whenever someone creates or updates a page tagged with “status,” the sidebar lists the page.
To add a custom sidebar:
1While editing a wiki’s settings, click Sidebar.
2In the Sidebar Title field, name the sidebar.
3In the Search Tag field, enter the tag required for pages listed in the sidebar.
4Click Save.
Changing Advanced Wiki Settings
If your server supports multiple host names and you’re a server administrator, you can choose which host name your wiki responds to and whether it responds to multiple hostnames simultaneously.
For example, a server might support wikis at the urls www.example.com, wiki.example.com, and intranet.example.com.You can configure the wiki so it responds to any, all, or any combination of those URLs.
If you don’t choose a specific host name for the wiki, all eligible host names are used.
30 |
Chapter 3 Creating Wikis and Blogs |
|
|
Loading...