


!
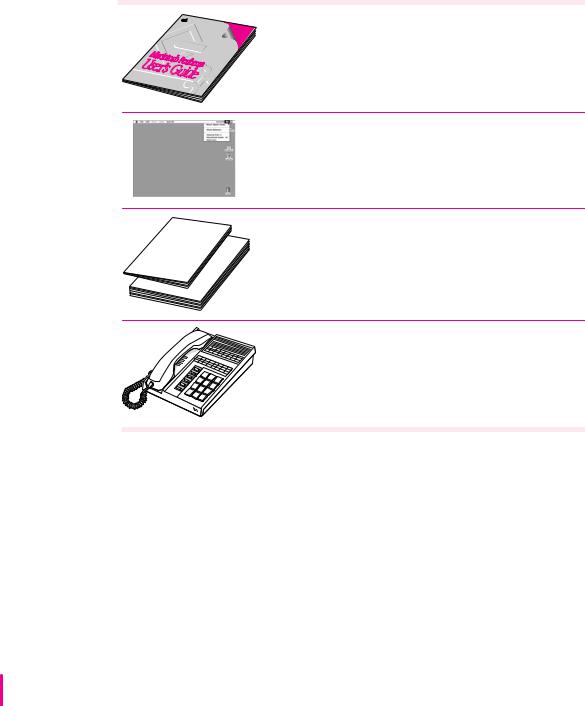
Macintosh Performa
User’sGuide
Includes setup, troubleshooting, and important health-related information for Macintosh Performa 500 series computers
K Apple Computer, Inc.
© 1994 Apple Computer, Inc. All rights reserved.
Under the copyright laws, this manual may not be copied, in whole or in part, without the written consent of Apple. Your rights to the software are governed by the accompanying software license agreement.
The Apple logo is a trademark of Apple Computer, Inc., registered in the U.S. and other countries. Use of the “keyboard” Apple logo (Option-Shift-K) for commercial purposes without the prior written consent of Apple may constitute trademark infringement and unfair competition in violation of federal and state laws.
Every effort has been made to ensure that the information in this manual is accurate. Apple is not responsible for printing or clerical errors.
Apple Computer, Inc. 1 Infinite Loop
Cupertino, CA 95014-2084 (408) 996-1010
Apple, the Apple logo, Apple SuperDrive, AppleTalk, EtherTalk, LaserWriter, Macintosh, MacTCP, and Performa are trademarks of Apple Computer, Inc., registered in the U.S. and other countries.
Apple Backup, Apple Desktop Bus, Apple Restore, AppleScript, Balloon Help, Disk First Aid, Extensions Manager, Finder, and Macintosh PC Exchange, PowerTalk, and QuickDraw are trademarks of Apple Computer, Inc.
Adobe, Adobe Illustrator, Adobe Photoshop, and PostScript are trademarks of Adobe Systems Incorporated, which may be registered in certain jurisdictions.
ExposurePro is a registered trademark of Baseline Publishing, Inc.
Helvetica and Times are registered trademarks of Linotype Company.
IBM is a registered trademark of International Business Machines Corporation.
QMS is a registered trademark of QMS, Inc.
QuarkXPress is a registered trademark of Quark, Inc.
SuperPaint is a registered trademark of Aldus Corporation.
Tektronix is a registered trademark of Tektronix, Inc.
Trinitron is a trademark of Sony Corporation, registered in the U.S. and other countries.
Simultaneously published in the United States and Canada.
Mention of third-party products is for informational purposes only and constitutes neither an endorsement nor a recommendation. Apple assumes no responsibility with regard to the performance or use of these products.
The Apple Publishing System
This Apple manual was written, edited, and produced on a desktop publishing system using Apple Macintosh computers and QuarkXPress. Technical illustrations were drawn in Adobe™ Illustrator; screen shots were created and modified with system software, ExposurePro, Aldus SuperPaint, and Adobe Photoshop. Proof pages were created on Apple LaserWriter printers and on QMS and Tektronix color printers. Final pages were output directly to separated film on a PostScript™-driven imagesetter.
Text type is Times®, display type is Helvetica® Narrow, and cover type is Apple Garamond, Apple’s corporate font. Ornaments are custom symbols designed for Apple Computer.
PostScript, the LaserWriter page-description language, was developed by Adobe Systems Incorporated.

Contents
|
Communications regulation information |
vi |
|||||
1 |
Getting Started |
1 |
|
|
|
|
|
|
Plugging in the computer |
1 |
|
|
|||
|
Installing an expansion card |
3 |
|
|
|||
|
Connecting the mouse and keyboard |
4 |
|
||||
|
Connecting other equipment |
6 |
|
|
|||
|
Turning the computer on for the first time |
7 |
|||||
|
What’s next? |
10 |
|
|
|
|
|
|
Learning the basics |
11 |
|
|
|
||
|
Reviewing the basics |
12 |
|
|
|
||
|
Turning the computer off |
13 |
|
|
|||
|
Turning the computer on |
13 |
|
|
|||
|
Where to find answers |
14 |
|
|
|
||
2 |
Getting Help |
|
15 |
|
|
|
|
|
Getting answers to your questions |
16 |
|
||||
|
Identifying objects on the screen |
24 |
|
||||
|
Learning useful shortcuts |
25 |
|
|
|||
iii

3 Expanding Your Computer and Using Special Features |
27 |
||
Your computer at a glance |
28 |
|
|
Where to connect additional equipment 29 |
|
|
|
Using the sound control buttons on your computer |
30 |
|
|
Using the screen control buttons on your computer |
31 |
|
|
Using the built-in microphone 32 |
|
|
|
Connecting to a network |
33 |
|
|
Expanding memory 34 |
|
|
|
Installing internal drives |
34 |
|
|
4 Using Programs and Backing Up Disks |
35 |
Installing application programs 36 |
|
Working with several programs at a time |
37 |
Protecting the information on a disk 38 |
|
Restoring the information on your hard disk |
44 |
5 Troubleshooting |
47 |
|
|
|
|
When you have questions |
|
47 |
|
|
|
When you run into trouble |
47 |
|
|
||
Solutions to common problems |
51 |
|
|||
Repairing a damaged disk |
|
62 |
|
|
|
Initializing a hard disk |
69 |
|
|
|
|
Installing or reinstalling system software |
72 |
||||
iv Contents

Appendix A Health, Safety, and Maintenance Tips |
75 |
|
|||
Health-related information about computer use |
75 |
||||
Safety instructions |
80 |
|
|
|
|
Handling your computer equipment |
81 |
|
|
||
Cleaning your equipment |
85 |
|
|
|
|
Appendix B |
Installing an Expansion Card |
87 |
||
|
Opening the computer |
88 |
|
|
|
Installing the card 91 |
|
|
|
|
Closing the computer |
93 |
|
|
Appendix C |
Special Keys on Your Keyboard |
95 |
||
|
Index |
97 |
|
|
Contents v

Communications regulation information
FCC statement
This equipment has been tested and found to comply with the limits for a Class B digital device in accordance with the specifications in Part 15 of FCC rules. See instructions if interference to radio or television reception is suspected.
Radio and television interference
The equipment described in this manual generates, uses, and can radiate radio-frequency energy. If it is not installed and used properly—that is, in strict accordance with Apple’s instructions—it may cause interference with radio and television reception.
This equipment has been tested and found to comply with the limits for a Class B digital device in accordance with the specifications in Part 15 of FCC rules. These specifications are designed to provide reasonable protection against such interference in a residential installation. However, there is no guarantee that interference will not occur in a particular installation.
You can determine whether your computer system is causing interference by turning it off. If the interference stops, it was probably caused by the computer or one of the peripheral devices.
If your computer system does cause interference to radio or television reception, try to correct the interference by using one or more of the following measures:
mTurn the television or radio antenna until the interference stops.
mMove the computer to one side or the other of the television or radio.
mMove the computer farther away from the television or radio.
mPlug the computer into an outlet that is on a different circuit from the television or radio. (That is, make certain the computer and the television or radio are on circuits controlled by different circuit breakers or fuses.)
If necessary, consult an Apple-authorized service provider or Apple. See the service and support information that came with your Apple product. Or, consult an experienced radio/television technician for additional suggestions. You may find the following booklet helpful: Interference Handbook (stock number 004-000-00493-1). This booklet, prepared by the Federal Communications Commission, is available from the U.S. Government Printing Office, Washington, DC 20402.
IMPORTANT Changes or modifications to this product not authorized by Apple Computer, Inc., could void the FCC Certification and negate your authority to operate the product.
This product was tested for FCC compliance under conditions that included the use of Apple peripheral devices and Apple shielded cables and connectors between system components. It is important that you use Apple peripheral devices and shielded cables and connectors between system components to reduce the possibility of causing interference to radios, television sets, and other electronic devices. You can obtain Apple peripheral devices and the proper shielded cables and connectors through an Apple-authorized dealer. For non-Apple peripheral devices, contact the manufacturer or dealer for assistance.
vi Communications Regulation Information
DOC statement
DOC Class B Compliance This digital apparatus does not exceed the Class B limits for radio noise emissions from digital apparatus as set out in the interference-causing equipment standard entitled “Digital Apparatus,” ICES-003 of the Department of Communications.
Observation des normes—Classe B Cet appareil numérique respecte les limites de bruits radioélectriques applicables aux appareils numériques de Classe B prescrites dans la norme sur le matériel brouilleur : “Appareils Numériques”, NMB-003 édictée par le ministre des Communications.
VCCI statement
CD-ROM drive
WARNING Making adjustments or performing procedures other than those specified in your equipment’s manual may result in hazardous exposure.
WARNING Do not attempt to disassemble the cabinet containing the laser. The laser beam used in this product is harmful to the eyes. The use of optical instruments, such as magnifying lenses, with this product increases the potential hazard to your eyes. For your safety, have this equipment serviced only by an Apple-authorized service provider.
If you have an internal Apple CD-ROM drive in your computer, your computer is a Class 1 laser product. The Class 1 label, located on the computer, indicates that the drive meets minimum safety requirements. A service warning label is on the CD-ROM drive inside the computer.
Communications Regulation Information |
vii |

Macintosh Performa computer
Keyboard cable
(built into the keyboard)
Your computer may come with either of these keyboards, depending on which Performa model you have.
Keyboard and keyboard cable
Mouse |
Computer power cord |
|
Optional security screws |

Follow the instructions in this
chapter to set up your computer
and learn the basics.
1 Getting Started
The illustration on the facing page shows all the equipment you will need to set up your computer and begin using it. Place your equipment on a sturdy, flat surface near a grounded wall outlet. Before following the setup instructions in this chapter, you may want to read “Arranging Your Office” in Appendix A (in the section on health-related information) for tips on adjusting your work furniture so that you’re comfortable when using the computer.
Plugging in the computer
Before you plug your Macintosh into a wall socket (and before you connect anything else to your Macintosh), carefully read all the setup instructions in this chapter. Then, begin by plugging in the computer according to the instructions that follow. The plug grounds the computer and protects it from electrical damage while you are setting up.
1
When you are ready to begin, follow these steps:
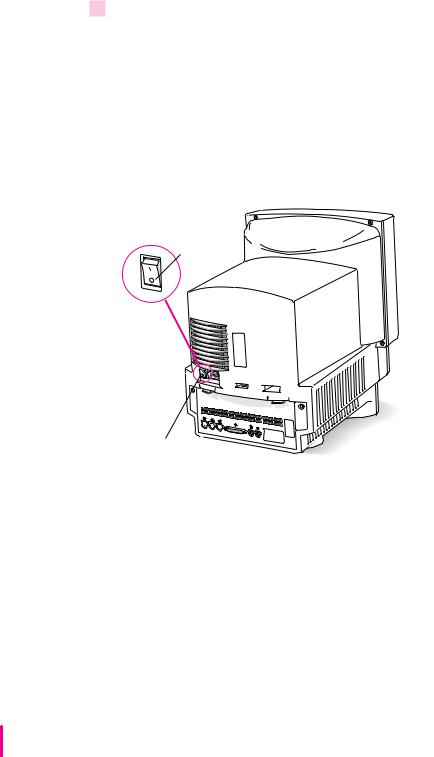
1Plug the socket end of the power cord into the recessed power plug (marked with the symbol ≤) on the back of the computer.
Make sure at least one end of the power cord is within easy reach so that you can unplug the computer when you need to.
IMPORTANT To protect both yourself and the computer from electrical hazards, the computer should remain turned off until you are finished
connecting its parts. Check the power switch at the back of the computer. Make sure that the bottom of the switch (marked with the j symbol) is pressed in
“Off” position
Power switch
2 Chapter 1
2 Plug the other end of the power cord into a three-hole grounded outlet or power strip.
Socket end of the power cord
Power cord plug
WARNING This equipment is intended to be electrically grounded. Your Macintosh is equipped with a three-wire grounding plug—a plug that has a third (grounding) pin. This plug will fit only a grounded AC outlet. This is a safety feature. If you are unable to insert the plug into the outlet, contact a licensed electrician to replace the outlet with a properly grounded outlet. Do not defeat the purpose of the grounding plug!
Installing an expansion card
If you purchased an expansion card separately from your Macintosh, install it now. (See Appendix B, “Installing an Expansion Card,” for instructions.) If you don’t have an expansion card, continue with the next section, “Connecting the Mouse and Keyboard.”
Getting Started |
3 |
Connecting the mouse and keyboard
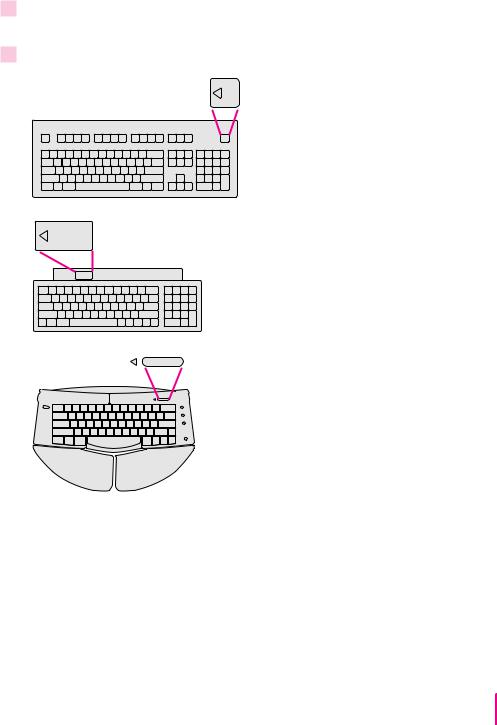
You have a choice of several keyboards for your Macintosh. The way you connect the mouse and keyboard depends on whether the keyboard has a separate cable or a built-in cable.
Connecting a keyboard with a built-in cable
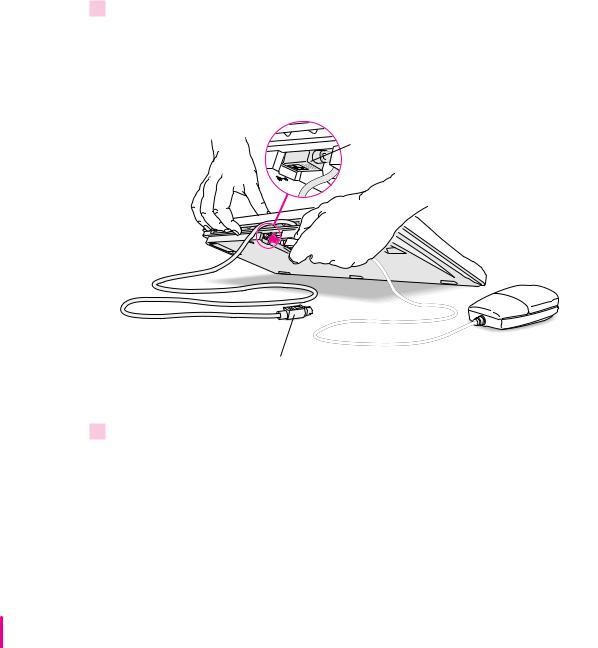
1Plug the mouse cable into the recessed port on the back of the keyboard.
The plug and the port are marked with the ◊ icon (symbol). The positions of the port and icon on your keyboard may be different from those pictured.
By the way: A port marked with the ◊ icon is called an Apple Desktop Bus (ADB) port.
Plug the mouse all the way into the recessed port on the keyboard. The flat part of the plug should be pointing down, as shown here.
This cable plugs into the Apple Desktop Bus (ADB) port on the back of the computer. The ADB port on the computer is marked with the ◊ icon.
2Plug the keyboard cable into the port marked with the ◊ icon on the back of the computer.
Some monitors have a port to which you can connect the keyboard or mouse. See the information that came with your monitor.
4 Chapter 1
Connecting a keyboard with a separate cable
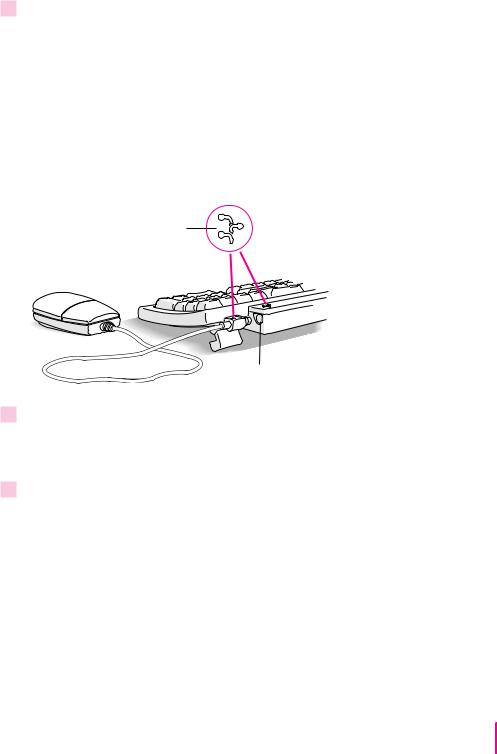
1Plug the mouse cable into the port on either side of the keyboard.
Most right-handed people prefer to use the mouse with their right hand; most left-handed people prefer to use their left hand. Plug the mouse into the port on the side you prefer.
The plug and the port are marked with the ◊ icon (symbol). Align the symbols before you insert the plug. (The positions of the port and icon on your keyboard may be different from those pictured here.)
By the way: A port marked with the ◊ icon is called an Apple Desktop Bus (ADB) port.
This icon is on both the cable and the port.
ADB port
2Plug the keyboard cable (both ends are the same) into the other port on the keyboard.
If you plugged the mouse cable in on the right, for example, plug the keyboard cable in on the left.
3Plug the keyboard cable into the port marked with the ◊ icon on the back of the computer.
Some monitors have a port to which you can connect the keyboard or mouse. See the information that came with your monitor.
Getting Started |
5 |

Connecting other equipment
If you are new to the Macintosh, it’s a good idea to get some experience using your computer before you connect other equipment, such as a printer or scanner. To learn basic Macintosh skills, continue with the instructions in this chapter.
When you’re ready to connect other equipment to your Macintosh, see the instructions in Chapter 3.
6 Chapter 1
Turning the computer on for the first time
To turn the computer on for the first time, follow these steps:
1Press the top of the power switch at the back of the computer. The top of the switch is marked with the symbol i.
2Press the Power key (marked with a triangle) on your keyboard.
Getting Started |
7 |
3Check to see what’s on your screen.
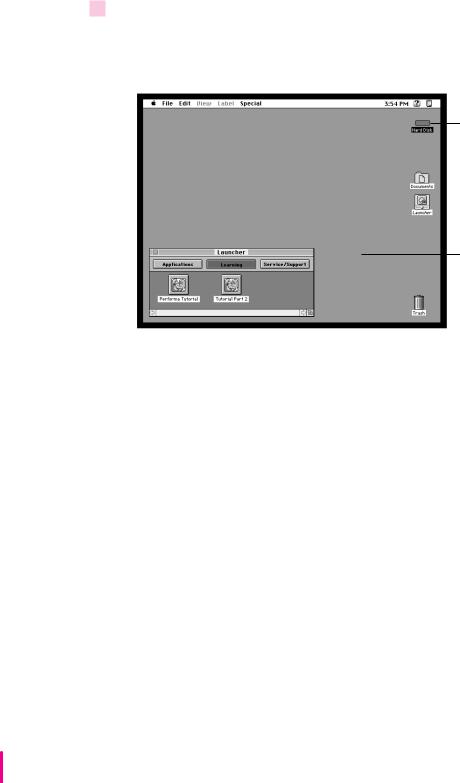
m If you see the Macintosh desktop, as in the illustration below, your system software has already been installed, and your computer is ready to use. Skip now to the section “What’s Next?” later in this chapter.
Hard disk icon
Macintosh desktop
mIf you see a blinking question mark, you need to install system software on your computer’s hard disk. (System software is the set of programs your computer uses to start itself up.) See “Installing or Reinstalling System Software” in Chapter 5 for information on how to install system software.
mIf you see anything else on your screen, or nothing at all, see the next section, “Problems Turning Your Computer On?”
8 Chapter 1

Problems turning your computer on?
If the screen is dark, check these items to see if you can identify the problem:
mIs the computer turned on? The power-on light on the front of the computer should be on. Make sure the top of the power switch on the back of the computer is pressed in.
mIs the power cord connected to the computer, and is the cord plugged into a power source?
mIf the computer is plugged into a power strip, is the power strip turned on?
mAre the keyboard and mouse cables connected correctly? (Don’t disconnect the keyboard or mouse cable while the computer is on. You could damage your equipment.)
mIs the brightness control on the monitor (marked with the Û icon) turned down?
mIf you have an external hard disk attached to your computer, is that hard disk turned on? Was it turned on before you turned on the computer? If you’re not sure, turn everything off. Then turn on the external hard disk before you turn on your computer.
If you see a blinking question mark on the screen, you probably need to install system software. See “Installing or Reinstalling System Software” in Chapter 5.
Getting Started |
9 |

What’s next?
Congratulations! You’ve finished setting up your computer. Now continue with one of the following steps:
mIf you are new to the Macintosh, turn to the next section, “Learning the Basics.”
mIf you are an experienced Macintosh user, turn to Chapter 2, “Getting Help,” to learn about Macintosh Guide, your main source of information when you’re working with the Macintosh.
mIf you want to connect other equipment, such as a printer, to your computer, see Chapter 3, “Expanding Your Computer and Using Special Features.”
Before you begin working with your computer, be sure to read the important health and safety information in Appendix A.
IMPORTANT If you need to turn off your computer at any point, please see “Turning the Computer Off” later in this chapter. It is very important to use the correct procedure for shutting down your Macintosh before turning it off.
10 Chapter 1
Learning the basics
If you are new to the Macintosh, you should begin by looking at the easy-to-use program called the Performa Tutorial. The two-part tutorial teaches you the basic skills you’ll need to use your computer. To start the tutorial, follow these steps:
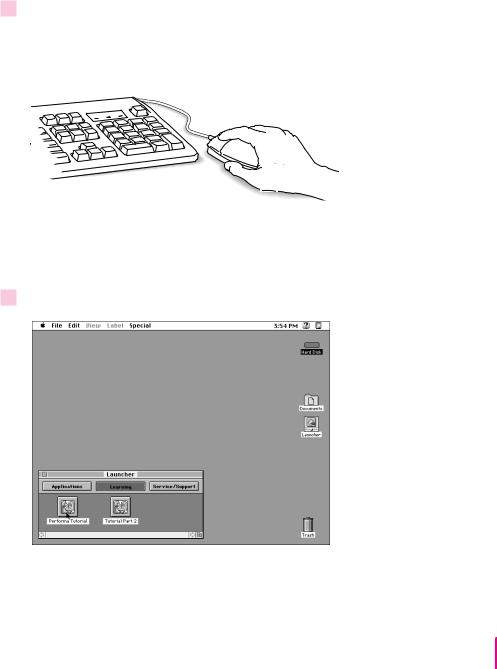
1Slide your mouse along your mouse pad or desk.
Hold the mouse as shown, with the cable pointing away from you. Don’t press the mouse button (under your index finger). Notice that the arrow (8) on the screen moves in the same direction that you move the mouse.
If the arrow doesn’t move, make sure that the cables connecting the mouse and keyboard are secure and that your mouse is positioned as shown in the illustration.
2 Move the mouse so that the arrow is over the button labeled “Performa Tutorial.”
If you don’t see the picture for the Performa Tutorial on your screen, put the arrow on the word “Learning” and click (press and release) the mouse button.
Getting Started |
11 |
If you run out of room on your mouse pad or desk while moving the mouse, pick up the mouse and place it where there’s more room. (The arrow on the screen moves only when the mouse is in contact with the mouse pad or desk.)
3Without moving the mouse, click the mouse button.
A window appears welcoming you to the tutorial. You can set this book aside for now and follow the instructions on the screen. When you have completed both parts of the tutorial, return to this book.
Reviewing the basics
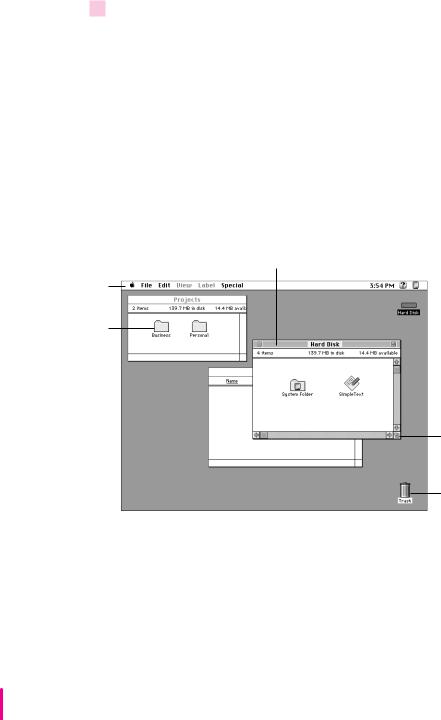
The strip across the top of the screen is called the menu bar. The symbols and words in it represent menus of commands.
Icons are small pictures that represent disks, folders, programs, and documents. To open an icon, click the icon twice quickly.
Windows are boxes that display text, graphics, or icons. To bring a partially covered window to the front, click anywhere in the window.
The following illustration summarizes many of the basic skills and terms you learned from the tutorial.
|
|
|
|
|
You can have several application |
|
|
To find an answer to |
programs open at once. To see which |
||||
To move a window, |
program is active or to switch from |
|||||
a question, look in the |
one program to another, use this |
|||||
drag it by the title bar. |
Guide (h) menu. |
|
|
|
menu (called the Application menu). |
|
|
|
|||||
|
|
|
|
|
|
This icon represents your |
|
|
|
|
|
|
|
|
|
|
|
|
|
computer’s internal hard disk. |
|
|
|
To bring hidden portions of a |
To close a window, |
|
||
|
|||
click the close box. |
window’s contents into view, |
||
|
|
|
click the scroll arrows. |
To change the size or shape of a window, drag the size box.
To throw away an item you no longer want, drag it to the Trash and choose Empty Trash from the Special menu.
12 Chapter 1
Turning the computer off
To turn the computer off, you choose Shut Down from the Apple (K) menu. Detailed instructions follow. (Note: The Shut Down command is also available in the Special menu.)
1Move the tip of the arrow to the Apple (K) menu at the top left of the screen.
2With the tip of the arrow on the apple, press and hold down the mouse button.
3While holding down the mouse button, move the arrow down the list of choices until the words “Shut Down” are highlighted, then release the mouse button.
You can also shut down your computer from the keyboard.
1Press the Power key (marked with a triangle) on the keyboard.
You will see a message asking whether you want to shut down or continue working.
2Click Shut Down.
To turn the computer on, simply press the Power key again.
Turning the computer on
To turn on the computer after you’ve shut it down with either the menu command or the keyboard:
m Press the Power key (marked with a triangle) on the keyboard.
Leave the power switch on the back of your computer in the “on” position (with the top part of the switch, marked with the symbol i, pressed in).
Getting Started |
13 |
Where to find answers
When you have questions about using your Macintosh, there are several places you can look for answers.
MacintoshPerforma
User’sGuide
In this book
Use this book to help you set up your computer and learn about it, or to find solutions to problems.
In the Guide menu
The Guide menu (marked with the h icon) is your main source of information about the Macintosh. To learn how to get different kinds of help from the Guide menu, see Chapter 2 in this book.
In other manuals
For answers to questions about other equipment or about application programs you have purchased, see the manuals that came with the equipment or programs.
From Apple’s customer support hotline
If you can’t find an answer in any of the materials provided, call the customer support hotline. (The phone number for the hotline is in the service and support information that came with your computer.)
14 Chapter 1
Use the instructions in this chapter to learn about the help available to you in the Guide menu.
2 Getting Help
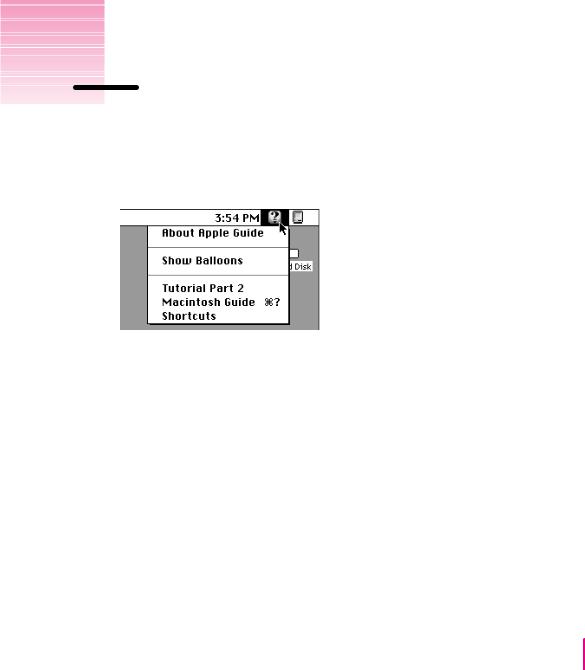
The Guide menu is your main source of information when you’re working with your computer. The menu is identified by a question mark (h) in the upper-right corner of the screen.
15
Getting answers to your questions
When you have a question while working with your computer, you can get the answer by choosing Macintosh Guide from the Guide menu.
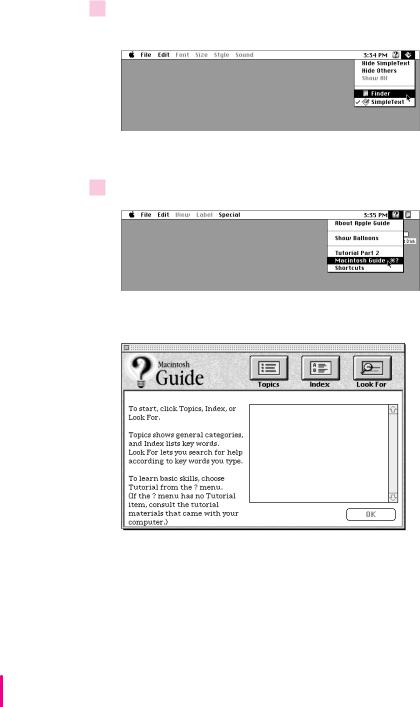
1Pull down the Application menu (in the upper-right corner of the screen) and choose Finder to make it the active application program.
A checkmark in the menu indicates that the Finder is the active program.
2 Pull down the Guide menu (marked with the h icon) and choose Macintosh Guide.
The Macintosh Guide window appears.
Whenever you use Macintosh Guide, its window remains in front of other windows. If the window gets in your way, you can move it by dragging its title bar (the gray bar across the top of the window).
16 Chapter 2
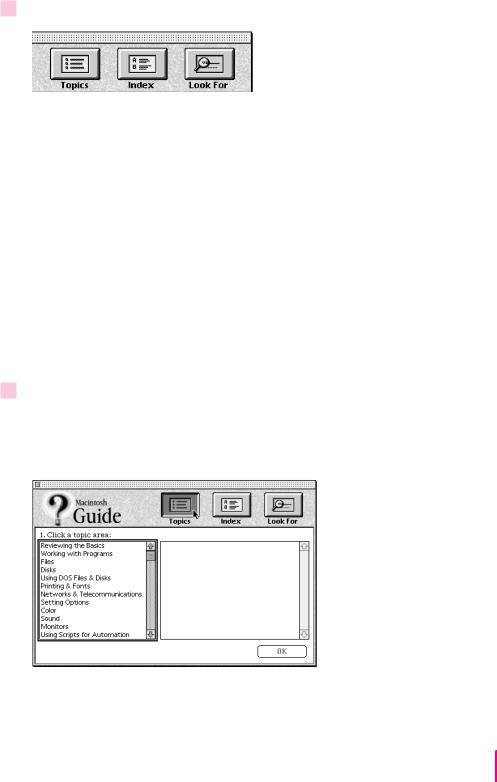
3Notice the three buttons at the top of the window: Topics, Index, and Look For.
Macintosh Guide gives you three ways of finding information:
m Topics lets you choose from a list of general subjects; it is like the table of contents in a book.
m Index lets you choose from an alphabetical list of more specific subjects; it is like the index in a book.
m Look For lets you search for information related to a specific word or phrase that you type.
In the following sections you will practice using each method.
If you have problems while using Macintosh Guide, see “Tips for Using Macintosh Guide” later in this chapter.
Getting answers with the Topics button
1In the Macintosh Guide window, click the Topics button.
A list of general topics appears on the left side of the Macintosh Guide window. (Depending on the hardware and software you have, the list of topics may look different.)
Getting Help |
17 |
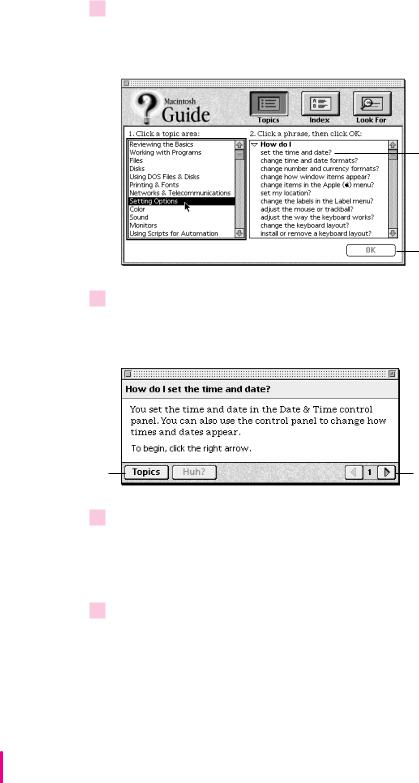
2Click “Setting Options” in the list of topics.
When you click any topic area, a list of related questions appears on the right side of the Macintosh Guide window.
To get instructions, click a question…
…and then click OK.
3Click the question “How do I set the time and date?” and then click OK. Or double-click the question.
A small window appears with instructions for you to follow.
If you want to return to the main Macintosh Guide window, click here.
Click here to see the next step (if there is one).
4Read and follow the instructions in this window.
Macintosh Guide provides step-by-step instructions to answer the question you selected. When you have completed each step, click the right arrow in the lower-right corner to see the next step.
5When you have completed all the steps, click the Topics button in the lower-left corner to return to the main Macintosh Guide window.
Now continue with the next section.
18 Chapter 2
Getting answers with the Index button
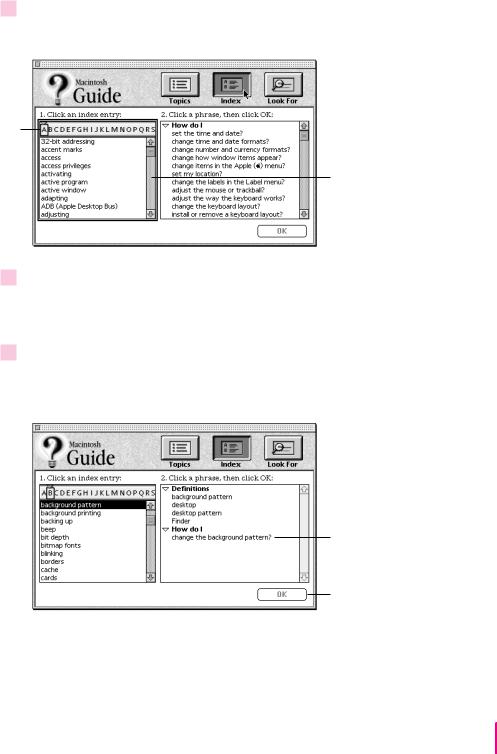
1In the Macintosh Guide window, click the Index button.
An alphabetical list of subjects appears on the left side of the window.
Slider
Scroll bar
2Scroll through the alphabetical list until the phrase “background pattern” is visible.
You can scroll through the list either by dragging the slider to the letter B or by using the scroll bar at the right of the list.
3Click the phrase “background pattern” in the alphabetical list.
When you click any index entry, a list of related questions appears on the right side of the Macintosh Guide window.
To get instructions, click a question…
…and then click OK.
Getting Help |
19 |
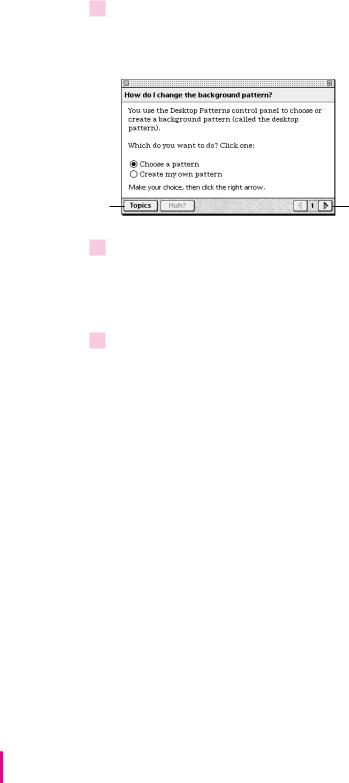
4Click the question “How do I change the background pattern?” and then click OK. Or double-click the question.
A small window appears with instructions for you to follow.
If you want to return to the main Macintosh Guide window, click here.
Click here to see the next step (if there is one).
5Read and follow the instructions in the window.
Macintosh Guide provides step-by-step instructions to answer the question you selected. When you have completed each step, click the right arrow in the lower-right corner to see the next step.
6When you have completed all the steps, click the Topics button in the lower-left corner to return to the main Macintosh Guide window.
Now continue with the next section.
20 Chapter 2
Getting answers with the Look For button
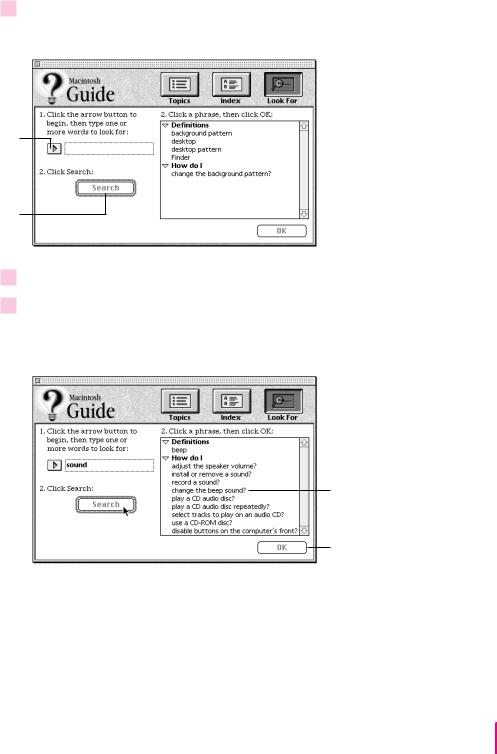
1In the Macintosh Guide window, click the Look For button.
A small box appears on the left side of the window, where you can type text.
To activate the text box, click here.
Type a word or phrase  in the text box…
…and then click here.
2Click the arrow button to activate the text box.
3Type “sound” in the text box and then click Search.
When you click Search, a list of questions related to the word or phrase you typed appears on the right side of the Macintosh Guide window.
To get instructions, click a question…
…and then click OK.
Getting Help |
21 |

4Click the question “How do I change the beep sound?” and then click OK. Or doubleclick the question.
A small window appears with instructions for you to follow.
If you want to close Macintosh Guide, click here.
Click here to see the next step (if there is one).
5Read and follow the instructions in the window.
Macintosh Guide provides step-by-step instructions to answer the question you selected. When you have completed each step, click the right arrow in the lower-right corner to display the next step.
6When you have completed all the steps, click the close box in the upper-left corner to close Macintosh Guide.
22 Chapter 2
 Loading...