


 Loading...
K Service Source
Macintosh SE

K Service Source
Basics
Macintosh SE
Basics |
Overview - 1 |
|
|
|
|
Overview
This manual contains complete repair procedures for the Macintosh SE, shown at left.
Figure: Macintosh SE

K Service Source
Specifications
Macintosh SE

|
Specifications |
Processor - 1 |
|||
|
|
|
|
||
|
|
Processor |
|||
CPU |
Motorola 68000 microprocessor |
||||
|
|
7.83 MHz |
|||
|
|
32-bit architecture |
|||
|
|
|
|
|
|
|
|
|
|
|
|

|
Specifications |
Memory - 2 |
|||
|
|
|
|
||
|
|
Memory |
|||
RAM |
1 or 2 MB, expandable to 4 MB |
||||
ROM |
256K |
||||
PRAM |
256 bytes of memory |
||||
|
|
CMOS custom chip with seven-year lithium battery |
|||
|
|
|
|
|
|
|
|
|
|
|
|

Specifications |
Disk Storage - 3 |
|
|
|
|
Floppy Drive
Hard Drive
Disk Storage
1.4 MB floppy drive
Optional second internal and external floppy drive
Optional 20 or 40 MB hard drive
Optional external hard drive

Specifications |
I/O Interfaces - 4 |
|
|
|
|
Expansion
SCSI
Apple Desktop Bus
Serial
Sound
I/O Interfaces
Macintosh SE expansion slot; uses a 96-pin Euro-DIN connector
Uses a 50-pin connector (internal) and a DB-25 connector (external)
Two Apple Desktop Bus (ADB) connectors for communication with keyboard, mouse, and other input devices
Two RS-232/RS-422 serial ports; 230.4 Kbaud maximum; mini DIN-8 connectors
For external audio amplifier (standard miniature)

|
Specifications |
I/O Devices - 5 |
|||
|
|
|
|
||
|
|
I/O Devices |
|||
Keyboards |
Apple Keyboard: 81 keys, including numeric keypad and cursor |
||||
|
|
keys |
|||
|
|
Apple Extended Keyboard: 105 keys, including 15 function keys, |
|||
|
|
separate cursor pad, and 10-key numeric keypad |
|||
Mouse |
Mechanical tracking; optical shaft at 3.94 pulses per mm (100 |
||||
|
|
pulses per in.) of travel; ADB connector |
|||
|
|
|
|
|
|
|
|
|
|
|
|

Specifications |
Sound and Video - 6 |
|
|
|
|
Sound Generator
Video Display
Sound and Video
Four-voice sound with 8-bit digital/analog conversion using 22kHz sampling rate
9-in. (diagonal) screen; high-resolution, 512 by 342 pixel, bit-mapped display
Specifications |
Electrical - 7 |
|
|
|
|
Electrical
Line Voltage
Frequency
Maximum Power
90–140 VAC; 170–270 VAC
47–63 Hz
100 W

|
Specifications |
Physical - 8 |
|||
|
|
|
|
||
|
|
Physical |
|||
Dimensions |
Height: 13.6 in. (34.5 cm) |
||||
|
|
Width: 9.6 in. (24.4 cm) |
|||
|
|
Depth: 10.9 in. (27.6 cm) |
|||
Weight |
17–21 lb. (7.7–9.5 kg) |
||||
|
|
Weight varies depending on whether hard drive or second floppy |
|||
|
|
drive is installed |
|||
|
|
|
|
|
|
|
|
|
|
|
|

K Service Source
Troubleshooting
Macintosh SE

Troubleshooting |
General/ - 1 |
|
|
General
The Symptom Charts included in this chapter will help you diagnose specific symptoms related to your product. Because cures are listed on the charts in the order of most likely solution, try the first cure first. Verify whether or not the product continues to exhibit the symptom. If the symptom persists, try the next cure. (Note: If you have replaced a module, reinstall the original module before you proceed to the next cure.)
If you are not sure what the problem is, or if the Symptom Charts do not resolve the problem, refer to the Flowchart for the product family.
For additional assistance, contact Apple Technical Support.

|
|
Troubleshooting |
|
Symptom Charts/Video - 2 |
|
|
|
|
|
|
|
|
|
|
Symptom Charts |
||
|
|
|
|||
|
|
|
Video |
||
Screen is dark; audio |
1 |
Turn brightness control clockwise. |
|||
and drive operate |
2 |
Check video cable connections. |
|||
|
|
|
3 |
Replace analog board. |
|
|
|
|
4 |
Replace video board. |
|
|
|
|
5 |
Replace logic board. Retain customer’s SIMMs. |
|
|
|
|
6 |
Replace CRT. |
|
Screen is bright and |
1 |
Replace analog board. |
|||
audio is present, but |
2 |
Replace video board. |
|||
no video information |
3 |
Replace logic board. Retain customer’s SIMMs. |
|||
is visible |
|
|
|
||

|
|
Troubleshooting |
|
Symptom Charts/Video (Continued) - 3 |
|
|
|
|
|
|
|
|
|
|
Video (Continued) |
||
|
|
|
|||
Screen is completely |
1 |
Replace power supply. |
|||
dark and fan is not |
2 |
Replace analog board. |
|||
running |
|
|
|
||
Single vertical line is |
1 |
Replace analog board. |
|||
displayed |
2 |
Replace video board. |
|||
|
|
|
3 |
Replace logic board. Retain customer’s SIMMs. |
|
|
|
|
4 |
Replace CRT. |
|
Single horizontal line |
1 |
Replace analog board. |
|||
is displayed |
2 |
Replace video board. |
|||
|
|
|
3 |
Replace logic board. Retain customer’s SIMMs. |
|
|
|
|
4 |
Replace CRT. |
|

|
Troubleshooting |
|
Symptom Charts/Video (Continued) - 4 |
||
|
|
|
|||
|
|
Video (Continued) |
|||
Vertical bars or |
1 |
Replace logic board. Retain customer’s SIMMs. |
|||
stripes are displayed |
2 |
Replace analog board. |
|||
Horizontal bars or |
1 |
Replace logic board. Retain customer’s SIMMs. |
|||
stripes are displayed |
2 |
Replace analog board. |
|||
White dot is displayed |
1 |
Verify that yoke cable is connected. |
|||
in center of screen |
2 |
Replace analog board. |
|||
|
|
3 |
Replace CRT. |
||
Screen jitters at top |
Replace analog board. |
||||
left and/or lower |
|
|
|
|
|
right |
|
|
|
|
|
|
|
|
|
|
|
|
|
|
|
|
|

 Troubleshooting Symptom Charts/Peripheral - 5
Peripheral
Cursor does not move |
1 |
Check mouse connection. |
|
2 |
Inspect inside of mouse for buildup of dirt and other |
|
|
contaminants. Clean mouse if necessary. |
|
3 |
If mouse was connected to keyboard, connect it to ADB port |
|
|
instead. If mouse works, replace keyboard. |
|
4 |
If mouse does not work in any ADB port, replace mouse. |
|
5 |
Replace logic board. Retain customer’s SIMMs. |
Cursor moves, but |
1 |
Replace mouse. |
clicking mouse |
2 |
Replace logic board. Retain customer’s SIMMs. |
button has no effect |
|
|
No response to any |
1 |
Check keyboard connection to ADB port. |
key on keyboard |
2 |
Replace keyboard cable. |
|
3 |
Replace keyboard. |
|
4 |
Replace logic board. Retain customer’s SIMMs. |

|
Troubleshooting |
Symptom Charts/Peripheral (Continued) - 6 |
|
|
|
|
|
|
|
Peripheral (Continued) |
|
|
|
||
Cannot double-click to open application, disk, or server
1Remove any multiple system files on hard drive.
2Clear parameter RAM. (System 7: Hold down <Command> <Option> <P> <R> during startup but before “Welcome to Macintosh” appears. System 6: Hold down <Command> <Option> <Shift> keys and select Control Panel from Apple pull-down menu.) Reset mouse controls.
3If mouse was connected to keyboard, connect it to ADB port instead. If mouse works, replace keyboard.
4If mouse does not work in any ADB port, replace mouse.
5Replace logic board. Retain customer’s SIMMs.

|
Troubleshooting |
|
Symptom Charts/Peripheral (Continued) - 7 |
||
|
|
|
|||
|
|
Peripheral (Continued) |
|||
Known-good |
1 |
Make sure that Chooser and Control Panel are set correctly. |
|||
LaserWriter does not |
2 |
Make sure correct version of system software is being used. |
|||
|
Make sure software is known-good. |
||||
|
|
3 |
Reset PRAM. |
||
|
|
4 |
Refer to Networks and Communications manual. |
||
Known-good |
1 |
Make sure that Chooser and Control Panel are set correctly. |
|||
ImageWriter or |
2 |
Make sure correct version of system software is being used. |
|||
ImageWriter II does |
|
Make sure software is known-good. |
|||
not print |
3 |
Reset PRAM. |
|||
|
|
4 |
Replace printer interface cable. |
||
|
|
5 |
Replace logic board. Retain customer’s SIMMs. |
||
|
|
|
|
|
|
|
|
|
|
|
|
 Troubleshooting Symptom Charts/Floppy Drive - 8
Floppy Drive
Audio and video are |
1 |
Replace bad disk. |
present, but one |
2 |
Replace floppy drive data cable. |
internal floppy drive |
3 |
Replace internal floppy drive. |
does not operate |
4 |
Replace logic board. Retain customer’s SIMMs. |
External floppy drive |
1 |
Replace bad disk. |
does not operate |
2 |
Make sure external floppy drive is on right side of Macintosh |
|
|
SE/30. |
|
3 |
Replace external drive. |
|
4 |
Replace logic board. Retain customer’s SIMMs. |
Disk ejects; display |
1 |
Replace disk with known-good system disk. |
shows icon with |
2 |
Replace floppy drive. |
blinking “X” |
3 |
Replace logic board. Retain customer’s SIMMs. |

 Troubleshooting Symptom Charts/Floppy Drive (Continued) - 9
Floppy Drive (Continued)
Unable to insert disk |
1 |
Insert opened paper clip into hole beside drive. |
all the way |
2 |
Switch off system power and hold mouse button down while |
|
|
switching power back on (to complete eject cycle). |
|
3 |
Replace floppy drive. |
Internal floppy drive |
1 |
Replace bad disk. |
runs continuously |
2 |
Replace floppy drive. |
|
3 |
Replace logic board. Retain customer’s SIMMs. |
|
4 |
Replace floppy drive data cable. |
Does not eject disk |
1 |
Insert opened paper clip into hole beside drive. |
|
2 |
Switch off system and hold mouse button down while |
|
|
switching system back on (to complete eject cycle). |
|
3 |
Replace floppy drive. |

 Troubleshooting Symptom Charts/Floppy Drive (Continued) - 10
Floppy Drive (Continued)
Audio and video are |
1 |
Replace bad disk. |
|
present, but neither |
2 |
Replace logic board. Retain customer’s SIMMs. |
|
internal floppy drive |
|
|
|
operates |
|
|
|
|
|
|
|
|
|
|
|

 Troubleshooting Symptom Charts/Hard Drive - 11
Hard Drive
Internal or external |
1 |
Verify that SCSI loopback card is not attached. |
|
hard drive does not |
2 |
Replace hard drive data cable. |
|
operate |
3 |
Replace hard drive. |
|
|
4 |
Replace logic board. Retain customer’s SIMMs. |
|
Works with internal |
1 |
Verify SCSI device switch setting on external device. |
|
or external SCSI |
2 |
Replace terminator on external device. |
|
device but not with |
3 |
Verify that terminator is installed on internal hard drive. |
|
both |
4 |
Replace hard drive select cable. |
|
|
|
|
|
|
|
|
|

 Troubleshooting Symptom Charts/Miscellaneous - 12
Miscellaneous
Clicking, chirping, |
1 |
Verify analog board cable is connected at J12 on logic board. |
or thumping sound |
2 |
Replace power supply. |
|
3 |
Replace analog board. |
|
4 |
Replace logic board. Retain customer’s SIMMs. |
Smoke/odor |
1 |
Replace power supply. |
|
2 |
Replace analog board. |
No video, no audio, and |
1 |
Connect power cord. |
no drive operation |
2 |
Switch power on. |
|
3 |
Replace power cord. |
|
4 |
Replace power supply. |
|
5 |
Replace analog board. |
|
6 |
Replace logic board. Retain customer’s SIMMs. |

 Troubleshooting Symptom Charts/Miscellaneous (Continued) - 13
Miscellaneous (Continued)
“Sad Macintosh” icon |
1 |
Replace bad disk. |
|
|
2 |
Replace SIMM(s) if code matches any of those given in |
|
|
|
“Isolating a Faulty SIMM” in Hardware/Memory. |
|
|
3 |
Verify that three-pin jumper on logic board is configured |
|
|
|
correctly for system RAM. See Hardware/Memory. |
|
|
4 |
Replace logic board. Retain customer’s SIMMs. |
|
“Sad Macintosh” icon |
1 |
Verify that three-pin jumper on logic board is configured |
|
and black vertical |
|
correctly for system RAM. See Hardware/Memory. |
|
line are displayed; |
2 |
Replace logic board. Retain customer’s SIMMs. |
|
screeching sound |
|
|
|
|
|
|
|
|
|
|
|

K Service Source
Take Apart
Macintosh SE
Take Apart |
Cover - 1 |
|
|
|
|
Cover |
Cover |
|
|
No preliminary steps are |
|
|
required before you begin |
|
|
this procedure. |
|
|
±Warning: This product |
|
|
contains high voltage and a |
|
|
high-vacuum picture tube. |
|
|
To prevent serious injury, |
|
|
review CRT safety in |
|
|
Bulletins/Safety. |
|
|
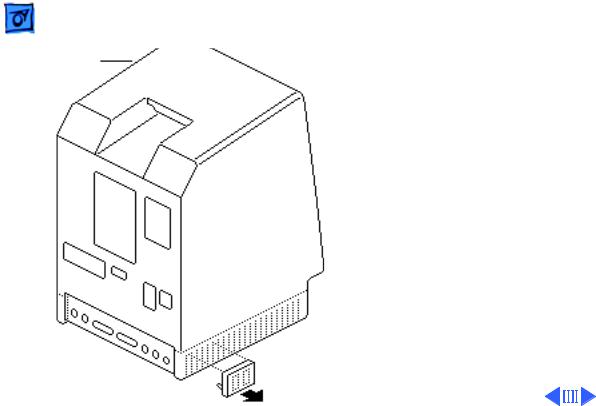
1 Using a small |
|
|
screwdriver, pry off |
|
|
the reset/interrupt |
|
|
switch (if present). |
|

Take Apart |
Cover - 2 |
|
|
|
|
2 |
Using a Torx |
|
|
screwdriver, remove |
|
|
the four case screws and |
|
|
separate the cover from |
|
|
the chassis with a pull- |
|
|
apart tool. |
|
3 |
Carefully lift up the |
|
|
cover and set it aside. |
|
4 |
Remove the paper |
|
|
insulating shroud from |
|
|
the bottom of the |
|
|
computer. |
|

Take Apart |
Cover - 3 |
|
|
|
|
Replacement Note:
Reinstall the two black case screws in the bottom of the cover and the two silvercolored case screws in the top of the cover.
Loading...