


 Loading...
Congratulations, you and your MacBook Pro were made for each other.

Welcome to your MacBook Pro.
www.apple.com/macbookpro
Built-in FaceTime |
|
|
|
Thunderbolt |
HD camera |
|
|
|
high-speed I/O |
Make video calls |
|
|
|
Connect |
to the latest iPad, |
|
|
|
high-performance |
iPhone, iPod touch, |
|
|
|
devices and |
or Mac. |
|
|
|
displays. |
Help Center |
|
|
|
Help Center |
facetime |
|
|
|
thunderbolt |
|
|
|
|
|
|
MacBook Pro |
|||
|
|
|
|
|
Click anywhere |
Pinch to zoom |
Rotate images |
Scroll up or down Swipe between |
View Mission |
|
|
|
full-screen apps |
Control |
Multi-Touch trackpad
Use gestures like these to control your Mac.
Help Center
 gestures
OS X Lion
www.apple.com/macosx
Mission Control |
Launchpad |
Full screen |
A bird’s-eye view |
Instant access |
Make apps |
of what’s running |
to all your apps |
full screen |
on your Mac. |
in one place. |
with a click. |
Help Center |
Help Center |
Help Center |
mission control |
launchpad |
full screen |
Mac App Store
The best way to discover and download Mac apps.
Help Center
 mac app store
H
ELLO
F
RO M
M 
C UP
E
R
TINO,CA 
iPhoto |
iMovie |
GarageBand |
|
Group your |
Organize, edit, |
Turn home |
Create great- |
messages by |
and share |
videos into home |
sounding songs |
conversations. |
your photos. |
blockbusters. |
with ease. |
Help Center |
iPhoto Help |
iMovie Help |
GarageBand Help |
photos |
movie |
record |
Contents
Chapter 1: Ready, Set Up, Go
9What’s in the Box
9Setting Up Your MacBook Pro
16 Putting Your MacBook Pro to Sleep or Shutting It Down
Chapter 2: Life with Your MacBook Pro
20 Basic Features of Your MacBook Pro
22 Keyboard Features of Your MacBook Pro
24 Ports on Your MacBook Pro
26 Using the Multi-Touch Trackpad
30Using the MacBook Pro Battery
31Getting Answers
Chapter 3: Boost Your MacBook Pro
37 Replacing the Hard Disk Drive
44 Installing Additional Memory
Chapter 4: Problem, Meet Solution
50An Ounce of Prevention
51Problems That Prevent You from Using Your MacBook Pro
Contents 5
54 Repairing, Restoring, or Reinstalling Mac OS X Software
59 Using Apple Hardware Test
59 Problems with Your Internet Connection
62Problems with Wi-Fi Communication
63Keeping Your Software Up to Date
64Learning More, Service, and Support
66Locating Your Product Serial Number
Chapter 5: Last, but Not Least
68 Important Safety Information
73 Important Handling Information
75 Understanding Ergonomics
77Apple and the Environment
78Regulatory Compliance Information
Looking for Something?
84 Index
6Contents

1
Ready, Set Up, Go
www.apple.com/macbookpro
Help Center Migration Assistant
Your MacBook Pro is designed so that you can set it up quickly and start using it right away. If you have never used a MacBook Pro or are new to Mac computers, read this chapter for help getting started.
Important: Read all the installation instructions (and the safety information starting on page 68) carefully before you first use your computer.
If you’re an experienced user, you may already know enough to get started. Make sure you look over the information in Chapter 2,“Life with Your MacBook Pro,”to find out about the new features of this MacBook Pro.
Many answers to questions can be found on your computer in Help Center. For information about using Help Center, see“Getting Answers”on page 31.The latest information about your MacBook Pro is available on the Apple Support website at www.apple.com/support/macbookpro. Apple may release new versions and updates to its system software, so the images shown in this book may be slightly different from what you see onscreen.
8Chapter 1 Ready, Set Up, Go
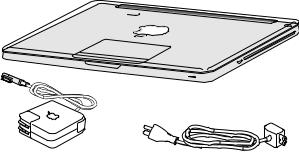
What’s in the Box
85W MagSafe Power Adapter |
AC power cord |
Setting Up Your MacBook Pro
Your MacBook Pro is designed so that you can set it up quickly and start using it right away.The following pages take you through the setup process, including these tasks:
ÂÂPlugging in the 85W MagSafe Power Adapter ÂÂConnecting cables and accessing a network ÂÂTurning on your MacBook Pro
ÂÂConfiguring a user account and other settings using Setup Assistant
ÂÂSetting up the Mac OS X desktop and preferences
Chapter 1 Ready, Set Up, Go |
9 |
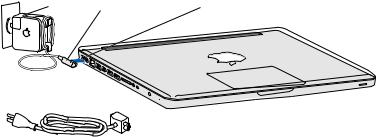
Important: Remove the protective film around the 85W MagSafe Power Adapter before setting up your MacBook Pro.
Step 1: Plug in the 85W MagSafe Power Adapter to provide power to the MacBook Pro and charge the battery.
Make sure the AC plug is fully inserted into the power adapter and the electrical prongs on your AC plug are in their completely extended position. Insert the AC plug of your power adapter into a power outlet and the MagSafe connector into the MagSafe power port. As the MagSafe connector gets close to the port, you’ll feel a magnetic pull drawing it in.
AC plug |
MagSafe connector |
¯MagSafe power port |
AC power cord
To extend the reach of your power adapter, replace the AC plug with the AC power cord. First pull the AC plug up to remove it from the adapter, and then attach the included AC power cord to the adapter, making sure it’s seated firmly.
When disconnecting the power adapter from an outlet or from the computer, pull the plug, not the cord.
10 Chapter 1 Ready, Set Up, Go
When you first connect the power adapter to your MacBook Pro, an indicator light on the MagSafe connector starts to glow. An amber light indicates the battery is charging. A green light indicates that the battery is fully charged. If you don’t see a light, make sure the connector is seated properly and the power adapter is plugged in.
Step 2: Connect to a wireless or wired network.
ÂÂTo use a wireless network with the built-in 802.11n Wi-Fi technology, make sure the wireless base station is turned on and that you know the name of the network. After you turn on your MacBook Pro, Setup Assistant guides you through the connection process. For troubleshooting tips, see page 62.
ÂÂTo use a wired connection, connect one end of an Ethernet cable to your MacBook Pro and the other end to a cable modem, DSL modem, or network.
GGigabit Ethernet port
(10/100/1000Base-T)
Ethernet cable
Chapter 1 Ready, Set Up, Go |
11 |
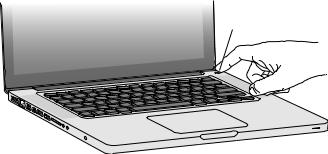
Step 3: Press the power (®) button briefly to turn on your MacBook Pro.
You hear a tone when you turn on the computer.
® Power button
It takes the MacBook Pro a few moments to start up. After it starts up, Setup Assistant opens automatically.
If your MacBook Pro doesn’t turn on, see“If your MacBook Pro doesn’t turn on or start up”on page 52.
12 Chapter 1 Ready, Set Up, Go
Step 4: Configure your MacBook Pro with Setup Assistant.
The first time you turn on your MacBook Pro, Setup Assistant starts. Setup Assistant helps you specify your Wi-Fi network, set up a user account, and transfer information from another Mac or PC.You can also transfer information from a Time Machine backup or other disk.
If you’re migrating from another Mac, you might have to update software if the other Mac doesn’t have Mac OS X version 10.5.3 or later installed.To migrate from a PC, download the Migration Assistant from www.apple.com/migrate-to-mac, and install it on the PC you want to migrate from.
After you start Setup Assistant on your MacBook Pro, you can leave it midprocess without quitting, move to the other computer if you need to update its software, and then return to your MacBook Pro to complete the setup.
Note: If you don’t use Setup Assistant to transfer information when you first start up your MacBook Pro, you can do it later using Migration Assistant. Open Migration Assistant in the Utilities folder in Launchpad. For help using Migration Assistant, open Help Center and search for“Migration Assistant.”
Chapter 1 Ready, Set Up, Go |
13 |
To set up your MacBook Pro:
1In Setup Assistant, follow the onscreen instructions until you get to the“Transfer Information to This Mac”screen.
2Do a basic setup, a setup with migration, or transfer information from a Time Machine backup or other disk:
ÂÂTo do a basic setup, select“Don’t transfer now”and click Continue. Follow the remaining prompts to select your wired or wireless network, set up an account, and exit Setup Assistant.
ÂÂTo do a setup with migration, select“From another Mac or PC”and click Continue. Follow the onscreen instructions to select the Mac or PC you want to migrate from. Your Mac or PC must be on the same wired or wireless network. Follow the onscreen instructions for migrating.
ÂÂTo transfer information from aTime Machine backup or another disk, select“From a Time Machine backup or other disk”and click Continue. Select the backup or the other disk that you want to migrate from. Follow the onscreen instructions.
If you don’t intend to keep or use your other computer, it’s best to deauthorize it from playing music, videos, or audiobooks that you’ve purchased from the iTunes Store. Deauthorizing a computer prevents any songs, videos, or audiobooks you’ve purchased from being played by someone else, and frees up another authorization for use. For information about deauthorizing, choose iTunes Help from the Help menu in iTunes.
14 Chapter 1 Ready, Set Up, Go
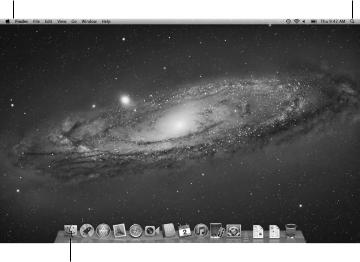
Step 5: Customize the Mac OS X desktop and set preferences.
You can quickly make the desktop look the way you want using System Preferences, your command center for most settings on your MacBook Pro. Choose Apple ( ) > System Preferences from the menu bar or click the System Preferences icon in the Dock.
Menu bar |
|
Help menu |
Spotlight search icon |
|
|||
|
|
|
|
Finder icon |
|
Dock |
|
System Preferences icon |
|
|
|||
|
|
Chapter 1 Ready, Set Up, Go |
15 |

Important: You can set an option to reset your password in Users & Groups preferences, in case you forget your login password. For help with system preferences, open Help Center and search for“system preferences”or for the specific preference you want help for.
Putting Your MacBook Pro to Sleep or Shutting It Down
When you finish working with your MacBook Pro, you can put it to sleep or shut it down.
Putting Your MacBook Pro to Sleep
If you’ll be away from your MacBook Pro for only a short time, put it to sleep.When the computer is in sleep, you can quickly wake it and bypass the startup process.
To put your MacBook Pro to sleep, do one of the following:
ÂÂClose the display.
ÂÂChoose Apple ( ) > Sleep from the menu bar.
ÂÂPress the power (®) button and click Sleep in the dialog that appears.
ÂÂChoose Apple ( ) > System Preferences, click Energy Saver, and set a sleep timer.
NOTICE: Wait a few seconds until the sleep indicator light starts pulsing (indicating that the computer is in sleep and the hard disk has stopped spinning) before moving your MacBook Pro. Moving your computer while the disk is spinning can damage the hard disk, causing loss of data or the inability to start up from the hard disk.
16 Chapter 1 Ready, Set Up, Go
To wake your MacBook Pro:
ÂÂIf the display is closed, simply open it to wake your MacBook Pro.
ÂÂIf the display is already open, press the power (®) button or any key on the keyboard.
When your MacBook Pro wakes from sleep, your applications, documents, and computer settings are exactly as you left them.
Shutting Down Your MacBook Pro
If you aren’t going to use your MacBook Pro for a couple of days or longer, it’s best to shut it down.The sleep indicator light goes on briefly during the shutdown process.
To shut down your MacBook Pro, do one of the following:
ÂÂChoose Apple ( ) > Shut Down from the menu bar.
ÂÂPress the power (®) button and click Shut Down in the dialog that appears.
If you plan to store your MacBook Pro for an extended period of time, see page 74 for information about how to prevent the battery from draining completely.
Chapter 1 Ready, Set Up, Go |
17 |

2
Life with Your MacBook Pro
www.apple.com/macosx
Help Center Mac OS X

Basic Features of Your MacBook Pro
FaceTime HD camera
Camera indicator light
Microphone
Built-in stereo speakers
Battery indicator lights (side)
Trackpad
Sleep |
® Power button |
indicator light |
Infrared (IR) |
Security slot |
Slot-loading |
receiver |
|
SuperDrive |
20 Chapter 2 Life with Your MacBook Pro
Built-in FaceTime HD camera and camera indicator light
Use the included FaceTime application to make video calls to other FaceTime users (on any iPhone 4, new iPod touch, or Mac with FaceTime), take pictures with Photo Booth, or capture video with iMovie.The indicator light glows when the FaceTime HD camera is operating.
Built-in microphone
Capture sounds with the microphone or talk with friends live over the Internet using FaceTime or iChat.
Built-in stereo speakers
Listen to music, movies, games, and other multimedia files.
Built-in battery and battery indicator lights
Use battery power when you’re away from a power outlet. Press the battery button to activate indicator lights that show the remaining battery charge.
Trackpad
Click or double-click anywhere on the trackpad.Touch the trackpad with one or more fingers to move the pointer and use Multi-Touch gestures (described on page 26).
Sleep indicator light
A white light pulses when the MacBook Pro is in sleep.
Infrared (IR) receiver
Use an Apple Remote (available separately) with the IR receiver to control Keynote on your MacBook Pro from up to 30 feet (9.1 meters) away.
Security slot
Attach a lock and cable (available separately) to prevent theft.
Slot-loading SuperDrive
This optical drive reads and writes standard-size CDs and DVDs.
®Power button
Turn your MacBook Pro on or off, or put it to sleep.
Chapter 2 Life with Your MacBook Pro |
21 |

Keyboard Features of Your MacBook Pro
Function (fn) key |
|
|
|
Mission |
Launchpad |
Media |
Media |
Control key |
key |
keys |
Eject key |
Brightness |
Keyboard illumination |
Mute |
Volume |
keys |
keys |
key |
keys |
22 Chapter 2 Life with Your MacBook Pro

Function (fn) key
Press and hold this key to activate customized actions assigned to the function keys
(F1 to F12).To learn how to customize function keys, choose Help > Help Center from the menu bar and search for“function keys.”
Brightness keys (F1, F2)
Increase ( ) or decrease (
 ) the brightness of the screen.
Mission Control key (F3)
Open Mission Control to get a comprehensive view of what’s running on your MacBook Pro, including Dashboard, all your spaces, and all open windows.
Launchpad key (F4)
Open Launchpad to instantly see all the applications on your MacBook Pro. Click an application to open it.
oKeyboard illumination keys (F5, F6)
Increase (o) or decrease (ø) the brightness of the keyboard illumination.
’Media keys (F7, F8, F9)
Rewind ( ), play or pause (’), or fast-forward (
 ) a song, movie, or slideshow.
—Mute key (F10)
Mute the sound coming from the built-in speakers and audio out port.
-Volume keys (F11, F12)
Increase (-) or decrease (–) the volume of sound coming from the built-in speakers and audio out port.
CMedia Eject key
Press and hold this key to eject a disc that’s not in use.You can also eject a disc by dragging its desktop icon to the Trash.
Chapter 2 Life with Your MacBook Pro |
23 |
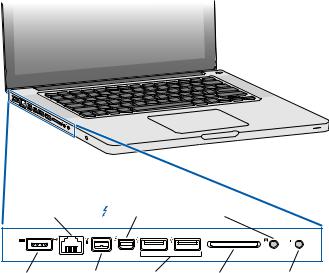
Ports on Your MacBook Pro
G Gigabit |
|
|
|
,Audio |
|
Ethernet port |
Thunderbolt port |
in port |
|
||
¯ MagSafe |
HFireWire |
dUSB 2.0 |
SDXC card slot |
f Audio |
|
power port |
800 port |
ports |
|
out port |
|
24 Chapter 2 Life with Your MacBook Pro

¯MagSafe power port
Plug in the included 85W MagSafe Power Adapter to recharge the MacBook Pro battery.
GGigabit Ethernet port
Connect to a high-speed Ethernet network, a DSL or cable modem, or another computer. The Ethernet port automatically detects Ethernet devices and doesn’t require an Ethernet crossover cable.
HFireWire 800 port
Connect external devices, such as digital video cameras and storage devices.
Thunderbolt port (high-speed data, video, and audio)
Connect Thunderbolt-compatible devices for high-speed data transfer, or connect an external display that uses Mini DisplayPort.You can purchase adapters to connect displays that use DVI, HDMI, or VGA.
dTwo high-speed USB (Universal Serial Bus) 2.0 ports
Connect an iPod, iPhone, iPad, mouse, keyboard, printer, disk drive, digital camera, joystick, modem, and more to your MacBook Pro.
,Audio in port
Connect your MacBook Pro to a line-level microphone or digital audio equipment.
fAudio out port
Connect external speakers, headphones (including iPhone), or digital audio equipment.
SDXC card slot
Easily transfer photos, videos, and data to and from your MacBook Pro with an SD or SDXC card.
Note: Adapters and other accessories are sold separately at www.apple.com/store or your local Apple Retail Store.
Chapter 2 Life with Your MacBook Pro |
25 |
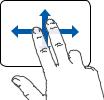
Using the Multi-Touch Trackpad
Use the trackpad to move the pointer and to perform a variety of Multi-Touch gestures. Unlike typical trackpads, the entire MacBook Pro trackpad is a button, and you can click anywhere on the trackpad.To enable Multi-Touch gestures, view instructional videos of the gestures, and set other trackpad options, choose Apple ( ) > System Preferences, and then click Trackpad.
Here are ways to use your MacBook Pro trackpad:
ÂÂTwo-finger scrolling lets you drag to scroll quickly up, down, or sideways in the active window.
26 Chapter 2 Life with Your MacBook Pro
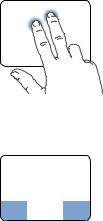
ÂÂSecondary-clicking or “right-clicking” lets you access shortcut menu commands.
•To set up two-finger secondary-clicking anywhere on the trackpad, select “Secondary click”in the Point & Click pane of Trackpad preferences.
•To set up a one-finger secondary-click zone in the bottom left or right corner of the trackpad, select“Secondary click”in the Point & Click pane of Trackpad preferences, and choose an option from the pop-up menu.
Secondary-click zone
Note: You can also secondary-click by holding down the Control key while you click.
Chapter 2 Life with Your MacBook Pro |
27 |
Loading...