


MacBook
Table of contents
 Loading...
Congratulations, you and your MacBook
were made for each other.
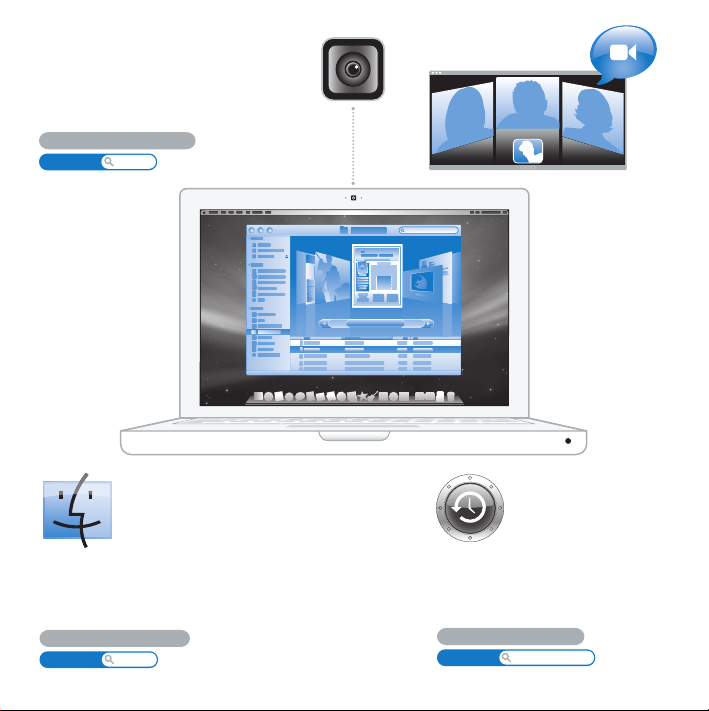
Finder
Browse the contents
of your computer
using Cover Flow.
www.apple.com/macosx
Mac Help
finder
Built-in iSight camera
Video chat with up to three
friends anywhere in the world
at the same time.
www.apple.com/macbook
Mac Help
isight
Time Machine
Automatically back
up your files to an
external hard drive.
www.apple.com/macosx
Mac Help
time machine
GarageBand
Create music by adding
musicians to a virtual stage.
Enhance your song to sound
like a pro.
www.apple.com/ilife/garageband
GarageBand Help
record
iPhoto Help
photo
www.apple.com/ilife/iphoto
iWeb
Create beautiful websites
with photos, movies, blogs,
podcasts, and dynamic
web widgets.
www.apple.com/ilife/iweb
iWeb Help
website
iPhoto
Organize all your photos
with Events. Publish to a
Web Gallery with a click.
iMovie
Collect all your video in
one library. Create and
share movies in minutes.
iMovie Help movie
www.apple.com/ilife/imovie


Contents
5
Contents
Chapter 1: Ready, Set Up, Go
9
What’s in the Box
9
Setting Up Your MacBook
15
Putting Your MacBook to Sleep or Shutting It Down
Chapter 2: Life with Your MacBook
18
Basic Features of Your MacBook
20
Keyboard Features of Your MacBook
22
Ports on Your MacBook
24
Using the Trackpad and Keyboard
25
Using the MacBook Battery
27
Getting Answers
Chapter 3: Boost Your Memory
33
Installing Additional Memory
40
Making Sure Your MacBook Recognizes the New Memory
Chapter 4: Problem, Meet Solution
42
Problems That Prevent You from Using Your MacBook
46
Using Apple Hardware Test

6
Contents
47
Problems with Your Internet Connection
50
Problems with AirPort Extreme Wireless Communication
50
Keeping Your Software Up to Date
51
Reinstalling the Software That Came with Your MacBook
52
Learning More, Service, and Support
54
Locating Your Product Serial Number
Chapter 5: Last, but Not Least
56
Important Safety Information
59
Important Handling Information
61
Understanding Ergonomics
63
Apple and the Environment
65
Regulatory Compliance Information
Looking for Something?
72
Index

1
1
Ready, Set Up, Go
www.apple.com/macbook
Mac Help Migration Assistant

8 Chapter 1
Ready, Set Up, Go
Your MacBook is designed so that you can set it up quickly and start using it right
away. If you have never used a MacBook or are new to Macintosh computers, read this
chapter for help getting started.
Important:
Read all the installation instructions (and the safety information starting on
page 55) carefully before you first use your computer.
If you are an experienced user, you may already know enough to get started.
Make sure you look over the information in Chapter 2, “Life with Your MacBook,” to find
out about the new features of this MacBook.
Many answers to questions can be found on your computer in Mac Help. For
information about getting Mac Help, see “Getting Answers” on page 27. Apple may
release new versions and updates to its system software, so the images shown in this
book may be slightly different from what you see onscreen.
Important:
Remove the protective film around the 60W MagSafe Power Adapter before
setting up your MacBook.
Chapter 1
Ready, Set Up, Go
9
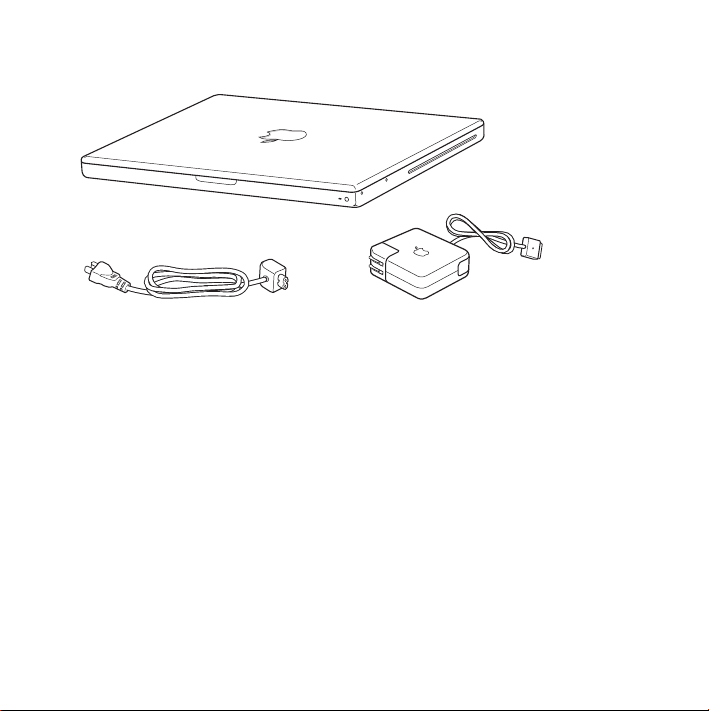
What’s in the Box
Setting Up Your MacBook
Your MacBook is designed so that you can set it up quickly and start using it right
away. The following pages take you through the setup process, including these tasks:
Â
Plugging in the 60W MagSafe Power Adapter
Â
Connecting cables and accessing a network
Â
Turning on your MacBook and using the trackpad
Â
Configuring a user account and other settings using Setup Assistant
Â
Setting up the Mac OS X desktop and preferences
AC power cord
AC
plug
60W MagSafe Power Adapter
10 Chapter 1
Ready, Set Up, Go
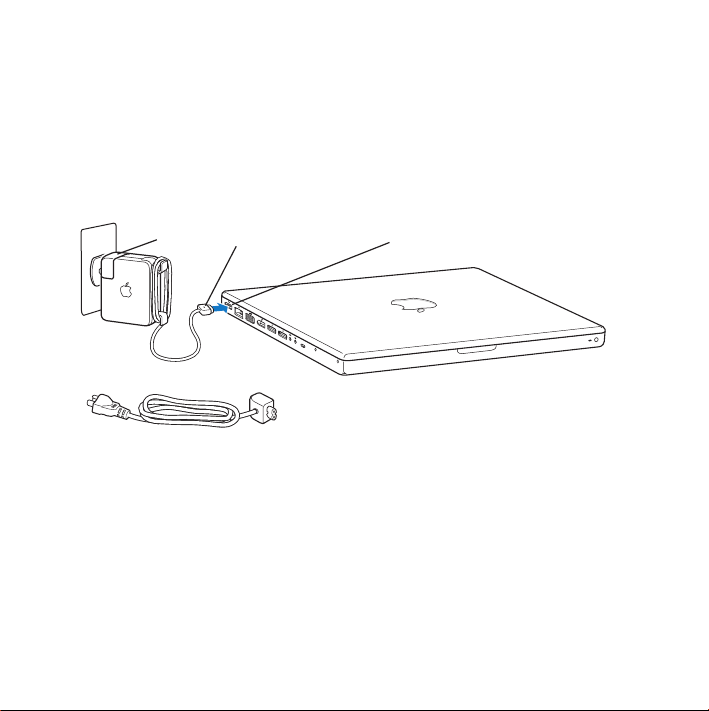
Step 1: Plug in the 60W MagSafe Power Adapter to provide power to the MacBook
and charge the battery.
Make sure the AC plug is fully inserted into the power adapter and the electrical
prongs on your AC plug are in their completely extended position. Insert the AC plug
of your power adapter into a power outlet and the MagSafe connector into the
MagSafe power port. As the MagSafe connector gets close to the port, you’ll feel a
magnetic pull drawing it in.
To extend the reach of your power adapter, first pull the AC plug up to remove it from
the adapter. Attach the included AC power cord to the adapter, making sure it is seated
firmly. Plug the other end into a power outlet. The AC power cord provides a grounded
connection.
When disconnecting the power adapter from an outlet or from the computer, pull the
plug, not the cord.
¯
AC power cord
AC plug
MagSafe power port
MagSafe connector
Chapter 1
Ready, Set Up, Go
11
Note:
When you first connect the power adapter to your MacBook, an indicator light
on the MagSafe connector starts to glow. An amber light indicates that the battery is
charging. A green light indicates that the battery is fully charged or is not installed.
If you don’t see a light, make sure the connector is seated properly.
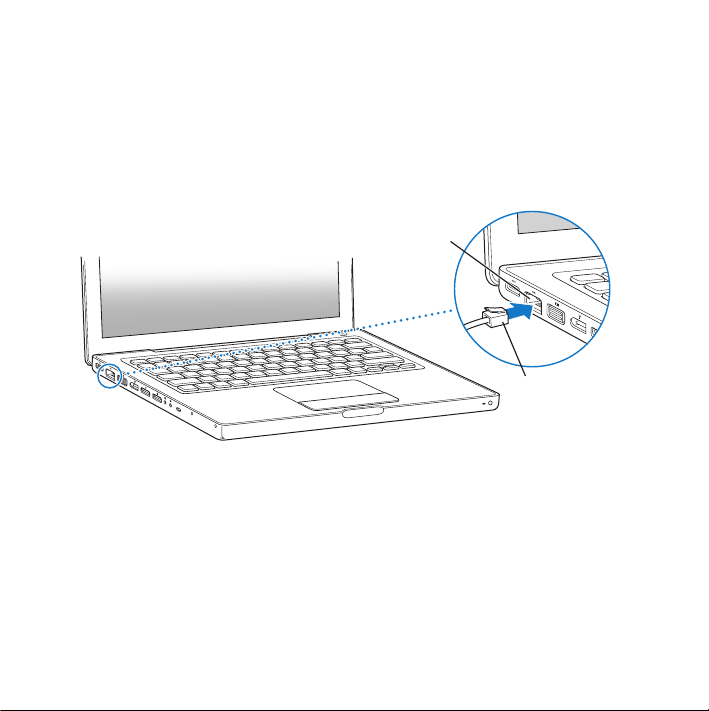
Step 2: To access the Internet or a network, connect one end of an Ethernet cable
to your MacBook and the other end to a cable modem, DSL modem, or network.
To use a dial-up connection, you need the external Apple USB Modem, available for
purchase from the online Apple Store at www.apple.com/store or from an Apple
Authorized Reseller. Plug the Apple USB Modem into a USB port on your MacBook,
and then connect a phone cord (not included) from the modem into a phone wall jack.
G
Ethernet
cable
Gigabit Ethernet port
(10/100/1000Base-T)
12 Chapter 1
Ready, Set Up, Go
Note:
Your MacBook also comes with AirPort Extreme technology for wireless
networking. For information about setting up a wireless connection, in the menu bar,
choose Help > Mac Help, and then search for “AirPort.” See “Getting Answers” on
page 27.
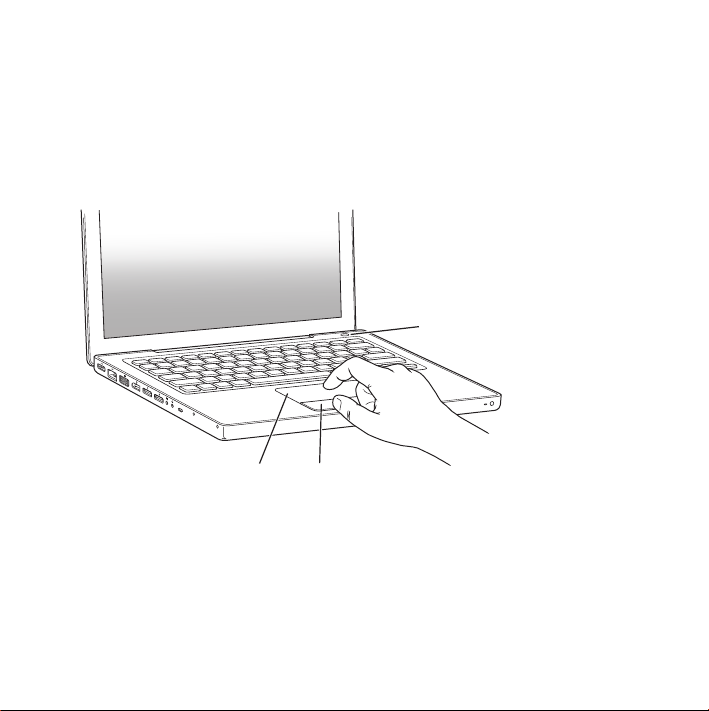
Step 3: Press the power (®
) button briefly to turn on your MacBook.
You hear a tone when you turn on the computer.
It takes the computer a few moments to start up. After it starts up, Setup Assistant
opens automatically.
If your computer doesn’t turn on, see “If your MacBook doesn’t turn on or start up” on
page 44.
Trackpad
Trackpad button
® Power button

Chapter 1
Ready, Set Up, Go
13
Step 4: Configure your MacBook with Setup Assistant.
The first time you turn on your MacBook, Setup Assistant starts. Setup Assistant helps
you enter your Internet and email information and set up a user account on your
MacBook. If you already have a Mac, Setup Assistant can help you automatically
transfer files, applications, and other information from your previous Mac.
If you don’t intend to keep or use your other Mac, it’s best to deauthorize it from
playing music, videos, or audiobooks that you’ve purchased from the iTunes Store.
Deauthorizing a computer prevents any songs, videos, or audiobooks you’ve purchased
from being played by someone else and frees up another authorization for use.
For information about deauthorizing, in iTunes, open Help > iTunes Help.
If you don’t use Setup Assistant to transfer information when you first start up, you can
do it later using Migration Assistant. Go to the Applications folder, open Utilities, and
double-click Migration Assistant.
14 Chapter 1
Ready, Set Up, Go
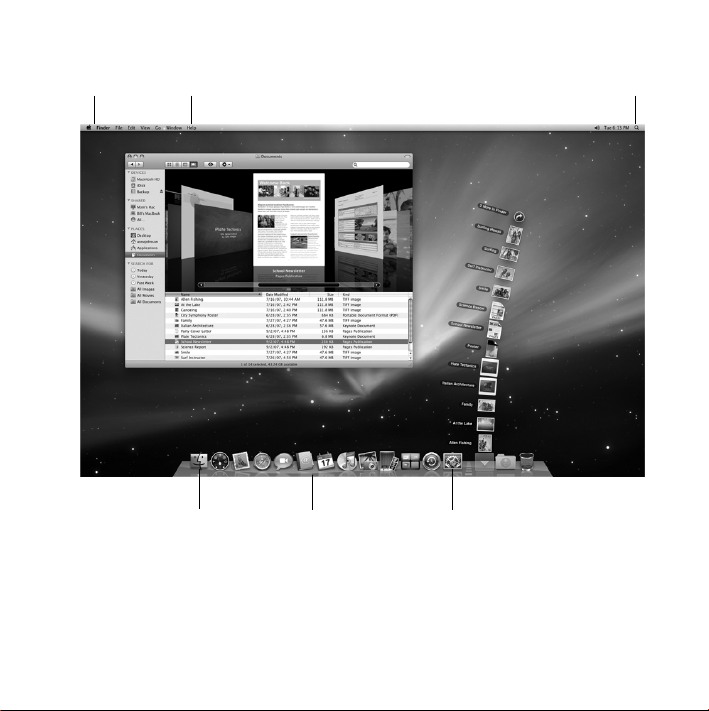
Step 5: Customize the Mac OS X desktop and set preferences.
Menu bar
System Preferences icon
Dock
Spotlight search iconHelp menu
Finder icon

Chapter 1
Ready, Set Up, Go
15
You can quickly make the desktop look the way you want using System Preferences.
Choose Apple (
) > System Preferences from the menu bar. As you get to know your
computer, explore System Preferences, your command center for most settings on your
MacBook. For more information, open Mac Help and search for “System Preferences” or
for the specific preference you want to change.
Putting Your MacBook to Sleep or Shutting It Down
When you finish working with your MacBook, you can put it to sleep or shut it down.
Putting Your MacBook to Sleep
If you’ll be away from your MacBook for only a short time, put it to sleep. When the
computer is in sleep, you can quickly wake it and bypass the startup process.
To put your MacBook to sleep, do one of the following:
Â
Close the display.
Â
Choose Apple (
) > Sleep from the menu bar.
Â
Press the power (®
) button and click Sleep in the dialog that appears.
Â
Choose Apple (
) > System Preferences, click Energy Saver, and set a sleep timer.
NOTICE:
Wait a few seconds until the sleep indicator light starts pulsing (indicating
that the computer is in sleep and the hard disk has stopped spinning) before you
move your MacBook. Moving your computer while the hard disk is spinning can
damage it, causing loss of data or the inability to start up from the hard disk.

16 Chapter 1
Ready, Set Up, Go
To wake your MacBook:
Â
If the display is closed,
simply open it to wake your MacBook.
Â
If the display is already open,
press the power (®
) button or any key on the keyboard.
When your MacBook wakes from sleep, your applications, documents, and computer
settings are exactly as you left them.
Shutting Down Your MacBook
If you aren’t going to use your MacBook for a day or two, it’s best to shut it down.
The sleep indicator light goes on briefly during the shutdown process.
To shut down your MacBook, do one of the following:
Â
Choose Apple (
) > Shut Down from the menu bar.
Â
Press the power (®
) button and click Shut Down in the dialog that appears.
If you plan to store your MacBook for an extended period of time, see “Important
Handling Information” on page 59 for information about how to prevent your battery
from draining completely.

2
2
Life with Your MacBook
www.apple.com/macosx
Mac Help Mac OS X
18 Chapter 2
Life with Your MacBook
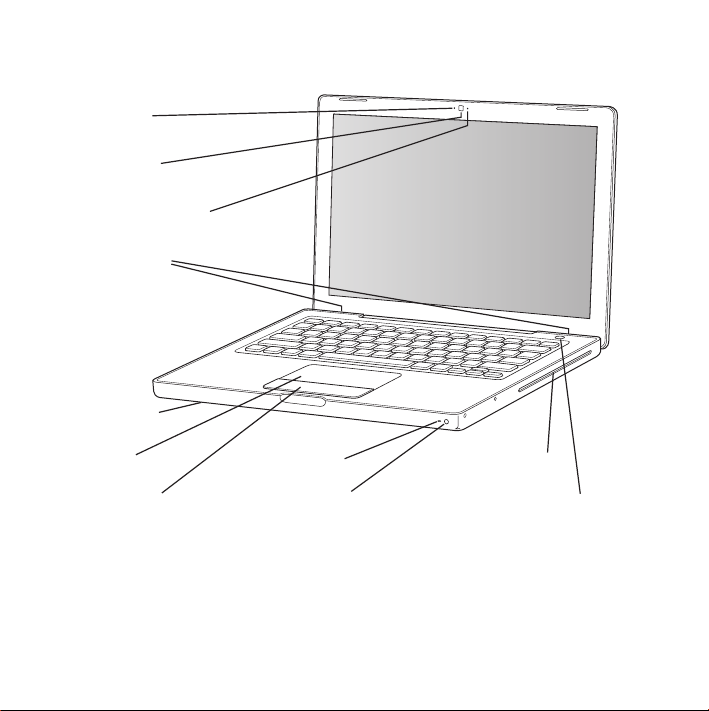
Basic Features of Your MacBook
®
?
® Power button
Camera indicator light
iSight camera
Microphone
Stereo speakers
Sleep indicator light
Infrared (IR) receiver
Trackpad
Battery
(underneath)
Trackpad button
Slot-loading optical drive

Chapter 2
Life with Your MacBook
19
Built-in microphone
Capture sounds with the microphone (located to the left of the iSight camera) or talk
with friends live over broadband using the included iChat AV application.
Built-in iSight camera and camera indicator light
Videoconference with others using iChat AV, take pictures with Photo Booth, or capture
video with iMovie ‘08. The indicator light glows when the iSight camera is operating.
Built-in stereo speakers
Listen to music, movies, games, and multimedia files.
Battery
Run the MacBook using battery power when you are away from a power outlet.
Removing the battery gives you access to the memory in your MacBook.
Trackpad and trackpad button
Move the pointer with one finger on the trackpad, or scroll with two fingers. Tap the
trackpad to click or double-click a selection.
Sleep indicator light
A white light pulses when the MacBook is in sleep.
Infrared (IR) receiver
Use an optional Apple Remote (sold separately at www.apple.com/store) with the IR
receiver to control Front Row and Keynote on your MacBook from up to 30 feet away.
Slot-loading optical drive
Your optical drive can read standard-size CD and DVD discs and write to CDs. If you have
a SuperDrive, you can also write to DVD discs.
®
Power button
Turn your MacBook on or off, or put it to sleep. Hold down to restart your MacBook
during troubleshooting.
20 Chapter 2
Life with Your MacBook
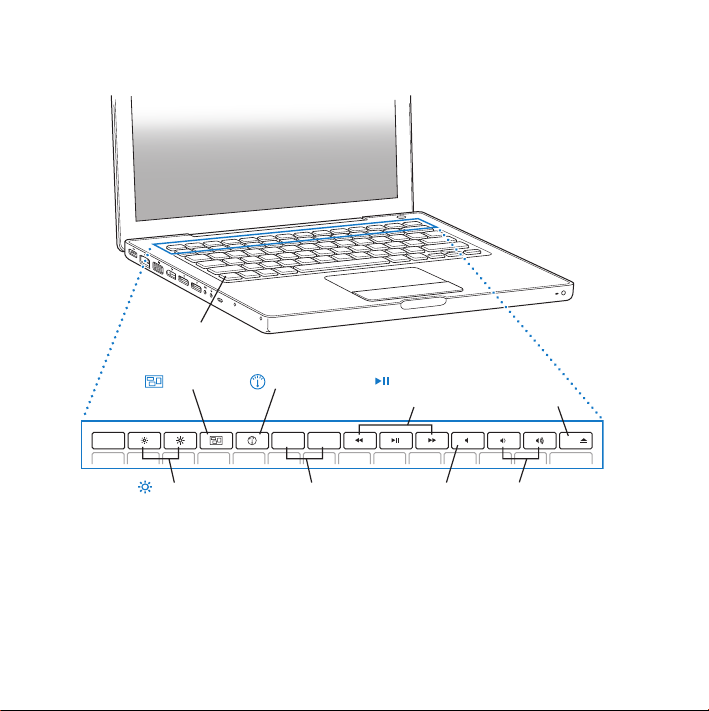
Keyboard Features of Your MacBook
esc
F1 F2 F3 F4 F5 F6 F7 F8 F9 F10 F11 F12
—
C
-
Function (fn) key
Volume
controls
Brightness
controls
Standard
function keys
Media
Eject key
Mute
control
Exposé
Dashboard
Media
controls
Chapter 2
Life with Your MacBook
21
Function (fn) key
Hold down this key to activate customized actions assigned to the function keys
(F1 to F12). To learn how to customize function keys, choose Help > Mac Help from the
menu bar and search for “function keys.”
Brightness controls (F1, F2)
Increase ( ) or decrease ( ) the brightness of the screen.
Exposé All Windows key (F3)
Open Exposé for quick access to all your open windows.
Dashboard key (F4)
Open Dashboard to access your widgets.
’
Media controls (F7, F8, F9)
Rewind (]
), play or pause (’
), or fast-forward (‘
) a song, movie, or slideshow.
—
Mute control (F10)
Mute the sound coming from the built-in speakers and headphone port.
-
Volume controls (F11, F12)
Increase (
-
) or decrease (
–
) the volume of the sound coming from the built-in speaker
or headphone port.
C
Media Eject key
Hold down this key to eject a disc. You can also eject a disc by dragging its desktop icon
to the Trash.
22 Chapter 2
Life with Your MacBook
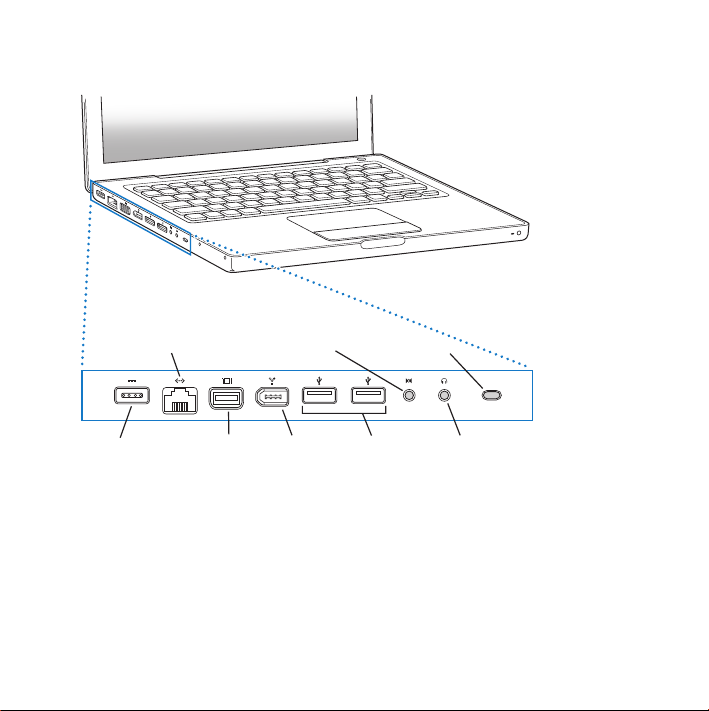
Ports on Your MacBook
¯
Gigabit Ethernet
port (10/100/
1000Base-T)
G
Security slot
Headphone
out/optical
digital audio
out port
f
Audio in/
optical digital
audio in port
,
Mini-DVI
port
£
FireWire
400 port
H
USB 2.0
ports
d
MagSafe
power
port

Chapter 2 Life with Your MacBook 23
¯
MagSafe power port
Plug in the included 60W MagSafe Power Adapter to recharge the MacBook battery.
G
Gigabit Ethernet port (10/100/1000Base-T)
Connect to a high-speed Ethernet network, a DSL or cable modem, or another computer.
The Ethernet port automatically detects Ethernet devices and doesn’t require an
Ethernet crossover cable.
£
Mini-DVI (video out) port
Connect to an external display, projection device, or TV that uses a DVI, VGA, composite,
or S-video connector. Depending on the type of external device you’re connecting to,
you can use a Mini-DVI to DVI adapter, a Mini-DVI to VGA adapter, or a Mini-DVI to Video
adapter, all sold separately at www.apple.com/store.
H
FireWire 400 port
Connect high-speed external devices, such as digital video cameras and storage devices.
d
Two USB (Universal Serial Bus) 2.0 ports
Connect a modem, iPod, iPhone, mouse, keyboard, printer, digital camera, and more to
your MacBook. You can connect one high-powered external USB device. You can also
connect USB 1.1 devices.
,
Audio in/optical digital audio in port
Connect your MacBook to a line-level microphone or digital audio equipment.
f
Headphone out/optical digital audio out port
Connect external speakers, headphones, or digital audio equipment.
Security slot
Attach a lock and cable (available at www.apple.com/store) to prevent theft.
Loading...